
HISPANIA from Draco Ideas is a slick little small box game with a big punch that sees the player controlling the Roman Empire and attempting to subjugate and put down resistance in the provinces of Hispania from 198 to 18BC. The game is extremely flexible and may be played cooperatively by 2-3 players, competitively with 4 players or as a solo game. The game is somewhat of a resource management game as the players must use their limited funds in the form of Denarii wisely to attack and put down revolts springing up around the country as local armies rally support for the resistance to Roman rule.
In Action Point 1, we took a look at the Board, discussing the point to point movement and various terrain features that make moving Legions about the Iberian Peninsula rather difficult. In this Action Point, we will cover the Roman Phase and the various actions available including Move, Garrison, Besiege and Attack.
Roman Phase
The meat of the game happens in the Roman Phase where the player gets to take various actions to move around the peninsula and try to pacify the resistance in the spaces. Remember that the goal of the Roman player is to occupy the 6 Hispanic capitals with their garrisons before the Revolt Reserve or time runs out. This is not as easy as it sounds and will require the players to be shrewd in their use of the various options available to them during the Roman Phase.
Each of the actions available to the players during the Roman Phase will cost a certain number of their limited Denarii. If players do not have the amount of Denarii needed for the desired action, they will be unable to take that action this turn. The players can take their actions in any order they wish and can even perform a single given action several time during the same turn. The 4 actions available during the Roman Phase include Move, Garrison, Besiege and Attack. Let’s take a closer look at each of these actions to give you a better understanding of how they work.
Move
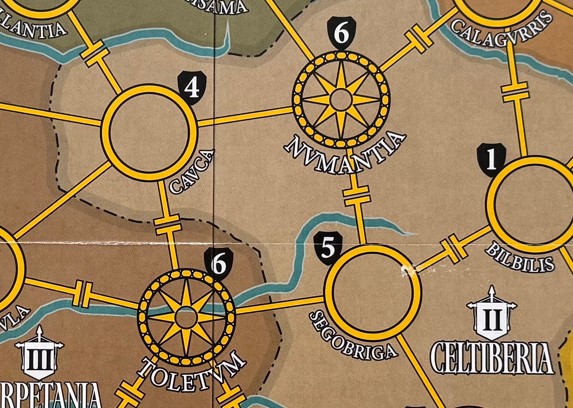
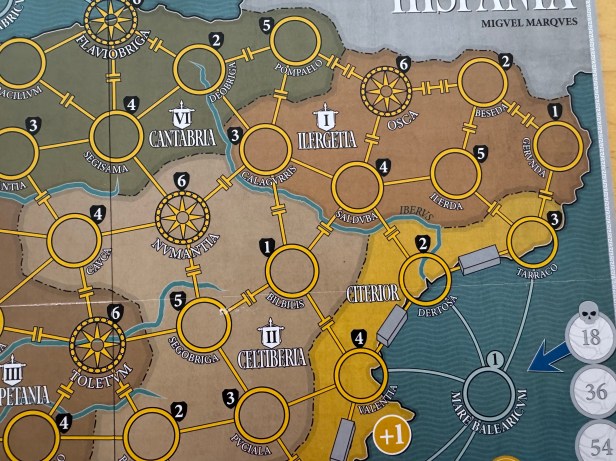
In order to move their Praetor or any Fleet in the ocean, the player must take the Move Action by paying 1 Denarii per segment shown on the Link between the current space they inhabit and the target space they desire to move into. These Links have different costs to move across them and represent more challenging terrain such as rivers and mountains and the additional effort and resources needed to cross. Most of the Links consist of just 1 segment, but certain land links have 2 or 3 segments to reflect the difficulty of the terrain as mentioned before such as the Iberus River or the Pyrenees Mountains, both of which are found in the Province of Ilergetia in northeast Hispania. These Links will cost 2 or 3 Denarii to move across and are the most difficult to access spots on the Board. If the player is forced to spend a lot of time and effort in Ilergetia clearing out Revolts, this will hamper their ability to combat the Hispanic uprisings in the other Provinces and can spell doom.
There are a few limitations to this Move though as a Praetor cannot move into or through a City that is currently in revolt (has a black disc located in the circle). The Praetor can move to a Sea Space from a city or another Sea Space but only if that target space currently has a Fleet located in it. Fleets can only move over the Sea and if they are carrying a Praetor they move with the Fleet as it moves. There are also road segments (signified by a gray block like line) drawn on the board located in the Roman Provinces of Citerior and Ulterior. These Roads facilitate more efficient Roman movement across the Links and can see the Roman Praetors moving along the entirety of the Mediterranean Coast from east to west with only the cost of a single Denarii if all of the Road segments are connected. These chained roads are very important and it is wise for players to place their limited road pieces in order to maximize their movements as they cannot afford to waste too much time moving about the board. There are revolts to put down!
If there is a Praetor already located in a space while another player is attempting to Move, they can move through that occupied space but cannot stop there to perform other actions. Movement is the most basic and simple action that the players have access to but it is important to Move wisely as you don’t want to waste time and funds moving through areas that you don’t need to.
There also are some special abilities that one of the Praetors has as well as the Consul found in the Imperium Game Variant. They have a special Move ability which is nice if playing with this optional rule. The Praetor of Ulterior (red) can Move for free through 1 Link when their Hispanic Phase is complete. This can be quite handy to reposition or gain ground with the red Praetor. The Consul (blue) may spend their Denarii to Move the other Praetors on the board. This is very powerful as the Praetors will get spread out and be unable to get to where the action is at times. Spending their Denarii to Move the others is very important and will come in handy more than you can imagine!
Now that we understand Move, let’s take a look at one of the most important actions in Garrison.
Garrison
Each of the Praetors has a number of Garrison discs at their disposal determined by the Difficulty Level that the players choose to play with. If they choose Low Difficulty, they will have 5 Garrisons per Praetor, with Medium Difficulty they will have 4 Garrisons per and at High Difficulty will have just 3 Garrisons per Praetor. Why are Garrisons important? They are important for several reasons as they place a small contingent of Roman soldiers in a frontier fort in a space and as long as that Garrison is located there, if a Revolt is rolled for that space during the Hispanic Phase, it will not be placed as the Roman soldiers keep the local populace in line. The Garrisons also provide a bonus to the Attack Action, which we will cover a bit later but it is important to have a few Garrisons placed when attempting to defeat Barbarian armies in the game as they move around spreading discord and riling up the local villages.
To place a Garrison, a Roman Praetor simply occupies a space and pays 1 Denarii to post a Garrison disc in that space. Any single space can contain a total of 3 Garrisons but they cannot all be of the same color. In order to place a Garrison in a Hispanic capital though, not just a city space, the entire province of that capital must be totally free of revolt and there cannot be any Hispanic Revolt discs located in the spaces of that Province. The Praetors can also choose to remove a Garrison from a space by simply paying 1 Denarii and returning that Garrison to their supply. The Praetors can only pay to remove their own color Garrisons and not those of their allied Praetors. Think of this as a repositioning of forces as the front moves and these Garrisons are needed to combat the rampaging armies of the Hispanic Barbarians. This is a very important part of the game as you have to move around doing the work of pacification and having Garrisons available to place will help in the long run and make your job that much easier.
Now that we have seen the actions of Move and Garrison, let’s take a look at one of the most important actions in Besiege.
Besiege
In order to take the Besiege Action, the player’s Praetor must be located in a space adjacent to a city in revolt, which means it contains 1 or more Revolt discs. Here the player will have a choice as they can decide to spend between 1-3 Denarii to initiate the Besiege Action which will give the attempt a +1 for each Denarii so spent; i.e. +1 when 1 Denarii is spent, +2 when 2 Denarii is spent and +3 when 3 Denarii are spent. Once these Denarii are spent, the player will then take the white Roman die and roll it. The final Roman combat value will be as follows: white Roman die result + the Besieging Praetor’s Garrisons connected to his location from which he is Besieging + the total Denarii spent for the action. This can also be doubled if there are friendly Praetor’s armies adjacent to the target space. The Praetor is trying to exceed the Shield Value found in the city they are Besieging. The Hispanic Revolt discs have their base value of the printed Shield Value plus a x2 bonus for any of their Hispanic Armies that are adjacent to the Besieged city space.
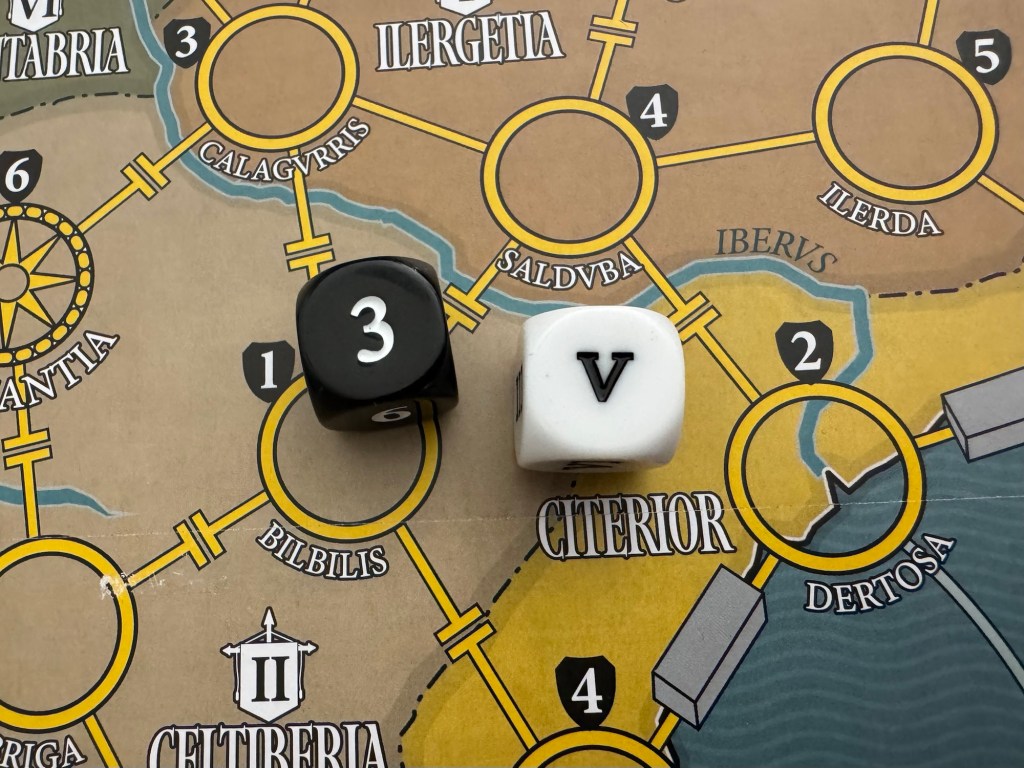
One note about the white Roman die. It is a standard 6-sided die but uses Roman numerals rather than numbers or pips. It has results from 1 (I) through 6 (VI) and will also be used by the player during the Hispanic Phase to roll along with the black die to determine where a revolt will spring up.
Let’s take a look at a quick example of a Besiege Action.
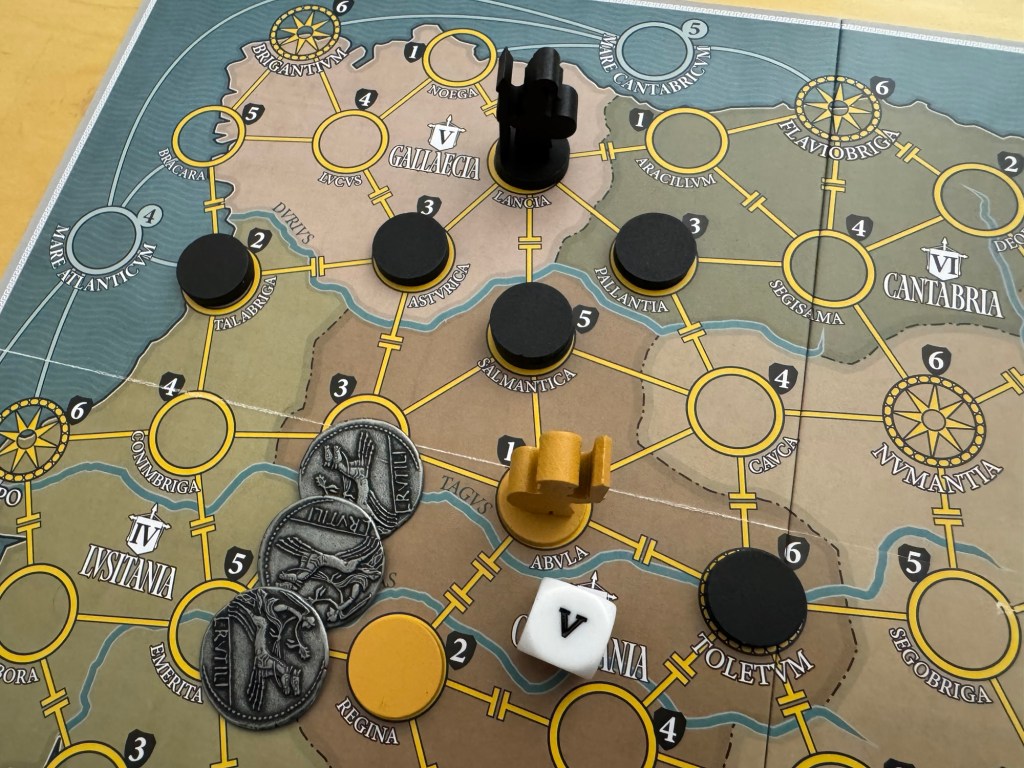
In the picture below, the yellow Praetor is attempting to Besiege the 2 Revolt discs located in Salmantica. The Shield Value of this space is a 5 and there is a Barbarian Army located to the north of the space in Lancia. This will mean that the Shield Value will be doubled for this Besiege so this will be a 10 Shield Value and will be a very tough nut to crack for the Romans. The Roman Praetor chooses to spend 3 Denarii, which will give a +3 to the Besiege roll, and there is a Roman Garrison located in both Salmantica and Regina that will give an additional +2 to the roll. But wait, we forgot to add in the standing Garrison located at Corduba, which will grant a +1 to any efforts which are connected through Links with Garrisons. This +1 standing bonus is for any Link that comes back to Ulterior and is not just for the benefit of the red Praetor as the red color would intimate. With a total of +6, the Roman player will have to roll a V (5) or higher on the dice and does rolling a V (5) for a total of 11, which succeeds as this value exceeds the Shield Value of the space. The Roman player will then get to remove one of the Revolt discs and will now have to succeed at a 2nd Besiege attempt to clear out the space or Revolt. As you can see, this can be a very tough slog for the Romans and it is important to plan out your Besiege attempts and ensure you have the support of several Garrisons as well as a friendly army adjacent to the space to double your results.
One final note on Besiege Actions. If the Besiege clears the space of Revolt discs, the Praetor doesn’t automatically advance into the space. They will have to use a Move Action and pay the cost to do so. Just keep that in mind.
Now that we have an idea of how Besiege works, let’s dive into an example of an Attack.
Attack
The Attack Action is used to remove Barbarian Armies off the board. These Barbarian Armies are the sowers of discord as they will move around during the Hispanic Phase placing out new Revolt discs each turn. If they are not checked and removed from the board, they will fill up an entire Province with revolt and will then move to an adjacent Province and begin their work of inciting rebellion there. Remember, one way to automatically lose the game is for a Revolt disc not being able to be placed out on the board when needed because the Revolt Disc Reserve is empty.
For all intents and purposes, the Attack Action works very similarly to the Besiege Action. The Roman player will choose to spend 1-3 Denarii, gaining a +1 bonus to their roll for each Denarii spent, and will also gain similar bonuses as described above for connected Garrisons and for supporting Praetors on the flanks of the attack. The main difference with the Attack Action however is that the Barbarian Army will roll their black die, which is a standard D6 with results of 1-6, and add that to their total Attack Value.
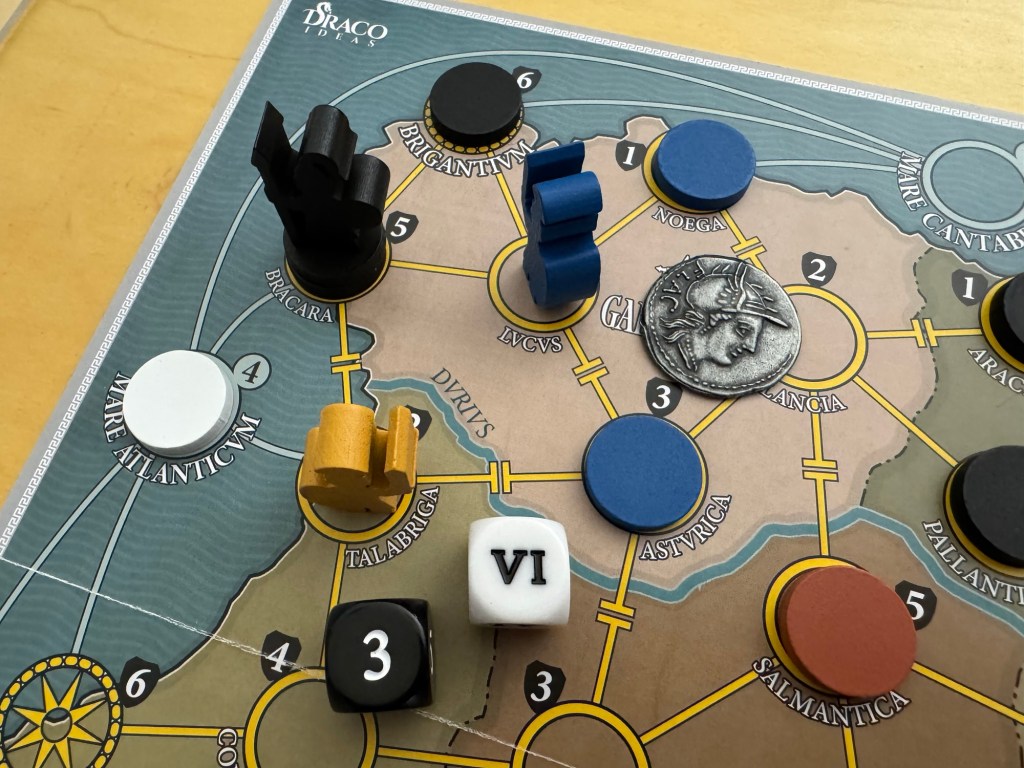
Let’s take a look at an example of an Attack Action below. In the below picture, the Consult (blue piece) is going to attack the Barbarian Army located in Bracara. We ignore the Shield Value of the spaces as this is an attack. The Consult will gain a +1 for each of the Garrisons connected to him (from Noega and Asturica) and decides to spend 1 Denarii for an additional +1. The Consul also calls on the aid of the yellow Praetor who is located in Talabriga to support the attack and his presence will double the Roman Value, including the dice roll. Therefore, the Consul has an Attack Value of +3 (+2 for the Garrisons + 1 for the Denarii) and then will roll the white die and the Barbarian Army gains a +1 for each of the Revolts connected to him (+1 from the lone Revolt in Brigantium and +2 from the 2 Revolt discs in Bracara) for a total of +3 and will also roll the black die.

The Roman player rolls a VI (6) while the Barbarian rolls a 3. This means that the Roman Total Attack Value is 18 (+3 (+2 for the Garrisons + 1 for the Denarii) added to the roll of 6 and then doubled) and the Barbarian Total Attack Value is 6 (+1 from the lone Revolt in Brigantium and +2 from the 2 Revolt discs in Bracara added to roll of 3). This means that the Roman Consult wins this battle and will get to remove the Barbarian Army piece as well as the 2 Revolt discs located in Bracara. A great victory and the Consul will most assuredly be transported back to Rome to receive the praise of his Emperor and the people.
The wargame part of this game is found in 2 of the 3 actions during the Roman Phase. Besiege and Attack are 2 of the most important actions available to the Roman player and their use is key to a victory in securing Hispania and adding it to the Empire. But, proper planning and support is key to these victories and the concerted efforts of all 3 of the Roman players (or less is playing solo) is paramount and moving their Praetors efficiently and placing Garrisons where there are tough challenges will assure victory. Although the dice gods can be very unkind.
If you are interested, you can check out our interview with the designer Miguel Marqués on the blog at the following link: https://theplayersaid.com/2024/04/12/interview-with-miguel-marques-designer-of-hispania-from-draco-ideas-coming-to-gamefound-soon/
In Action Point 3, we will take a look at the Hispanic Phase and how they spread Revolt and move Armies around the board.
-Grant

In the rules is says:”To be able to multiply x2, the reinforcement meeples of each side must be connected to the enemy.”
So in the Besiege example the Spanish Army must be connected to the yellow Praetor and not to the revolt disc in Salmantica.
LikeLike