Purple Haze is a very thematic story-creation tactical level campaign wargame that is set in 1967 Vietnam. The player takes charge of a squad of U.S. Marines and must lead them through the terrain and battlefields of south Vietnam on various missions such as Search and Destroy, Patrol, Rescue and Long Range Recon. The game forces tough choices on the player to determine the outcome of the mission and your squad as you encounter enemy resistance, booby traps, a dangerous physical environment all with a black cloud hanging over the team as they will be forced to make moral decisions in furtherance of their objectives and to preserve their own lives.
The game has a narrative generation focus as your choices will lead to specific outcomes and additional challenges or boons while also incorporating tactical combat on a battle board and building a campaign arc over a series of several missions. The writing builds a vivid story about the situation and includes historically accurate situations as well as cultural and period specific jargon and experiences. The goal is to move from mission to mission, building experience and gaining new abilities to be used to survive the jungles of Vietnam, while following orders to the best of your ability. Nothing is easy with this game and Trait tests will force the players to roll dice to determine the outcome of all types of challenges including physical, perceptive, diplomatic and emotional situations as squad members will track both their health and mental fatigue as it effects them over the course of the mission and the campaign.
We have now played the first 7 missions in the game and have really enjoyed what we have experienced and I want to share my thoughts about the game here in this First Impressions style post.

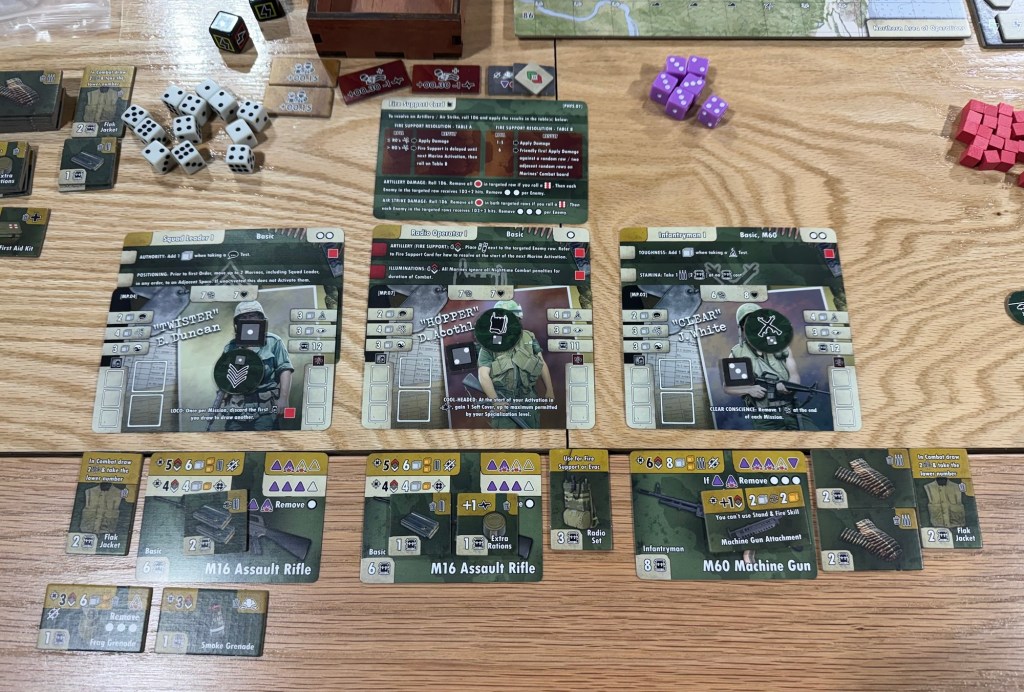
The first thing I want to share is the composition and makeup of the squad. Whether playing solo or cooperatively, the squad will consist of 6 different soldiers (Marines) each with a different specialty and each with their own abilities and statistics. There are 30 Marine Profile cards include in the game, which means a choice of 5 different individual Marines to choose from. These Marine Profile cards lay out each Marine’s unique Ability and Traits. Specialties include Squad Leader, Radio Operator, Scout, Corpsman, Engineer and Infantryman. As you might think, these Marines each are very important to the squad’s success in missions and the players have to understand how their abilities are best used. Some of these abilities are what I would call passive as they are always in effect when making dice rolls for checks or the like. An example of this is the Squad Leader’s Authority ability where he will gain an extra white dice to roll when making a Charisma Trait check. Each of the Marines have their own special focus and it is really important for the player to understand this and utilize them to the best of their ability. One thing that I found was it can be a bit problematic to remember all of the differing abilities of all 6 of the soldiers. There is just a lot to remember and invariably you will forget something when doing a Trait check or pass over what could have been used to improve your chances. This becomes even more difficult as the soldiers will level up over the course of the campaign and will gain even more abilities. So instead of having to remember 6 abilities, when you go up to level 2 you will now have to remember 12. Just give yourself a break from time to time and some grace to walk something back or roll an extra die to see if it would have made a difference. Remember, in these solitaire games there are no referees and no flags to be thrown when you break the rules. This does become a bit less of a problem when playing cooperatively as you will be divvying up the Marines and probably are only controlling a max of 2 or 3 which is a bit easier.
Marines will activate individually during the Combat phase when they are placed on the Combat board, but when taking actions on the Strategic Map they will not take independent turns and Squad Actions happen collectively for the entire Squad. This gives you a bit of a break as well during the game as you will be able to spread that focus out over the different soldiers.
I already briefly mentioned this but as you progress through the campaign and different missions your squad will gain experience and have the opportunity to level up gaining new abilities. Experience is earned by individual Marines for passing difficult Trait tests, the squad’s overall performance during combat, and depending on the number of primary and secondary objectives the squad completes. This experience is spent at the end of each mission to upgrade the Marine’s level of specialization. There also is a thing referred to as Boon points which are usually gained from drawing Boon cards. These are drawn if the squad performs particularly well in combat, and through the resolution of certain events during missions as well as during the end of campaign R&R phase. In addition to generating Boon points, the Boon cards can be used to provide one-off boosts during the game by discarding the cards to gain a listed benefit. Boon points can also be spent during the R&R phase to give better dice roll modifiers for outcomes from R&R. Certain Events during a mission may also be impacted if Boon points are spent.
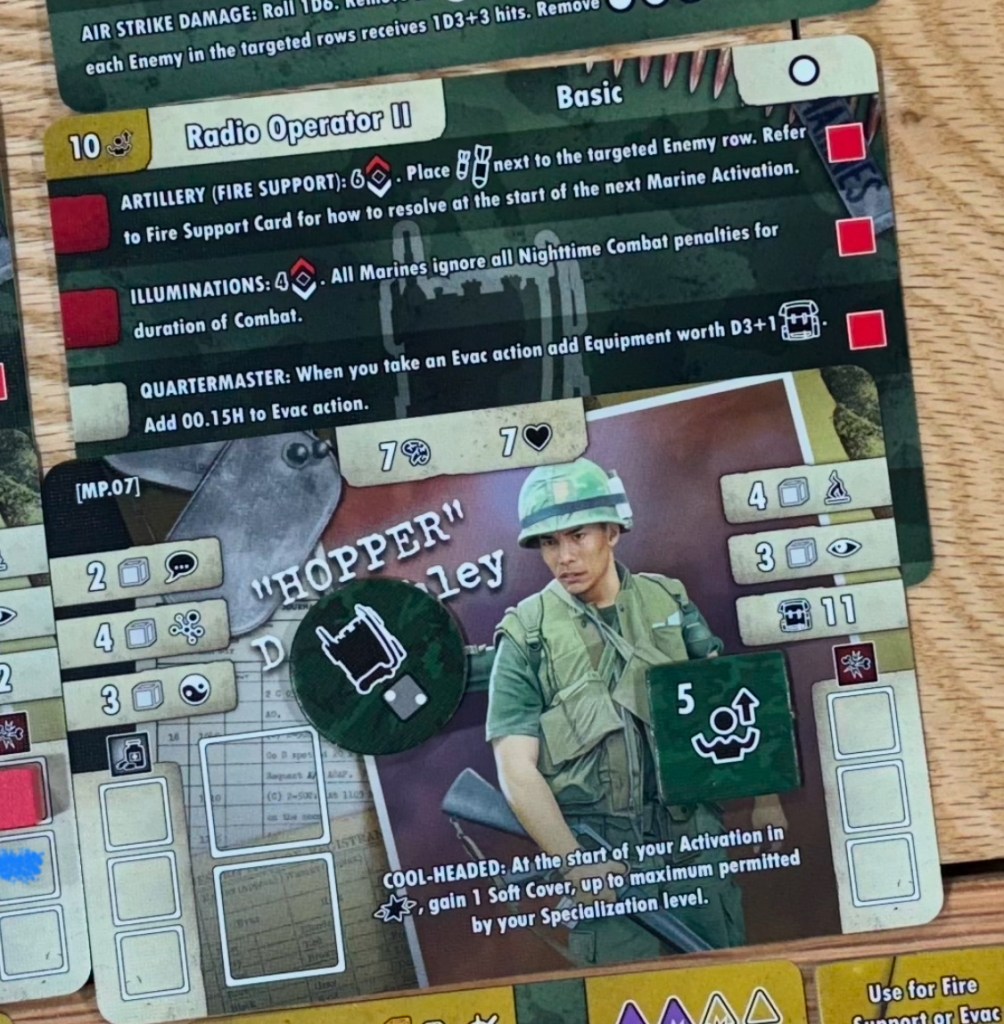
Let’s a take a look at a Marine that has leveled up to Specialty II. We will take a look at Hopper who acts as the Radio Operator for our squad. At start, when he was a Radio Operator I, Hopper had access to the top 2 abilities on his card to bring in artillery support and deploy illuminations during night rounds to improve the ability to fight. But when he levels, he gained the new Quartermaster Ability which allows him to roll a D3+1 and gain that many points of gear to distribute to the soldiers. This will generally be used for additional ammunition, grenades, bandages and some food which are very important to the squad to be used during combat as well as on the Strategic map when moving around from objective to objective to regain stamina.
One other aspect at the start of the game is choosing a Marine’s gear and weapons. Each Marine has a Load Capacity which is denoted on their Profile card on the right side next to the backpack symbol. Some of the Marines have to carry specific gear for their specialty such as the radio for the Radio Operator of the Medical Kit for the Corpsman but after that is accounted for you will then be able to spend the remaining Load Capacity on weapons, ammunition and other gear.
There are a wide variety of different weapons available to your squad. Some of the weapons though have to be earned over time and throughout the campaign. Typically, at the outset of a new campaign weapons that are available to all Specializations will have Basic written on them. Some specializations are limited and this will be written on their Profile card and then some weapons will require a specific type of ammunition that must be carried to use the weapon, such as fuel for the flamethrower, belts of ammunition for the M-60 or grenades for the grenade launcher. This is an important part of the planning during the pre-phase of a mission as load capacity must be used to to hold ammunition for other Marines from time to time and that ammunition will have to then be be redistributed prior to marching to ensure each Marine has enough ammunition to use for their weapon. You know how in every Vietnam War movie you see soldiers carrying M-60 ammo for the heavy gunner. That is in the game and was a pretty cool part of the planning for each mission.
Each weapon has a range and then lists the number of dice that will be rolled in combat. Also, each weapon can give bonuses when certain dice results occur such as removing cover from the battle board or even splashing over into adjacent enemies to do damage to them as well as the target.

In contrast to weapons, there are no restrictions on the type of gear that can be taken by each Marine. The only exception is the Radio Set and Claymore Mine for the Radio Operator and Engineer. But this gear is vitally important as each will serve a role in the mission. Flak Jackets will protect Marines from injuries or death (as they can draw 2 damage cards and take the lower of the 2 values), rations can be used to regain stamina and medical kits can be used to treat wounds.
I always love a tactical game that gives me the power to choose what I want to take on the mission. Having to do this during the setup of a mission helps me to understand what the objectives are, what might be needed to more effectively achieve the objectives and how I can support my squad by distributing the load of heavy weapons ammo. Some people don’t like this level of granularity in their games but I really do and that is why I love a game like Warfighter from Dan Verssen Games because you have to choose wisely and cannot simply carry everything that you might need.
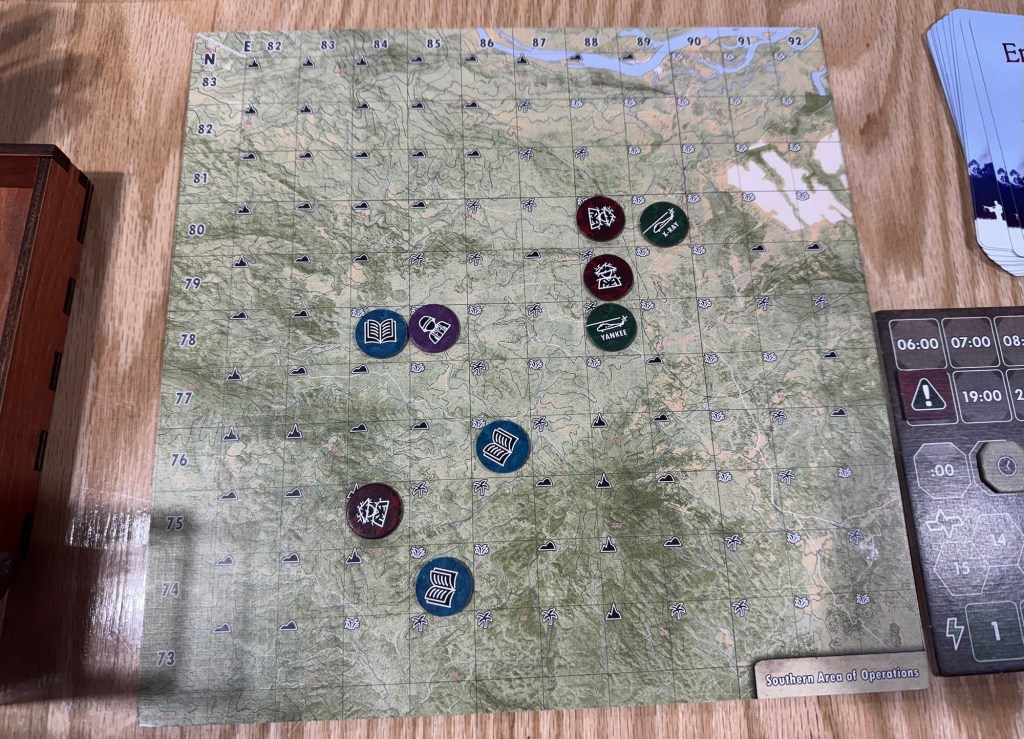
The players will have to move around on the Strategic Map as they are reconnoitering the various objectives and locations outlined in the scenarios. There are 3 Strategic Maps including Northern, Southern and Quang Long and what map to use will be set out in the mission set up instructions. The maps are based on Pictomaps that were produced by the US Army in 1965. They represent fictional areas in the southern part of what was known as I Corps in South Vietnam, near the DMZ. Each square on the map represents an area of 1km by 1km and each of these spaces has a terrain symbol printed in them to give the player an idea about what they will have to march through in order to get to where they are going. The different terrains include Urban (built-up areas with streets and buildings), Paddy (cultivated rice paddies or no jungle which are mostly flat areas with some small villages), Jungle (heavily wooded areas), Hilly (heavily wooded areas with significant elevation increases and decreases in the terrain) and Mountainous (heavily wooded areas with mountains or significant elevations). Each of these different terrain types will have a movement cost in the form of move time. March is the most common squad action the players will use and it will have to be managed as an exhausted squad is not effective and can be hampered in the game. Marching can be either straight (up or down, left or right) or diagonal. A march takes time and costs stamina points. If the stamina has reached zero, each time the squad has to move after that will inflict damage on the individual Marines which is determined by a random D6 roll and then placing a damage marker on that Marine’s Profile card.
The way that players can manage their stamina is to do a bivouac action. The purpose of the bivouac action is to recover stamina. The Squad recovers 1 SP (the Stamina marker is moved towards the number 15 by 1 space) for every 00.15H spent bivouacking. Extra rations carried with the squad members can be discarded as part of the bivouac action to recover an additional 1 SP per ration discarded and multiple rations can be discarded in the same bivouac action. I really like this part of the game as the accumulation of stamina loss will lead to the player having to make the tough choice to bivouac. The risk here is that the more time spent doing this recovery, the less time that you have to maneuver through the terrain to reach and achieve of your identified objectives. It is a real trick to have to manage and players will have to plan out their routes effectively to avoid really difficult terrain that will eat up more time and incur more stamina loss with getting to each objective in the allotted mission time parameter. Sometimes the most direct route is more dangerous as you will move close to enemy bases which will increase your chances of an encounter that might lead to combat. You have to be aware of this and take an assessment of your time, what shape you are in physically, whether Marines are wounded or worse yet killed, your available assets and ammunition and the time needed to get to and from all objectives. Maybe I like this part because I am a planner of my own life and always try to maximize my time at work and at home accomplishing my missions.
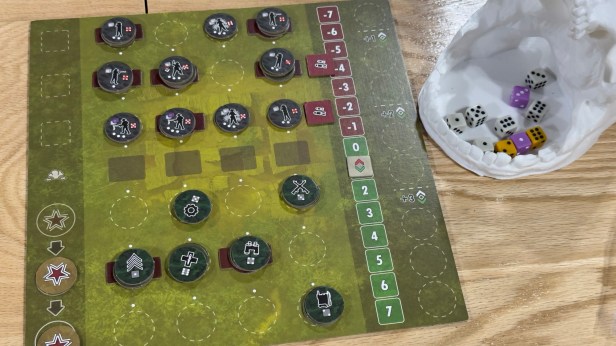
I want to cover the dice in the game as there is a very interesting matching dice system that works well and is very well done. The trait and combat tests work the same way and require the player to roll 3 purple Focus dice for any trait tests or 2 purple Focus dice for each combat test. The purple Focus dice are the dice that you are attempting to match with the rest of the dice. With each test, you will also roll a number of white Strike dice and the number of dice are determined by the Marine’s trait for a trait test or by their weapon for a combat test. Typically, the players will roll 3-5 of these white Strike dice. There are also gold Crit dice that can be rolled in combat if the used weapon provides them. It is important to remember that the base number of dice used may be adjusted by various factors including range, cover. line of sight or if the combat test is at night.
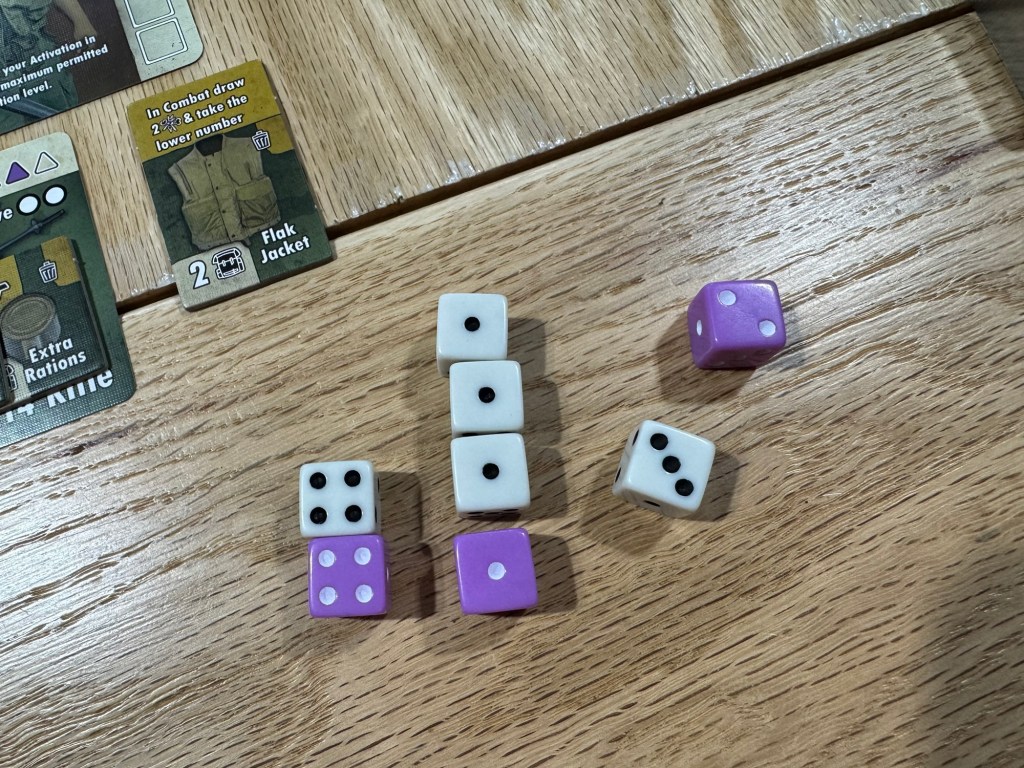
The player will roll the number of purple Focus dice first and then the white Strike dice looking for number matches between the purple (Focus) and white (Strike) dice. Then if there are left over white dice, you will then match them to other unused white dice to create matches. If the player was granted gold Crit dice, these will then be rolled and matched to any matching dice number including white and purple. Any dice that do have any matches will be removed from the test. Crit dice that match other Crit dice but do not match a Focus or Strike dice are also discarded. Then the player will total their number of successes which is determined by the number of matches you achieve. If the match does not include a Focus (purple) die, the number of successes is always 1 Strike die less than the number rolled with matching faces. For example, 3 white Strike dice with a 6 face will create just 2 hits (3 matching faces – 1). A matching Crit die is always considered to be 2 successes.
In the picture shown above, can you tell how many successes are scored here? There are a total of 4 successes due to 1 matching 4 results (equating to 1 success) and 3 matching 1 results (equating to 3 successes. 1 + 3 = 4 total successes. I just really like the system they chose for these tests and for combat. It is light and fun and also will take you a few tries to get used to. This system means that there is a lot of luck thrown in but that is what makes this a game and not necessarily a simulation of the Vietnam War.
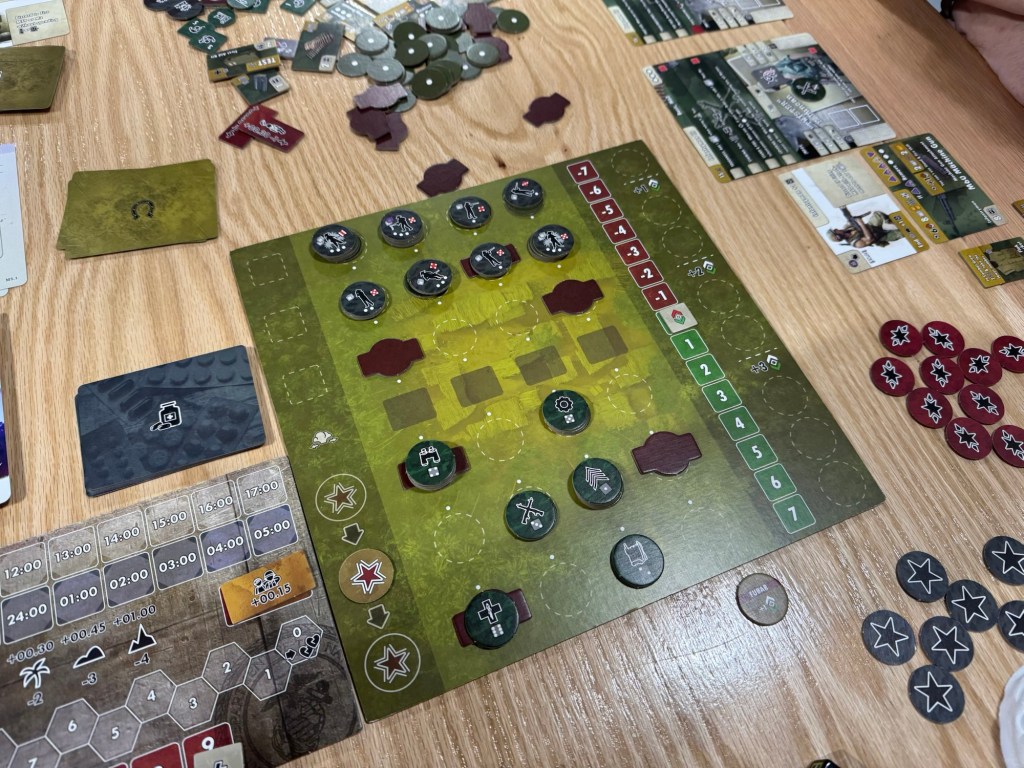
One of my favorites parts about the game is the combat. Combat is triggered by Events and once triggered will be decided on the Combat Board. The Event text will lay out the Combat Board set up, including the number and type of Enemy units that you will face, which will vary depending on the Threat level and the consequences of earlier Events and choices that have already been resolved. Depending on the outcome of the combat, the squad may earn experience, acquire new skills and find new Boon cards, which will help with future challenges.
As you can see in the picture above, the squad has been ambushed by 10 Viet Cong Fighters after the squad raided a nearby suspected VC village and 2 hidden guerillas fled the scene and then lost the trailing squad. The 2 fleeing VC were able to rouse their comrades who then set a skillful ambush that has the squad outnumbered, outgunned and out in the open.
Also shown in the picture is an Air Strike that has been called in by the Radio Operator denoted by the 2 red counters with ordnance shown on them. These ordnance are being dropped by several F-100 Super Sabre jets with pinpoint accuracy and unleashing a hellfire of napalm that will attack each Enemy Fighter in 2 adjacent rows doing a number of damage that is likely to kill each of them. Without these powerful weapons, the squad would have been in trouble but these aircraft have leveled the playing field!
Combat is triggered by events. When it is triggered, play moves to the Combat Board and there are several pieces that will have to be used to represent the enemy forces against the squad, Enemy unit counters are placed on the board and drawn from a random pool so there will always be unknown strength and numbers. They also have access to special tactics markers that can be used to provide them with extra attacks, bonuses or other factors. A certain number of these tactics markers will be placed out from the encounter and they can also gain more throughout the battle.
During combat, players will determine which side has the initiative and so will act next by checking the Initiative marker on the Initiative Track. When the Marines have the Initiative, the marker will be located on a green space and when on a red space it is the Enemy’s turn. At the beginning of the combat, the Initiative marker is placed where instructed by the Combat Setup Box, and the position will vary depending on the Threat Level that the players currently have. Each chosen action incurs a set amount of initiative spaces and once a player takes an action they move the Initiative Marker that number of spaces toward the red portion of the Initiative Track. If after taking an action, the Initiative Marker is still in the green section of the track, then they Marines can take an additional action. I think that this system is really clever and gives the players some sense of control over the battle as they can make decisions based on the relative position on the track and whether they mind giving that initiative over to the enemy to act. Sometimes you can take a small action with a lesser cost to maximize your turn and get the most out of it that you can. Or you can take a big action and pass that initiative back to the enemy. I just really like this system and feel that it represents some of the more tactile elements of combat.
One of the more interesting parts of the narrative portion of the game is the concept of keywords and writing them in your Logbook. As you make your way through each of the scenarios, some of the encounters you come across will note that you should write a specific keyword into your Logbook noting the choices or outcomes of your mission progress. An example might be Rice Tax, which is a result of the squad stopping the VC from using their stock piled rice in a certain village or the name of a Marine you met and freed from capture. These keywords will then factor into later missions if mentioned and the players have them in their Logbook and provide you with a slightly different outcome or reaction from an encounter.

I am a big fan of these “smart” methods to inject a slightly different lean with each scenario and to effect the outcome in favor of or even against the player. These keywords are not really dynamic as much as they are a static way to affect the outcome. It just is really well done in the game and does make you consider your actions against what the mission might include, measured against or in relation to your objective and then how each encounter could potentially affect it.
Here is a link to our unboxing video to give you a good look at the components and the fantastic production:
Here also is a link to our RAW video on the game, which is more a spewing of our thoughts and a discussion about the intricacies and parts of the game:
I was unable to cover each and every aspect of the game in this post as it really is just that big and has so much content and nuance that it will take you playing the game to really get a feel for what it is attempting to do. But, we really enjoyed Purple Haze and have played it a lot finishing 7 scenarios as already mentioned. We have a few remaining and want to finish it out to see how it ends. They also have multiple smaller expansion packs (Born to Kill, Tunnel Rats, Force Recon – Stingray and Force Recon – Keyhole) that will add scenarios and we are definitely interested in trying those out. We will put up some more content on the game as we continue to play and experience it. But for now, it is safe to say that we really very much enjoyed this one and are looking forward to more.
-Grant

Hi Grant!
Four hits, not six. One hit from the matching 4s and three from the 3 white 1s matching the purple 1.
LikeLiked by 1 person
Great write-up! I think I am “in” on this one once it becomes avaiable.
Quick question….out of 5 (w/ 5 being the highest), what “complexity” rating do you give this?
Thanks!
LikeLiked by 1 person
I would say a 3.5 as there are a lot of moving parts but it just takes a few plays to get it down. The rules are pretty good and clear.
LikeLiked by 1 person