A few years ago, I was able to do an interview with a new designer named Kieran Oakley who had established a new publishing house called Gecko Games to release his first game called Assault on Gallipoli. Since that time, the game released and quickly sold out and was then picked up by Hexasim to do a 2nd Edition print run. Assault on Gallipoli is a moderately complex area control wargame that covers the key battles of the Gallipoli Campaign of World War I in 1915. It does focus on the Australian and New Zealand Army Corps (ANZAC) sector of the campaign rather than the main British landings, so it doesn’t include the landings that occurred further south at Cape Helles.
What I would say straight asway is that most WWI wargames are high level strategic or operational level games that don’t really deal with the strategies and tactics used in the actual battles of the period and are more abstract and don’t focus on the minutiae of the battles. Assault on Gallipoli though focuses on the gritty details of the period and includes a large focus on the hand to hand combat in the desperate bayonet charges, the constant threat of being shot by a sniper, the rugged terrain and how it hampers movement, the presence of trenches as well as barbed wire that make direct attacks much more difficult and the use of artillery and off shore bombardments to soften up targets before going over the top. I really very much enjoyed the focus of this design and want to share my thoughts in this First Impressions style post.

Before I dive into my thoughts, I wanted to point out that this is a new 2nd Edition copy of the game that was released recently by Hexasim. I own a 1st Edition copy and there seem to have been very few changes to the game itself. The board was replaced with a bit smaller of a board and the box size and shape was changed but no other major changes seem to be evident. I would say that the counters are very nicely illustrated with clear, large and legible numbers and they are pre-rounded so no clipping necessary. The general art style of the game is very appealing and the package is just a high quality product.
Activation
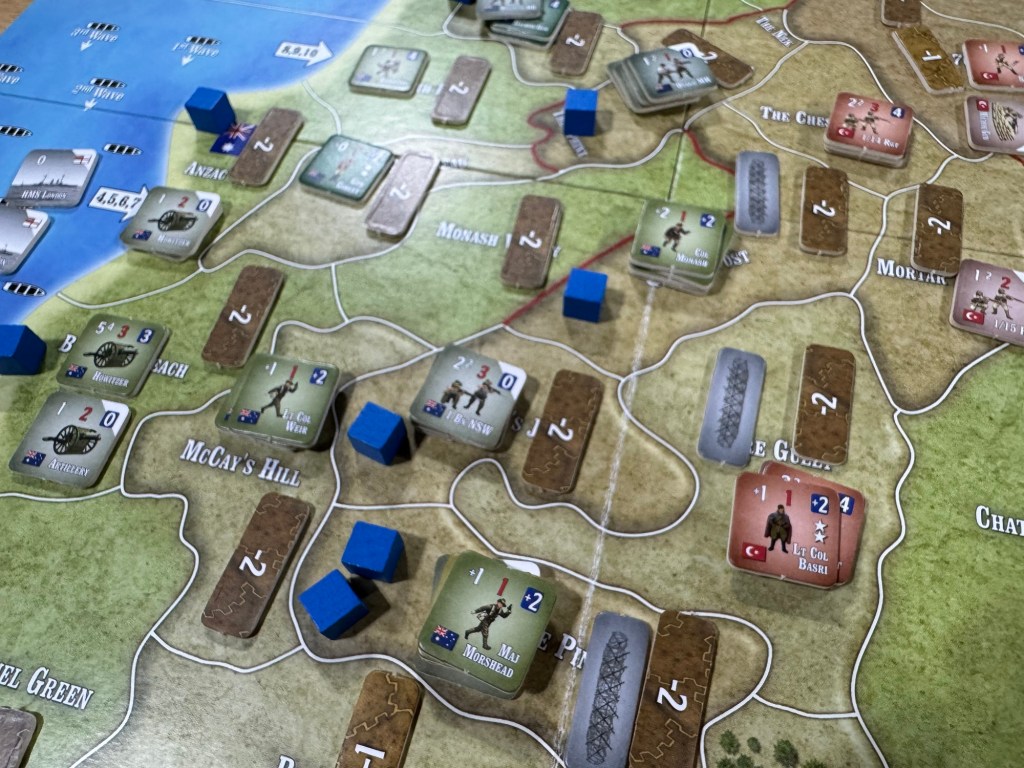
The first thing that I want to go over is at the heart of the game and is the alternating unit activation sequence. All of the combat units in the game have 2 sides to their counters. On the front is their Fresh side while the back is Exhausted. Fresh Units are considered to be at full strength while Exhausted Units have a slightly reduced strength and movement value. After players have activated a Unit to perform any one of several actions, including fire, movement or digging a trench, the Unit will be flipped over to it’s Exhausted side and the stack’s turn will end. For easy identification, the Units that are Exhausted have a white triangle in the upper right-hand corner of the counter near the Movement value.
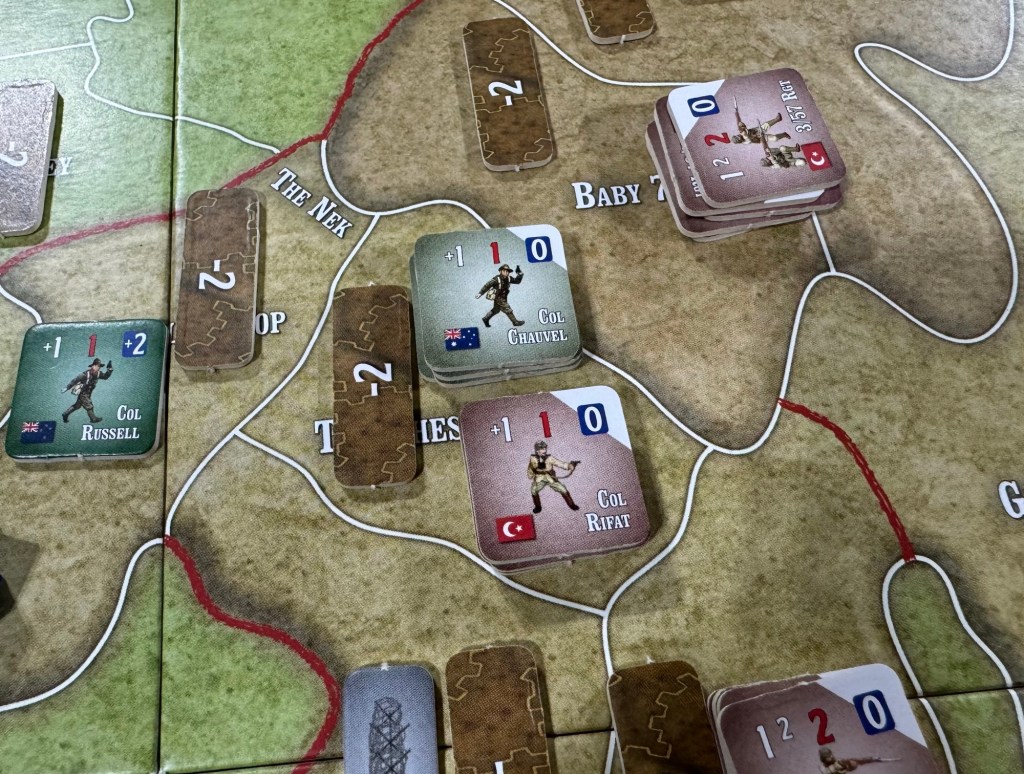
The act of becoming Exhausted can happen in 2 different ways. One I have already mentioned by taking any of the various actions. The 2nd way is that the stack is targeted by enemy fire, either ranged fire, artillery bombardment or close combat. When hits are scored in fire, the counters that are taking the hits will become Exhausted by flipping them over. Some of the Units have multiple steps, basically any Unit with a Combat Strength of 3 or higher with the exception of Machine Gunners, have a step and when they are Exhausted and take a hit they will be replaced with an available Remnant counter. This makes the activation system very interesting and gamey (in a good way!) as players have to understand that in order to attack, move or dig a trench, they have to Exhaust a unit and if that unit cannot be Exhausted as a part of the action because they are already Exhausted they cannot take that action.
What we found was this leads to the players trying to do long range artillery bombardments or off shore naval support from the ships in the Aegean Sea first to front line troops who are dug in their trenches and behind barbed wire. You don’t want to activate a stack of front line troops until you really have to or want to do something significant like a fire attack or charge into close combat as they are then more susceptible to being eliminated and you just don’t have that many units to begin with. I think that in our first turn, we just activated all of the front line troops first and were wailing away at each other but then later in the round realized that this left them very vulnerable to being wiped out by artillery fire. This really caused us to have to consider our strategies and decide what risks we were willing to take with troops and how we would best support those in the front that were being hit by artillery fire.
The concept of initiative is called Morale Advantage and is also pretty important to the design as the player with the initiative takes the first action, and can Exhaust some good enemy units in the front with well placed artillery strikes, but also gains a total of 5 Action Cards to just 4 for the player who doesn’t have initiative. Initiative is determined at the start of every Turn after Turn 1 with both players rolling a d10 to determine who has the Morale Advantage. Each player will add up all their casualties, including Ships and Leaders, but not Remnants. Eliminated Divisional commanders count as 2 casualties, while eliminated Commanders-in-Chief count as 3 then subtract the lowest casualties from the highest. The result is the modifier that the player with the most casualties has to add to their Morale Advantage dice roll. After the dice roll, the lowest score wins the Morale Advantage and gains initiative. If the score is a tied, the player who already has the Morale Advantage keeps it. As you can see, the player who is getting wiped out on the battlefield will gain a significant handicap in this battle of initiative and this part is a key to a good showing in the game.
I really think that these 2 concepts worked well together to create a very interesting and challenging game as players truly have to consider how best to use their men and not just waste them in blind charges and fruitless moves just to expose them to greater potential losses.

Combat
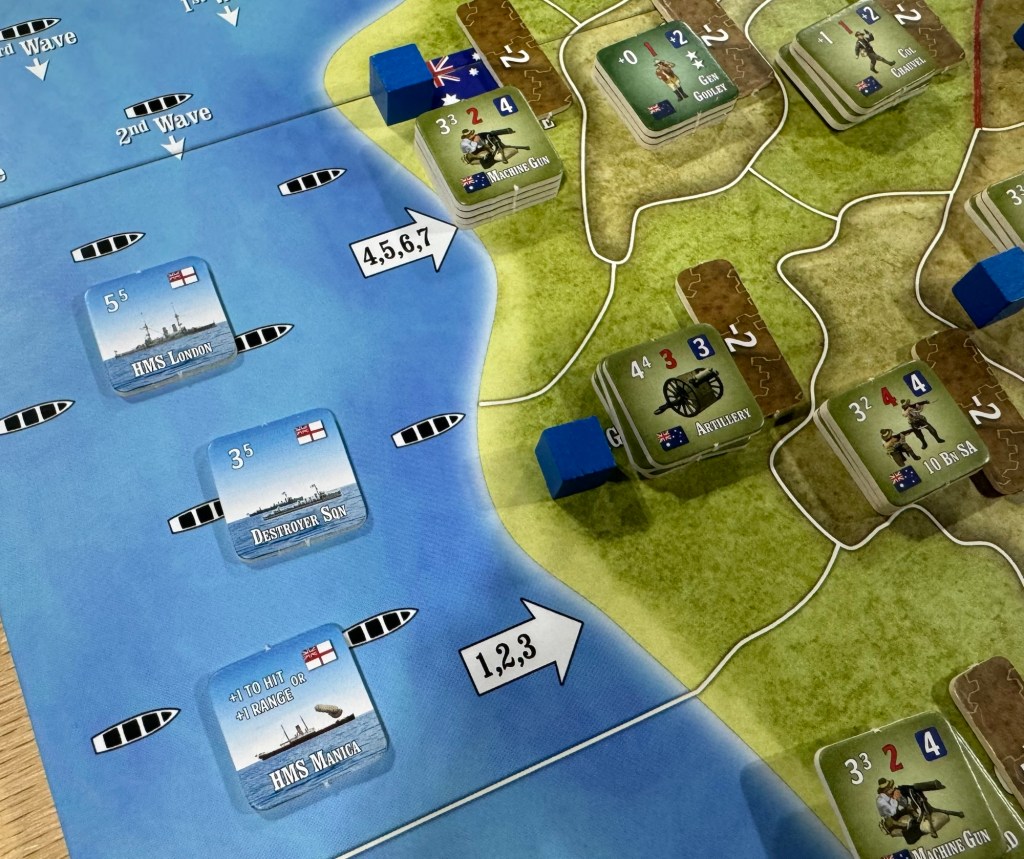
To fire at enemy Units the activating player selects Units in an area to fire and then chooses a valid target meaning a target that is in range of the firing units. Friendly Units in the same area may combine their Firepower in these attacks. To fire, you simply add up the Firepower of the selected Units and roll one ten-sided die (D10) for each point of Firepower. The standard roll you need to hit a target is 4 or less. But this number can be modified up or down according to several different factors including defenses (Shallow trenches reduce this number by -1 while Deep trenches provide a -2 modifier), Leader bonuses of +1 or +2 as shown on the Leader counter, -1 penalty when firing at Units in Woods, a -1 penalty when firing at targets that are at a higher elevation than the firer, and a -1 penalty when firing at targets at long range. And the rolls are all low. Less than the final modified target number. So with no modifications, it will be 4 or less but if in Deep trenches then 2 or less, Shallow trench 3 or less, etc. For every hit scored, the defending player must take 1 Damage Point and reduce the strength of their Unit/s in the target area.
Taking of damage is a very difficult choice as each Unit can be reduced if they have an Exhausted side to absorb 1 hit, including Leaders, so keeping your units Fresh is very important. The concept of a Remnant is also a thing as larger units can be broken down to a lesser unit called a Remnant, which can then take a hit to be eliminated. Deciding what Units to lose is very important and you have to consider your position and what you are trying to accomplish that turn.
I thought that the combat was well done and was pretty fun as it is somewhat a bucket of dice approach. It also reminded me of the combat found in Verdun 1916: Steel Inferno from Fellowship of Simulations as Units in that game are also in a few different states but they are blocks and are either laid down when Exhausted or standing up when Fresh. That game uses a lot of dice as well but they are d6’s
Close Combat Uses its Own Unique Resolution Process with Special Close Combat Cards
One of the things that I always enjoy in these smaller scale tactical wargames is how they handle the concept of Close Combat. There are two ways Close Combat can be conducted in Assault on Gallipoli. The Close Combat uses its own deck of cards and the process is somewhat of a matching card play with one player, the one that has initiative, playing a card first and the other player having to match the card played or play a card that acts as that card.
There are 6 different types of Close Combat Cards that form a deck of 36 total cards. The breakdown is as follows:
- Bayonet Charge (9 cards)
- Ambush (6 cards)
- Infiltrate (6 cards)
- Raid (5 cards)
- Creeping Barrage (5 cards)
- Reserve Trench (5 cards) This card is a ‘wild card’ which can be played to match any other Close Combat Card. It can also be played in an offensive manner to represent any other Close Combat Card.
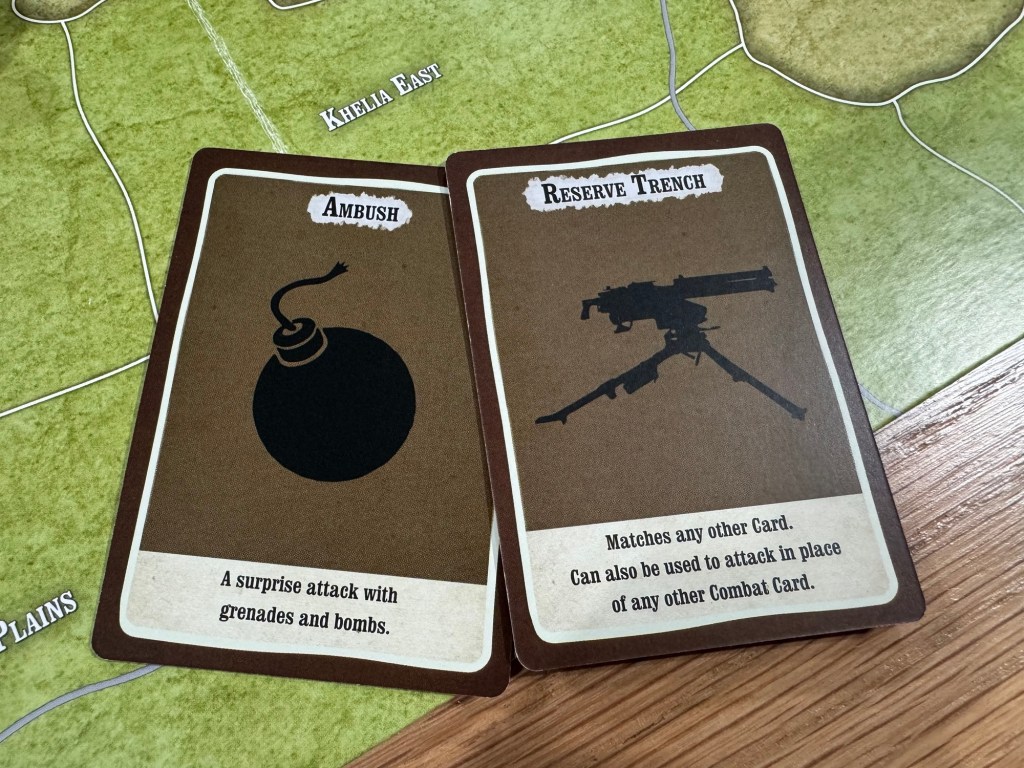
The number of Close Combat Cards is determined by a few factors including the total Firepower of all Units involved, extra +1 or +2 cards for Leaders present and +1 card for Shallow trenches and +2 for Deep trenches for the defender. This will result in a number of cards between 3-8 and means that these Close Combats can take a few plays to resolve but it is pretty easy to adjudicate and doesn’t take that much more time than rolling dice. I frankly love this system and feel like it was a good representation of this brutal hand to hand combat that doesn’t rely on dice luck but cards (and the associated card draw luck I realize). I really like thinking about the odds of the other player having the cards I am considering playing based on the knowledge of the makeup of the deck. There is a good amount of tension with this method as well and I really like the way it works. It is somewhat of a mini-game within the game and that is fine by me. I can see where some would think that this was just added in because the designers liked it but I do feel that it has a thematic connection to the grim nature of the fighting at Gallipoli.

Killing Time Track
One of the best parts of the design was the method used to determine the end of any given round of play. This game has an alternating activation system but there is no guarantee that all of the units of either side will get to activate because of the Killing Time Track and how it works with combat. The Killing Time Track represents the unknown and the cruelty of fate on the battlefield. The mechanic ensures that no one knows exactly how long each turn will last. At the start of each Turn, you place the Killing Time Track Marker on 8. Whenever the active player having their Round rolls a 10 during fire combat the Killing Time Marker goes down by 1. When the Marker reaches zero, the player’s activations end, and neither player may activate any more Units. You only reduce the Killing Time Marker by 1, even if you roll multiple 10’s during a round of shooting. In a game that sees players rolling 3-6 dice this happens way more than you would expect. I do think that it is important to plan out your attacks with you larger Firepower Units to make sure you are able to do what it is that you were planning to do. If you roll all your large number of dice attacks early, you might move that Killing Time Track marker along very quickly and as the defender, this is what you want to see. I also felt like I did with Combat Commander from GMT Games with the time mechanic where as the defender who is trying to simply outlast your opponent and hold key victory point spaces taking even a poor odds shot is better than not shooting as you might roll a 10 and move that marker.
I thought that this was very good way of handling the end of a turn and it really keeps players on their toes as they are trying to do what it is that they need to get done in the limited time that they may have. And sometimes, you will get to activate all of your units because you are not rolling 10’s so you can never rely on that aspect. Just well done and it felt like it fit with the system.
Action Cards
In addition to the Close Combat Cards we have already discussed, there also is a deck of 54 Action Cards. Each player begins the Turn with 4 or 5 Action Cards depending on who has initiative. There are 3 types of Action Cards including those that can be played at any time (these have a green background); those that you can only play during your own Round (brown background); and those that count as your whole Round when played (red background). The Action Cards can be used in a variety of ways to influence Fire Combat, increase movement, add Units to the board, etc.

I have always liked the addition of cards to any wargame as they just keep the game interesting and a bit unpredictable. I think that it is funny with some wargamers. They want to be able to control everything to do with combat and command and control. But, in real life on the battlefield, commanders cannot really control anything with the exception of being in the correct spots. The Action Cards add to this difficulty as you just never know what might happen.
One of my favorite type of cards are those that allow you to break the rules. For example, barbed wire means that you cannot move into an area with barbed wire unless you started your turn adjacent. Well, there is a card that removes that barbed wire so you can move a Unit in. There are red lines drawn on some of the areas that represent impassable cliffs but there is a card (Hidden Gully) that allows you to ignore this and move through a red line. Just scrumptious and enjoyable! I love the Action Cards.
I actually very much enjoyed our play of the game and feel that this game is a perfect introductory medium weight and complexity wargame that appeals to both rookies and veteran wargamers. with great art and production, easy to grasp rules and helpful play aids, anyone can play this game. I also know that this is the first game in a planned trilogy that covers Australia’s most famous battles. In an interview that I did with the designers in 2022 they mentioned that the games will be Assault on Tobruk ‘41 then followed by Assault on Kokoda. They have already started working on these titles and hope to have them out soonish. In the interview they mentioned late in 2023 but that has obviously come and gone.
If you are interested in Assault on Gallipoli: The ANZAC Landing Campaign 1915 2nd Edition, you can order a copy from the Hexasim website at the following link: https://www.hexasim.com/en/3951-Assault-on-Gallipoli.html
-Grant
