
Land and Freedom: The Spanish Revolution and Civil War is a very interesting and unique card-driven in which players are play the roles of various factions who are attempting to work together to repel the Fascist attack on Spain’s sovereignty. The three sides, including the Moderates, Anarchists and Communists, have to work together in a loose alliance against the Fascists but also in an attempt to keep each ideology in check and win the game by amassing the most glory. The game looks at Spain in the framework of 4 separate geographic Fronts, which players have to defend using only their wits and the cards at their disposal. These cards can be used for their powerful events or placed into a tableau where in later turns the play of matching symbol cards here can trigger a very powerful and game changing momentum swing. The game is semi-cooperative, and what is meant by that is that all of the players will lose the game if 2 of the Fronts or Madrid are lost but if they sufficiently work together to keep the Fascist invasion at bay, they can then win individually for their ideology by amassing the most Glory through their brave deeds, skillful manipulation of the turn order and focus on increasing their hold on important aspects such as government control, external support from world powers in the form of Foreign Aid, the increase of individual liberty or a focus on collectivization.
In this series of Action Points, we will take a look at the Game Board and discuss the Fronts and various Tracks that belong to the different factions, examine the anatomy of the Player Cards and discuss the use of their Action Points and Events as well as the Fascist Event Cards, take a look at the Morale and Teamwork Bonuses and how they are best used by the players, discuss the uses for Hero Points and take a look at the various Medallions that can be acquired and their uses and discuss how the game is won or lost and the process of acquiring Glory.
Game Board
The really great thing about the board for this game is that it is a 17″x22″ canvas mat that is really durable and looks great. It will not rip, tear or really wear in any negative way and gives the game a good quality to its production right off the bat. The board contains quite a lot of information and is divided up into four main areas that are used by the players to cooperate together in defeating the Fascists but also to focus on winning for their individual ideology. The Fronts are located in the upper left hand section of the board and track the progress of the fight against the Fascist troops as they converge on the capital Madrid in an effort to conquer the country. The various Tracks are located in the upper right hand side of the board and track the progress of the players’ ideological progress in various key areas including Liberty, Collectivization, Government, Soviet Support and Foreign Aid. The Glory Box measures how successful each of the different ideologies have been in their efforts throughout the game while the Current Events Track and Current Year Deck areas are what tells the players the challenges they must overcome and the opportunities that could be presented from successful completion of goals. Finally, dead center of the board is where the Bonuses are tracked for both Cooperation and Morale and these become very important to the players to garner synergy from working together to defeat Fascism. Let’s take a bit of a closer look at these different areas.

Fronts
There are 4 Fronts shown on the map inlay in the upper left hand portion of the board. These Fronts are Madrid, Northern, Aragon, and Southern. Each Front is shown with a box with the name of the Front and the symbol of the prevalent faction there shown above the name of the Front. Madrid is the only Front to have no symbol as it is the capital of Spain and is the most important Front on the board as its loss to the Fascist forces will end the game in an immediate defeat.
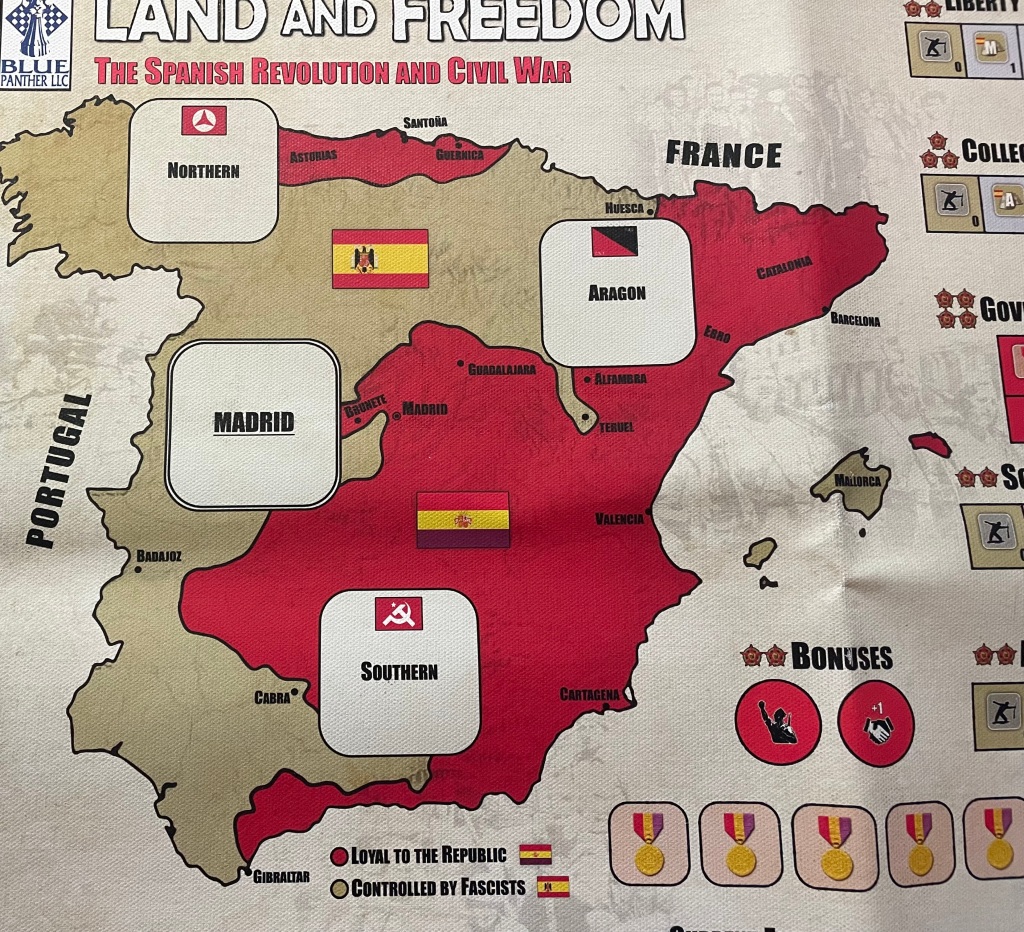
The struggle for control of the various Fronts is shown by double sided tokens called Fascist Attack/Republican Strength tokens. One side of these tokens is associated with the Fascists and shows a -1 value while the opposite side is associated with the newly elected Popular Front referred to as the Republican Strength tokens and shows a +1 value. There will never be a token on the Front from each side as the placement of 1 Republican Strength token will cancel out and remove a Fascist Attack token and vice versa. As these tokens accumulate, the Strength of the Front will be increased or decreased dependent upon which type of tokens are placed.
The map of Spain also shows various towns and villages as well as the neighboring countries of Portugal, France and even the adjacent Mediterranean Sea and the few islands controlled by Spain. You may notice that Spain is divided up by into two different colors on the map. The red is associated with the areas loyal to the Republic while the tan is associated with those areas controlled by the Fascists. This has no bearing on the game play but is shown for historical context.
If a Front ever falls to -10, it suffers Defeat immediately. As soon as any Front falls to -10, the players suffer Defeat on that Front. The players will then cover the Front with a “Defeat on a Front” card. The defeated Front can never again be strengthened or recovered in any way. If the defeated Front is Madrid, or the second Front to be defeated, the game is over and all players have lost. There are immediate effects of Defeat on a Front which include the Morale Bonus being turned off and Collectivization, Soviet Support, and Foreign Aid will all be reduced by 1. For the rest of the game, any Fascist Attack on the defeated Front instead will Attack the remaining Front closest to Defeat, and any Tests on the defeated Front will automatically fail. The Front closest to Defeat is considered to be the one closest to -10. If there is a tie, it is broken by the player who holds Initiative.
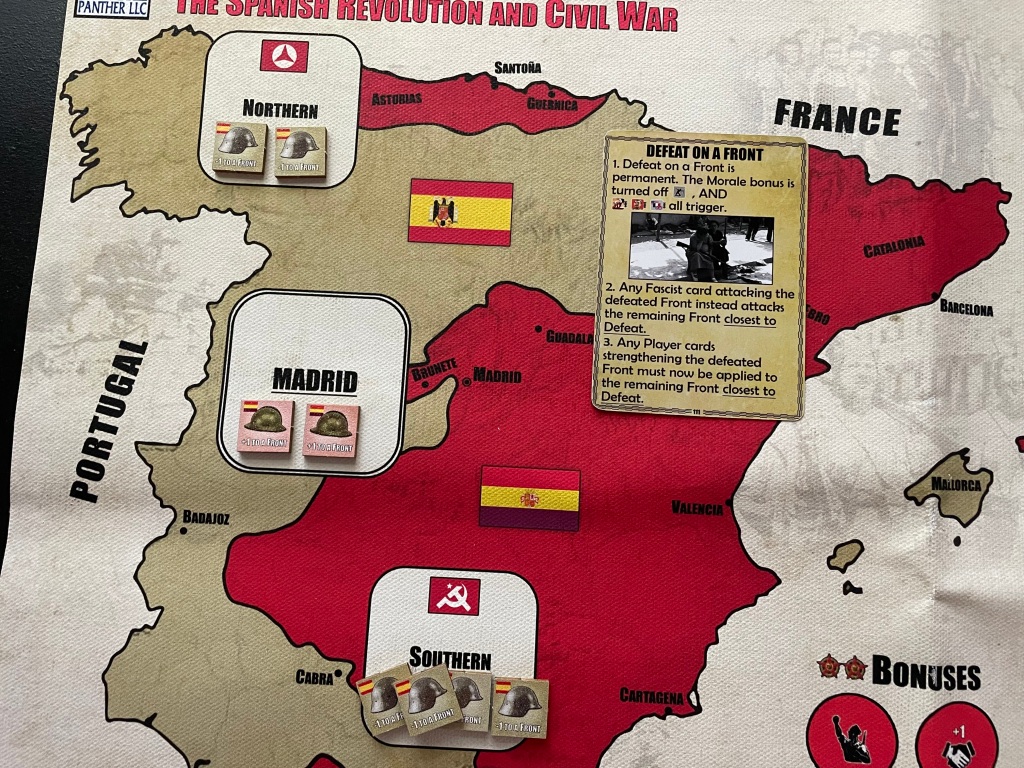
Likewise, if a Front ever rises to +10, it achieves Victory immediately. As soon as any Front reaches +10, the players achieve Victory on that Front. The players will cover the Front with a “Victory on a Front” card. The victorious Front can never again be Attacked or damaged in any way. For the rest of the game, any Fascist Attack on the victorious Front instead Attacks the Initiative player’s choice of Front, and any Tests on the victorious Front automatically pass. Any Player cards affecting the victorious Front can now be applied to the Front of the player’s choice. The Front closest to Victory is that closest to +10. If there is a tie, it is broken by the player who holds Initiative.
These are all things we will discuss in more detail later on in the series.
Tracks
The various Tracks are located in the upper right hand side of the board and track the progress of each of the players’ ideological progress in various key areas including Liberty, Collectivization, Government, Soviet Support and Foreign Aid. Each player owns two of these Tracks and derive specific benefits from reaching certain points on these Tracks called Triggers. You can tell whose Track each belongs to by their presence of that faction’s symbol on on the Track.

The Anarchists own the Liberty and Collectivization Tracks, the Communists own the Soviet Support Track and want to manipulate the Government Track as far as possible to the left to the lower values while the Moderates own the Foreign Aid Track and want to manipulate the Government Track to the right toward the higher values. There is a really interesting synergistic element though to these Tracks as each player has one of their Tracks that is directly dependent on the progress on their other Track. This means that they will not be able to move a certain Track higher until their other Track meets a certain identified threshold.
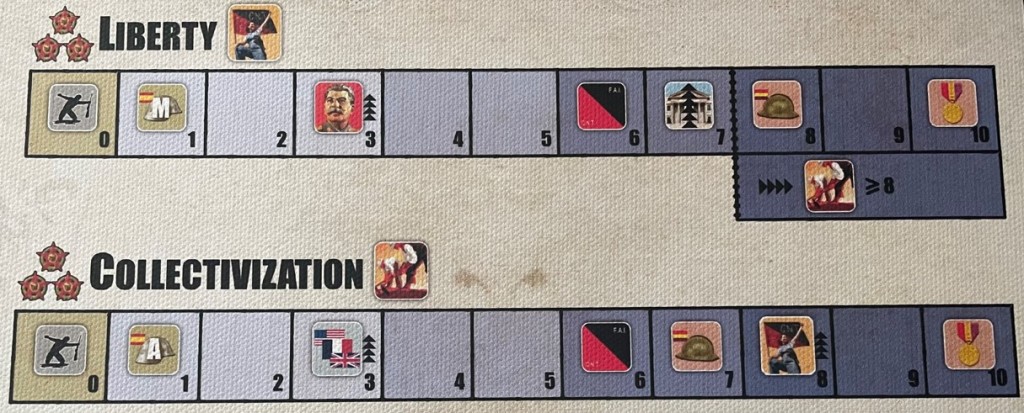
For the Anarchists, the Liberty and Collectivization Tracks are tied together as the Liberty Track cannot advance past 7 unless the Collectivization Track has reached at least 8. For the Communists, the Government and Soviet Support Tracks are linked as the Government Track cannot go below 3 until the Soviet Support Track has reached at least 8. For the Moderates, the Government and Foreign Aid Tracks are tied together as the Government Track cannot advance past 7 unless the Foreign Aid Track has reached at least 8. These thresholds are denoted on the different Tracks by a black line with intermittent dots and is also reinforced by a nice symbol of the track that sets the threshold with a > or < next to it as a reminder. It is important to remember though that if the value on the threshold track is every reduced by a card, the dependent track will remain at the current level but cannot advance further unless the threshold track is restored to the minimum value.
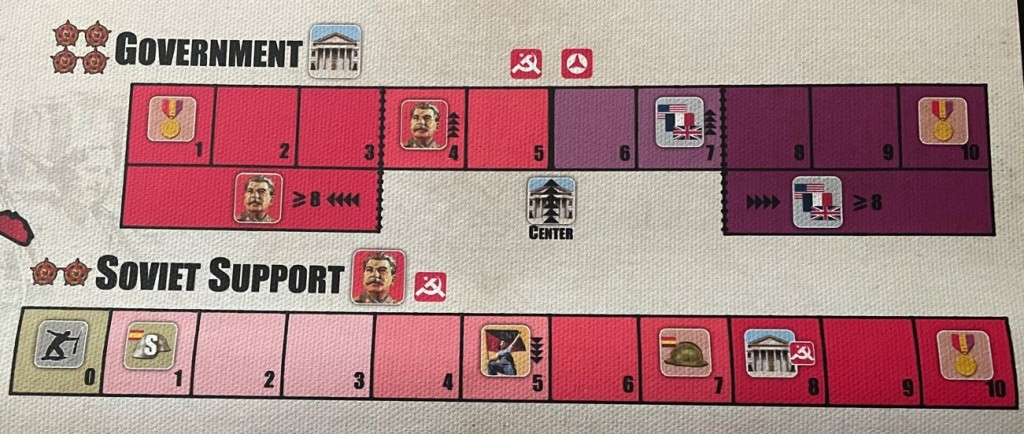
One final note about the Government Track. The Center of the Government Track is located between spaces 5 and 6. This Track decides which side has the Initiative each Turn until the Anarchist player reaches their thresholds for control of the Initiative. When the Government Track moves “towards Center,” it will move only one step along the track and if it passes across the Center line the control of the Government will switch from one player to the other. For example, if the Government is currently at 6 and a card or Trigger moves it “towards Center” it goes to 5 and will now give the Communists player control of the Government. When the Government moves “away from Center,” it will always move one step in the direction of the player that already controls the Government. This is clearly denoted on the board with a thick black line between spaces 5 and 6 with the Government icon below and the words center underneath.
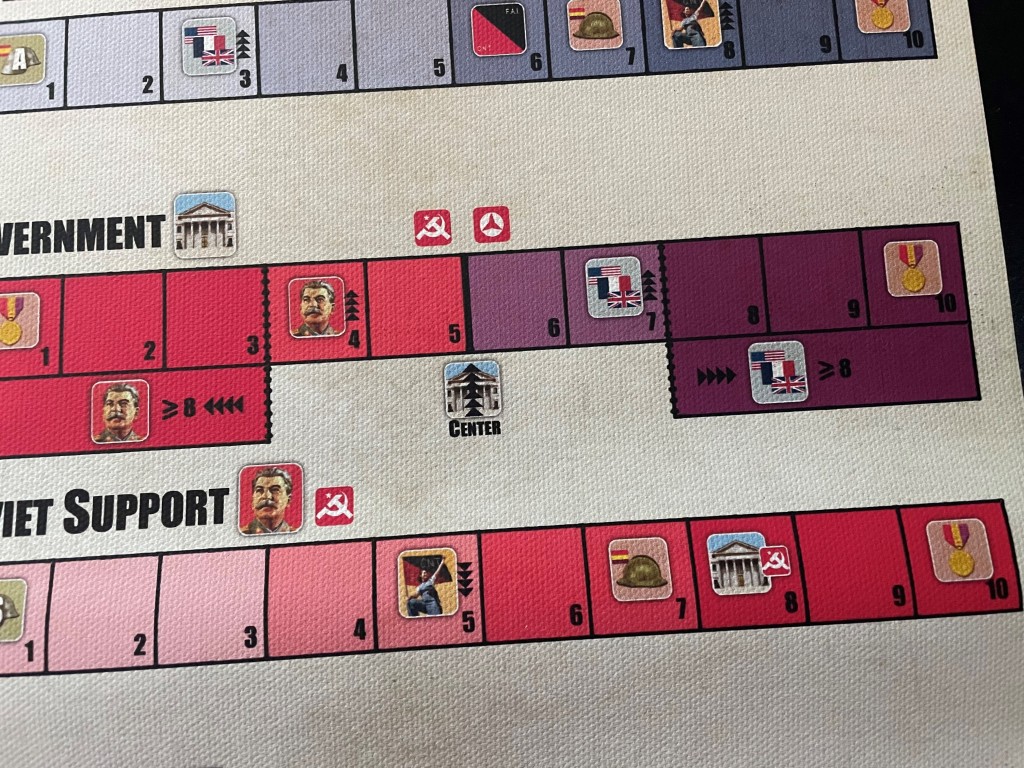
A few other important aspects of these Tracks are the Triggers found on the various Tracks which are denoted by symbols. If the player moves their standee on a Track and it lands on or passes one of these Triggers, they gain an immediate bonus. Once the Trigger is received, the players cover those spaces utilizing the Blank markers which are the red circle counters provided with the game. This means that the Trigger is extinguished and cannot be gained again in the future if the player falls below that level and advances on the Track again. These Triggers typically do things like add a +1 Strength marker to a Front or advance/decrease another Track. Found at the end of Tracks is the special Medallion symbol. Once the Track has reached this point, the player will get to claim one of the available Medallions that grants the player a one time bonus or a unique permanent upgrade or an additional way to utilize Hero Points.
Tracks range from a value of 0 to 10, and will move up and down as a result of Fascist Cards and player turns. A player can use their cards or spend Hero points to move any Track in either direction.
One word of warning about the Tracks. If players selfishly focus too much on their owned Tracks and ignore the Fronts, this is a recipe for disaster as the Fascists will win. While you have to focus on the Tracks slightly, if you never do anything with the Fronts, it will lose everyone the game. You have to play this smartly and should look for opportunities to play on your Tracks only when things are under control. And by things being under control, I mean the Fronts are clear or not near being defeated. But, as the game wears on, the Fascist Events will get tougher and tougher, placing out more Fascist Attack markers as well as having tougher tests for the players.
Glory Box
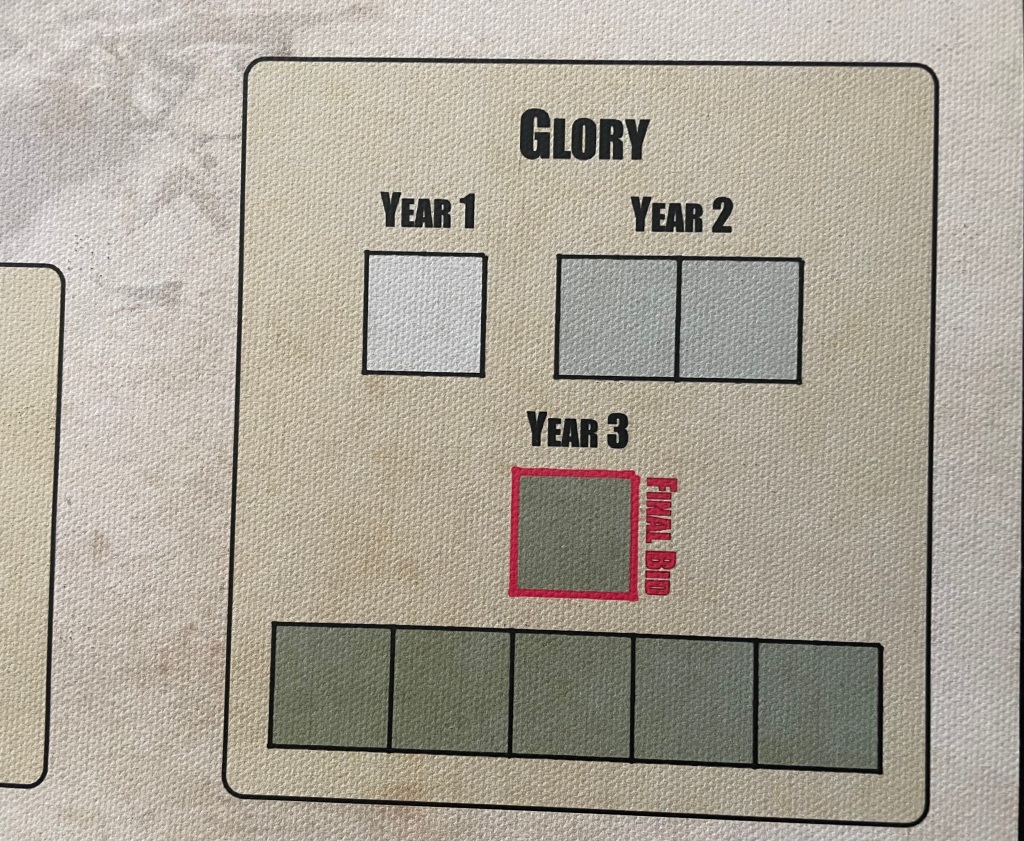
The Glory Box is basically the score track as it displays the current score of the game which is based on what faction symbols have been drawn out of the Glory Bag at the end of each Year. The Initiative player gets to add one of their tokens to the bag at the end of every turn, and again at the end of every Year (so the last turn of each Year counts double). The only other way to add a token to the bag is through the use of the Subterfuge Medallion, which we will discuss in a later post in the series. One token is drawn at the end of Year 1, two at the end of Year 2, and five at the end of Year 3. The player with the most Glory wins. If there is a tie, the Initiative player will break it (Initiative breaks all ties).
Once drawn out of the Glory Bag, the tokens are placed in the Glory Box and show players the current score. This is one of the more interesting parts of the design and really encourages teamwork (or discourages selfish play) as players can and should change the way they play based on the Glory Box and its current score as well as the makeup of the Glory Bag. Beware to the coalition that sees one player get out in front. This will change how the game is played.
Current Year Deck and Current Events Track
The Current Year Deck is how the turns are measured. Each year will have 4 cards drawn from the deck and placed in the next open space of the Current Events Track. The Fascist Event Card drawn will add a certain number of Attacks to the Fronts. The Events found in Year 2 of the Current Year Deck are more difficult and will add more Attacks than those in Year 1, and Year 3 Events are even more difficult. The challenge definitely grows as the game progresses and a fragile alliance between the 3 factions will end in a premature loss. Fascist Events impose other immediate negative effects as well, such as reducing specific Tracks or turning off Bonuses.

Bonuses
Located in the middle of the board is the Bonuses area. This is where both the Morale and Teamwork Bonuses are tracked. There are 2 circular spaces here with images in the middle. The circle on the left is the Morale Bonus and the one on the right is the Teamwork Bonus. These areas are effected by Fascist cards in a negative way, by “turning off” or disabling a specific bonus, or by the player cards that “turn on” or enable the bonuses. The players can also spend Hero Points to “turn on” a bonus.
These bonuses are used by the player when they are placing Republican Strength markers onto Fronts to remove additional Fascist Attack markers (Teamwork Bonus) or to get additional activations of their icons found on cards that have been played to the player’s Tableau (Morale Bonus). Keeping these Bonuses on is very important for the players and they will find their mission that much easier when they do have them.
I hope that you have enjoyed this quick look at the Game Board used in Land and Freedom. The board is very crowded with tracks and boxes and can be a bit intimidating upon first glance. But, once you are familiar with the game and its mechanics, the board layout is very functional and helpful to efficiently and effectively playing the game.
If you are interested, we posted an interview with the designer Alex Knight and you can read that at the following link: https://theplayersaid.com/2023/02/06/interview-with-alex-knight-designer-of-land-and-freedom-the-spanish-revolution-and-civil-war-from-blue-panther-llc/
Also, the game can be ordered for $65.00 from the Blue Panther LLC website at the following link: https://www.bluepantherllc.com/products/land-and-freedom
In Action Point 2, we will examine the anatomy of the cards in the game and discuss the use of their Action Points and Events.
-Grant

I don’t think of it as semi-cooperative; to me it is more frenemy.
LikeLiked by 1 person
I think that we are saying the same thing.
LikeLike