Not every game has to be a deep and complex simulation of a subject. Sometimes, the subject is less gamed and one of the best benefits of the design is simply bringing light to the conflict as well as a better understanding of the issues that caused it to start in the first place. I have said it many times but complexity doesn’t create a good gaming experience. Theme does and the most recent game from White Dog Games called Irish Freedom does this in spades.
The mechanics used as the basis for this solitaire only game is that of the random die roll. This random die roll is used to control the protagonists in the game in the form of the British during the War of Independence and then the Republicans and Pro-Treaty forces made up of the British and their allies in the Free State Forces during the subsequent Civil War. Nearly every thing that the solitaire AI does seems random. But the randomness is only in the die rolling as the actions that typically come out of it reinforce the actions that would have most likely been taken at the time.
The British/Free State Forces AI

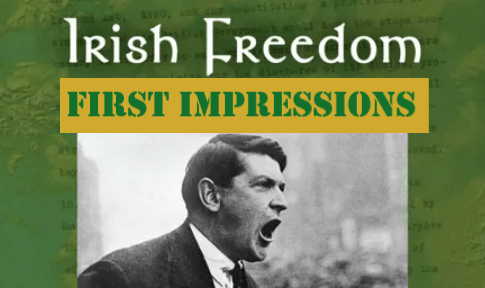
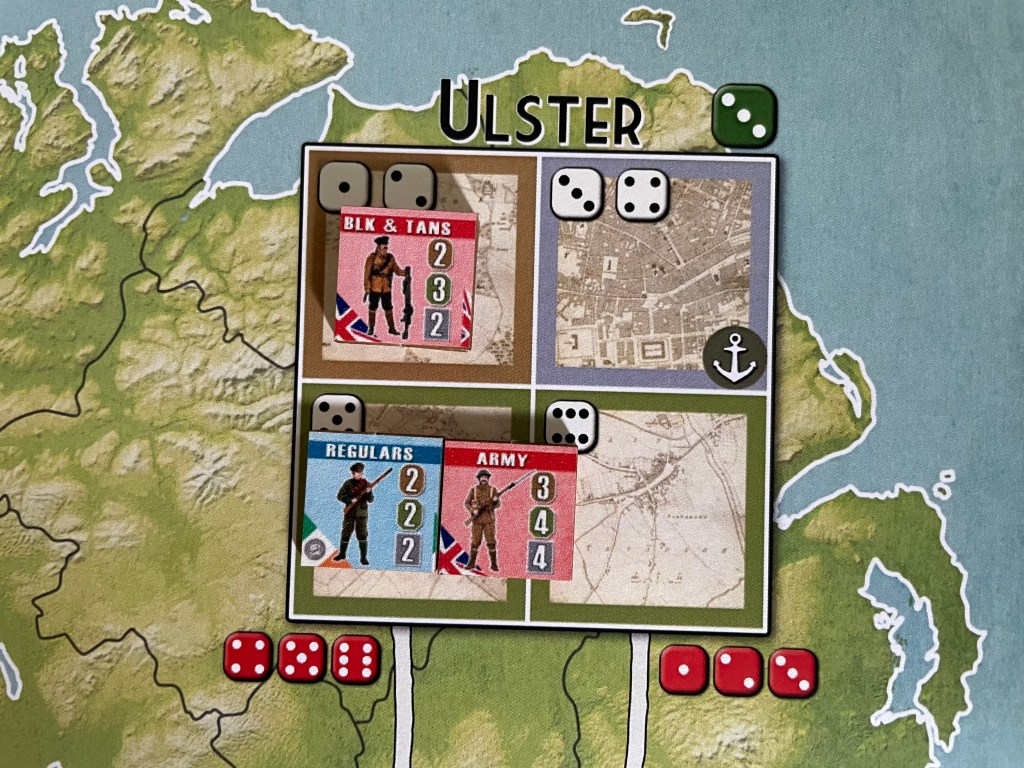
Roll a die. You will read this a lot in the rules. You will do this over and over, not only to determine a random Region that the AI will act in, but also in what Area within that Region. As you look at the map shown to the right, you will notice die symbols all over the map in varying colors including green, white and red. The green die symbol is used to determine a random Region that the AI will act in. The white die symbol helps you to identify what area within the chosen Region movement and an attack or a retreat might take place and the red die symbol is used when the British/Free State Forces AI cannot find a target in the Region they occupy and they are trying to move to an adjacent Region along a road, shown by the white lines.
The AI gets to act twice in their part of the Sequence of Play, the first is to recruit or upgrade their units on the map. A die is rolled and you will place new units or upgrade existing units (like the Royal Irish Constabulary (RIC) units into Black & Tans, place a new Guerilla or place a new Mob). Then another die is rolled and you will move the most powerful unit in that Region to attack the weakest enemy unit. Very simple.
If the AI cannot find a target in the Region that was rolled, they will roll another die to determine to which adjacent Region they will move via the roads and then will land on the weakest enemy unit. This might seem really random to the untrained eye who has not played the game yet. The core concept of the game is that of an insurgency. An insurgency of weaker, less well equipped and organized para-military units in fighting off a very powerful and well trained force. I will talk about this in a later section but the Terrain in the Regions is very important and determines the Combat Factor of each unit when a battle occurs in it. The Bogland (light brown) is the home of the Irish Guerillas and their better trained Flying Columns. They are at home in the Bogland and consequently fight better there than in any of the other Terrain. The British Army units and their compatriot Black & Tans fight better in City (gray) or Townland (green) Terrain.
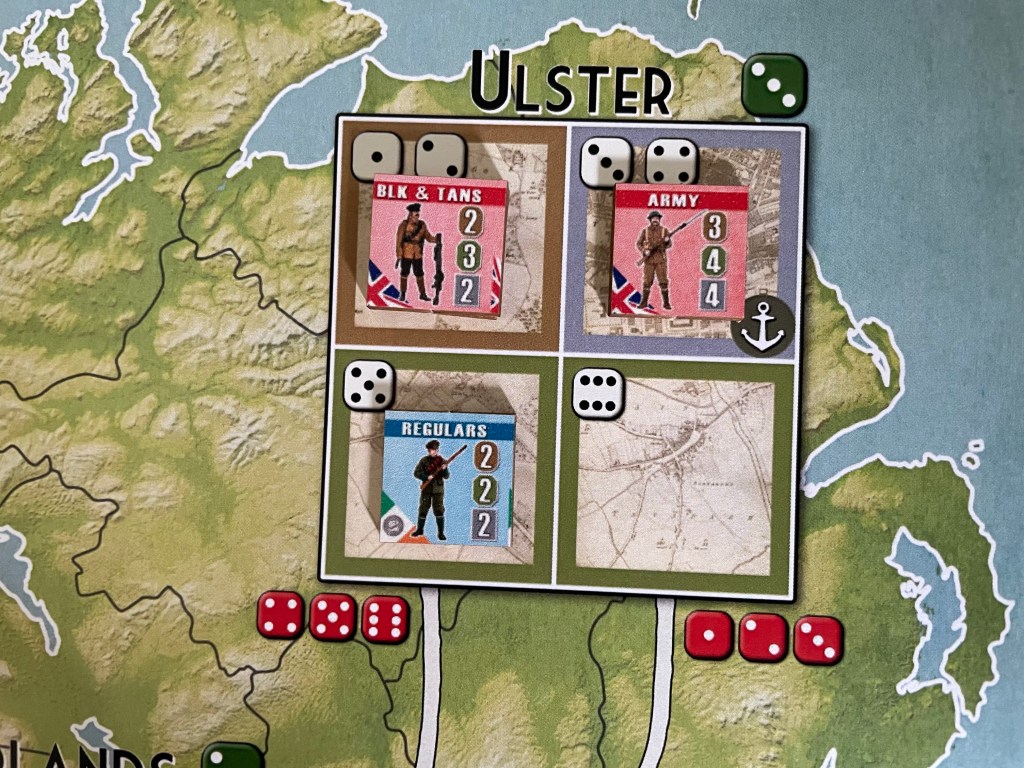
But, an insurgency is about hiding in the shadows and attacking when you have the advantage so very rarely will the Irish march into a City and take on the British on their home turf. You want to stay in the hinterlands and take advantage of the Bogland and await the British to move into you. This is what the AI is doing. Hunting down the insurgents. Marching out from their places of safety to take on the weaker units head on. The AI understands that the Irish will not come out in force, not very often anyway, and they must initiate the action. And that is the genius behind this design. Dave Kershaw has done a masterful job in turning something as random as multiple die rolls into something that has meaning and really helps to form and tell the story of the War of Independence and the Civil War.
I also really like how the AI upgrades its units. It is trying to build a more effective fighting force and will prioritize changing out RIC units with better Black & Tan units. But, when all else fails and the same Region is rolled and no RIC units are found, because they have either been eliminated by the Irish or already upgraded, it will go about placing a Mob. So it either upgrades their units or incites the local populace into action. Genius! This is how these counter insurgencies work. The more powerful government invests in more troops and more weapons or they use propaganda to create resistance and outrage toward the insurgents. Both tactics bear fruit as they directly fight and eliminate the insurgents or erode their base of support and limit their recruiting base.
And the AI in this game does these things very well….even though it seems completely random on the surface. It is not random, but good, thematic and purposeful design intended to tell the story of this struggle. Who would have thought a random die roll could be so meaningful?
Terrain is Key
I have mentioned this point earlier, but it deserves a bit more in-depth look. The Terrain in the Regions is very important and is more than just about a name that differentiates them from each other. The Terrain actually is the determining element of a unit’s combat effectiveness. You might be confused by this and say that a unit’s combat effectiveness is determined by their training, makeup and weaponry. And you would actually be right, when all things are equal. And the terrain in Ireland is not equal and the insurgents know this and will use that terrain to their advantage. The Combat Factor of each unit is determined by the Terrain they are fighting in. There are just 3 different Terrain types in the game, including City, Townland and Bogland. The Bogland (light brown) is the home of the Irish Guerillas and their better trained Flying Columns. They are at home in the Bogland and consequently fight better there than in any of the other Terrain. Why? Because they will use that terrain to setup ambushes, and sneak attacks and also use it to melt away once a battle is over. These are the details that the game incorporates into it’s design even though it has a lot of random die rolling. The British Army units and their compatriot Black & Tans fight better in City (gray) or Townland (green) Terrain.
As you look at each of the unit counters included in the game, you will see three values listed along the right side of the silhouette. These are the unit’s Strength and is used during combat. The top value, in light brown, coincides with the Bogland. The middle value, in green, is the Townland and the bottom value, in gray, is the City value. These Strength values are very important when discussing combat and you have to understand your relative advantage in order to do well in the game. I have included the picture below with the units in somewhat of a hierarchy with the most powerful units at the top and the weaker units at the bottom. The most powerful unit in the game is the British Army unit. They have superior combat Strengths of 4 in the Townland and City and only marginally less at 3 in the Bogland. Compare that to the most powerful units for the Irish and you will see that the Flying Columns have a respectable 3 in the Bogland but just a 2 in Townland and a very weak 1 in the City. An Irish Regular has a 2 in the Bogland, Townland and City so they are the most versatile of the Irish units and can be used in any of the Terrains. Mobs are really just cannon fodder as they have a 1 Strength value in all 3 of the Terrains. I also want to point out the Artillery and Armored Car units shown at the bottom of the picture. They are not stand alone units but can be appended to another unit to move along with them as they go from Area to Area and will improve the unit Strength values.

As you can see, the Irish units are outclassed and cannot really win this game by focusing on moving out in force to take on the British in their home Terrains. They have to be wily about how they attack and one of the best ways to do that is to gather together Irish units in Regions by moving them into the same Area. When a group of units is attacked in an Area, they will add all of their Strength values together to come up with one total Combat Strength that is used as a comparison to the British (more on this in the next section).
Combat is Quick
The Combat Procedure is really very simple and uses a relative number determined by the difference in the Attacker’s Strength and the Defender’s Strength. This number can be negative and acts as a Die Roll Modifier (DRM) for the procedure to determine the outcome. After this calculation is complete, a D6 is rolled and modified by the DRM to come up with a value that is checked on the below picture Combat Results graphic. As you can see, a low result is never good for the attacker and a high result is never good for the defender.
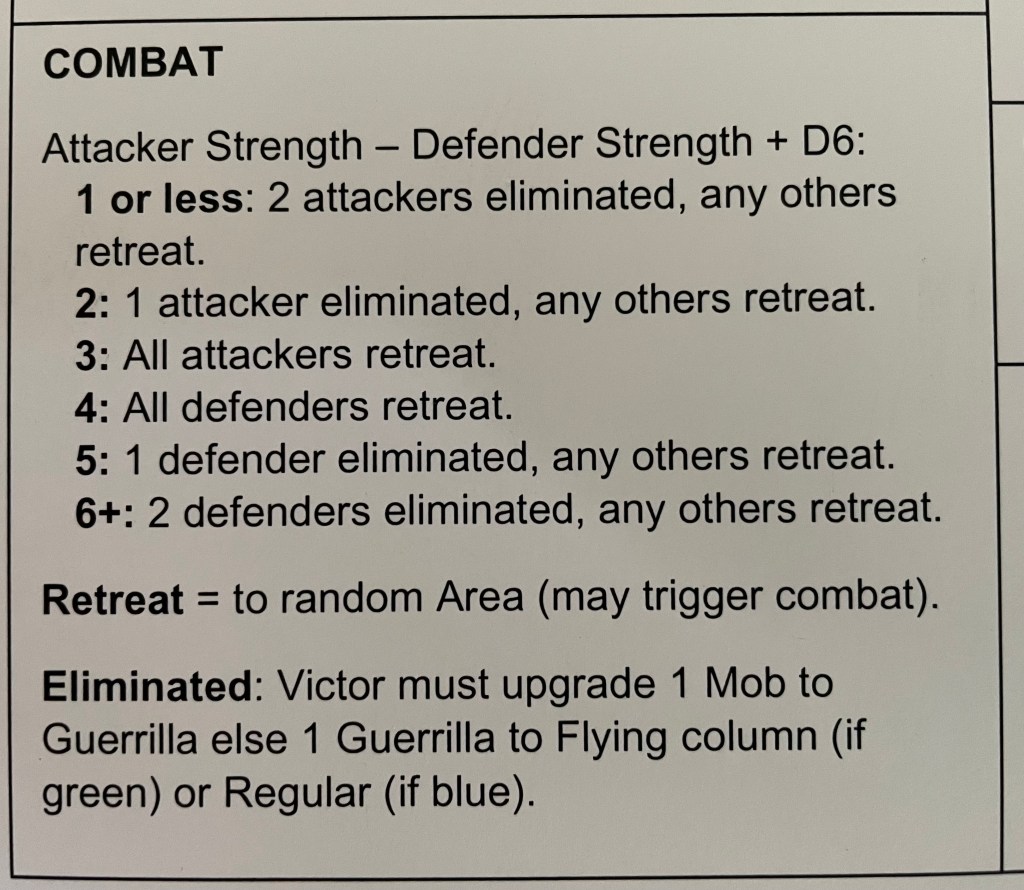
On a result of 3 or 4, one of the sides will be forced to retreat all of their units that participated in the combat. The retreat direction is determined by another die roll (see a pattern here) and can result in another combat if the retreating units move into an Area that is occupied by enemy units. I actually really like the retreat rules as it sets up an opportunity for a combat redo in some ways and can lead to a decisive result that was missed by a poor roll. This also reinforces the insurgency concept as the retreating forces are pushed into other units either awaiting them or come upon them by accident after a battle. I just really like the theme this interjects into the game with only a die roll.
One final important note is that the victor has the opportunity to upgrade one of their victorious units in the Area where the combat occurred. A Mob can be upgraded to a Guerilla or a Guerilla can be improved to a Flying Column or Regular depending on the color of the unit. This upgrading can be seen as being due to several reasons. From the combat experience gained, increasing the units strategy and tactics. Or simply due to the fact that they loot the defeated units of their weapons and equipment turning them into a more competent and capable military unit. I like to think of the former with the upgrading of Guerilla units to Flying Columns or Regulars and the latter to the Mobs finally picking up some equipment and weapons and replacing their bricks and broken beer bottles. A simple combat procedure that has some interesting twists and results and once again fits into the thematic background of the War of Independence or Civil War.
Player Decisions are Tight and Limited
This is the question that many people always have about a solitaire game. How were the decisions? Were they meaningful? I would answer both of these questions in the same way. Yes! In each of the two scenarios, the player has limited actions and limiting your available actions make each of them important. In the War of Independence scenario, the player will have just 2 actions while in the Civil War scenario there are 3 actions. These actions are limited to either recruit a unit or move a unit (and you cannot move a stack of units but just 1 unit!) so you have to understand what you are trying to do, which requires a little thought and planning, but also need to understand you can’t waste them as you just don’t get that many opportunities.
The other thing about the decisions you are making is the pushing your luck element. In order to do well at the game, you have to win each of the 10-turn scenarios pretty quickly. Usually, winning by Turn 4 gives you highest VP and it goes down slightly from their. In order to do better than historically, you really have to win one of the two scenarios by Turn 4 and then the other by Turn 6. This would equate to 7 VP and give you a good victory! This really puts you up against the wall and you can feel the tension of having to do well, especially early, to get towards your goal. And because there is a lot of dice rolling, you can never really guarantee victory so it keeps you on your toes.
I don’t want you to misunderstand. The decisions are key and you are limited on how many you have but this game is not a mind melting, finger nail chewing, sweat-a-thon where you are agonizing over every single turn. The game is pretty clear but you have to do things well. Sometimes that includes some luck with the dice, particularly when you are overmatched and outclassed in combat, but also in how the AI rolls. You have to react though and make the proper decisions to win this one.
Event Cards Teach the History
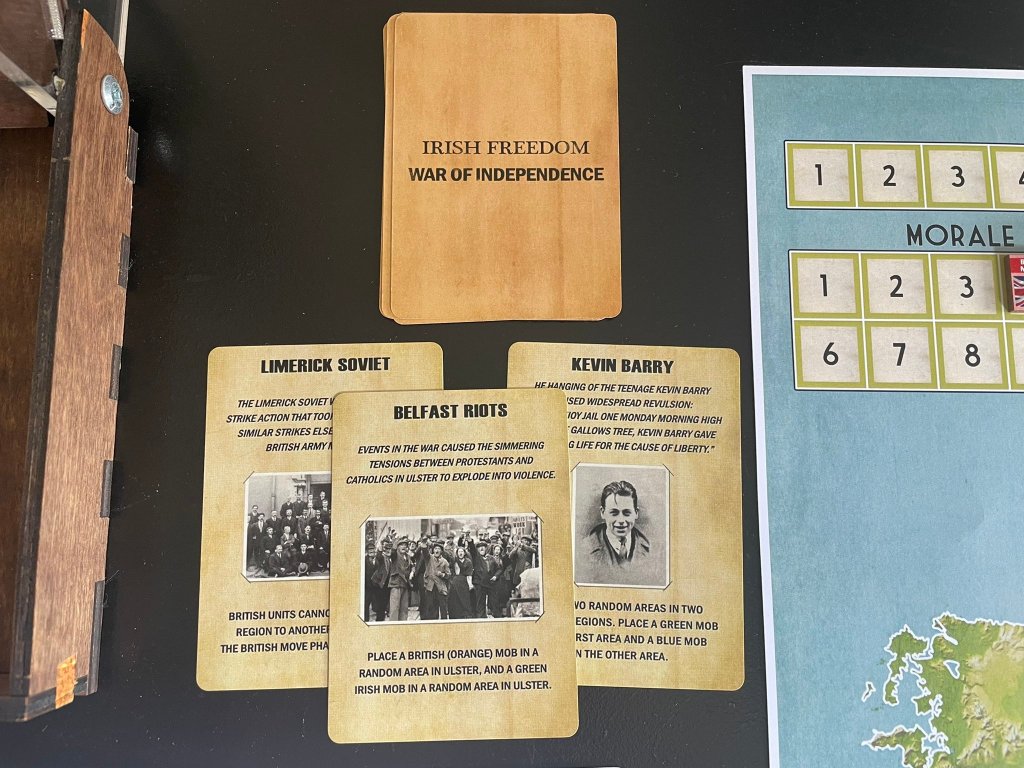
The game comes with 18 total cards, 9 of which are for the War of Independence and 9 for the Civil War. These cards act as Event Cards and are a concerted effort by the designer to include bits and pieces of the history into the player’s mind while adding in some flavor, chaos and a bit of uncertainty. They are pretty standard cards. They bring on enemy reinforcements when you weren’t expecting them. Sometimes they remove enemy units from the board and sometimes it is your units that get removed. The important thing about the cards though is that you draw one before you do the victory check. So, the actions on the cards can change things significantly and turn a victory into the need to go another turn. Or the cards can improve your situation before this victory check. That is another part of the design that is interesting and causes some angst.
But the greatest part of the cards is the history that you learn from their play. As you can see from the cards pictured below, you will learn about characters such as Kevin Barry who was an 18 year old Irish Republican Army soldier who was executed by the British Government. He was sentenced to death for his part in an attack upon a British Army supply lorry which resulted in the deaths of three British soldiers. This execution inflamed nationalist public opinion in Ireland, largely because of his age. Or the Belfast Riots in mid-1920, when on Bloody Sunday in Dublin, fourteen British intelligence operatives were assassinated; then the RIC fired on the crowd at a Gaelic football match, killing fourteen civilians and wounding sixty-five. A week later, the IRA killed seventeen Auxiliaries in the Kilmichael Ambush in County Cork escalation the war at the time. This gritty and dark history is told well through the play of these Event Cards and I always appreciate the work and time that goes into telling these histories.
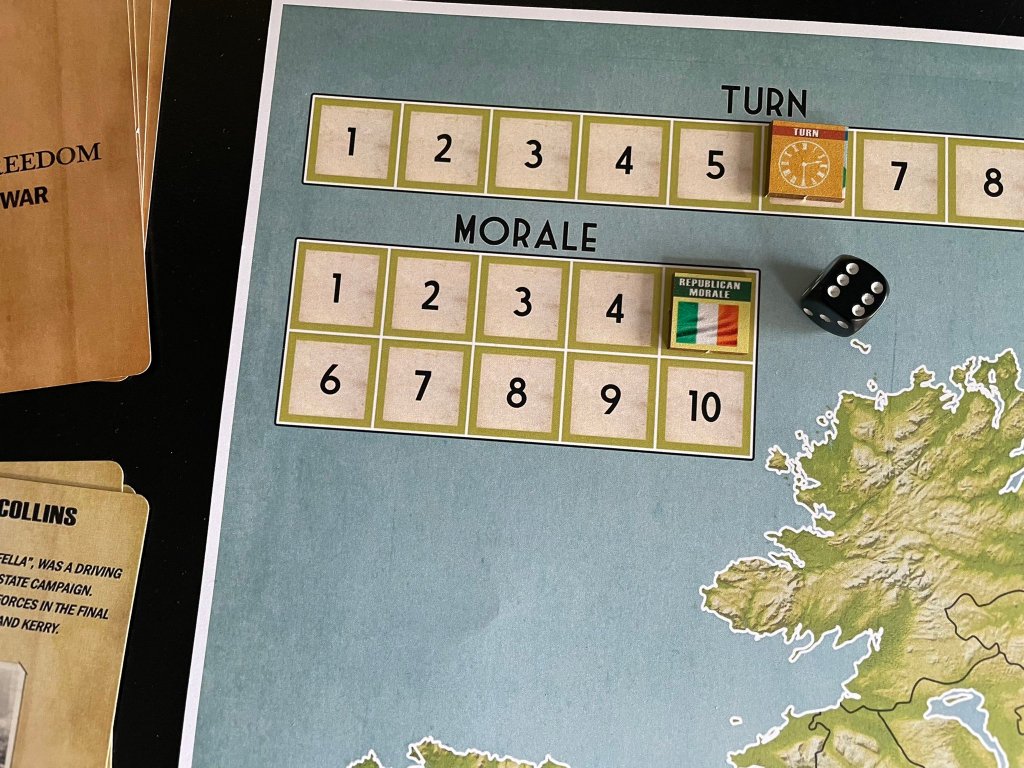
Morale is the Key
The game is won or lost through the standing of the Morale of either the British during the War of Independence or the British and Pro-Treaty Irish in the Civil War. There is a track with 10 spaces that represent this morale. It is raised and lowered based upon whether there are regions cleared of the British units, whether Cities are occupied by Irish units or by how many British units have been eliminated. The key is not getting the Morale to zero but in getting it below 6 where at the victory check each round, the player can roll a D6 and if they roll over the current Morale the Treaty is forced and the conflict is over. This is much harder than it sounds though as you have to work really hard to clear Regions and occupy Cities and then have to make sure you keep them clear before Mobs or other British units pop up in the region to attempt to wrest back control. I found that I went about trying to pick off RIC units before they could upgrade to more difficult to defeat Black & Tan units but this can only be relied on for a few points as you really have to work hard to get the Regions clear.
I really like this Morale roll, which is determined by the luck of the die, but you have to work so hard to get it where you need it that it doesn’t feel cheap. It actually feels like an enduring struggle between opposing viewpoints during an occupation. And with the emphasis on die rolling, winning in this way seems to fit right into the design.
Final Verdict
I hope that you have enjoyed this look at this very interesting yet simple introductory wargame covering the Irish War of Independence and Irish Civil War. The game is simple, for sure, but it has clear rules and easy to understand processes that control the AI, but that doesn’t mean it is simplistic. I really liked this one. I have experience with other Dave Kershaw designs, including Solitaire Caesar and World War Zed: USA both published by White Dog Games, and to me his games share some DNA and feel similar yet different all at the same time. I like that the player has to consider how they will attack the overwhelming power of the British. I also like that the decisions are limited but impactful because you only have a few options and a few actions each turn you have to make them matter. I enjoy having to anticipate, plan and prepare for the inevitable British units moving around in the Region. But I really like the thematic touches in this one, without any special rules or exceptions. The design is just very grounded in the history and makes perfect sense as you play through. This is a solid and interesting game that will appeal to new wargamers, or seasoned Grognards, but also those who have an interest in the history of Ireland.
-Grant

Why would the British Army in “Ulster” be attacking Irish Army units during the Civil War?
LikeLike
Probably should of said Free State forces against the Republican enemy in the Irish Civil War. My mistake.
LikeLike
Thank youi. Very interesting
LikeLiked by 1 person
Thanks for this interesting review.
I share your enthusiasm for David Kershaw’s designs. Still, I wonder if referring to the game system as having an AI might be overstating what he’s up to here. There seems to be more than the usual amount of randomness in this game, such that the active player is actually reacting to what are essentially dice rolls, to see what opportunities appear and consequences produce. In order to make the conflict more easily playable—an admirable objective to be sure—the designer may have actually made it unpredictable, because the player’s decisions are overwhelmingly governed by dice results. That produces interesting game play perhaps, but it doesn’t leave the player with much to do except make moves and hope the dice go his way. An insurgency strategy that might work in one instance won’t in another, simply due to the dice.
In fact, is there any real sense of any actual AI functioning? It appears that the AI is fundamentally what the dice say it is, and those are unattached to any actual strategy or approach by the political authorities. Luck, randomness—these appear to me at least to pretty much overwhelm what the player is trying to do. I suppose my take is that an AI driven by dice—that is, a random AI—isn’t really an AI.
Please do correct me if I’m misreading your comments. Again, this sort of detailed review is most welcome, and I’m sure others appreciate it as well. Thank you.
LikeLike