
In 2017, we played and really enjoyed Supply Lines of the American Revolution: The Northern Theater, 1775-1777 from Hollandspiele and were impressed with the way the game modeled the importance of supply and logistics during the first three years of the American Revolutionary War. Recently we finally had an opportunity to play the follow-up game in the series called, you guessed it, Supply Lines of the American Revolution: The Southern Strategy which shifts the scene of the fighting to the Southern colonies of Virginia, Georgia, and North and South Carolina. This edition of the system has a very different feel and emphasis than its predecessor. In the Southern Theater, both combatants have much smaller armies with fewer resources. Maneuver is more central to each player this time around and there are new Siege and Naval Battle rules that provide new opportunities for attack. The big change though is the addition of Partisans who don’t directly fight against the opposition but provide support in the background with holding spaces to extend supply lines, running raids to disrupt enemy supply and supplementing the armies in the theater with new recruits.
In this series of Action Points, we will cover the Mapsheet looking at the differences between the various spaces including Cities, Forts and Points while also covering the various Sea Zones and Partisan Boxes and how they function in the game, take a look at the different Units including Leaders, Soldiers, Navies and Partisans, examine the different type of Supplies and how they are generated, moved along continuous supply lines and how they are Expended to activate armies and do battle, examine the fight for the control of the hearts and minds of the local populace through the actions of Partisan Militia and Loyalists, take a look at a few examples of Land Battles, Sieges and Sea Battle and how they are resolved, and then discuss each sides path to victory and how that is effected by the Political Will Track.
Mapsheet
The Mapsheet covers the four southern colonies of Virginia, Georgia, North Carolina and South Carolina. Found in these colonies are a collection of various Areas that include Cities, Forts and Points that are all connected via Movement Lines. Along these Movement Lines, each side will attempt to setup a continuous line of their own Units to create a Supply Line which will allow for the free movement of supplies of war, including both Food Supply represented by green wooden cubes and War Supply represented by tan wooden cubes. Let’s take a closer look at these spaces and their differences.
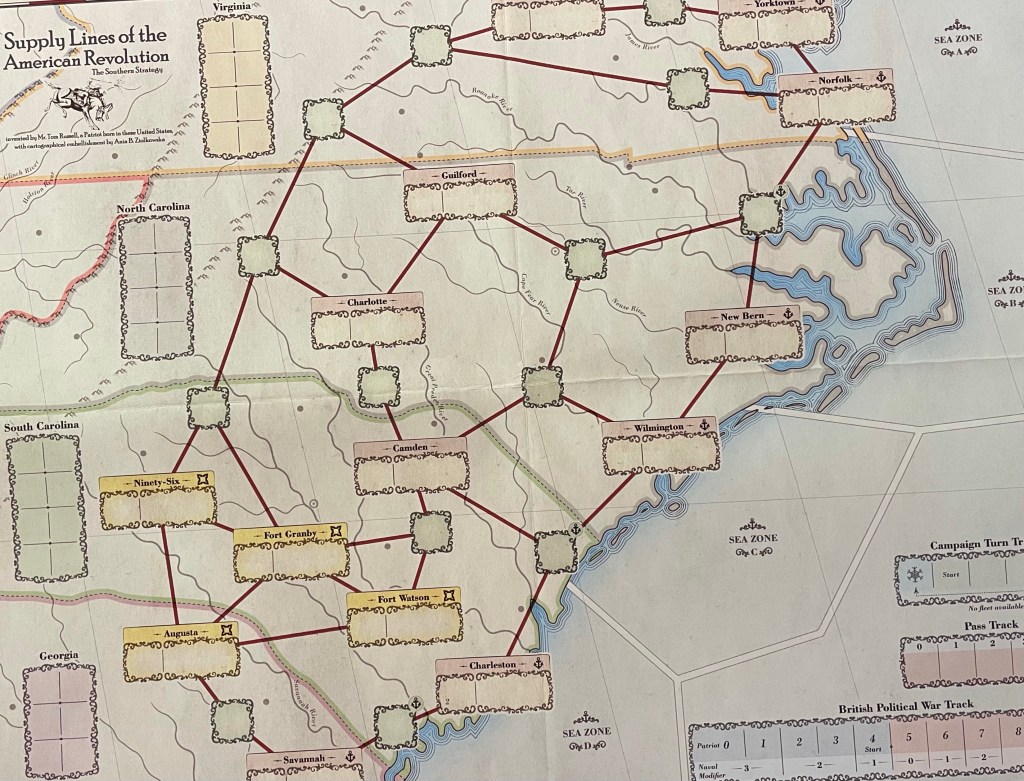
Cities
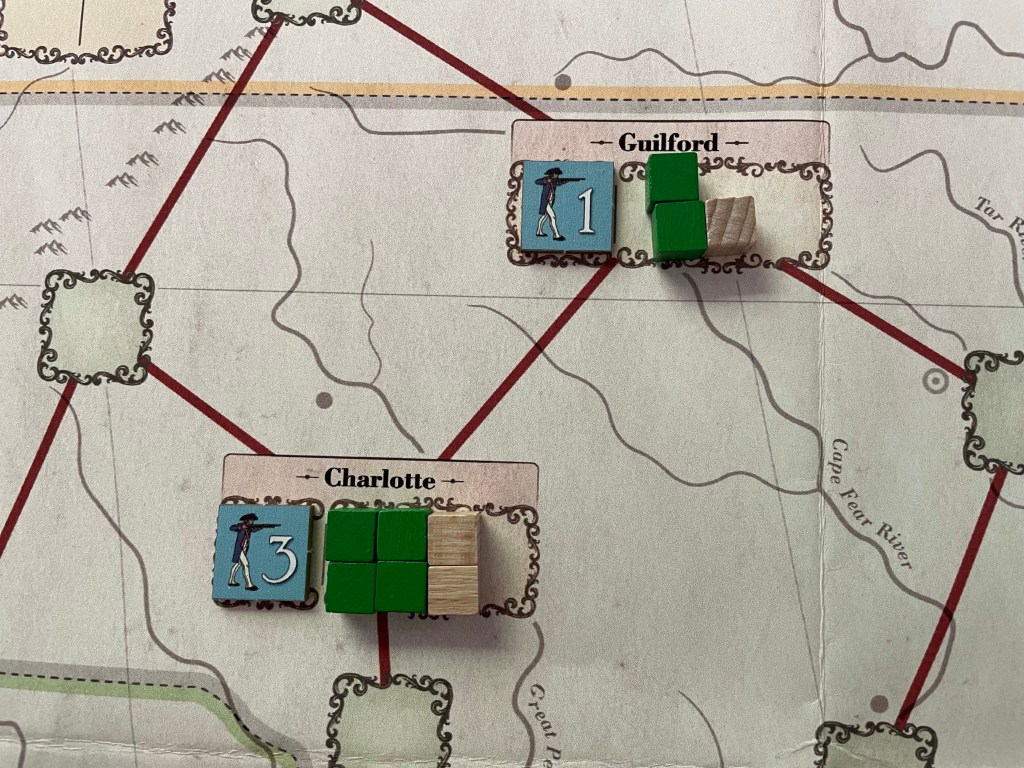
Cities are Areas that will generate Supplies when occupied by either side. The City Boxes are colored pink on the map. A City Box is divided into two halves. On the left is the Unit Box where players will place Units that occupy the Area and on the right, which is the longer portion of the Area, is the Supply Box where Supplies are stored until used or moved from the City. The Unit Box doesn’t have a limit to the number of Units it can hold while the Supply Box is limited to eight Supplies in total.
Cities do provide a Defensive Bonus to Units that occupy them as the Attacker will earn just one Battle Die for every two War Supplies (tan cubes) that are expended as compared to when attacking a Point the Attacker gains one Battle Die per War Supply used.
Cities that contain an anchor symbol in the upper right hand corner are considered to be Port Cities and that means that Naval Movement can land Units in that City via a Sea Zone.

Forts
Forts are areas that can hold both Supplies and Units but doesn’t generate Supplies like a City. Fort Boxes are colored Yellow and have a fort symbol in the upper right hand corner of the box. Similar to City Boxes, each Fort Box has two halves. On the left is the Unit Box where players will place Units that occupy the Area and on the right, which is the longer portion of the Area, is the Supply Box where Supplies are stored until used or moved from the Fort. Each of the Forts will begin with one War Supply placed in the Supply Box. Each of the Supply Boxes in Forts can hold up to eight Supplies.

There are four such Forts on the map and they are identified by the names of historical forts at the time of the American Revolutionary War. These names include Ninety-Six, Fort Granby and Fort Watson in South Carolina and Augusta in Georgia. Similar to Cities, Forts offer the same Defensive Bonus as described above.
Points
Points are spaces between Forts and Cities along Movement Lines and represent unsettled areas such as wilderness and farmland. These spaces don’t generate nor hold Supplies but Units located in them can carry Supplies. These Points are the only Areas that can be targeted by the Patriot Skirmish Attack.

Some of the Points on the mapsheet have anchor symbols and count the same as Port Cities when moving Supplies and Units via Sea Zones. These type of Points can really cause some trouble for your supply lines and must be guarded against as a well timed British Naval landing can steal your Supplies and cut your supply lines to the point where you will be unable to gain control back.

Movement Lines
Movement Lines are the thick black lines that connect the various Areas together and result in two Areas being adjacent for purposes of moving men and Supplies. These Movement Lines must be strictly followed when moving Units and Supplies and cannot be ignored.
Partisan Boxes
Each Colony has a specific Partisan Box where Militia and Loyalist forces will enter play. These Partisan forces are referred to as Irregular Forces and can be used or expended to take certain Actions that benefit or hinder each side. They represent the struggle over the hearts and minds of the average colonist and their torn loyalty to their mother country and their new country. The Patriots have Militia that can be used to support and grow local armies or raid supply lines and take out control of key Points. The British have their Loyalists who can hold onto key Points to make a contiguous line for the movement of Supplies and also can forage for key supplies if needed. Each box in the individual colonies have the same amount of spaces with eight and it will take time to build the forces up there to benefit the players. We will cover these Irregular Units in greater detail in a later post.

Sea Zones
Located along the east coast of the colonies are Sea Zones. There are four different Sea Zones labeled A, B, C and D. These Sea Zones contain just two Units, both the Crown Navy Unit and the French Navy Unit which is friendly to the Patriot cause. Only the British can transport Supplies and Units via a Sea Zone from one Port City to another. But if the French Navy Unit is in a Sea Zone it effectively blocks the Crown Navy from transporting Units or Supplies. There can also be battles at sea and this is key for the Patriots as the threat of Naval Transport of Units is very high and keeps them on their toes as they must defend Ports up and down the coast.

Campaign Turn Track, Pass Track and British Political Will Track
The mapsheet also contains several Tracks that allow the players to track key information. These include the Campaign Turn Track, Pass Track and British Political Will Track. Here we will discuss this in a bit more detail.
Campaign Turn Track
The game progresses over a structured turn sequence that includes a series of Campaign Turns that each roughly represent a period of three months. There is no set amount of turns but the game will come to an end as soon as the Crown either reaches their objective of controlling ten Cities or Forts or if the Patriots capture the main Crown Leader in Lord Charles Cornwallis or if the British Political Will Track reaches the zero space during any Victory Check. The Campaign Turn Track has five different spaces and two of these five are Winter Turns, which simply means that each side’s Fleets leave the board and travel to the calmer waters of the Caribbean to protect assets there and avoid strong winter storms. At the end of each five space turn, the British Political Will Track will degrade one space toward zero.

The Pass Track
Each turn players will roll for Initiative and the highest die result will be where the Pass Marker will be placed on the Pass Track. This Pass Track just keeps track of the times that each player passes during their Impulses and when it reaches 0 then the Campaign Turn will be complete. This pass ability can be very important and can be used strategically to gauge what your opponents intentions are for the turn to allow you to react appropriately.
British Political Will Track
This tracks the support for the continuing war in the colonies back home in England as the war drags on and the expenses begin to pile up for the British. The track marker is moved when a battle is won by the Patriots as Attacker or when the Patriots are defending and have a Leader present and lose the battle then the marker moves in the favor of the British. You will also notice that there is a Naval Modifier listed under each space. During a Naval Battle, if the marker is located on a red space then the British will add the modifier to their attack total and the Patriots will reduce the modifier from their total and when the marker is on a blue space the Patriots will add the modifier to their attack total and the British will reduce the modifier from their total. Once the marker reaches the 9 space the British automatically win and if the marker reaches the 0 space the Patriots win.
The final comment I have about the map is that this layout and graphic work is very functional but there are little bits of detail work that make a big difference. From the crisscrossing of the major rivers, streams and waterways shown on the map, to the various mountain ranges shown, there is some great detail work that adds to the theme and feeling of the period and location. You will never mistake this for a work of art but it shows that the artist, who is Ania B. Ziolkowska, took some time to get these details correct.
In Action Point 2, we will take a look at the different Units including Leaders, Soldiers, Navies and Partisans and how they are used in the game.
-Grant

I don’t have Southern Strategy, but your article reminded me that I purchased a digital copy of the first volume a month or so ago. I need to get it running on VASSAL this weekend and read/watch your comments about the original. Will be interested to know if you ultimately have preference for one over the other.
LikeLiked by 1 person