
In Solitaire Caesar the player will attempt to replicate the rise and fall of the Roman Empire from 350BC to 1453AD. The game is fairly simple in its rules overhead as well as the different pieces that the player can control but was designed as an introductory wargame covering one of the greatest Empires in the World’s history. Players will lead Legions around the map, taking Cities, conquering Provinces to build up additional Cities and protecting against the continual onslaught of Barbarian tribes from all directions of the compass. Each turn the player will score Victory Points from controlling cities and will track those throughout the various scenarios or full play campaign attempting to replicate or even do better than the historical result.
In Action Point 1, we took a tour of the map and examined the differences between Civilized, Wild and Wilderness Provinces. In Action Point 2, we took a look at the Turn Track and the set number of Talents the player will receive each round and then looked at the Roman Phase and the various actions the player can take including Raise Legions, Move those Legions to invade Provinces and conduct Roman Combat and Build Cities. In this Action Point, we will examine the Barbarian Phase and the differences between Civilized and Uncivilized Barbarians and how they move and attack.
Barbarian Phase
During the Barbarian Phase, a random number of Barbarian Armies will be spawned and will move toward the Empire with the goal of attacking and sacking cities. The Barbarian Armies are spawned in Wild Provinces that are spaced around the map. There are 5 of these Wild Provinces and include Nord, Steppe, Parthia, Arabia and Berber.

If you look at the map pictured above you will notice the spacing of the 5 different Wild Provinces where Barbarians spawn. There are two such Wild Provinces located in the north, two in the east and only one in the west. The other thing that I wish to point out is that each of the Wild Provinces has a number listed below the name. These numbers are from 1-6 and coincide with a 6-sided die roll. You will also notice that Steppe has two numbers, a 2 and 3, and will generally spawn more often than the other areas but it is random so maybe not.
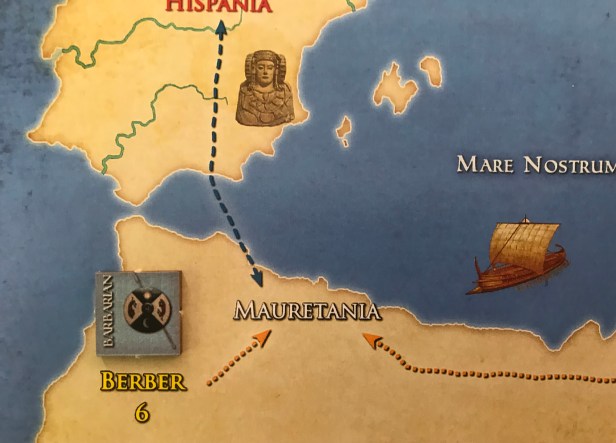
In the west stands the lone Wild Province of Berber which is located in West Africa near Gibraltar. The first Province that Barbarians spawned here will come into contact with is Mauretania, which is a Remote Province. If you remember from our previous discussions on the map, this Remote Province is more difficult for the Romans to build Cities in as it will cost 3 Talents versus only 2 Talents for a Civilized Province. From the Roman players perspective, this is one of the easier areas to defend against Barbarian incursions as there are only a few routes that they can take to reach Roman Cities. This route also has a more difficult route for the Barbarians as to get to Hispania to the north, the Barbarians must cross the Mediterranean Sea via a Sea Line of Communication.
If a Barbarian tribe moves into a city via a Sea LoC, their fighting strength will be reduced in the form of a Dice Roll Modifier (DRM) of -1. This can make a huge difference in these battles as the roll is typically a 50/50 thing where a Legion will be removed on a roll of 4-6 but with the -1 DRM would require a 5 or 6 to remove a Legion. These areas can be used as a major speed bump and I always try to have at least one Legion in these type of coastal cities as the Empire shrinks.
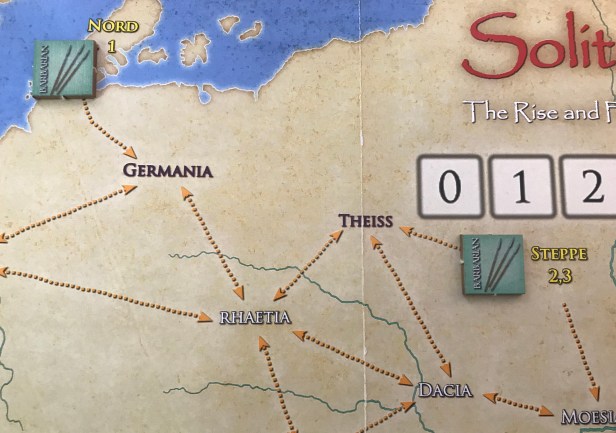
In the north stands Nord and Steppe. In these areas will always spawn the Uncivilized Barbarians, which we will discuss more in a moment. The real advantage to invasions coming from the north is that there is quite a separation from the Wild Provinces, Wilderness Provinces and Remote Provinces before you come into contact with more Civilized Provinces. This allows the Romans to prepare for invasions and to have a few road blocks or speed bumps set up in the north. Even controlling a Province with a Roman Control Marker (SPQR), and not having a City built in these Provinces, will cause the Barbarian army to have to leave a counter behind thereby weakening the army and its effectiveness.
The real difference with this area and its Wild Provinces is that Steppe has two numbers that will spawn Barbarian Armies and will typically lead to more invasions coming from the north as 50% (1-3) of the possible numbers are accounted for here. There are no seas to cross and therefore the north offers an easier route of attack for these Barbarians.

In the east are the more Civilized Barbarians in Arabia and Parthia. Arabia is only one Line of Communication removed from Civilized Provinces in Palestine and from there the invasions can move north or west and encounter plenty of targets to sack. This is always my least worried about area though as more often than not the Barbarians will be Civilized and will not lead to my hard earned investments in Cities being destroyed but simply conquered.
Civilized or Uncivilized
There are two types of Barbarian Armies in the game, Civilized and Uncivilized. Each has their own identifying counter with the Civilized Barbarians being light blue sporting a well made shield and metal spear while the Uncivilized Barbarians are green and carry three wooden spears or javelins.
The only difference in game terms between the two types of Barbarians is that Civilized Barbarian Armies will retain Cities when they invade and capture a Province while the Uncivilized Barbarian Armies will destroy the Cities when sacking them. This difference is fairly subtle but when the cost of building Cities is considered, either 2 Talents in Civilized Provinces (Red) or 3 Talents in Remote Provinces (White), you will definitely want more Civilized Barbarians on the map as you won’t have to rebuild as many Cities and can use your limited Talents to build more Legions, pay the costs of Bribery or Donatives or expand your Empire into more outlying Remote Provinces.
Turn Track Table
We looked at the Turn Track Table in Action Point 1, but it was to understand Income. Now I would like to examine the Table and look at how the player will generate new Barbarian Armies during the Barbarian Phase.
First, you will notice that there are two rows during each turn that are focused on the Barbarian Phase, including the Highest Die and Civilized. You will notice in this small segment I have shown here (only representing Turns 1-3 and Turns 10-12) that the Highest Die refers to the highest numerical result of the two 6-sided dice that are rolled. The highest numbered die is the Wild Province where the first army will be placed on the map and the number will be the number of Barbarian counters that will be placed there. As you can see in Turn 1, the Highest Die result will be placed in Berber.
The second row that we will look at will be what Wild Provinces on the board will generate Civilized Barbarians this turn. In this row, you will see that there are letters listed that correspond to the Wild Provinces as shown on the bottom of the Table. A is Arabia, B is Berber, P is Parthia, etc.

I really enjoy the way this Table is constructed. It gives the player a glimpse into the future and generally where each Barbarian invasion will come from. This is very thematic in my opinion as intel and scouts would have reported to Rome the movements of the Barbarians on the frontiers and where they were amassing, allowing the Romans to adjust their forces and redeploy more men and material in that general area. This insight gives the player a chance to prepare for the inevitable attacks and will allow for more Legions to be placed in the Cities in the path of those invasions. The second die though is harder to plan for as it is more random.

One final thought on the Barbarian invasions before we go into the mechanics of how the process works. In the Table above, you will notice that I have presented the number of times on the Turn Track Table where each Wild Province is identified as the location of the Highest Die Barbarian invasion. The most represented is Nord with 5 instances followed by Parthia and Steppe each with 4 instances. This means that 9 times or 50% of the Turns the invasion will come from the Wild Provinces in the north. Both Arabia (55.6%) and Parthia (83.3%) will be identified as Civilized quite a lot while Nord will be Civilized only 5 times or 27.8% of the time and Steppe will never appear as Civilized.
Understanding these nuances about how the Barbarian Phase works can give you the advantage that you need to withstand the continual onslaught and see the Roman Empire through to victory.
Generate New Barbarian Army Groups Sub Phase
Now that we have looked at some of the finer points of Civilized versus Uncivilized and how to use the Turn Track Table to your advantage, let’s take a look at how these Barbarian Armies are generated. The process is very simple, as most of the elements of this game are. The player will simply roll 2D6. These 2 numbers will determine the number of Barbarian Armies that will attack the Empire and what Wild Provinces they will issue forth from.
The highest number rolled of these two dice is the number of Barbarian Armies to be placed in the Wild Province listed on the Turn Track Table in the Highest Die row for the current Turn. Conversely, the lowest number rolled is the number of armies to be placed in a second Wild Province chosen randomly by rolling a third d6 and using this result to determine where the lowest number Barbarian Armies will spawn. The placement will be according to the numbers located next to each of the named Wild Provinces on the board with 1 = Nord, 2 = Steppe, 3 = Steppe, 4 = Parthia, 5 = Arabia and 6 = Berber.
At most there will only ever be two Provinces that become active and spawn Barbarian Armies each turn but it is possible that the randomly determined Wild Province may be the same as that determined by the highest die roll. This results in a “super” Barbarian Army made up of the number of units determined by both the highest and lowest die which can be between 2-12 Army counters.
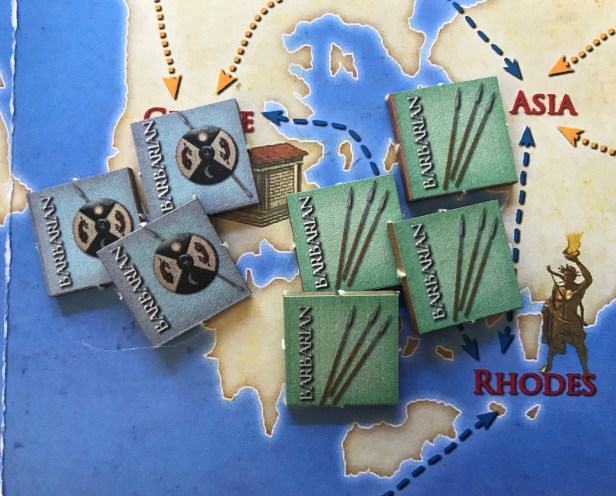
Let’s take a quick look at an example. Let’s assume it is Turn 1. We roll 2D6 and then consult the Turn Track Table. We roll a 6 and a 4. We then look at the Highest Die row and see that we will place 6 Barbarian Army counters due to the fact that we rolled a 6 in Berber, which happens to be listed as a Wild Province that will spawn Civilized Barbarian Armies during this turn.

We take 6 Civilized Barbarian Army counters (the light blue ones with a shield and metal spear) and place them in a stack in Berber. As you can see in the picture below, the Roman player knew that at least one invasion would come from Berber (due to the foresight the Turn Track Table grants) and has prepared for that invasion by placing Legions strategically in the Provinces near to the Wild Province.

We then return to the example and see that our second die showed a result of a 4 which tells us that the second Barbarian Army will contain 4 Barbarian Army counters. In order to determine where the second Army will spawn we must roll a third d6 and consult the Wild Province numbers.

We roll a 3 which means that the second Barbarian Army will spawn in Steppe. We refer again to the Civilized row on the Turn Table Track and notice that Steppe or S is not listed as being Civilized so this will be an Uncivilized Barbarian Army. We grab 4 Uncivilized Barbarian Army counters (green with 3 spears or javelins) and place them in a stack in Steppe.

This Barbarian Army was almost impossible to anticipate and as you can see the Romans are not quite as prepared to face this horde in the north. I say it was hard to anticipate but it really wasn’t as remember that Steppe has two numbers associated with it (2 and 3) and will get more spawns than some of the other Wild Provinces. Now that we see how to generate these Barbarian Armies, let’s take a look at how they move and fight.
Move Barbarian Army Groups Sub Phase
Once generated, all of the Barbarian Armies in a Wild Province will phase as a group, meaning that all counters in the stack in the Province will take the same action together. These groups will continue to phase until it is either eliminated or only one Army counter remains in the Province that the group occupies. First, we will move and resolve combat for the Barbarian Army group with the highest number of armies first.
Movement is pretty simple and there are priorities to assist the player in performing these moves. Movement is defined as being a move from an occupied Province to an eligible Province linked by a Line of Communication. An eligible Province will meet one of the following two conditions in no order or priority:
- A Province that does not contain a Barbarian Army
- A Province containing a Barbarian Army linked by a Line of Communication to a Province that does not contain a Barbarian Army
A Wild Province is never an eligible Province. If there are no eligible Provinces from the above mentioned criteria then all adjacent non-Wild Provinces become eligible except for the following:
- Provinces that the Barbarian Army group has already moved through
- Provinces that could only lead to Provinces that the Army group has already moved through
If there are ever more than one eligible Province that the Barbarian Army group could move to the player will determine where it is going to move to randomly by assigning values to the Provinces and rolling a single d6. For example, say that the Army group could move to either Egypt or Palestine from Arabia, assign the value of 1-3 to Egypt and 4-6 to Palestine. Roll the die and move to that Province according to the numbers. If the Province already contains a Barbarian Army counter (it could also contain a City if the Barbarian Army is Civilized), then the Barbarian Army group doesn’t stop and will move through the Province on their way to the next eligible Province.
If the Province that the Barbarian Army group moves into is unoccupied, one Barbarian Army counter of the group will remain in the Province as the rest of the group moves to the next eligible Province. If the Province contains only a Roman Control Marker (SPQR), the marker is removed and one Barbarian Army counter is left in the Province as the remaining Barbarian Army group moves onto the next eligible Province.
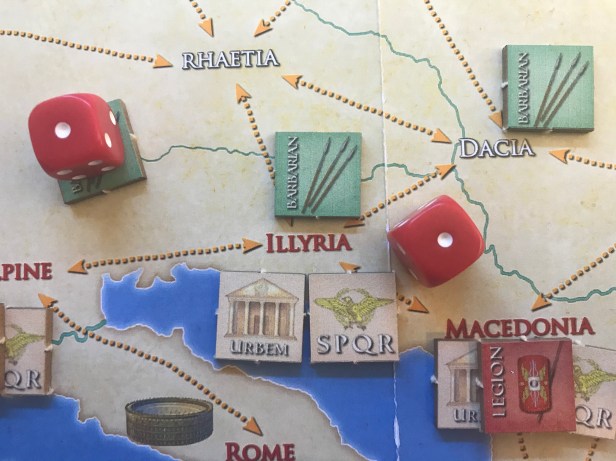
Let’s take a quick look at a few of these moves. We will use the Uncivilized Barbarian Army group located in Steppe for this example (remember that in the game you will start with the Barbarian Army group that has the most number of units). This group contains four Army counters and at first has two movement options, to either the Wild Province Theiss or the Remote Province Moesia. You will assign a value to each of them; 1-3 for Theiss and 4-6 for Moesia and roll a d6. We get a result of 5 which means we will move the group to Moesia. No counters are left in Wild Provinces upon moving.

Now that the Barbarian Army group has moved to Moesia and didn’t encounter a City or Roman Control Marker the group looks next to an eligible Province to move into. They do not ever look back from where they came from so their move eligible Provinces are Dacia or Macedonia. We assign a value to each of them; 1-3 for Dacia and 4-6 for Macedonia and roll a d6 resulting in a 1 which means the group will choose to move to Dacia.

Remember that when a Barbarian Army group moves into a Province that is unoccupied, one Barbarian Army counter of the group will remain in the Province as the rest of the group moves to the next eligible Province. So you can now see that the Barbarian Army group now consists of only 3 counters as one is left in Moesia. At Dacia, there are 3 eligible Provinces that could be moved to so you assign values and roll a d6. 1-2 is Theiss, 3-4 is Rhaetia and 5-6 is Illyria which contains a Roman controlled City. The result is a 5 and the Army group will move to Illyria once again leaving one counter behind.

This now is going to result in a Barbarian Combat with only 2 Army counters. Let’s stop there as you now should have a feel for movement. We now will take a look at the Conduct Barbarian Combat Sub Phase.

Conduct Barbarian Combat Sub Phase
Legions and Cities will resist when Barbarian Armies enter the space where they have been built. If a Province occupied by a Barbarian Army group also contains one or more Legion counters and a City, the Legions will fight the Barbarian Army before the City does.
If the Province contains only a City, the player will roll a d6 for the City as it attacks the Barbarian Army. On a roll of 2-6, if the attacking Barbarian Army was Uncivilized the City has been defeated and the City marker will be removed symbolizing the destruction of the City and its residents and the Barbarians looting. If the attacking Army was Civilized the Roman Control Marker will be removed and the City will remain but the Barbarian Army will occupy it. If the Barbarian Army then has remaining counters, it will move to an eligible Province and leave behind one Army counter.
On a roll of a 1, the City has successfully defended against the Barbarian Army. The player will remove one Barbarian Army counter and if there are still Army counters in the group, the siege will continue with the City rolling another d6 and following the same results. This will continue until the City is defeated or all Barbarian Army counters are removed.
Let’s go back to the Uncivilized Barbarian Army group that moved into Illyria in our previous example and has encountered a Roman Controlled City. Remember, that the Army group contains only 2 counters. A d6 will be rolled representing the defensive efforts of the City.
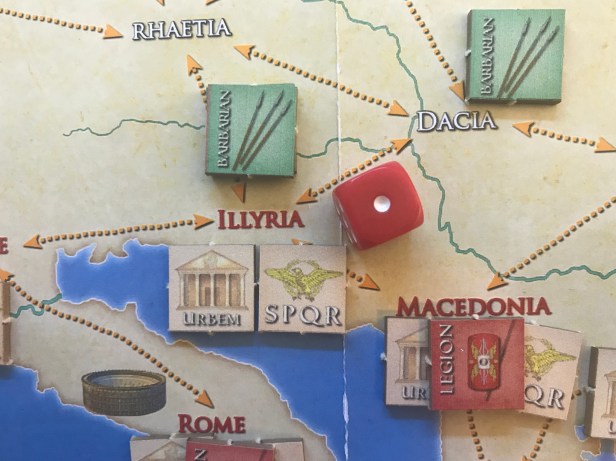
A 1 is rolled, which means that a single Barbarian Army counter will be destroyed and removed from the stack. (This really was my roll for this example, I was shocked as it doesn’t happen very often!)

As there is still one Barbarian Army counter still remaining in the group, the siege will continue and the player will roll a d6 again looking for a result of 1. If the result is a 1, the attack will cease and the City will stand under Roman Control. What do you think will happen?
Bingo, another 1 is rolled and the City at Illyria has fended off the Uncivilized Barbarian Army out of the Steppe. (Once again, I really rolled a 1. I can count on one hand how many times I have rolled 1’s and seen a City survive an invasion like this.)

Now that we have seen that example, let’s move to a Civilized Barbarian Army example as the group out of Berber moves to the east to threaten Carthage and Sicily. Will the Romans stop the invasion before it reaches the gates of Rome?
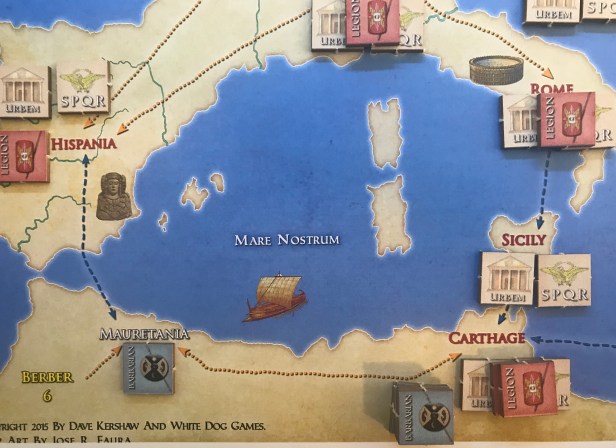
During the beginning of the move, there is only 1 eligible Province that the Civilized Barbarian Army group can move to from Berber and that is into Mauretania. They then leave a single Army counter there and roll a random dice (with 1-3 moving to Hispania and 4-6 moving toward Carthage). The roll results in a 5 and the Army group moves to attack the Legions hold up at Carthage.
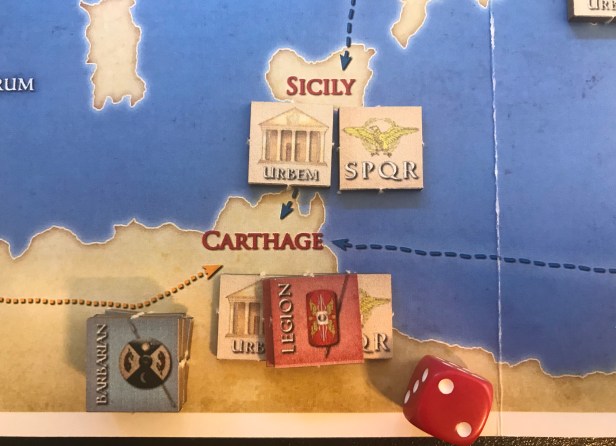
Upon reaching Carthage, the horde encounters 2 Roman Legions and the combat commences. The Roman players rolls a d6 and results in a 2 which means that a Barbarian Army counter will be removed. There are still 4 Barbarian Army counters remaining in the group and they attack again.
This time the die roll is a 4 which means that the Barbarians have won and will remove 1 of the Legions from Carthage. The battle continues as there are still 4 Barbarian Army counters remaining.
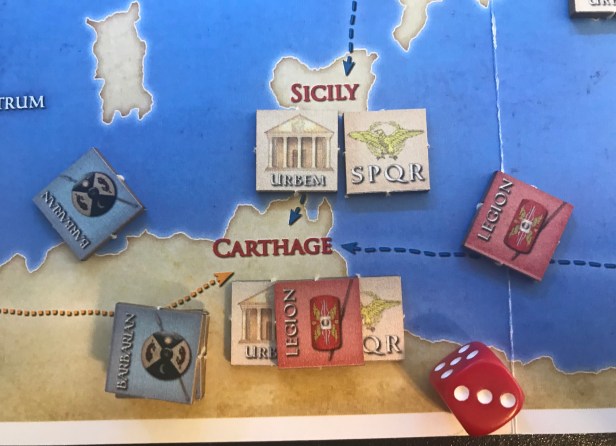
The Romans are successful again in battle as they roll a 3 (remember that a Roman Legion scores a hit on a roll of 1-3) and another Barbarian Army counter is removed. On the next attack, the Romans roll a 6, which means the Barbarians score a hit and remove the last standing Legion.

Now, we move to the City siege and the City rolls a die looking for a 1. Not so lucky this time as a 3 is rolled and the City falls to the Civilized Barbarian Army. The Roman Control Marker (SPQR) is removed by remember that Civilized Barbarians do not destroy Cities that they conquer. This is a good thing for the player as they won’t have to reinvest into building this City again but must fight for it and reconquer it.

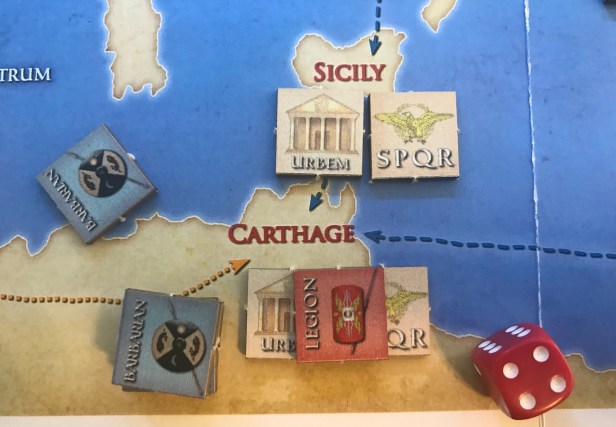
The Barbarian Army group has a decision to make about where they move as there are 2 eligible Provinces. Values are assigned (1-3 to Sicily and 4-6 to Cyrene to the east) and a d6 is rolled and results in a 1 which means the group will move north into Sicily. This is a Sea Line of Communication so the combat is in favor of the Romans and the City will defend and score a hit on a roll of 1 or 2, as opposed to the normal 1. The dice is rolled versus the 2 Civilized Barbarian Army counters and a 2 scores a hit and removes one of the 2 remaining counters. The siege continues and the Roman player rolls a 4 which means that the Barbarians have won this battle and only the Roman Control Marker (SPQR) will be removed but not the City. The invasion lost steam due to several losses in combat and was ultimately unable to reach the gates of Rome.

I really like the simple way that the Barbarian Armies are generated and the fact that you can plan for how to deal with them. The system creates a continual onslaught of forces against your Empire and you will only be able to repel the invaders and survive from turn to turn by planning ahead and choosing your choke points and areas to defend from. Sometimes as mentioned, bad rolls will create two large stacks and they will simply carve a swath of death and destruction across the Empire taking out multiple Cities and burning your Victory Point generators to the ground. I also really like that the Barbarian movement can be very unpredictable. Sometimes, they will simply not move toward your Cities and will spend time moving around simply burning their own power ending in a wasted attempt to invade. But, sometimes they will simply cut at the heart of your holdings and you will simply be unable to stop them. When this happens, just know that you are not alone in this happening during the game or in history. Have fun with it and plan where you can.
In Action Point 4, which is the final entry in this series, we will cover the Optional Rules, including things like Donatives, Bribery, the Emperor Legion, Skilled General and Roman Income Variant, which is like easy mode, and finish up with some simple strategies to keep in mind that will improve your chances of winning.
-Grant

Thank You, may I ask what the Civilized Chits are for? I have them in my PnP version.
I don’t see them mentioned in the rules.
LikeLike
From the text of the Action Point:
There are two types of Barbarian Armies in the game, Civilized and Uncivilized. Each has their own identifying counter with the Civilized Barbarians being light blue sporting a well made shield and metal spear while the Uncivilized Barbarians are green and carry three wooden spears or javelins.
The only difference in game terms between the two types of Barbarians is that Civilized Barbarian Armies will retain Cities when they invade and capture a Province while the Uncivilized Barbarian Armies will destroy the Cities when sacking them. This difference is fairly subtle but when the cost of building Cities is considered, either 2 Talents in Civilized Provinces (Red) or 3 Talents in Remote Provinces (White), you will definitely want more Civilized Barbarians on the map as you won’t have to rebuild as many Cities and can use your limited Talents to build more Legions, pay the costs of Bribery or Donatives or expand your Empire into more outlying Remote Provinces.
LikeLike