
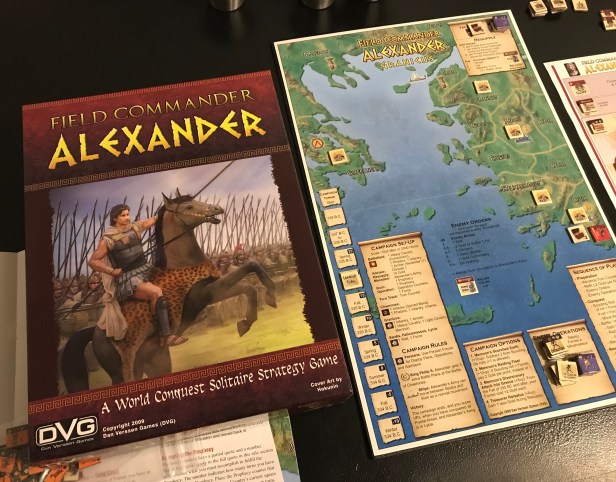
Field Commander: Alexander from DVG, the second game in the Field Commander Series following Field Commander: Rommel, is a solitaire game where the player finds themselves controlling the life of Alexander the Great of Macedon when he comes of age in 338 B.C. as he attempts to dominate the ancient world. You will decide what units to purchase and train, what advisors to listen to and seek guidance from and what cities you will sack along the way as you try to realize and fulfill various ancient prophecies.
In this series of Action Points we will examine many facets of the game taking a look at the various campaigns and how they differentiate themselves, the basic sequence of play and how Alexander’s army moves around the board and interacts with prophecies and obtains different advisors, how battles occur and the different Force types involved and the economy of gold, insight, building temples and cities and whether to raise or govern.
Campaigns
Variety in any solitaire wargame is key in my mind as it means it is replayable. Field Commander: Alexander excels in this area as there are not only 4 different campaigns that can be played alone or linked to form a campaign, but there are Special Campaign Options that introduce even more variety and really ratchet up the difficulty.
There are four campaigns included in the game as follows:
Granicus – 338 BC to 334 BC. This campaign begins when Alexander’s father Philip II is still alive and sees if Alexander can rule all of Greece first before he attempts to go into Asia. The game typically starts with Alexander’s army moving to Chaeronea to vanquish his rival southern Greeks followed by his first foray into Asia at Ilium and culminates with a large battle at Lycia.
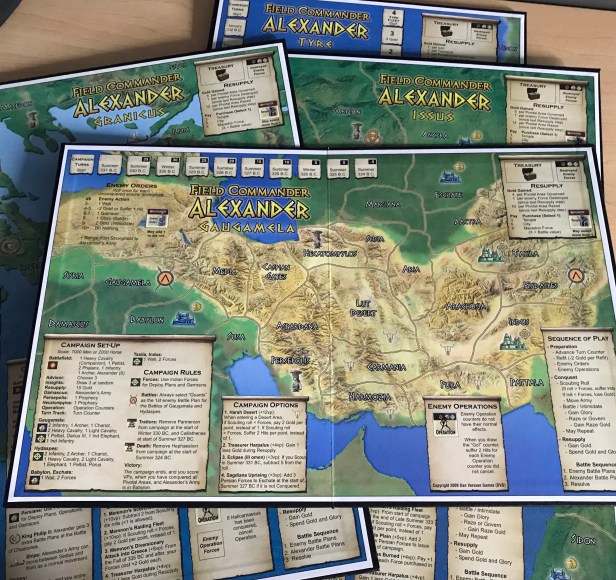
Issus – 333 BC to 332 BC. The second campaign starts at Lycia and follows Alexander’s trail north though Gordion, thence south to Tarsos and east to the battle of Issus. The campaign comes to an end at Sidon as the siege of Tyre begins.
Tyre – 332 BC. This campaign is very different from the others and covers the siege and assault of the vital island port of Tyre.
Gaugamela – 331 BC to 323 BC. The fourth and final campaign focuses on the conquering of the Persian Empire and Alexander’s travels to India (elephants make an appearance) and subsequent journey home.
Once you have chosen a campaign to play you simply have to take the appropriate board and find the Campaign Set-Up and Campaign Rules sections which are printed directly on the board.
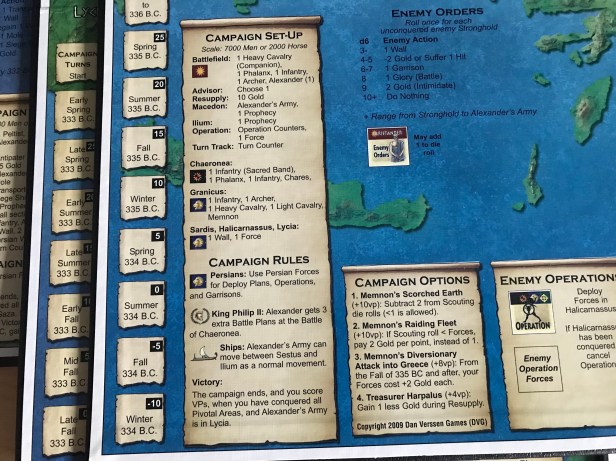
The Campaign Set-Up gives various directions such as what Forces to put into your starting army on the Battlefield, where to place randomly drawn Prophecy counters and what enemy Forces to place in what regions. In this same section will be given special Campaign Rules that will guide some of the action. For example, on the Granicus map you will see that at the battle of Chaeronea Alexander will be allowed to draw 3 extra Battle Plans. This is very important as normally at this point in Alexander’s career the player will only get to draw 1 Battle Plan based on Alexander’s Battle Value. This is a key rule that is here to replicate history as Alexander’s father Philip II was there to guide him prior to his death (or murder) during this first major engagement and the extra Battle Plans represent his skill and tactics.
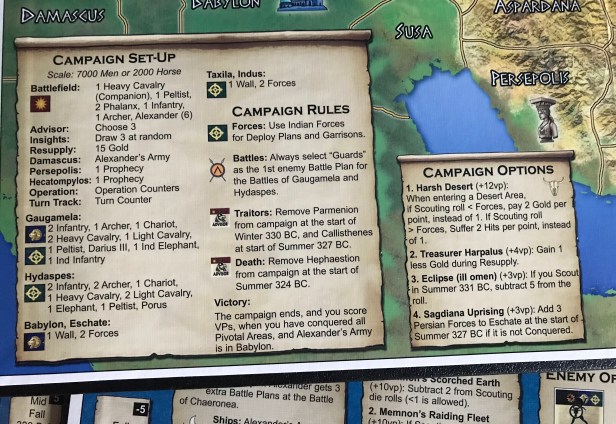
The Campaign Set-Up will also tell you what your objective is and how to win the campaign. I really enjoy how the rules are right there in front of you as you play the game. You will play the campaigns through to completion and will then check your score based on several factors such as what year you completed the campaign in, each Governed Area (more on this in Action Point 3), unspent Glory and the VP gained from using Campaign Options.
Campaign Options
The Campaign Options are a bit of a different animal and are there to increase the difficulty of the campaign.

As you become more comfortable with each of the campaigns you can begin experimenting with these Campaign Options to ratchet up the difficulty. In the picture above of the Granicus Campaign Options, you will see there are 4 options. You can add any one of these or add all of them to really test yourself.
Memnon’s Scorched Earth is a good one to examine. This will give you +10VP’s if you use this in the campaign and complete it. This option will make it harder for you as Alexander’s army moves through the countryside and will cause him to have to pay more gold than usual to move. This represents the condition that the Persians have destroyed the local farms and fields and finding food in the form of forage to feed the army is more difficult and it will cost more gold to bring in supplies. This condition will lead to less money for Alexander to use to buy new Forces or to refit Units that have been damaged in combat. Not a terribly hard option but you will be cash strapped.
I really like using the Campaign Options. I have used as many as 3 in one campaign and still won but haven’t won when using all 4. I do get a real sense of achievement when I can win even with these added difficulties and really appreciate the added variability and replayability that they give.
I hope that that you have gained a good insight into how the campaigns are treated. I have played all 4 campaigns with Granicus coming in at 5 plays (with a record of 4-1), Issus with 3 plays (2-1), Tyre with only 1 play (1-0) and Gaugamela with 1 play and I lost terribly. In Action Point 2, we will examine the basic sequence of play and how Alexander’s army moves around the board (Scouting Roll) and interacts with prophecies and obtains different advisors.
-Grant

Hey Grant: I’m a HUGE fanboy of DVG games, and frankly, haven’t thought too much about this game much… being a bigger “Warfighter” fantatic. But as I read your thoughts, it occured to me that I should play this once. Good work! Keep the great thoughts coming. It’s always good to get a fresh perspective.
LikeLiked by 1 person
Phillip was already dead before Granicus 🙂
LikeLike
I wonder what the future holds for the Commander series. I own and have only played the most recent Fleet Commander: Nimitz (shocked to find that it’s already a 5-yr-old game). The play experience left me feeling disappointed and cold for what it delivered. Nevertheless. I left it thinking there was a potentially good game hiding in there if a couple rules elements could be rethought or tweaked with some house rules. Sure enough, that’s what a BGG member eventually did.
Grant. It sounds like you are getting a little better mileage out of Alexander than I did with Nimitz. Do you have any other games in this series? I have heard some kinder words about FC: Napoleon.
LikeLike
I like both Rommel and Alexander, but FC:N is a masterpiece. Absolutely fantastic. I haven’t played Nimitz, but haven’t heard many good reports.
LikeLiked by 1 person