
In this Action Point, I want to cover a combat sequence to give you a feel for the various options that players have. We will take a look at Air Support and Artillery Support as well as lack of DRMs for combat. For this example, I will use the picture below to show you how a single combat works.

First off, combat occurs between stacks that are adjacent. Which is cool as you don’t have to worry about having enough movement points to make it all the way into the enemy’s hex, just enough to get your units adjacent. The active player then declares which hexes he is attacking and with what stacks he controls. These stacks can split to attack different hexes but they can’t split an individual unit’s attack power.
Once the attacking hexes and the defending hex are decided, the players then simply calculate the odds of the battle and refer to the Combat Results Table, which, as I stated in our previous Action Point, is a very interesting treatment.
Once this calculation is completed and the proper column is identified, the players can then add in various support to the combat, including Close Air Support or Artillery Support.

Close Air Support and Artillery Support
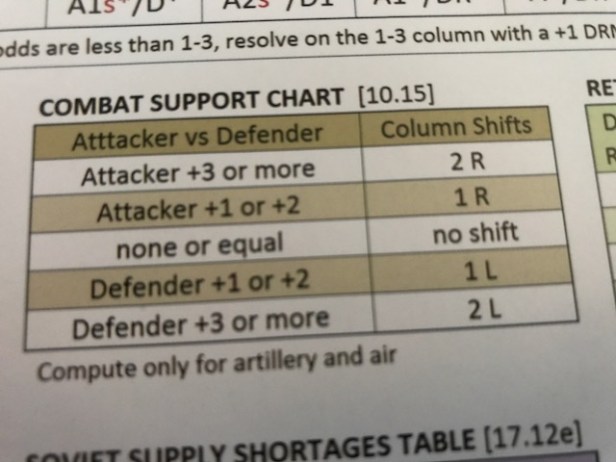
Both of these type of units function as Support units. Both players can add support to the same single combat, air units as desired and available artillery that is within range, although bombers are limited to targets they can see, such as towns. Ground attack air units (Stukas) and artillery can hit anything. The process is that the defending player gets the first opportunity to identify what support units they wish to add to the combat and cannot change that decision after the attacker declares their support. Players then compare support values provided from the various participating Support units and refer to the Combat Support Chart to determine odds shifts, either one or two columns, either way, and your shifts may cancel your opponent’s shifts. The attacker then applies the net shift and goes to the appropriate column on the CRT to obtain a final result. You might notice that there are no DRMs in Demyansk Shield, which is pretty uncommon in a wargame. Vance did this to model infantry combat which is more straightforward than other types. He also wanted to take into account the fierce weather and its effect on the game, which sometimes changes conditions.
Some combat results will include an asterisk. If this occurs for your side you choose either all your artillery support to be Fired (no longer available this turn) or all your air support to be Flown (no longer available this turn). If the asterisk does not occur those same support units will be available for the next combat and can be used for any number of combats that turn as long as they are in range, in the case of artillery, and have not been marked as Fired or Flown. This element really gives a lot of flexibility to your combat choices. I found that I really had to think about how best to use the limited support and whether the odds were against me and could reasonably produce and asterisk result wherein I would lose the support.
So, in the picture at the beginning of the Action Point, it is the German players activation and he identifies that he will attack the 42nd Soviet Army that is stacked on top of another Army. He chooses the Krauth SS Infantry Unit with its attack power of 3 (1st listed number on the counter) along with the 3 attack from the unit underneath and decides that the Thies SS Infantry Unit stack will join the combat as well with its combined 8 attack for a total combat factor of 14. The defending Soviet 42nd has a 4 defense (2nd number listed on the counter) along with the unit beneath it with its 4 defense for a total defense of 8. The total then looks like this 14-8, which is 1-1 odds. So, the Support Phase is next and the Soviet player decides to add no support, as they have no artillery in range and only have the 2 Air Support markers which they don’t want to risk at this time, so they pass and add no Support. The German player cannot add the one support point from the Artillery Support unit as it is not within range (it has a range of 4 but the battle is 5 hexes away). So, their only option is to commit the lone Stuka unit which adds its 2 Support Points granting a column shift to the right to the 3-2 column, still not great, but slightly better. But wait, there is now going to be a one column shift back to the left to the 1-1 column for the frozen river which the Germans are attacking across. Uh oh. This could be ugly!
A dice is then rolled coming up a 3 which refers to the outcome on the CRT as a A2*/D1. This translates to the Attacker losing two steps (ouch!) as well as having the dreaded asterisk come up, which means they will have to mark their Air Support unit as Flown and it cannot be used for the reminder of this turn in other combats. The Defender though will also have to lose one step but holds the line and is not forced to retreat. End result of this risky attack was not good for the Germans and will now make it much easier for the Soviets to counterattack on their turn, possibly driving the SS Units back and crushing their left flank.
I hope you got a taste for how combat works in Demyansk Shield. It really is a pretty interesting and tight system that works well and is most importantly fun to play. The Soviet forces are just tough enough to be able hold their own against the Germans and a skillful use of their limited Support Units and the terrain can make for a fair fight. Make sure to check out our Action Point 1 where we discussed the CRT as well as some of the more interesting and specialized units that are included in the game.

-Grant

This game has a very interesting topic.
Additionally it doesn’t seem to be neither too complex nor too simplistic.
LikeLike
Agreed. The game is well designed and is very playable but has enough variety and interesting elements to keep my interest. I look forward to more plays in the future.
LikeLike