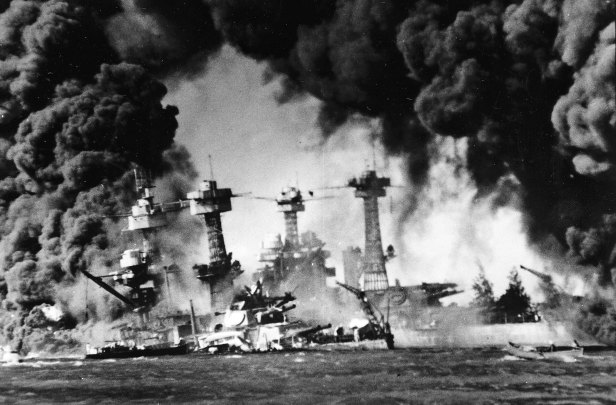
Air Raid – Pearl Harbor! is a game that does exactly what it says on the tin. It’s a 2 player tactical simulation of the Pearl Harbor attack that brought the United States into WWII. There’s a solo scenario, but primarily it’s a head-to-head engagement as the US attempts to scramble defenses and reduce losses. The game’s designer, John Heim, was gracious enough to answer some questions about Air Raid – Peal Harbor! that’s currently on Legion Wargames’ CPO list. All of the images are prototypes and aren’t necessarily final production quality.
Air Raid – Pearl Harbor!
Alexander: Hello John, thanks for taking the time to answer some questions for us. Before we dive right in how about you let every know who the real John Heim is? What’s your background and how did you get into wargame design?
JH: Hi, Alexander. Well, I have a BA in History, which I went for after going on academic probation my first year of college – I was guided into trying to be a civil engineer by my Dad, who worked with a lot of engineers at Bell Laboratories. My math skills were not up to par, and I had been an A student up to that point, and so my parents said I should try to get a degree in SOMEthing and I chose history. It has not per se done me any good making a living from history, however, just the fact that I have a BA on my resume has been an entre. I’ve done a lot of forgettable jobs, found out I stink at sales, and have become a good customer service-type worker. I have worked for a government agency for the past 20 years and my function is to manage the forms department, create and revise new forms, and handle all of the attendant procedures. I do this for a current total of 1,200+ forms and until recently was a one-man operation. I have had a co-worker assigned to assist, and I would say things are now split about 85/15.
My first wargame was bought by my Mom in Meyer’s Discount Store in New Brunswick, N.J. (long out of business now). It was Avalon Hill’s Midway; it still has the $4.95 price sticker on it. I was a prolific scale modeler and was forever trying to find ways to fight  realistically with my models. Midway opened my eyes, and not long after I owned PanzerLeader, PanzaerBlitz, and The Russian Campaign. My father, bless his heart, spent some time playing them with me but I don’t think he was terribly interested. And so, I became a solitaire player. I currently own over 1,000 individual titles, and have reached the point where I question if I will ever get to play many of them. But I am definitely hooked.
As I suspect is the case with most designers, I began by making variants to games and this eventually branched out into independent designs. I currently have completed, or nearly so, eight simulations and have ideas or am working on maybe half a dozen more. It is a long process to get to them due to life commitments, and once I have the urge to focus on one, it comes together fairly quickly. I have learned since that development is a long process, finding reliable testers is a challenge, although it can be done, and publication, well, let’s just say it takes a while. LOL!
Alexander: When you’re not designing games which games do you like to play and why?
JH: I am currently doing a lot of playtesting for Decision’s various magazine games. They are varied, fairly quick to play, and they are fun in that I am not evaluating and amending my own work, but evaluating and enjoying something I know little to nothing about in terms of subject. If this were not the case (maybe when I retire?) I want to get to things in my collection.
I gravitate towards immersing myself in a topic and playing several games in that genre. I am itching to once again set up War in the Pacific (original and DG editions), AETO/APTO, World in Flames, and Pacific War, as well as Pacific Fleet and I can’t help but want to also work with the “game kit” known as The Eagle and the Sun. WWII Pacific is my all-time favorite subject and my least for some reason is WWII Eastern Front. I am attracted, too, to very eclectic subjects, such as the variety Legion Wargames produces. There is something about the Pacific War that holds my attention. I have read much, watched much, and played much. I have reached a point where I understand both sides very well, and I am able to look at situations from the perspective of both sides. Not that I can’t do that with any two adversaries, but there is something about watching WWII era war movies as a youth, with their caricatures of the Japanese, and I now know how to look past the propaganda aspects, the racism, and see the honor, duty, and country ingredients of both sides. I am touched by stories of valor and dedication on both sides. It was an epic struggle of cultures. Of course, their was racial chauvinism on both sides and I don’t condone it BUT, it was a fact of the time.
Alexander: What is your favourite aspect of game design in general and why?
JH: My favorite aspect of game design is the research. I pick topics which grab me, and I am well-motivated to look into them. I enjoy tracking down everything I can on the subject, sorting through any conflicting data and resolving those conflicts, and making an outline of the rules. I usually have many or all of the scenarios defined in my head before I get to the actual mechanics, which are more work and less fun. I do freely take ideas and concepts from other games, on the same or different subjects, and I put my own spin on them many times.
Alexander: Air Raid – Pearl Harbor! (ARPH!) is an historical simulation of that fateful day in December 1941, Which influences inspired you to create a game on this topic?
JH: This topic has always fascinated me. I have ready dozens of books, I was and still am enamored of the film Tora! Tora! Tora! and various public television specials. Years ago I created a game on the subject, hand-drawn map and counters, hand-written rules (30 or more years ago). Several Decembers ago I wanted to pull it out and update it and found the entire thing is lost to me. And so I started from scratch and it was a very interesting experience, almost as if I were channeling a spirit. Ideas and concepts kept flowing into my head, and I made an outline and began hanging things from that. The essential product was down on paper in about two weeks. Refining it, creating counters and a map have proceeded since (with the more than able assistance of my developer, Mr. Jim Gordon). It fascinates me still that it flowed out of me so quickly. I was making notes and writing up rules, creating tables and counter layouts at all hours of the day and night. It was exhilarating and exhausting at the same time.
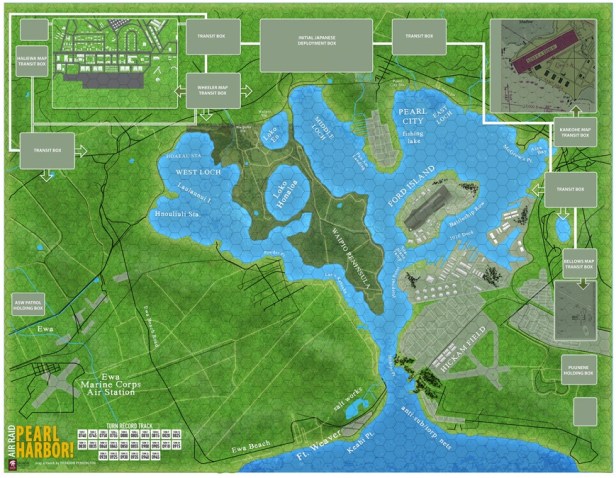
Alexander: The entirety of the bay is represented on the map, are there rules for setting up the US Navy/Air Force in alternate patterns versus history to try and be more defensively prepared?
JH: There are options for more ground-based anti-aircraft units, options for the US being on higher alert at the start. The deployments are largely as they were historically; if either or both the Enterprise and Lexington and their task groups are in port, the player will have to do some juggling. I honestly had not thought of allowing different deployments and I think the subconscious reason was that the US Navvy was pretty obsessive-compulsive as to where they moored and berthed their ships. Battleships just would not have been out at the cruiser moorings near Aiea Bay for example (Battleship Row was so-called because that is where they tied up). In my followups to publication, I think I will include possible alternate deployments, and thank you for bringing that up. Of course, once a copy is purchased, players are free to experiment in any way they choose.
Alexander: The game is a 2 player tactical game, but the initial scenario is primarily solitaire. How does the solitaire system work, and can the main game be played solo easily as well?
JH: The historical scenario leaves the U.S. in the worst possible initial position, and I did not think a player would enjoy that side very much (there is always a chance the US can win and players could switch sides and see who does better if they want to do that). And so I recommend it as a solitaire scenario to recreate history, hopefully learn what happened and why, and as a way to learn the majority of the game mechanics and to give an idea of Japanese targeting issues. I play everything solitaire and so I hope my designs are also playable solitaire. Having an opponent is a very different experience, and I envy players who get to experience surprising or being surprised by an opponent. The historical scenario requires the two attack waves to be composed as they were (there are options for the Japanese to alter the strike compositions). The player also must follow the listed, historical target priorities and thus cannot decide to, for example, attack ground facilities rather than warships.
Alexander: How is air-to-air combat conducted in Pearl Harbor?
JH: I wanted something which could handle many individual combats in a quick way. What I came up with is a system whereby each armed aircraft type has To Hit number range on its counter, and its targets have a maneuver factor which modifies the To Hit die roll.
These can range from -5 for a B-17 to +2 for a lumbering seaplane and represent structural toughness, actual aerobatic ability, and the effect of defensive armament throwing off the attacker’s aim. If the To Hit number is achieved, refer to a table to see how many individual aircraft in the target counter are shot down and/or damaged. Armed targets simultaneously get to fire back, using the same method. Each aircraft in the firing counter (attacking and defending) can be added into a total and that number of dice thrown at once, which also speeds resolution. Then roll for ammo depletion. This last is very important, because the Japanese player would simply shoot with each Zero every turn and inflict far more damage than they should. This mechanic forces the Japanese to be prudent to a degree to avoid using up his ammunition before the attack is over.
Alexander: How are air-to-surface combats and bombing runs handled?
JH: These are handled by bombing or strafing aircraft being placed on their intended target (ships or grounded aircraft, or ground facilities). Multiple dice can be rolled at once to speed play and if the To Hit number for the ordnance is achieved, refer that number of hits to the appropriate table to see the damage result. It is possible to achieve a critical hit, which will cause more damage (as happened to the Arizona) and it is also possible to make a hit with a dud bomb. Torpedo planes drop from two hexes away from their target, and have a very limited ability to hit vessels behind other vessels. Also possible is a miss on the intended target to strike an adjacent one.

Alexander: How are turns and order of battle managed in Air Raid – Pearl Harbor?
JH: Turns are five minutes each, and hexes are 250 yards across. Ships move generally up to seven hexes a turn (those which are or are able to get underway). Aircraft are simply placed, as their speed would take them anywhere on the map in five minutes. The exception is that there are several transit boxes which consume an entire turn’s movement for air units. Transit boxes were needed to get the hex-map insets for Haliewa, Wheeler, and Kaneohe airfields. The order of battle for both sides is set at scenario start. The Japanese by optional rules may vary the composition of their attack waves and also have the option of launching a third strike, even the next day if they choose.
Alexander: What were some unique challenges that you came up against in trying to model the attack on Pearl Harbor into a game?
JH: I don’t think there was a wholly unique challenge, but the lop-sided result of the historical event and the effect that has had on the mind of potential players, the perception that it is uninteresting to game, was something I took very seriously, and crafted a victory system to allow both sides to win, and a number of plausible options and scenarios to show how things could have been different. Very different.
Alexander: A topic like Pearl Harbor might seem somewhat deterministic for a game, walk us through how you have made the game competitive for both sides to meet their victory conditions?
 JH: This was a major point for me to tackle very near the beginning of the design process. The key to competitiveness in this simulation is the Victory Point Table. The Japanese must be careful to gain victory points along the Y axis of the table by sinking and damaging US ships, and destroying and damaging US aircraft. This is a balance which must be considered. Doing just what the Japanese did will give the historical result, a Japanese tactical victory, which is essentially a draw as they Japanese player, with hindsight, was unable to improve on the historical result. It is admittedly harder for the US player to win, it is akin to when a professional sports team wins a play-off spot because some other team loses a different game that day. The Japanese need to stumble for the US to win, but there are numerous ways that the Japanese can stumble.
Alexander: Which aspect of the game are you most proud of and why?
JH: I am most proud of two things. One is the air system, which allows combat among many individual aircraft to be conducted quickly and easily. The ammo depletion rule I particularly like because it realistically limits the amount of firepower the Japanese have, and they must use it judiciously, rather than shooting everything up every turn with every plane. The second thing is that the victory conditions are structured such that the Japanese player must balance his attacks well among the various targets in order to do better, or even as well as, the historical attackers. One of the key components of this dilemma is the rule whereby all armor-piercing bombs and all torpedoes – their most effective weapons – must be expended such that hits are recorded as achieved but the resulting damage is not determined until all of these weapons are used up. Thus, the player can estimate how much damage he has done to important/critical targets, but will have to judge if he has done enough or if he should attempt to get some more hits on it, at the expense of hitting something else important.
Alexander: What are your thoughts on the graphic design on the map and artwork that has been put together? Who is the artist for the map and counters?
JH: I am very pleased with what I have so far of the map by map artist Brandon Pennington. While this has no effect on game play, he is making the runways look as close as possible to the way they were on December 7, using period photos. It is the kind of detail which helps put players at that day, place, and time. The counters are by Knut Grunitz and they are superlative. The counters are well laid out and very functional, and the images are marvelously colorful and as detailed as you can get onto a .6” counter.
Alexander: Can you give some specific examples of how the game has evolved throughout the play testing process?
JH: Surprisingly, the game has stayed basically the same albeit with massaging of rules and charts/tables as needed. With one exception. I originally used Pollard markers to tally the number of aircraft in a counter, and also had ordnance counters with their own Pollard markers. This made for some prodigious stacks! Jim had the good sense to create a roster system which handles things well, reduces stack size, and eliminated a goodly number of counters. The rosters have been modified several times to take over various functions, allowing a lot of markers to be eliminated from the counter mix.
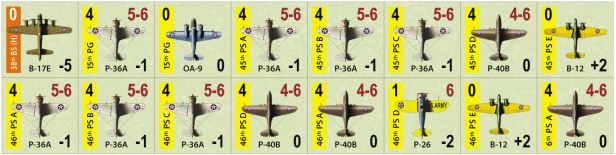
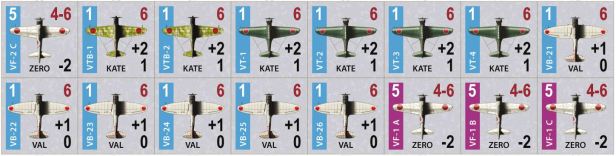
Alexander: With over 500 counters in ARPH! can you run us through how the aircraft are organised?
JH: The Japanese are mostly organized with three individual aircraft per counter although the level-bomber Kates are five to a counter. The Americans are more varied, ranging from 1 up to 8 aircraft per counter. They are organized by squadrons. All aircraft in a given counter are of a single type, so, for example, the 46th Pursuit Squadron at Wheeler Field consists of four counters – A, B, and C with seven aircraft each, and D with five P-40s.
Alexander: How many scenarios are there included in the game and what does each one cover?

JH: There are five scenarios, and various optional rules may be introduced by player agreement to give most of these a different flavor. From the rulebook –
- Historical Scenario
The Historical Scenario presents two waves of Japanese air attacks against U.S. forces based on Oahu.
Game length: 26 turns (0740 through 0945)
Initial Alert Level = 0
U.S. Setup
U.S. air and naval forces are setup first according to the historical deployments indicated on the U.S. Roster Sheets.
Japanese Setup
The Japanese Aircraft Roster indicates the historical composition and ordnance of the First and Second Waves of the raid. The First Wave of Japanese aircraft deploy in the Initial Deployment Box on Game Turn 1 (0740 hours) after all U.S. forces are deployed. The Second Wave of aircraft deploy in the Initial Deployment Box on Game Turn 13 (0840 hours).
- Alternate Japanese Plan Scenario
This scenario provides players with all historical forces available. The difference between the Historical and Alternate Japanese Plan scenarios is some flexibility in the Japanese attack plan.
Game length: 26 turns (0740 through 0945)
Initial Alert Level = 0
U.S. Setup
U.S. air and naval forces are setup first according to the historical deployments indicated on the U.S. Roster Sheets.
Alternate Japanese Deployment
The Japanese player is allowed to reorganize the composition of the attack waves but he is required to organize his air resources in two waves of roughly equal strength with all three aircraft types (Kate, Val, Zero) represented. The composition and ordnance for each aircraft can be annotated on the Japanese Aircraft Roster. The First Wave arrives in the Initial Deployment Box on Game Turn 1 (0740 hours) and the Second Wave arrives on Game Turn 13 (0840 hours). The Japanese player can assign forces to attack any target.
- Third Strike Scenario
This scenario can be played as an addendum to either the Historical or Alternate Japanese Plan scenario, or played by itself to examine the often-pondered third strike which the Japanese did not launch. This scenario is projected as an attack on December 7 or December 8, with slightly different Japanese air group orders of battle.
Game length: 13 turns (Dec 7, 1600 through 1700; or Dec 8, 0800 through 0900)
Initial Alert Level = 3
U.S. Setup
If the Third Strike Scenario is played by itself, U.S. ships are deployed at start in position and with historical damage as noted on the U.S. Ship Roster. U.S. aircraft available as usable after the Historic Raid are listed on the U.S. Air Roster. If the Third Strike is played as an addendum to Scenarios 18.1. or 18.2., damage incurred by U.S. forces during the First and Second Wave attacks remain in place. Any undamaged ship can roll five times on the Steam Up Table and a successful die roll allows that ship to sortie at the player’s discretion. Each ship that sorties is subject to one attempted attack by an I-boat.
Japanese Setup
The Japanese Aircraft Roster indicates the composition and ordnance of the Third Wave on December 7 or December 8. The Third Wave of Japanese aircraft deploy in the Initial Deployment Box at 1600 hours on Dec 7, or 0800 hours on Dec 8 after all U.S. forces are deployed.
Japanese Forces
All surviving and undamaged Japanese aircraft are considered serviced, fueled and armed and available to participate in the third strike. All aircraft lost and damaged during the first two waves are ineligible for use in the third strike on December 7. If the Japanese lose more aircraft destroyed and damaged in the first two weaves than actually occurred, remove the same number aircraft of the appropriate types from the third strike, taking them as evenly as possible from all six aircraft carriers. If the Japanese player has lost fewer aircraft, increase the third strike by the same number of the appropriate type and add aircraft as evenly as possible from all six carriers. Some aircraft damaged in the first two waves could have been repaired in time to participate in the December 8 attack (see rule 11.7). The Akagi, Kaga, Soryu, and Hiryu between them carried 100 modified Type 91 torpedoes and used 40 in the first strike. The number of Type 99 Mark 5 800 kg armor-piercing bombs is indeterminate but they were said to be in very short supply (probably 50 were used). Thus, I allow the third strike to carry another round of torpedoes by the torpedo bomber specialists surviving the first attack but the level-bombing Kates use the Type 99 Ordinary 250 kg bomb in lieu of armor piercing ordnance.
- U.S. Early Warning Scenario
Any scenario can incorporate a variation of the initial Alert Level on the day of the attack through a semi-blind process. The Japanese player secretly chooses an Attack Day between December 1 and December 10 and writes it down.
Game length: determined by the scenario being played
The U.S. player assigns an Alert Level for each day, including one day at Alert Level 0, four days at Alert Level 1, three days at Alert Level 2 and two days at Alert Level 3.
The Japanese player reveals the Attack Day.
U.S. Setup
U.S. Air and Naval forces are setup first according to the historical deployments indicated on the U.S. Roster Sheets.
Japanese Deployment
The Japanese forces are organized and arrive according to the historical First Wave and Second Wave assignments. Use the Japanese cruiser scout planes from the Chikuma and Tone per Optional Rule 5.7.
- A Wholly Different War
This scenario presents the players with the situation where one or two U.S. aircraft carriers are in port on the fateful morning. The loss of the battleships was ultimately not a killing blow; the U.S. was forced to rely on aircraft carriers and submarines to prosecute the war and these two weapons systems came to dominate the Japanese as the battleships never could have. The Enterprise was returning from delivering Marine F4Fs to Wake Island and scheduled to reach Pearl Harbor at 7:30 a.m. on December 7 but was delayed by weather. The Lexington was farther away and less likely to have been in port for the attack, but putting her in port is what alternate history is all about. The potential loss of one or both American carriers in the first battle of the conflict would have led to a wholly different war than the one which actually ensued.
Game length: as per the scenario being played.
Alert Level: as per the scenario being played.
U.S. Setup
U.S. air and naval forces are setup first according to the historical deployments indicated on the U.S. Roster Sheets. In addition, the U.S. player decides if one or both carrier groups are in port. The carriers berth at one of the Ford Island moorings (east or west). The escorts dock or anchor at any available location in the harbor. The air groups would have flown ahead and landed at Ford Island NAS.
Alexander: How long does it take to play a full game of Pearl Harbor versus the different scenarios?
JH: Each scenario is a full 26 turn game, except for the Third Strike scenario, which is 13 turns on its own, and will also be playable as a follow-on to a full 26 turn game, stretching a full game to 39 turns. My estimate is that a game can be played in a long afternoon, but play over two days is more likely. Things move quickly for the first two to four turns, then things become busier and near the latter turns there are fewer aircraft attacking, normally fewer air combats, and the turns move somewhat faster at that point.
Alexander: Are there any other games that you’re working on that you’d like to let us know about?
JH: Corregidor is in pre-production with Legion Wargames, and Rangers Lead the Way! has been contracted to Decision Games, pending acceptance in their feedback results. I have nearly completed The Lonely Queen, which is about the 20+ real and planned attacks on the battleship Tirpitz while it was in Norwegian waters. Rising Sun Over Hawaii is in the concept-to-reality stage with a co-designer, and I also am co-designing with Steve Dixon (Picket Duty, Target For Today) a simulation of PT boat actions in the Pacific. There are a number of others, but I don’t want to turn this article into a sales brochure. <grin>

Alexander: And finally, any last parting words of advice for those who will be play Air Raid – Pearl Harbor! in the future?
JH: For the Japanese player, I advise a careful balance in target selection, with some forces orbiting out of AA range to be applied where earlier attacks may have failed to “pick up the spare”, if you will. Also, attack the battleships with torpedoes as soon as possible to retain favorable modifiers for surprise and for lack of obscuring smoke. The biggest caveat is to attack enough facilities to move up the X axis of the Victory Point table while inflicting enough damage to ships and aircraft to do well on the Y axis. It is a careful balance to be achieved.
For the American player, I would say don’t get discouraged, don’t give up if you are being whipped from pillar to post. The Japanese may make a less than excellent targeting plan, or may just have horrible luck on To Hit and damage rolls. Depending upon the scenario, the Japanese player may stretch too thin, may take too many bites at the apple, and pay for that with aircraft losses. An American victory is not easy to obtain but keep fighting back and destroying as many Japanese assets as possible, in small increments if that is the best chance of succeeding.
Thanks for the insight John, I’m really looking forward to this game. Legion Wargames always puts out a premium product, so I’m looking forward to getting this one to the table.
