
Martin Melbardis began his design career with Campaign: Fall Blau from Catastrophe Games. This was a very interesting little dice chucking solitaire game on Operation Barbarossa during WWII. Since that time, he has started his own independent wargame company called Solo Wargame and has designed 12 different and very interesting roll and write wargames on a plethora of subjects including World War I (Trench Tactics), World War II (Operation Barbarossa, Lone Wolf: U-Boat Command and War in the Pacific), Napoleonic Wars (Siege Works), Ancient Rome (Rome Must Fall) and the Crusades (Crusade: Road to Jerusalem). His newest game called Thermopylae: Last Stand is focused on the the famous stand by the 300 Spartans and their Athenian allies at the Hot Gates (remember the phrase “This is SPARTA!”) in 480BC and looks really interesting and I reached out to Martin to get a bit more information about the game.
At the time of the posting of this interview, the campaign for the Kickstarter only has one day remaining so if you act quickly you can still back the project at the following link: https://www.kickstarter.com/projects/105281170/thermopylae-last-stand
Grant: Welcome back to the blog. What is your new game Thermopylae: Last Stand Print and Play about?
Martin: Hey! Thanks so much for having me back!
My latest game, Thermopylae: Last Stand is a solo Print and Play wargame about one of history’s most legendary last stands, the defense of the narrow pass at Thermopylae. This is where King Leonidas and his 300 Spartans, alongside their Greek allies, faced the full might of Xerxes I and the Persian Empire.
It’s a tense, dice-driven tactical puzzle about holding the line for as long as humanly possible. Each turn you’ll manage your Phalanx formation, shifting men to cover gaps, reinforcing weak points, and bracing for another brutal Persian assault.
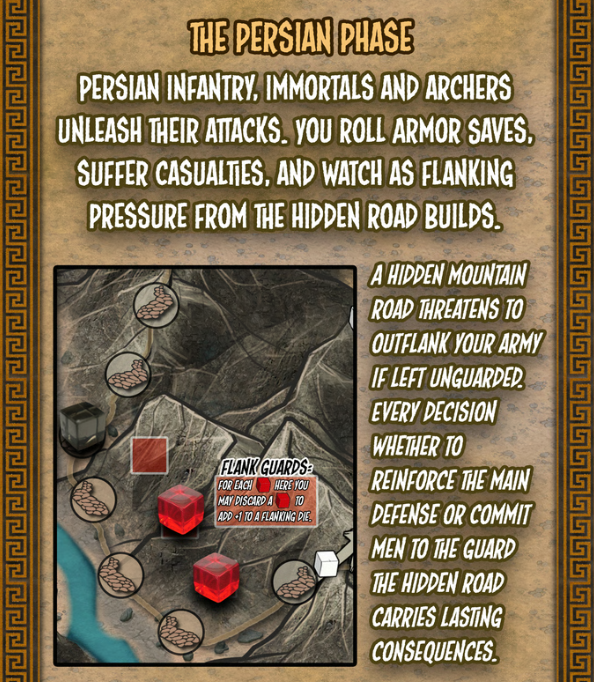
However, holding the pass isn’t your only concern. Somewhere beyond the cliffs, the Persians are closing in on a hidden path that could potentially outflank your position.
Grant: Why was this a subject that drew your interest?
Martin: Honestly, I’ve always been fascinated by historical “last stands” moments where small groups defied impossible odds such as Rorke’s Drift, Bastogne or the Little Big Horn. The Battle of Thermopylae is probably the most iconic of them all.
However, the real spark for this idea came from a supporter (Adnan) of one of my earlier Kickstarter games. He suggested that I design a game on this subject and this would plant the seed that eventually grew into this project. So Cheers to him! What a Legend!
Grant: What is your design goal with the game?
Martin: My goal with Thermopylae: Last Stand was to design a tight, fast-playing solo wargame that captures the tactical tension and raw desperation of holding a Phalanx together under overwhelming pressure. I wanted the gameplay to feel like they’re constantly fighting to keep order in the chaos of battle, shifting men to cover gaps, reinforcing where the shields start to falter, and watching the Phalanx slowly erode turn by turn. The goal was to make players feel that tension in their gut.
I also wanted the game to stay somewhat grounded in historical authenticity, so I had to include the hidden mountain path that doomed the real Spartan defense. This added a nice additional layer of decision making whether to commit precious reserves to the front or divert them to guard the flanking path…a painful tradeoff that mirrors the choices Leonidas could have faced at that moment.
Grant: What sources did you consult to get the historical details correct?
Martin: Unfortunately, I didn’t actually use any book sources for this one, since I didn’t have any in-depth material on the subject myself. Instead, I gathered everything from websites like Wikipedia, various historical articles, and several well-made documentaries on YouTube that explored the geography of Thermopylae, the tactics of the Phalanx, and the context of the battle itself.
And yes, I’ll admit I also even rewatched the movie 300 (2006, Legendary Pictures and Warner Brothers Pictures) to get into the right mindset, even though I know it’s pure fantasy! It might not be historically accurate, but it definitely helped hype me up, boosted a few muscles and fueled the creative energy behind designing a game.
Grant: What elements from the Battle of Thermopylae did you need to model in the design?
Martin: The key was the terrain, that narrow pass called the Hot Gates that negated the Persians’ numbers (for a time). That’s why the game focuses on a small, grid-based formation where the Phalanx’s ranks and ability to remain unbreakable is the key to victory.
I also knew I had to include the mountain path that ultimately doomed the Spartans, the route the Persians discovered and used to outflank the defense spelling the doom of the 300 Spartans and most of their allies. While Ephialtes, the Greek who betrayed them, isn’t directly represented in the game, his actions are felt through the Flanking Track. Each turn, the Persian scouts advance along this path, slowly closing in from behind. It adds a constant sense of dread…you can hold the front as best you can, but you always know that time and ultimate betrayal, are working against you.
Another small detail I wished to model in game was that of the Greek’s importance of the gods and divinity. I inserted a small rule called “Divine Favor” where you could reduce your reserves by -1 to re-roll a die. This brings an important element of Greek culture to the game and can help turn the tide after a disastrous roll of the dice.
Grant: How have you worked to include a sense of desperation and long odds? Have you succeeded?
Martin: Absolutely, as that’s the theme and intention here. The game usually begins under control, but the pressure builds quickly. As casualties mount and morale wavers, your Command Dice weaken, the Persians grow stronger by the day, and you can literally watch your Phalanx begin to collapse piece by piece. By the final turns, you’re clinging to survival, screaming at your dice and trying desperately to buy a few more turns before the Phalanx is destroyed.
In my early playtesting, I was holding the pass far into day 3 or 4 often, but I decided to ramp up the difficulty levels. After several rounds of adjustments, the game is now much tougher, and I’m only managing around a 25% success rate at surviving past Day 3. It feels punishing, but I feel like that is entirely appropriate. I’m even debating whether to tighten the difficulty just a little more to ensure to truly represent the desperate struggle and overwhelming odds.
Grant: Mechanically, how does the player have to split their focus between the front line and the hidden mountain pass?
Martin: That’s one of the game’s strategic dilemmas. You only have a handful of red cubes in your Reserves and limited Command Dice, so deciding when to reinforce the front versus when to send troops to guard the flank is brutal.
Neglect the hidden path, and the Persians will outflank you, ending the defense quickly. But weaken the Phalanx, and you risk a morale collapse before they even get there. The tension between those two priorities defines the experience.
Grant: What is the ultimate player goal for the game?
Martin: Unlike all of my other games, your goal here isn’t to win per say…it’s simply to holdout and buy time for the other Greek city-states to prepare and your sacrifice actually strengthens their resolve. By keeping up your Morale and your formation tight, your goal as the player is to try and weather the storm of Persian attacks for as long as possible.
In game terms, surviving past Day 3 is considered a victory in itself, surmounting the historical stand of Leonidas and his men. But if you somehow manage to hold beyond Day 4, that’s a Heroic Victory, a feat that cements your legend in bronze.
For historical context and from what I read, the Spartans were eventually outflanked by Day 3 and overwhelmed sometime that morning or afternoon.
Grant: What is the Phalanx Grid and how does it work?
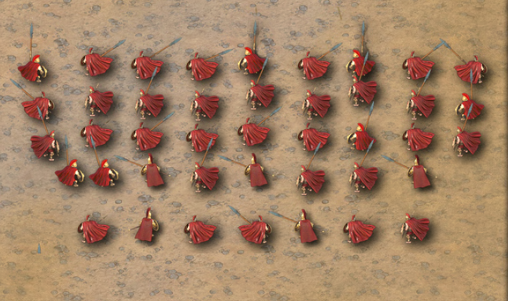
Martin: The Phalanx Grid is the core of the game. It’s a 3×4 grid of red cubes that represents your Spartan formation (the Phalanx). Every cube represents a group of 25 or so Hoplites and every space on the grid, a position in the formation.
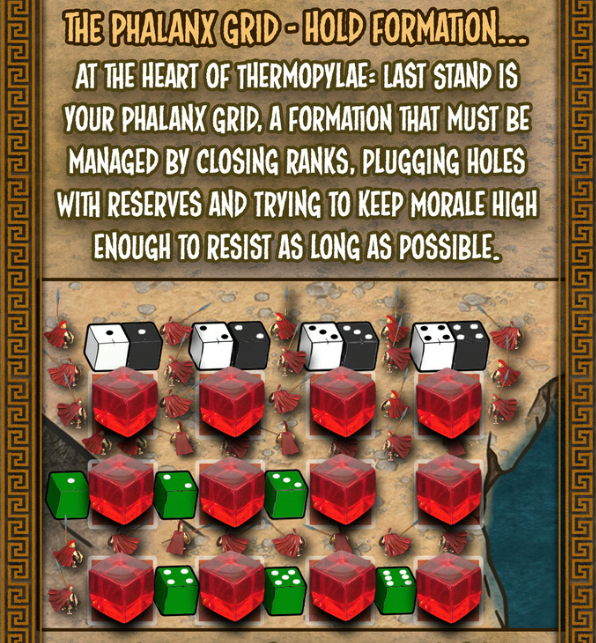
As attacks come in, cubes are removed through casualties, shifted to plug gaps, or reinforced. You’ll literally move and tighten the formation as the battle unfolds, closing ranks to keep your defense intact and your front row at full strength for future counter-attacks. It’s simple, but gives a real sense of managing a living, breathing formation of rank and file under the stress of battle.
To withstand these waves of attacks, the Shield Wall Order allows you to place yellow cubes on top of your red hoplite cubes. These represent raised shields locking together in defense. Each yellow cube can be used to block against and ignore a single incoming hit from either Persian Infantry (white cubes) and Archers (green cubes), though they offer no protection against the elite Immortals (black cubes), who are much deadlier in combat.
Grant: What is the layout of the Game Sheet?
Martin: Everything is designed for quick setup and intuitive flow. The Phalanx Grid takes up the center of the sheet. The Timeline runs along the top right to track the days and phases. There are two Persian deployment zones, one at the top of the Phalanx grid and another at the bottom that is used when they are outflanked. The actual Flanking Track sits to the center left, while the Morale Tracker and Casualty Track are just below the Timeline.
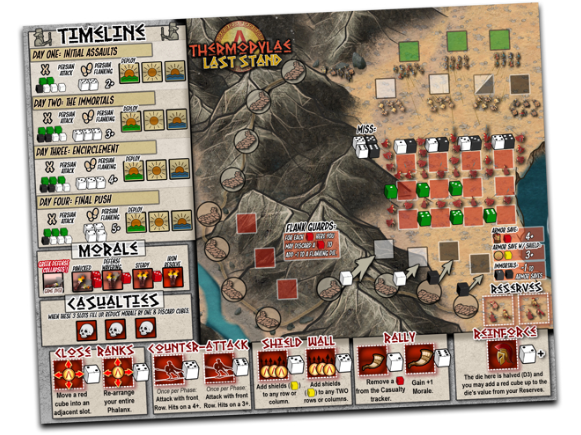
It’s all self-contained, easy to setup, understand and you can play the entire game on a single sheet with some cubes and dice in about 30 minutes or less.
Grant: How are Command Dice used by the player?
Martin: At the start of each Spartan Phase, you roll your four Command Dice to determine what actions you can take this turn.
Once rolled, each die can be allocated to an Order Box, representing a tactical choice such as forming a Shield Wall, launching a Counter-Attack, or Reinforcing the line. You’ll constantly have to react to the Persian assaults and choose between orders for defense, offense, and recovery knowing you’ll rarely have the dice to do all three.
In addition, each Order contains two types of actions: a Basic Action and a Boosted Action. Basic Actions require a lower die result and represent standard actions. Boosted Actions demand higher rolls but deliver stronger, often decisive effects.
For example, the Rally Order offers two possible actions depending on the die result allocated to it. The Basic Action requires a roll of 3 or higher, allowing you to remove one red cube from the Casualty Tracker, helping to stabilize your lines and prevent future morale loss. The Boosted Action, on the other hand, demands a roll of 6 or higher and rewards that risk by increasing your Morale by one, restoring the Spartans’ fighting spirit and buying you a little more time before the defense collapses.
Grant: How is the number of Command Dice determined each round?
Martin: While you always roll 4 Command Dice each Spartan Phase, which type of dice is tied directly to your Morale Tracker.
When casualties mount and morale drops, you start replacing your white Command Dice with red “fatigued” dice that have weaker rolls. So as the Spartans tire and morale breaks down, your tactical flexibility shrinks. White Dice roll normally (values of 1–6), giving you the full range of control. Red Dice, however, are treated as D3’s (values of 1-3) their result is halved and rounded up (e.g., a roll of 5 becomes a 3). These “fatigued” dice reflect reduced effectiveness and limited command reach as the Spartans tire or begin to panic under pressure.
Grant: How do you differentiate the various types of Persian units
Martin: Each Persian unit type is represented by a different color cube and die: White cubes represent Regular Infantry (numerous but weak), Green cubes represent Archers (target the back ranks) and Black cubes represent the elite Immortals (elite troops, hardest to defend against). They all attack differently and force you to adapt. Immortals, for example, ignore Shield Wall protection, making them even deadlier.
Attacks from Persian Infantry and Immortals differ from those of the Archers, as each type of unit strikes a different part of the Phalanx Grid. Infantry and Immortals assault the front ranks of each column, clashing directly with your hoplites in brutal close combat, while Archers fire over the ranks, raining down destruction and targeting the rear rows.
Grant: What different Orders does the player have access to? How do they affect the game?
Martin: There are five Orders total you can access each Spartan Phase: Close Ranks, Shield Wall, Counter-Attack, Reinforce and Rally.
Each Order represents a key tactical decision on the battlefield. Every Order can be executed as either a Basic Action or a Boosted Action, depending on the die result you assign. Choosing which Orders to prioritize allows you to react.
Close Ranks
When gaps begin to form in the phalanx, this Order allows you to tighten your formation by shifting red cubes into adjacent empty slots. The Basic Action (2+) lets you move a single cube to plug a nearby breach in the grid. The Boosted Action (4+) gives you the freedom to rearrange the entire formation, restoring order to a crumbling line. This is your tool to repair and maintain cohesion while under attack. Shield Wall
The hallmark of the Spartan defense, locking shields and bracing for impact. The Basic Action (3+) allows you to place two yellow shield cubes on red cubes of your choice in your Phalanx, protecting those units from incoming Persian Infantry and Archer attacks. The Boosted Action (5+) lets you place four yellow shield cubes on red cubes of your choice in your Phalanx, greatly improving your defensive posture. However, shields provide no protection against the Immortals, who are more deadly than other Persian units.
Counter-Attack
When the moment is right, the Spartans can strike back. The Basic Action (3+) lets each front-row cube roll for retaliation attacks, removing Persian units on rolls of 6+. The Boosted Action (6+) lowers that threshold to 5+, delivering a devastating counter-attack. Counter-Attacks can only be performed once per phase, representing a rare burst of Spartan ferocity before being forced back into defense.
Reinforce
Used to bring fresh fighters from your reserves or to station men along the flanking road. The die you assign here is halved (rounded up) to determine the number of new red cubes you can deploy. Reinforcements can either fill empty slots in the Phalanx Grid or strengthen the flank guard to delay Persian outflanking. Each time you reinforce, however, you must reduce the value of a Reserve Die by -1. Reserves are limited and when a Reserve Die reaches 0, it’s removed from play.
Rally
The Spartans gather their courage and restore discipline amid the chaos. The Basic Action (3+) removes a red cube from the Casualties Tracker, helping prevent morale loss. The Boosted Action (6+) increases Morale by one, restoring Spartan combat spirit. Rallying at the right time can make a huge difference.
Grant: How is “victory” achieved?
Martin: As mentioned before, victory is measured by time. If your Phalanx and Morale can survive beyond Day 3, you’ve more than matched history and earn a victory. If you somehow manage to hold beyond Day 4, that’s a Heroic Victory, completely rewriting history and the legend of Thermopylae.
Grant: What are the immediate loss conditions?
Martin: You lose immediately if your Morale reaches the “Greek Defense Collapses!” slot on the Morale Tracker or if your Phalanx grid is completely destroyed (empty). Either way, your army breaks, and the pass falls.
Grant: What type of experience does the game create for the player?
Martin: It’s fast, tense, and deeply thematic. I believe that the game feels like a mix between a tactical puzzle, an old miniature rank & flank wargame and a bit like a historical drama.
You’ll likely have those moments of triumph, blocking a deadly volley or landing a perfect counterattack…followed by turns of complete collapse. It’s meant to be emotionally charged, which is exactly what I wanted for players to experience, the thrill of resistance under impossible odds.
Grant: What other topics are you planning to create games for in the future?
Martin: Up next in 2025, I’m heading back to revisit Siege Works! I’ll be adding several new maps with new mechanics such as Toulon, Mantua, Danzig, and maybe a few surprises. More importantly, this time, you’ll be fighting from the French side! I’ve had some friendly complaints from my French fans about always being the opposition, so I’m happy to give them their moment in the spotlight… Vive L’empereur!
I also have plans to cover WW1 at some point in the near future and also to continue developing my series of WW2 Roll & Writes (Operation Barbarossa and War in The Pacific) next year with new entries possibly exploring North Africa, D-Day or the Berlin Offensive.
Finally, I would also love to explore the possibility of trying to dip my toes in to self-publishing physical games with a tiny wargame that fits in a small box or mint tin.
As always, I’m listening to my fans, so maybe expect a few surprises hidden in the mix!
Thank you for your time in answering our questions Martin. I have very much enjoyed playing 2 of your other games in Siege Works: A Napoleonic Siege Roll & Write Game and War in the Pacific: A WW2 Roll & Write Game and very much look forward to more from your design kitchen.
If you are interested, and to get a feel for the games offered by Solo Wargame, you can check out my videos on War in the Pacific on our YouTube Channel. Here is my playthrough of the game:
And here is my review on the game:
As mentioned above, the Kickstarter campaign only has one day remaining so if you act quickly you can still back the project at the following link: https://www.kickstarter.com/projects/105281170/thermopylae-last-stand
-Grant
