Drop Zone: Southern France is a company-level wargame covering the Allied airborne assault that spearheaded Operation Dragoon, which was the invasion of Southern France or the Second D-Day on August 15, 1944. The history behind this operation is really very interesting as early on the morning of D-Day, the allied First Airborne Task Force (1st ABTF) parachuted a dozen miles behind the Riviera landing beaches to seize key towns and road junctions, to prevent the German occupation forces from counter-attacking the amphibious landing, and to facilitate the advance of Allied forces. The 4:00 AM parachute drop was badly scattered due to an unexpected dense fog bank that blanketed the battlefield. Drop Zone: Southern France covers the first two days of this airborne operation in six game turns, when the American and British paratroopers and glider-men fought surrounded and alone, supported only by French resistance bands. This game is very good and is just a solid wargame.
In Action Point 1, we looked at the Game Board paying attention to the airdrop zones, the terrain and the objective spaces highlighted in yellow and red. In Action Point 2, we took a look at the airdrop procedure and covered an example of both the airborne and glider landings. In Action Point 3, we looked at the hidden units for the Allies and why this is such an interesting aspect. In this Action Point, we will review the Chit-Pull Activation process and take a look at the Assets in the game.
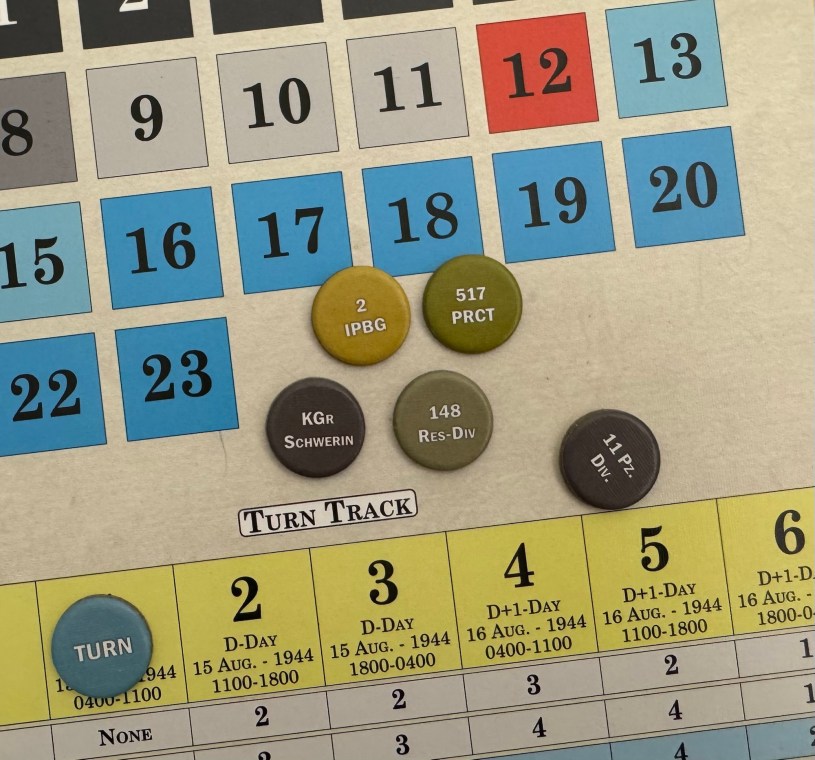
Chit Pull Activation
One of the aspects about wargaming that I really enjoy is replicating the conditions under which the historical battles were fought and then trying to meet or exceed those historical results with the same difficulty that was experienced during the event. I have found that one of the best mechanics to simulate these conditions is the use of a Chit-Pull System that I feel addresses the problem of simulating simultaneous action on the battlefield and issues of command and control during all the confusion of combat. So how does Chit-Pull work? Simple…the current player randomly draws a chit or counter from an opaque container (as hiding the information on the chits is key so no one can know what is coming) identifying a group of units which may now be activated. This Chit-Pull mechanic also allows for solitaire play as both sides can be easily played with the activation mechanism.

In Drop Zone, there are are four Commands with 2 of those being Allied (the 517 PRCT and 2 IPBG) and 2 German (KGr von Schwerin and 148 Division) and each of these Commands have a specific Initiative Chit that is assigned to activate them. At the start of each game turn, with the exception of the first game turn as that order is pre-determined, the players will draw an Initiative Chit to activate the 1st Command. When the Command has completed its turn, the players will draw another Initiative Chit to activate the next Command until all 4 of the Commands have been activated. Keep in mind though that there is a pre-emption ability to this process as the Allied player may play an Initiative Asset for the appropriate Command to go first, without having to draw a chit.
This Chit-Pull Activation mechanic is very well done in the game and I think really creates the uncertainty that would have been there during the operation. The difficulty with airborne operations is always timing and surprise and if the chits don’t agree with you then that is just part of it. But in addition to the Chit-Pull Activation is the inclusion of assets, which also adds an element of the unknown to the game and creates some great opportunities.
Assets
Assets are included in the game and each side gets a random draw of these Assets each turn. There are a total of 12 Asset Counters for the Allies and 10 for the Germans. The Assets will be organized according to the set-up instructions but the Assets are randomly drawn for both sides at the beginning of Turns 2-6, as indicated on the Turn Track. The purpose of these Assets is to represent the various elements that each side had access to in the operation and that do things like add dice to combats, provide changes to the initiative and give an opportunity for different Commands to attack together.

These Assets may only be used once and are then discarded. So what effect do these Assets have? Let’s take a quick look at the different types.
Indirect Fire (both sides) – provides the indicated number of dice for Indirect Fire to support attack or defense.
Anti-Tank (both sides) – these Assets have two values listed on the counter — the Anti-Tank value may only be targeted at enemy armor units while the Indirect Fire value can be used against infantry and armor targets. These are very versatile Assets that are typically more important to use against hard armor targets.
Air Strike (Allied side only) – these assets have two values — the Anti-Tank value may only be targeted at enemy armor units while the indirect fire value can be used against both infantry and armor targets. Air Strikes may be used in combat, to support attack or defense, or as interdiction.
Initiative (Allied side only) – during the Initiative Phase this Asset allows the player using it to place their chosen Command Chit in the 1st space on the Initiative Track without the need to draw a chit). Only 1 of the 2 Allied Initiative Assets may be played in a single turn. This is one of the more powerful chits for the Allies as it gives them the opportunity to act before the Germans to move into position, take a key space or bring in additional units to brace for an attack.

Coordinated Attack (Allied side only) – this is a very important chit for the Allies as it may be used by either Command during the combat phase. Any units of the inactive command that are adjacent to the target hex may participate in the attack if the owning player chooses. The player may also choose to play one Indirect Fire or Anti-Tank Asset from either Command but not both. This is an important chit for the Allies and can be used at the right time to break the defending Germans.
Regroup (German side only) – this Asset must be played during the Reinforcement Phase and may be used for the German Command to receive 2 Replacement Points.
I really do like these Asset Chits and the fact that they are randomly drawn each turn creates some interesting tension as you are always waiting for that one chit that you need to make a difference this turn. These are limited assets and you must choose to use them wisely in order to improve your chances at victory for both sides. Just a very well done part of the game and I very much liked their inclusion.
In Action Point 5, we will cover an example of combat with the cool custom dice.
-Grant
