
Bursting on the scene over the past couple of years, Clint Warren-Davey is a new designer who has jumped in with both feet. His first design is called Werwolf: Insurgency in Occupied Germany, 1945-1948 from Legion Wargames and is a COIN Series inspired card assisted game about a what if scenario where the Werwolf Insurgency wreaks havoc over the final few years of World War II and continues their struggle even after the surrender of the Third Reich into the Post WWII era. He also has a new game out called One Hour World War II. But his newest project is about the ANZAC landings at Gallipoli called Gallipoli: Ordered to Die from The Dietz Foundation. I reached out to Clint to get a bit more information about the game and he was more than willing to discuss this new design.
If you are interested in Gallipoli: Ordered to Die, you can back the project on the Kickstarter page at the following link: https://www.kickstarter.com/projects/dietzfoundation/gallipoli-ordered-to-die
Grant: Welcome back to the blog Clint. With your 3rd game currently on Kickstarter how has your design approach changed?
Clint: Well, my design approach hasn’t really changed in between each of the 3 games (Werwolf: Insurgency in Occupied Germany, 1945-1948, One Hour WWII and now Gallipoli: Ordered to Die), because they were all designed at about the same time – roughly, 2022-23. They’ve just had to wait for publishers to be ready to launch crowdfunding campaigns. So you will see a similar design approach across all of them.
Grant: What lessons have you learned and been able to put into practice?
Clint: Since my first real foray into game design – Werwolf – I have certainly learned a lot. Mainly about keeping rules simple and minimizing the number of exceptions and special rules. And the importance of marketing your games – which I do primarily through my Twitter/X account.

Grant: What is your new game Gallipoli: Ordered to Die about?
Clint: It is about the major battles at Anzac Cove in 1915. To be clear – the Gallipoli campaign was massive and covered a wide area of the Gallipoli peninsula in Turkey. There were over 500,000 Allied troops fighting there, including about 60,000 Anzacs (Australia and New Zealand Army Corps – Aussies and Kiwis) but also British, French and Indian units.
Anzac Cove and the Sari Bair Mountain range was the part of the peninsula where the Anzacs fought. They landed on 25th April in a very dramatic and chaotic amphibious assault, which allowed them to carve out a narrow strip of territory and hold onto it amidst Ottoman counter-attacks in May. In August, one final attempt at a gigantic offensive at Anzac Cove was made – this was a disaster and eventually the Anzacs were evacuated. The game covers all three of these battles – the Landing, the Ottoman Counter-Attack and the August Offensive.
Grant: What was your rationale in the name of the game?
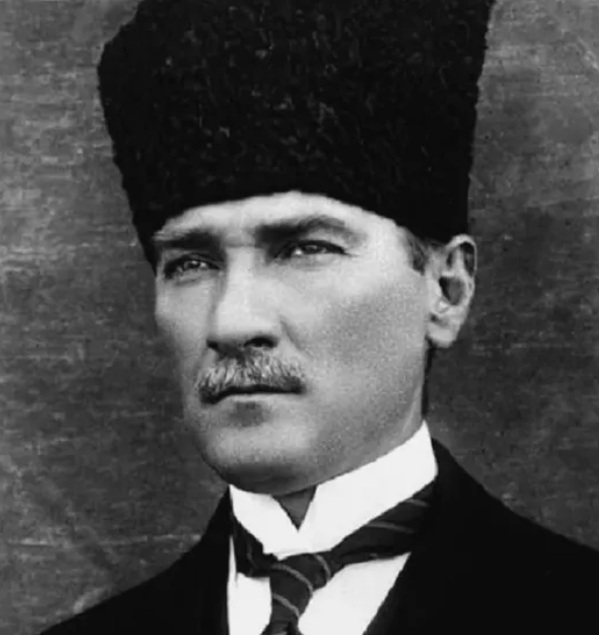
Clint: The name of the game comes from a very famous quote by Mustafa Kemal – later known as Attaturk. He led the Ottoman Turkish forces at Gallipoli and after the war he became the President of the Republic of Turkey. When the Anzacs landed and were racing for the heights of Chunuk Bair, he rallied fleeing troops and told them to fix bayonets and launch an immediate counter-attack. He said “I am not ordering you to fight. I am ordering you to die.” As an aside, there is a chit that appears in the game called “Ordered to Die” that allows for a suicidal attack. But more about the chits later.
Grant: Why was this a game you were inspired to design?
Clint: To explain that, I have to go back to my teenage years! As an Australian, I first learned about Gallipoli in 9th grade history class. It’s a mandatory topic in all Australian high schools, and now as a history teacher I have the privilege of explaining the Gallipoli campaign to new generations of Aussie kids. Ever since then, it has been an interest of mine. Every year on Anzac Day I had thought of making a game based on this epic conflict but kept putting it off. Then a few things changed. I got into wargame design in a serious way in 2022. Also, I frequently use wargames in the classroom to teach historical wars. On Anzac Day of 2023 I was at my local pub, surrounded by patriotic Australians who would all know something about Gallipoli, but not in much detail. They would have heard of Lone Pine maybe, or knew that we landed on the wrong beach, but not much beyond that.
I thought to myself – there should be a game on Gallipoli that could be easily played by high school students AND ordinary people down at the pub AND by dedicated wargamers. A game that’s simple, portable, not too expensive, easy to teach and plays in less than an hour. But still shows the complex geography and the controversial command decisions that shaped the battles around Anzac Cove. So, I finally committed to the project that has been brewing in the back of my head for 20 years and started making the game.

Grant: What other Gallipoli games did you study for inspiration?
Clint: Primarily, Kieran Oakley’s Assault on Gallipoli. Kieran is a fellow Aussie and lives not far from me, he was happy to discuss his design approach over some Zoom calls and was kind enough to share some files from his game. Kieran’s extensive research helped me nail down the Order of Battle and the precise layout of the terrain – although my game is much simpler and more compact than his. Not to say one is better than the other – they are just different gaming experiences.
Grant: What is your design goal with the game?
Clint: As I stated earlier, it is intended to be an accessible, simple, inexpensive, fast-playing game on the Anzac experience at Gallipoli which you could happily play with high school students, your mates down at the pub, or with serious wargamers. I also wanted a straightforward and deterministic combat system and a kind of chess-like appeal to the maneuvering. Surprises can happen due to the Leadership Chits, but mostly it is pure strategy and no luck.
Grant: What main mechanics are used in the game?
Clint: Basically, you get 3 actions per turn. Each action can be spent to fire a Barrage or move a stack of units 1 space, including into battle. You can allocate these 3 actions however you wish, so there is some flexibility. But you usually won’t have enough actions to move every unit every turn – you have to focus your efforts. When you do move into an enemy-occupied space you fight a battle, and the battles are generally resolved with a deterministic system – highest strength wins. There are no cards, no dice, no charts – all very simple.
Grant: How did you differentiate the ANZAC troops from the Ottomans? How are they different?
Clint: Generally, the Anzac battalions have a higher strength than the Ottoman ones. They are usually 2/1 while the Ottoman units are 1/0. This is not bias on my part as an Aussie – it is simply based on the combat record. The Anzacs had been training for 9 months before landing at Gallipoli and were extremely keen to get into the fight. During and after Gallipoli they became universally renowned as excellent soldiers, inflicting a very favorable loss ratio on enemies that often had superior positioning or numbers. Of course, the Turks were no slouch – we severely underestimated how tenacious they were. But in an equal fight I would say Anzac units were more effective in combat.
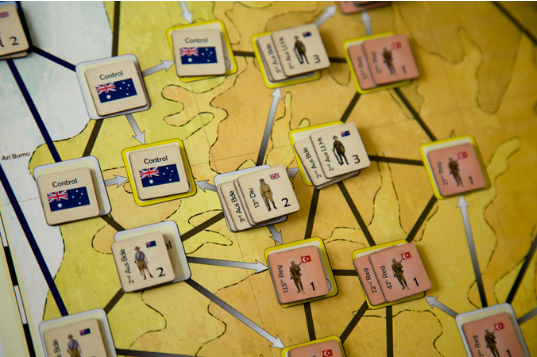
Grant: What is the layout of the board?
Clint: It’s a point-to-point map, with each space representing a key location in the campaign. Most spaces in the center of the map were fought over several times, such as Lone Pine and Russel’s Top.

Grant: Why did you feel point to point movement was the best approach? What strategic decisions are forced upon the players by the layout?
Clint: I feel point-to-point is the best map layout in terms of clarity. It’s very obvious where units can and can’t move and you don’t need many fancy terrain rules. If I had made this an area movement or hex map I would have to include borders or spaces showing impassable cliff faces – instead I can represent these by simply not having a connection between certain spaces. The point-to-point layout also clearly shows the high ground which is the most critical part of the whole campaign. Many of the connections show arrows – if you are moving in the same direction as an arrow, your units are going uphill to a space with higher elevation and therefore will suffer a penalty in battle.
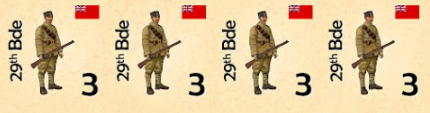
Grant: What is the counter anatomy? What different units are included?
Clint: The counters just have a title, a picture and a number. The number is the only thing relevant to gameplay and is the unit’s combat strength, ranging from 0 to 3. One side shows the unit at full strength, the reverse side is reduced strength, i.e. after the unit has taken a hit. Each unit is a battalion and we have provided titles to show which regiment or brigade they are from, e.g. you will see three units belonging to the Ottoman 72nd Regiment and four units belonging to the Australian 1st Brigade.
Most of the Anzac units are strength 2/1 and most of the Ottoman units are strength 1/0, but there are some exceptions. The elite Anzac Light Horse units are 3/1, while the fearsome Gurkhas of the 29th Indian Brigade are 3/2. The Ottoman 57th Regiment has units rated 2/1 – these are the most crucial units for the Ottoman player as they can go toe-to-toe with Anzac units. There are also some Ottoman regiments (like the 1st and 6th) which were historically regarded as elite shock troops but who fell apart quickly in the May counter-attacks – these are rated as 2/0.

Grant: What is the scale of the game?
Clint: Each unit in the game represents a battalion. With about 10-20 units per side in each scenario, players are commanding roughly a division or corps. There is no specific ground scale on the point-to-point map, but the whole area depicted on the map could probably fit in a 3km by 2km box if you were looking at a real map.
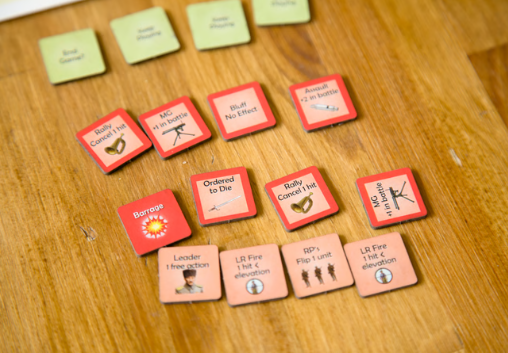
Grant: How are the Leadership Chits used and why are they important?
Clint: The Leadership Chits are very important and represent all the stuff that is not just infantry battalions slogging it out in the usual way. There is naval gunfire, long-range fire (shooting down on the enemy from a higher elevation), heroic officers rallying their units, replacements being fed into the front line to boost units back up to full strength, and more. Most of the chits relate to combat, and boosting your strength. Battles are extremely close and even a +1 or +2 modifier is huge. My favorite chit is “Ordered to Die” – it allows the Ottoman to inflict a hit in battle even if they lose that battle: essentially a desperate, suicidal attack.

Grant: What actions do players have each turn?
Clint: Basically, just Barrage and Move. A Move can result in a battle, which are resolved as they arise.
Grant: Why was your decision to limit this to just 3? What does this represent historically?
Clint: Well, I really didn’t want players to be able to activate all of their units every turn. That would be a level of coordination and sweeping, broad-front advances that simply didn’t occur in these battles. There were no radios, very patchy telephone communications and complex terrain where it was hard to get runners to relay messages efficiently. Even with meticulous planning and synchronized watches, you would be hard pressed to have multiple regiments or battalions attacking at the same time – at least before the enemy reacts. After some initial testing, I settled on 3 actions a turn, which felt about right for the operational tempo of the time.
Grant: How does Barrage work?
Clint: Very simple. As one of your three actions for the turn, you may place a Barrage marker on a space with enemy units. If you attack that space in the same turn, you will get +1 to your combat strength in the ensuing battle. Basically it represents using the artillery available to you as a division-level commander to soften up the target in true WWI style.
Grant: How does combat work in the design?
Clint: It’s essentially a deterministic system, much like One Hour WWII. Each unit has a combat strength and to this you will add modifiers for high ground, artillery barrages and any Leadership Chits you want to commit. The highest total combat strength, including all these modifiers, wins.
The real distinctive feature of the combat is how losses work. Regardless of the result, all attacking units take 1 hit. This means you are guaranteed to suffer heavy casualties as the attacker even if you have superior numbers. Secondly, if the defender loses the combat they will suffer a single hit and then have to retreat – but they may cancel their retreat and therefore keep control of the space by inflicting another hit on their own units. This represents desperate local counter-attacks to regain front-line positions, a staple of tactical level WWI combat. These combat rules mean that actually wresting control of a space from the enemy is often a hard slog and will take several attempts. There is no blitzkrieg here – you will be fighting tooth and nail for every few yards of trench, and the losses will be piled up high.
Grant: How do players obtain victory?
Clint: Depends on the scenario, but essentially it’s about controlling key spaces on the map – especially the high ground. Many spaces have an elevation number, from 1 to 3. The higher the number, the higher the elevation – which is relevant for combat and for scoring. It’s harder to attack uphill, i.e. into a higher elevation space. But if you do take a high elevation space, it’s worth more victory points at the end.
Grant: What different scenarios are included?
Clint: There are three scenarios:
- The Landing: This is about the initial landing at Anzac Cove on 25th April, 1915. It’s where the Anzacs disembarked from their boats just before dawn and began attacking uphill into the steep cliffs and ravines of the area. This scenario is not only the best introduction to the game, it is also the most fluid and dynamic of the three. There will be a lot of movement, as both sides attempt to stake out a viable front line amidst the chaos of an amphibious landing in very uneven terrain. As the Anzacs, your battalions are landing in 4 waves of 4 units each. Basically, you start with 4 units ready to land and will get another 4 units every second turn. You are in a race against time and a race against your Ottoman opponent – you need to get enough high ground under your control to meet the victory threshold. Historically the Anzacs were expected to take Chunuk Bair on the first day of the landing- this was a near impossible task given the strength of Ottoman units in the vicinity and in the game you will find it just as difficult. So don’t race straight for the highest point on the map (Chunuk Bair) – you will overextend yourself and probably allow the Ottomans to cut your supply or slow you down with weak detachments deployed in depth.
- Ottoman Counter-Attack: This depicts the large scale counter-offensive of May 1915, where the Ottomans attempted to drive the Anzacs back into the sea. This one is a true meat grinder. Both sides start very close together, with a packed front line formed by the previous few weeks of trench raids and skirmishes. As the Ottomans, you are on the offensive – and this is going to cost you an enormous number of soldiers. Historically this was intended to be a surprise attack under the cover of dawn, but the Anzacs knew it was coming and prepared accordingly.
- August Offensive: This one depicts the final Allied attempt at a breakout in the Gallipoli peninsula. Historically, the attack at Anzac Cove was meant to coincide with a British landing at Suvla Bay, a little to the north. It was a fairly complicated plan that relied on the Australians tying up enemy reserves in a series of local attacks, while the New Zealanders and Brits attempted to take the high ground of Chunk Bair and the rest of the Sari Bair mountain range. This is the largest scenario in terms of the sheer number of units on the board. Like the Ottoman Counter-Attack, this is a close range, grinding battle of attrition with the Anzacs on the offensive. As always, the losses will be piled up high. One small part of the August Offensive – the Battle of the Nek – is depicted in the 1981 Mel Gibson film – Gallipoli. In game terms, the Nek would be a single Light Horse unit attacking from Russel’s Top to Baby 700 and being destroyed. When you play the scenario, you will see that there were a lot of other battles happening at the same time as this – like the much larger struggle for Lone Pine.

Grant: What type of an experience does the game create?
Clint: Well, the lack of randomness will give you a chess-like experience, where you plan your moves ahead and any failure is your fault – not the dice! It is very tense. However, there is also an element of “push your luck” due to the Leadership Chits. You might be able to win an attack with just your front line units. But if the enemy has chits left, you don’t know what they are or if they will be committed to the battle. Maybe the enemy has a spare Machine Gun Chit (+1) or an Assault Chit (+2). Maybe you will need to commit your own chits to win. Or maybe they are just bluffing and have nothing useful – you don’t want to over-commit but you also don’t want to lose the fight. This bluffing and tension feels like poker or some other card game – especially when you reveal your chits simultaneously and see who has come out on top!
Grant: What are you most pleased about with the design?
Clint: I really love how compact it all is. There are no bells and whistles – you just have a map, your unit counters and the rules. It’s quick to set up, quick to teach and is just plain fun every time I have a go at it. I think it will hit the table a lot among wargamers as the scenarios are all playable within an hour. Everyone is time-poor now, so we need more games like this! I also like the unit designations, as it adds personality to each counter if you know a bit of the history. Knowing that I’m sending in the New Zealand Mounted Rifles, or Australian Light Horse, or the Ottoman 57th Regiment is really cool from a historical point of view.
Grant: What has been the response of playtesters?
Clint: Mostly positive. Aside from having to clarify some rules and minor mistakes, they have all enjoyed the game and found it accessible while still having nail-biting decisions and plenty of tactical options. They like how different each of the 3 scenarios is and how the rules are very simple.
Grant: What other designs are you working on?
Clint: Too many! One Hour WWII has already been released, but One Hour WWI and One Hour Napoleon should be launched later this year. One Hour English Civil War will probably launch next year. Then there is Division Commander: 101st Airborne, a wargame following the story of the 101st Airborne division in WWII. I also have a game on the Polish Underground and a COIN-style game about the life of Jesus and the Roman occupation of Judea. Both of those are not ready for release yet, still in development. Finally, I’ve got a game very similar game to Antoine Bauza’s 7 Wonders, but based on the entire Old Testament of the Bible. Enough to keep me busy for a long time!
Thank you for your time in answering our questions Clint. I really appreciate your detailed responses as well as examples of how the game plays and some bits of strategy mixed in. This one looks like a great little introductory wargame that will be very strategic and fun to play. I also am very much excited about your other designs, especially the COIN-style game on the life of Jesus Christ and then the Division Commander game (as I just love any game with airborne troops!).
If you are interested in Gallipoli: Ordered to Die, you can back the project on the Kickstarter page at the following link: https://www.kickstarter.com/projects/dietzfoundation/gallipoli-ordered-to-die
-Grant
