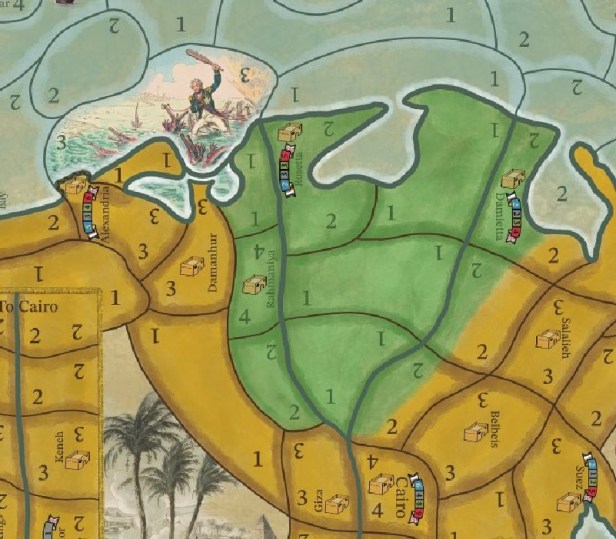
A few years ago, we became acquainted with Andrew Rourke through his Coalitions design from PHALANX that went on to a successful crowdfunding campaign. He has since been a busy guy with starting his own publishing company called Form Square Games and also starting the first design in a new series called Limits of Glory that will take a look at the campaigns of Napoleon. In Campaign I, which is called Bonaparte’s Eastern Empire, the game is focused on the campaign of the French in Egypt between 1798 and 1801. It covers everything from the invasion fleets leaving France trying to avoid Nelson and the British Navy, to the final surrender of the remnants of the French Army to an Anglo-Ottoman force in 1801. The game is very interesting and uses some new ideas to focus on the luck and skill of commanders through a mechanic called the Glory Rating. This Glory Rating can be used as a type of currency by commanders to do several things such as re-roll dice for movement or in battle. This becomes a sort of push your luck and resource management aspect and the players who more wisely use this scarce resource will find themselves victorious.
In Action Point 1, we looked at the area movement Map Board and got an understanding of the various features and also how armies navigate the hostile terrain of Egypt. In Action Point 2, we examined the Event Clock and discussed how it effects the game. In Action Point 3, we discussed the use of the Glory Rating for commanders and what it represents. In this Action Point, we will cover a few examples of movement, combat and sieges and show how they work.
Movement
One of my favorite parts of the game is how movement operates. Nothing fancy here or overdone but the chosen method was pretty interesting and takes into account the ability of a commander to move their forces through various terrain types. These terrain types are shown on the board where each space has a number value between 1 and 4 printed on them, which indicates the number of dice to be rolled to activate elements in that space. The easier the terrain is to move through, the more dice the player will get to roll. Dice rolls will only succeed on a 5 or 6 and fail on 1 to 4. Only one dice success is needed to activate the space and be able to move out. Therefore spaces with a value of 1 will be harder to move out of compared to spaces with a value of 4.
You will notice that the values on the spaces are not random and represent the conditions of the spaces, their connections, terrain and other aspects that would effect the movement of troops. Low numbers can represent areas of desert that were hard to move through due to lack of water or large distances of ocean that took a long time to cross and were susceptible to storms or windy conditions. Higher space values represent a better ability to move through those areas due to less severe or flat terrain, overall smaller distances or even more accessibility to forage and supplies for the troops. Also keep in mind that Elements can continue to move until they fail a test to be activated and can even spend Glory to attempt to re-roll those dice.
Let’s take a look at a few examples of Movement, with one of those being pretty difficult and the other being much easier.
In the picture below, Lannes is located in the space to the west of Damietta with his forces and wants to move in to initiate a battle with the Mamluk forces there in the Built Up Area (BUA). The Space Value where Lannes is attempting to move from is shown as 1. This means that this area is a bit difficult to maneuver through, probably because it is lower swampy area, and this Movement attempt will be difficult.
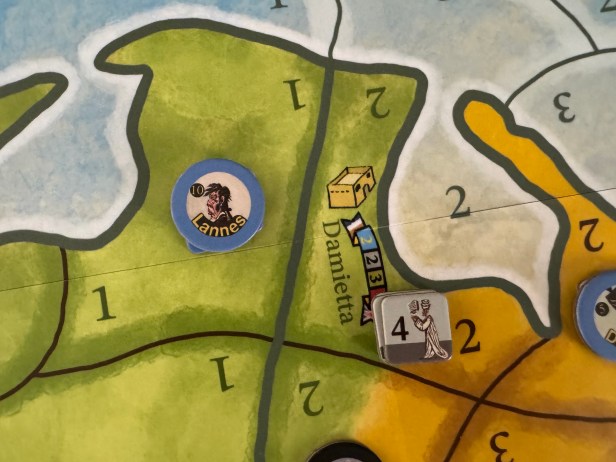
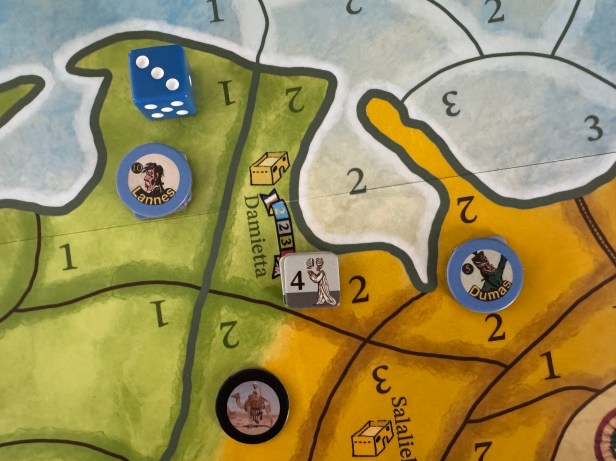
Remember, that when any unit attempts to move out of a space that we use the Space Value they are moving out of for the movement test. Not the Space Value they are moving into. Lannes will only be able to roll 1d6 and must score a result of a 5 or 6 to be successful. Lannes rolls the dice and is unlucky as he gets lost in the quagmire of the swampy area and cannot seem to find the end of it. His attempt has failed. In our last post in this series, we did discuss the use of a Commander’s Glory Rating to do re-rolls of dice and he can spend one of those limited number of points but decides not to as he is running low at this time.
Now that you have taken a look at one of the more difficult attempts let’s take a look at one that is a bit more of a cakewalk. And by a cakewalk, I mean the fact that more dice will be rolled which is always better as you increase your chances of success.
In the picture below, we see that Reynier is located in Rahmaniya to the east of Damanhur and is attempting to move to the space below him. The Space Value of Rahmaniya is a 4 so this means that Reynier will get to roll 4d6 to attempt to get a single 5 or 6 success. The 4 Space Value represents the logistical ease with which to obtain supply, including food, water and possibly porters from the area to assist in moving the baggage trains that are needed to support the army on the move.
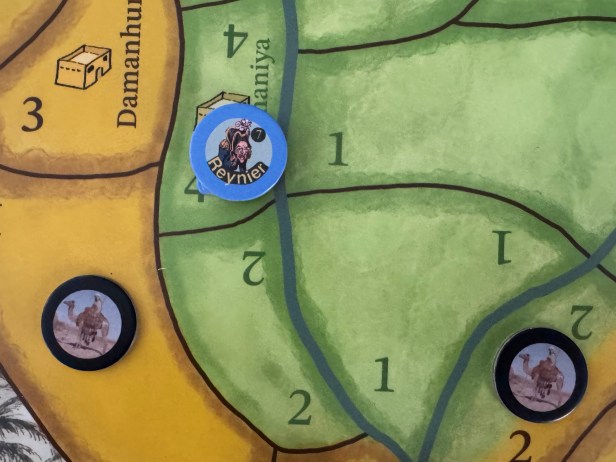
The dice are rolled and Reynier gets results of a 1, two 3’s and a 6, which is a success and means that he can move to the intended spot. As you can see, rolling 4 dice is much better and easier to ensure movement than just 1 die.
This movement system is really pretty slick and simple and keeps the game lite and fun as the players will always be rolling dice for this check or that. Be aware though that the constant dice rolling does slow the game a bit, especially when you are having a run of back luck and have to use your Glory Rating to perform re-rolls.
Now let’s take a quick look at an example of Combat and Sieges.
Combat
A big part of the game is the Combat as you would expect and while it is fairly simple, there is a CRT to consult and you have to understand the ways to make your forces the best that they can be…typically by ensuring their are with a Leader. Any Elements that move into a space containing enemy Elements must then engage them in Combat unless the enemy Elements decide to retreat into a Built Up Area (BUA) located in the same space. If there is no BUA, then the Combat will take place in the open.
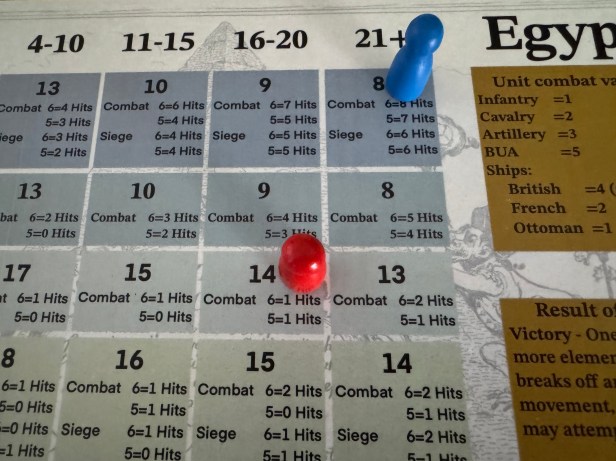
The first step is for the players to calculate the combat strength of the Elements in that space. Each type of Element, including Infantry, Cavalry and Artillery will add a unique amount of combat strength. Each Infantry unit will add 1 combat strength, each Cavalry unit will add 2 combat strength and each Artillery will add 3 combat strength. Once the combat strength values for each side are calculated, the players will then refer to the Combat Table to cross reference their values to use in the Combat by referring to the top line of the combat table, finding the appropriate column that matches the calculated Combat Strength of their Elements in the space and then go down the table to the row matching the Command Status and nationality of the Elements. When the appropriate space is determined, the player will then place their Combat Marker (which is represented by a wooden pawn, blue for the French and red for the Coalition) in the intersecting box.
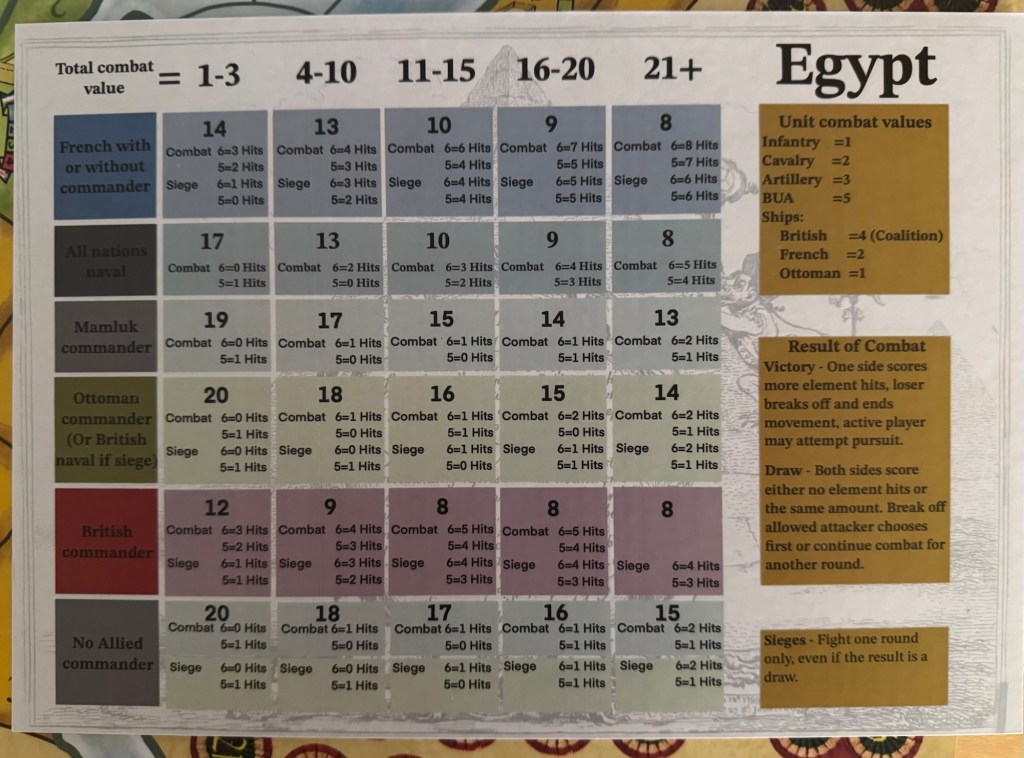
Each player will then get to roll 4 dice, no matter their location on the Combat Table or their total Combat Strength. If there is a Commander with remaining Glory Points in the battle, the player may choose to re-roll any number of dice. The active player will declare how many dice they wish to re-roll, then the non-active player declares how many dice they wish to re-roll. Players then re-roll the dice simultaneously. Both players may require opponents to re-roll successes, with the active player again declaring their request first, followed by the non-active player, before re-rolling the dice simultaneously. These re-rolls or requests for opponent re-rolls will cost the Commander 1 Glory Point for each dice they wish to re-roll.
The player will have to find the target number they are trying to roll in the box on the Combat Table and the results of these dice must equal the number shown. For example, a total 14 Combat Strength French Army with a Commander must roll a total of 10 on these 4d6. If not, they are not successful in their attack and they must decide if they are going to re-roll.
If the target value is reached, then the player will refer to any 5’s and 6’s to determine the number of hits created from this attack. Remember, a 5 or a 6 is required for a success. But Combat has 2 success thresholds with the target total on 4d6 as well as looking for 5’s and 6’s. Really pretty simple once you do it a few times and get used to the Combat Table. The battles in this volume in the series are pretty one sided for the most part as the Ottoman and Mamluk units are just not up to snuff as they typically create just 1-2 hits per 5 or 6 while the mighty French Army will inflict 3-8 for each 5 and 6 result.
If a sufficient total is scored, successful scores of 5 or 6 will reduce the opponent’s strength by one Element for each hit inflicted. The player receiving the hits decides which Elements to remove. The most number of hits will decide the winner, unless all Elements of one side or the other are removed. If both players lose no Elements or the same number of Elements, both sides have the option to break off. If both decided to stand, then another Combat follows immediately as part of the same player’s turn.
Let’s now take a look at an example of Combat.
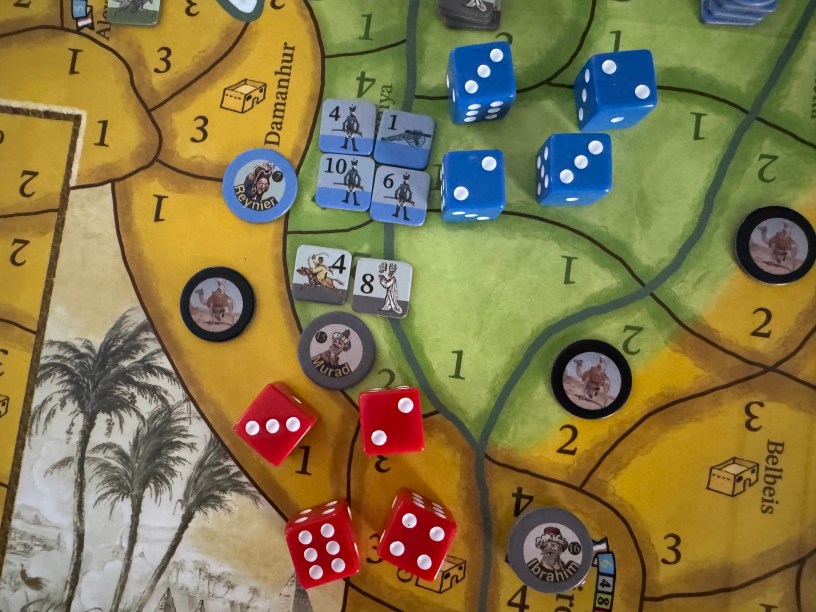
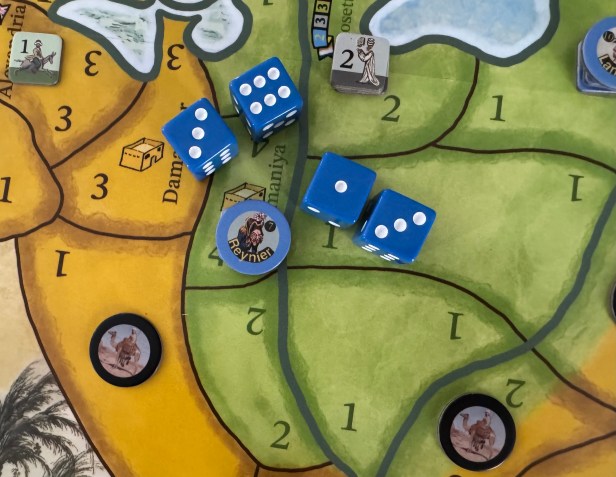
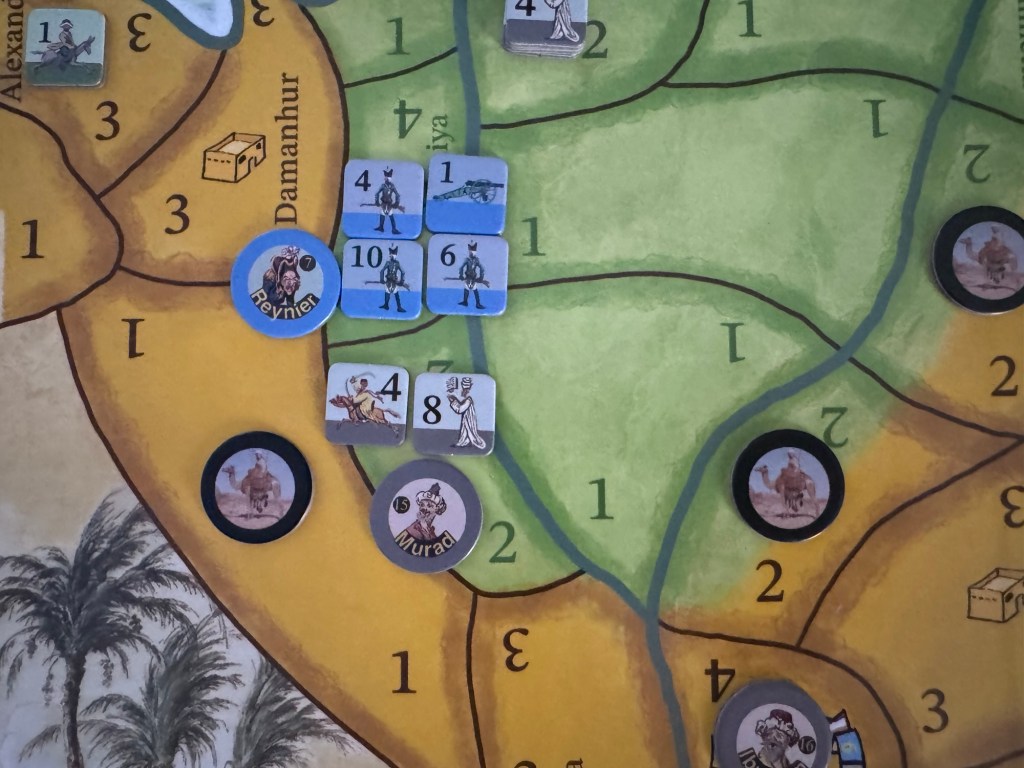
In the picture below, Reynier has successfully moved into an open space held by Murad and his Mamluk forces. The Mamluk have a total of 20 Combat Strength (8 Infantry at 1 CS per + 4 Cavalry at 2 CS per = 20 Combat Strength) as compared to the French who have a total of 23 Combat Strength (20 Infantry at 1 CS per + 1 Artillery at 3 CS per = 23 Combat Strength).
With each side’s total Combat Strength having been calculated, we refer to the Combat Table. The Mamluks have a total of 20 Combat Strength and a Leader is present so will look at the 16-20 column while the French have a total of 23 Combat Strength so will use the 21+ column. The target total needed to be rolled on 4d6 by the Mamluks is 14 and the French must roll just 8.
The dice are rolled and the results are as follows for the French: two 2’s, and two 3’s for a total of 10 and for the Mamluks: a 2, 3, 4 and 6 for a total of 15. Both sides eclipse the needed target number so are successful in Combat so now we take a look at 5’s and 6’s to determine the number of hits scored and see the French have none while the Mamluk’s have one 6.

As both have Leaders present, they both decide to spend a few Glory and re-roll some dice. The French decide to spend 4 Glory to re-roll all 4 dice and the Mamluks spend just 1 Glory to re-roll 1 die. The French roll worse than before as they now don’t meet the target number and also scored no 5’s or 6’s. The Mamluks fair better as their lone re-rolled die scores a 5 and another hit. Remember that Commanders can choose to spend their Glory to force the opposing side to re-roll their successes but in this example I will just stop here. This Glory concept is really pretty interesting and makes for a very tense and interesting gaming experience because you have to spend them wisely to do well and the urge is just to spend, spend, spend with no thought for later when you will have little to no remaining Glory.
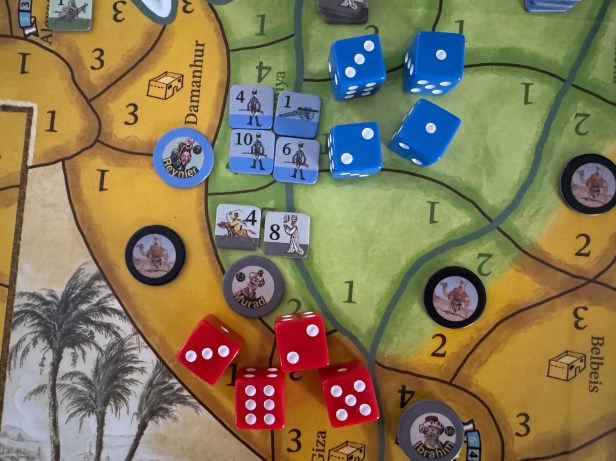
We then refer to the Combat Table and see that 5’s and 6’s will score 1 hit each for the Mamluks so then the French must decide to lose 2 Elements and choose to lose 2 Infantry, which drops their Combat Strength from a 23 down to a 21. The French must now breakoff and retreat to a connected friendly held space. This will end their turn as they will have to place a Momentum Marker (wooden pawn) to signify Reynier is done this turn. As was mentioned previously, the French very much outclass the Mamluk and Ottoman forces. On the 21+ column, a successful 5 will score 7 hits and a 6 will score 8 hits for the French. This is a tough game for the Coalition and their hope lies in the continual whittling away of the French forces and hoping that their Commanders use their Glory early and often so they are less effective later when the British arrive on the scene to back up the local defenders.

Siege
Sieges are a very interesting twist on Combat and for all intents and purposes is generally the same process as normal Combat. Elements in a space with a friendly or unoccupied BUA may retreat into it when enemy Elements enter the same space. They may then only be attacked as a siege. They always add five Combat Strength points to their total to represent the BUA walls and they may add the Combat Strength of any friendly naval elements in an adjacent sea space. Commanders inside a BUA without any other Elements can defend the BUA in a siege using the Combat Strength offered
by the protection of its walls, which are presumed to include a small inherent garrison of troops. In this case, if the defender receives any hits in the siege, the Commander will be removed from
the game and the BUA is captured.
The only real difference with Siege is that the first turn is considered to be an assault. Both players total the Combat Strength of all their Elements present. This includes all Cavalry, Infantry, Artillery and any naval Elements in an adjacent sea space. Defenders also add the combat strength of the fortified BUA. Once the assault is over, if there are remaining Elements in the BUA defending, the Siege will commence and at this point Cavalry are no longer included in the total Combat Strength of the attackers or defenders. Once the one round of assault is finished, a Momentum Marker is placed in the space and then just one round of Siege Combat follows in any subsequent turn if the attacking player activates the space. There is no die roll is needed to activate the space as in the case of a Movement as it is already shared by opposing Elements. After each single round of Siege Combat, a Momentum Marker is placed in the space containing the BUA. The attacking player has the choice about whether to activate their forces to continue the Siege each round or they can await reinforcements to arrive to increase their numbers. That is pretty much all of the differences. The Elements will be removed with successful hits and Commanders can choose to use their Glory to re-roll their failed dice or force their opponent to re-roll their successes.
I do very much enjoy the simplicity of the Combat system in this game. It just works well and is lite and fun. I love that each side gets to roll the same number of dice, although with vastly different outcomes, and their is a real sense of the time period and the system shows the influence and power that a good Commander has over their troops with the Glory Rating. Just a great little fast playing system that I cannot wait to see in the other upcoming volumes.
In case you are interested and want to learn more, you can check out our video review of the game at the following link:
In Action Point 5, which is the conclusion to this series, we will discuss the path to victory for both the Coalition forces including the British, Ottomans and Mamluks as well as the mighty French forces.
-Grant

Great explanation of the mechanics Grant, thanks for taking the time to do this, I’m really glad you enjoy the system. Andy
LikeLiked by 1 person