A few years ago, we became acquainted with Matt White who is a fantastic artist and budding wargame designer and also posted an interview with him regarding his graphic design approach and how he makes that beautiful art! He is a very talented graphic artist and has since designed several very interesting small scale wargamers, with his most recent offering is called Operation Biting. Operation Biting is a print and play solitaire tactical wargame focused on the British Airborne in World War II with a daring raid to steal secret radar plans from the Germans called the Bruneval Raid. I have played it about 5 times over the past few weekends and wanted to share my First Impression thoughts with you here.
First off, the game is a print and play wargame that ran a successful Kickstarter campaign this summer raising $3,056 (£2,434) at a cost of $12.50 (£10) per game. So right off the bat you can see that this is a pretty good deal and you get some beautifully illustrated counters and the map is just gorgeous. As such, if you buy this game you will have to find some sharp scissors and get to some “arts and crafts time” by printing out the counters, rules, player aids and the board and the cutting out the counters. These files were emailed to the backers and were easy to download and print out. You can print the counters out on thick card stock paper or I have seen some people glue them to the back of a cereal box and then cut them out. The counters were well aligned on the page and were not difficult to cut out and keep looking nice. I am not as particular with my cuts as some of you might be but I think at the end they were playable and looked pretty good.
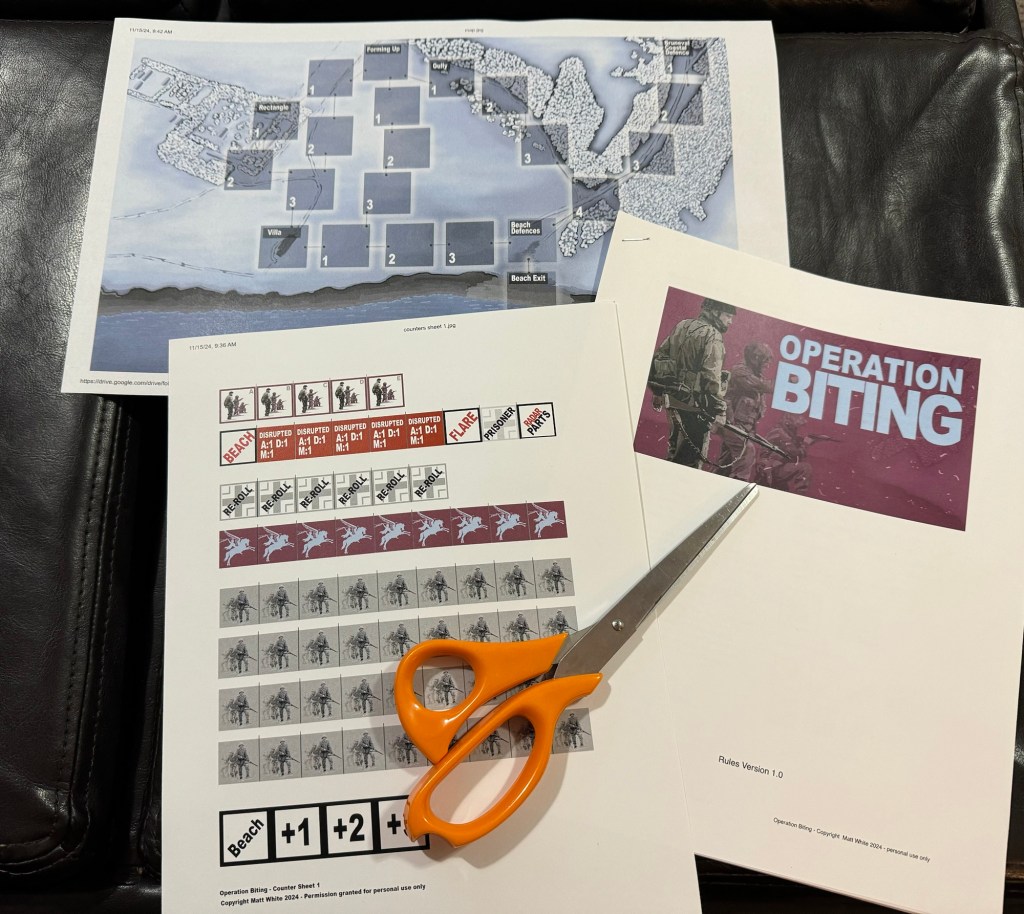
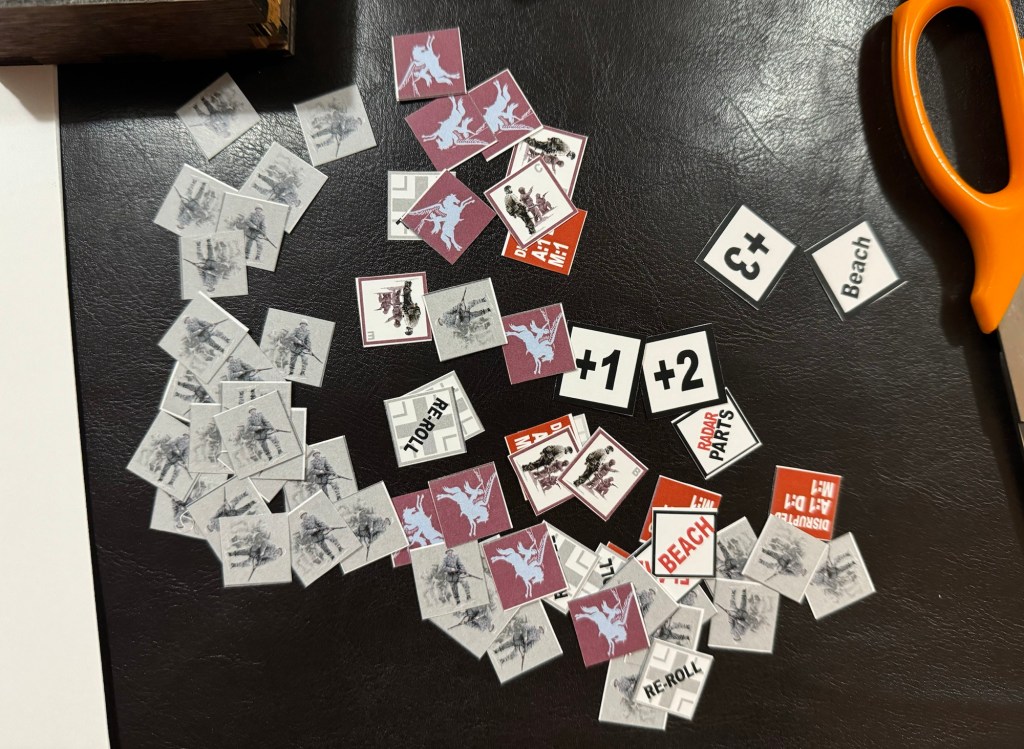
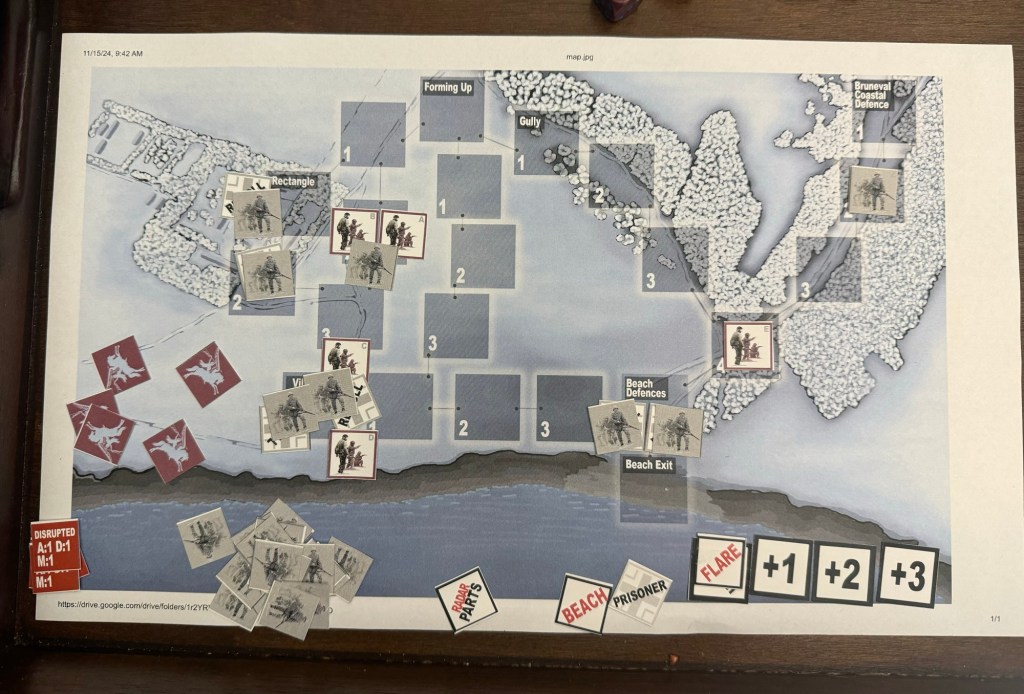
One thing that you can see in the picture below more clearly is the fantastic art that Matt has created for these counters. The German soldier counters and the 1st Airborne counters are absolutely stunning and really create a great connection with the game. The Administrative markers, including the Disrupted markers, Re-Roll markers, the Villa counters (including the Radar Parts counters and Prisoners counters) and the Beach associated markers (which include a Flare counter, Beach counter and the track for the Signaling attempts are all very clean and clear and give some very important gameplay information on them.
The board is a look at the coast of France during 1942 and is a point to point movement map that has various numbered boxes shown for ease of reference. There are also several German locations including the Bruneval Coast Defence Box, Rectangle Box, Villa Box, Beach Defences Box and the Beach Exit box, which are all important locations for the spawning and actions of the German defenders. The board is printed out on a legal size sheet of paper measuring 8.5″ x 14″ and is very appropriately sized for the counters. My only gripe about the board was its use of muted greys and whites but that actually sets a pretty decent tone for the game as the night raid was delayed for a few days due to poor weather and there was snow on the ground.
The player aids are also very useful and the rules were understandable but from time to time I had to read them again and again to make sure that I got the gist. The rules of the game are fairly simple and are easy to grock once you start playing and moving counters about. One of the best parts about the setup of the game before getting started is the player having to determine each of the Airborne squads statistics. There are 3 key statistics including Attack, Defence and Morale, which each play a vital role in the game. Before starting the game, the player uses the Airborne Squad Stats Player Record to record these statistics and then needs to refer to them throughout their game. The value for each one must be between 1 and 3 but with no attributes having the same value. The player has some tough decisions to make as each of their squads will have strengths and weaknesses. Some squads will be better at attacking. Some better defenders and then some will have higher Morale and will be able to perform stressful tasks under fire such as disabling the radar parts, taking prisoners and signaling the Royal Navy on the beach for pickup.
I really enjoy games that have a setup phase where you have to assign statistics, equipment, weapons, etc. as it forces on players tough choices about how they wish to attack their objectives and with what squads will be most effective at the different tasks. Having to carefully consider what statistics to give to what squads and then maneuvering them in order to best utilize them is really a big focus of the game. The numbers assigned to each statistic equates to the number of dice that squad will roll in those different areas. You don’t want your high Morale guy to be your main attacking unit as they will probably only have a 1 or 2 ability and then when they are counter attacked will have poor defense. You don’t want to attempt to take prisoners or disable the radar with your low morale guy as your chances of success will be lessened and time is of the essence here as you just can’t wait around because there are more German soldiers being summoned.
During the game the player will face defensive German forces already in position at several key locations including the Villa Box, Rectangle Box and Beach Defences Box. These defenders are static though and will not leave those locations to chase down the squads if they move past them but they will be tougher to take on as they are armed with a special Re-Roll token that allows them to re-roll their lowest dice in combat. This can make their attacks very effective and cause the squads to become Disrupted, which not only makes their statistics worse but if 2 such Disrupted counters are placed the squad will be eliminated. In addition, additional German counters will enter the board, pursuing the player and causing havoc. The Enemy Reinforcement Roll will occur each new round and the German soldiers will possibly spawn at 2 locations; the Rectangle Box and the Bruneval Coastal Defence Box. These reinforcements, unlike their more static defensive counterparts will aggressively pursue the squads once they spawn and will be ready to attack. Taking on 2 of these German soldiers in on Zone can be extremely challenging and in my experience will not end well for the player.
This was not an easy mission historically and it is not easy in the game as the Germans are determined to stop the British from succeeding. Because the game is dice dependent, Lady Luck will play a part, as with any military operation, but your decisions, planning and tactics are crucial, especially in how you maximize your squads and utilize their strengths to your advantage to hold back the German forces.
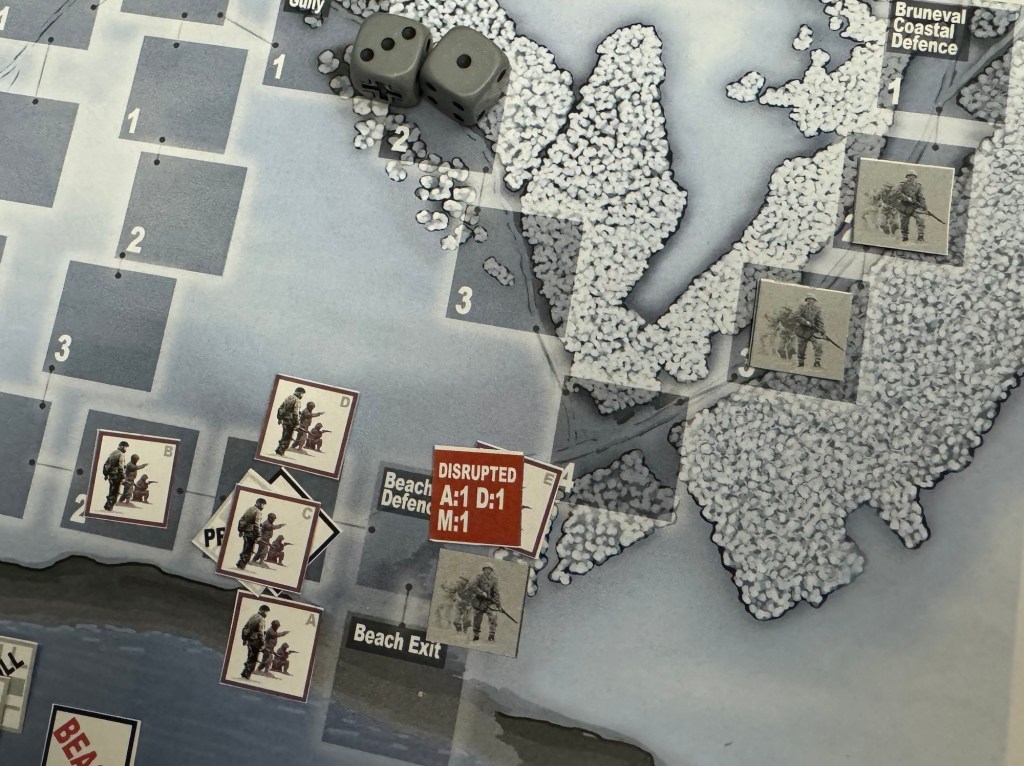
Combat is very simple but is pretty fun as it uses a counter die roll with the highest results being kept to compare to the enemy’s numbers. The player must roll 2d6 for the enemy and record the highest number. That is the number that the player’s Airborne Squad must now beat using their number of dice for their Attack attribute. They have to roll equal to or higher than the defender’s value in order to score a hit and remove the enemy unit from the board. But, the player has a limited number of re-rolls that they can choose to use that are called Bravery Points. These are tracked with markers with the Pegasus logo representing the 1st Airborne Division. The difficulty of the game can be made harder or easier by adding Bravery Points to your pool or taking them away. I actually tried it without Bravery Points at all and it didn’t end very well for me! The combat changes slightly when a unit is attacking multiple defenders such as in the below picture. This Airborne Squad E (code named Rodney), has an Attack attribute of 2 so therefore can roll 2d6. In the case of attacking 2 units the highest die result is compared to the highest defender die result and the other die result is compared to the next defender result. In this picture, Rodney Squad got lucky and rolled a 6 and 5 which was enough to defeat the German soldier’s 3 and 2. Both of these German units were eliminated and this freed up the squad to move toward the Beach Defence Box to attempt to take out the resistance there before the rest of the squads could clear the Villa, capture their prisoners, disable the radar parts and make their way to the Beach.

Any of the special actions, such as taking prisoners and disabling the radar, requires a unit to attempt this action by rolling 2d6 and then adding their Morale statistic as a bonus to the roll needing a result of 10+ for success. In the picture below, Hardy Squad has a Morale statistic of 3, which will add a +3 bonus to the roll, and was rolling 2d6 and needs a final result of 10+. Not an easy task but one that I was successful in here by rolling a modified 13!

The same process is followed for several of the other similar tasks including taking prisoners and signaling the Royal Navy when the radar parts and squads are at the Beach Exit Box. Here is where you will have to protect your high Morale units to do their work as those bonuses are key and without them you will find that you spend a lot of extra turns rolling the dice all the while having German soldiers spawning and moving toward the squads to prevent them from getting away.
To achieve victory the player must steal the radar parts, grab some prisoners and escape from the beach! This is the final part of the game where, hopefully, all your plans will come together and you will have made the right choices all while being lucky with the dice and utilizing your scarce Bravery Points at the right times. At the Beach Defences, there are multiple defended German positions with 2 German soldiers with Re-Roll tokens here awaiting the squads. Not only do you have to contend with them but also the additional spawning and advancing German squads who are attempting to reinforce those areas.
When you have arrived at the Beach Exit, the player must send up a flare to signal to the Royal Navy to come and retrieve your squads (along with the all important radar parts and prisoners that you have captured) and this is the most tense part of the game. While you wait, trying again and again to get the required 11 or 12 result to signal, you will have to fight a rear guard action against the advancing German forces, while trying to signal your rescue!
On each roll after the first, the player will be able to apply the modifier from the Royal Navy Arrival Track which increases from +0 at the beginning to the maximum +3 modifier after the 3rd attempt.
If, with the relevant modifier, the result is 11 or 12 the Royal Navy will arrive! The game is not over yet however as the player must now progress to the Attempt to Leave Beach step. Oh, yes, you have to get off the beach while taking fire from the German reinforcements who can now fire from the Beach Defence Box and do not have to close on your squads to engage them.

Once the Royal Navy have arrived on the Beach, the player can determine if their Squads are successful in leaving the beach. For each of your Airborne Squads that attempt to leave the beach, the player will have to first determine the Beach Exit Value by rolling 2d6 and using the highest value as the Beach Exit Value. The player will then roll for each squad that is attempting to leave the Beach a number of dice equal to their Morale statistic. This can be done once per turn for each squad on the Beach. If one of the dice values is equal to or higher than the Beach Exit Value rolled for that turn, the squad leaves the Beach and is added to the Beach Track denoting they have made it off the Beach. The player can use any remaining Bravery Points for re-rolls but will have to do this quickly and efficiently, especially if there are more German units stacking up all firing at the squads.

In the end, this is a fun and relatively quick playing little solitaire game! The average game will last 30-45 minutes and is really pretty simple to pick up. What a great little narrative I was able to create with Operation Biting though. I really did enjoy the game and its mechanics and had a blast chucking dice. As mentioned before, the rules are pretty simple to grock and the game has good player aids, generally clear rules, and is highly playable. Frankly, this was the best $12 I have spent in a long time as this really is a fantastic little print and play solo wargame.
The game creates some real tension and a feeling of urgency as you have to move quickly and decisively and must get some luck if you are to keep your squads together and get them to their objective and return safely home. The game also really focuses on and emphasizes using your squads to achieve your objectives by planning well and utilizing their strengths. Plus the danger at the end of the game when the squads are on the Beach is really well done and I love how challenging those rolls are. This is a game about dealing with the unknowns, adjusting your plan to the appearance of new threats in spawning German soldiers and relying on a bit of luck and a smidge of good fortune!
Not a lot of quibbles with this one but maybe one. The static defending German units make it so that I never want to enter the Rectangle or the space just below it. I don’t really have any reason to do so. These units will not come out to chase me down and cannot fire at my units in adjacent Zones so there really is no impetus for me to risk my troops there. I simply move expeditiously down to the Villa and get to attacking the static defenders there all the while trying to capture prisoners and disabling the radar parts. I was surprised by that aspect and have considered whether there should be a requirement to attack those Zones and at least keep them at bey rather than bypassing them? Just my thought but maybe that would make the job harder…and it really is pretty challenging already as the dice hate me and you have to rely on those dice.
If you are interested in Operation Biting and wish to acquire a copy, you will need to contact Matt White directly on Board Game Geek. Here is a link to his BGG profile: https://boardgamegeek.com/user/Matt%20White
-Grant
*Note: The dice seen in the pictures are my own custom dice purchased from Flames of War and other suppliers. The player will have to provide their own dice for the game as this is a print and play offering and will need to have at least 3 dice preferably more.
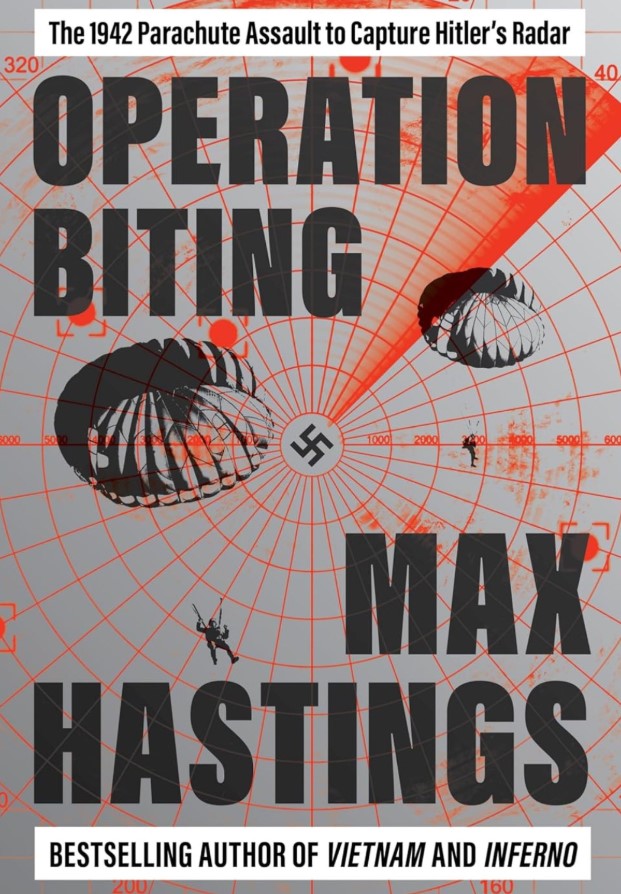
*I have also purchased the book written by Max Hastings titled Operation Biting: The 1942 Parachute Assault on Hitler’s Radar. This book can be purchased on Amazon for the price of $26.01 paperback or $28.00 hard cover. You can follow the link by clicking the picture below.