
As you know, I love the COIN Series and anything associated with it. This new Irregular Conflicts Series is considered COIN adjacent and shares some of the same elements. The 2nd volume called A Gest of Robin Hood is a 2-player game that is set in the world of literature but based on actual events of the time as it covers the bandit known as Robin Hood as he patrolled the Sherwood Forest around Nottingham and attempted to relieve the evil Prince John of the money that he stole from the peasants and give it back to them. The game is very much asymmetric as each of the sides has different goals and objectives but also have different actions, called Plots & Deeds, that can be used to great effect to change the landscape of Nottinghamshire and plant the seeds of insurrection or pacify the locals and keep them paying those juicy taxes. We have played the game a few times now and have really enjoyed what is it that we are seeing and experiencing. The game is a great entry point into the world of asymmetric gaming and also teaches some of the basic principles of the COIN Series mainly focusing on the Sequence of Play, card assisted framework and diverging player sides with vastly different focus. The game is very approachable but also has a lot of meat to it and is really an interesting experience.
In Action Point 1, we took a look at the Game Board, which is absolutely stunningly beautiful yet very functional, and discussed the different areas including Prison, the Justice/Order Track and various other spaces. In Action Point 2, we investigated the 2-player Initiative (Sequence of Play) Box to understand what makes this process unique. In Action Point 3, we looked at the menu of Plots & Deeds for the Sheriff. In this Action Point, we will take a look at the menu of Plots & Deeds for Robin Hood and his Merry Men and do a bit of compare and contrast.
Goal of Robin Hood and His Merry Men
As we did with the previous post in this series, before we go into the individual Plots & Deeds, I want to give an overview of the goal of the Robin Hood player. Robin Hood and his Merry Men are trying to keep the Royal Favour Track, which is broken up into both Justice and Order, in their favor be keeping it on the Justice part of the track, which is the upper half. Ultimately he is trying to cause an auto victory by increasing Justice to the 5 or 6 space. In order to do this, Robin Hood will have to regularly place out Camps on the board during the Recruit Plot which gives the added benefit of increasing the Justice Track in their favor. They also are trying desperately to keep their Merry Men hidden on the board and to evade capture by the Sheriff and his Henchmen. Keeping them hidden allows Robin Hood to take the the board impedes the Robin Hood player from doing what they need to do to win the game such as robbing carriages to fund the construction of Camps. But, as was in the case of the Sheriff, this is much easier said than done! And I would comment that I feel like Robin Hood has the tougher time of doing it, mainly due to the scarcity of funds.
Plots
The Robin Hood player chooses from Recruit, Sneak and Rob Plots. Let’s start off taking a look at how Robin Hood deploys his Merry Men onto the board and attempts to encourage revolt in the Parishes.
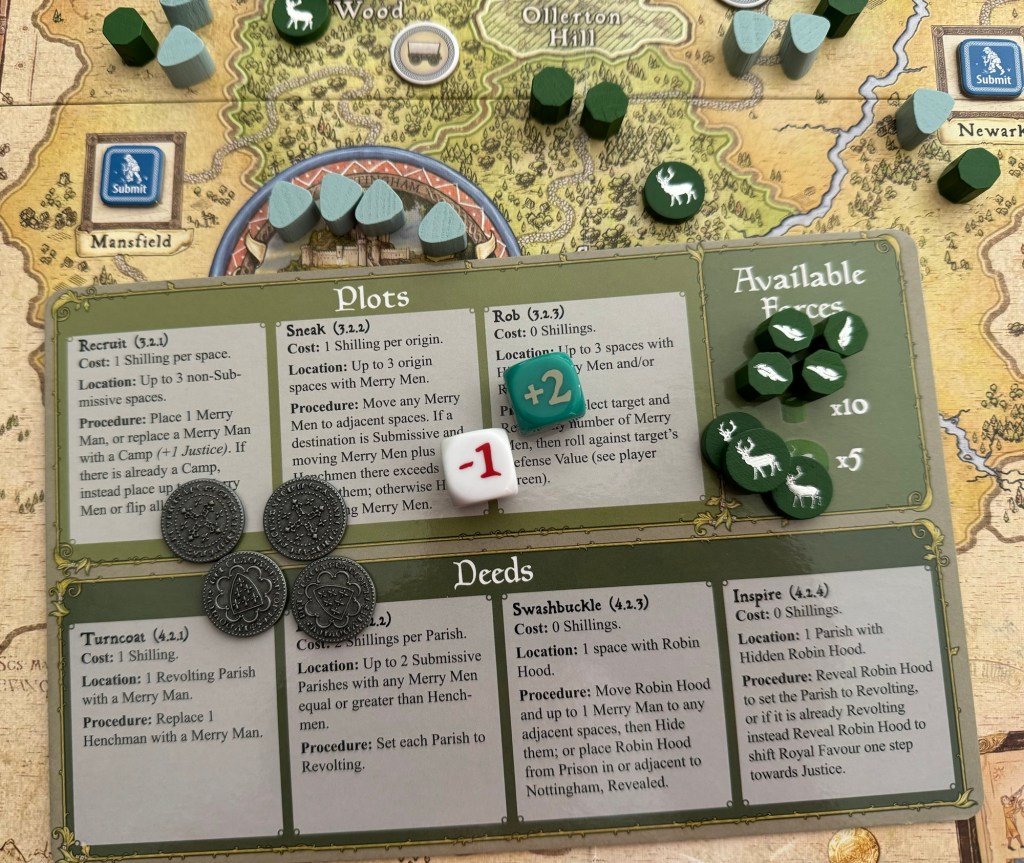
Recruit Plot
The Recruit Plot allows Robin Hood to place Merry Men on the board and to set up Camps. This process also has a scoring benefit as when the Robin Hood player places out a new Camp, they will gain a +1 shift toward Justice on the Royal Favour Track. The process is pretty simple as the player will select up to 3 spaces that are currently not Submissive and then will pay 1 Shilling per space they are Recruiting in to either place out a single Merry Man, or to replace one existing Merry Man (but not Robin Hood) with an Available Camp. and shift Royal Favour one step towards Justice. If there is already a Camp in a selected space, then instead either place up to two Merry Men in that space or flip all Merry Men there to Hidden.
This Plot is very useful to bring out new forces onto the board but also to hide those that have been busy in inciting open rebellion in the Parishes so that they don’t get arrested. Recruiting and protecting the Merry Men is important as you cannot do much if you have no men on the board. Also always keep in mind that the Robin Hood player will always have a bit tougher time getting funds to perform actions. Yes they can rob but that is not always successful. Remember that during the Royal Inspection Phase of the game, Robin Hood will gain 1 Shilling for each Camp they have on the board located in a Forest space or the Ollerton Hill space. I always recommend getting 2 Camps out in the Forest spaces.
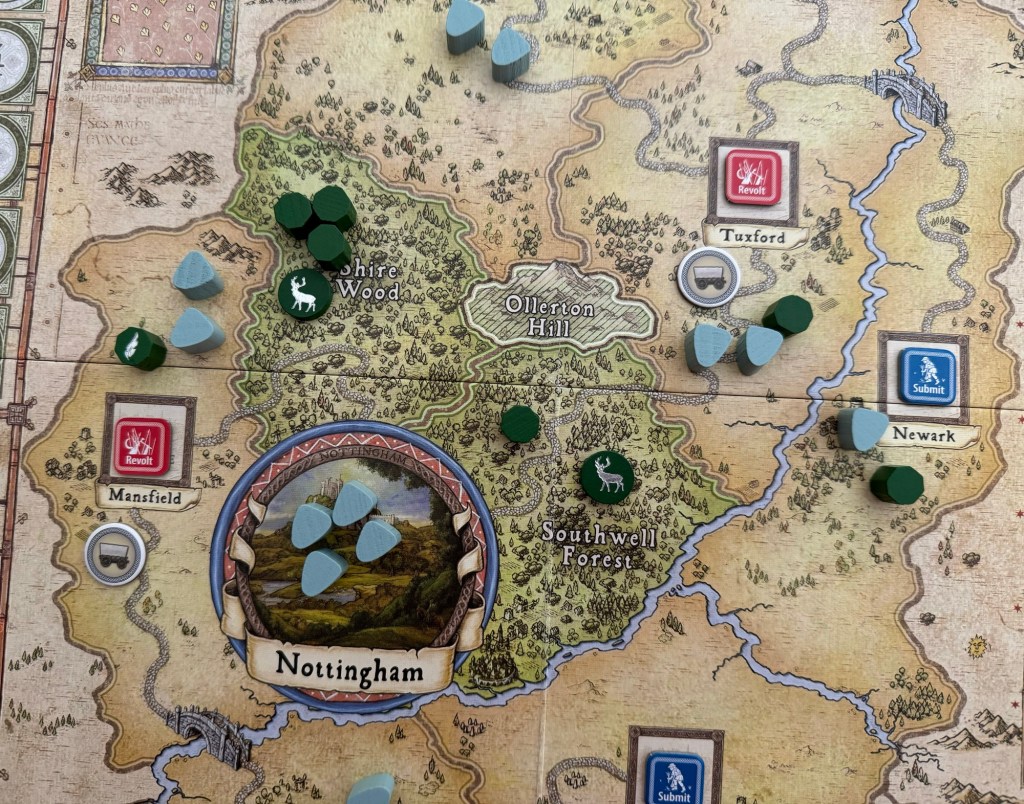
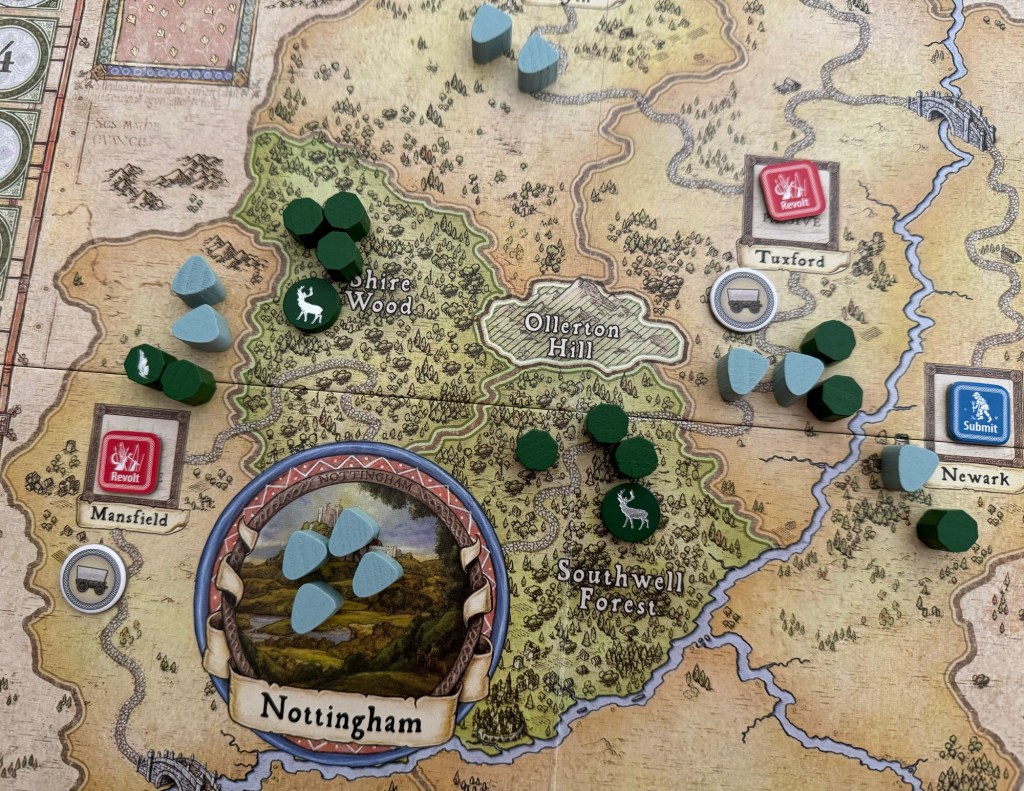
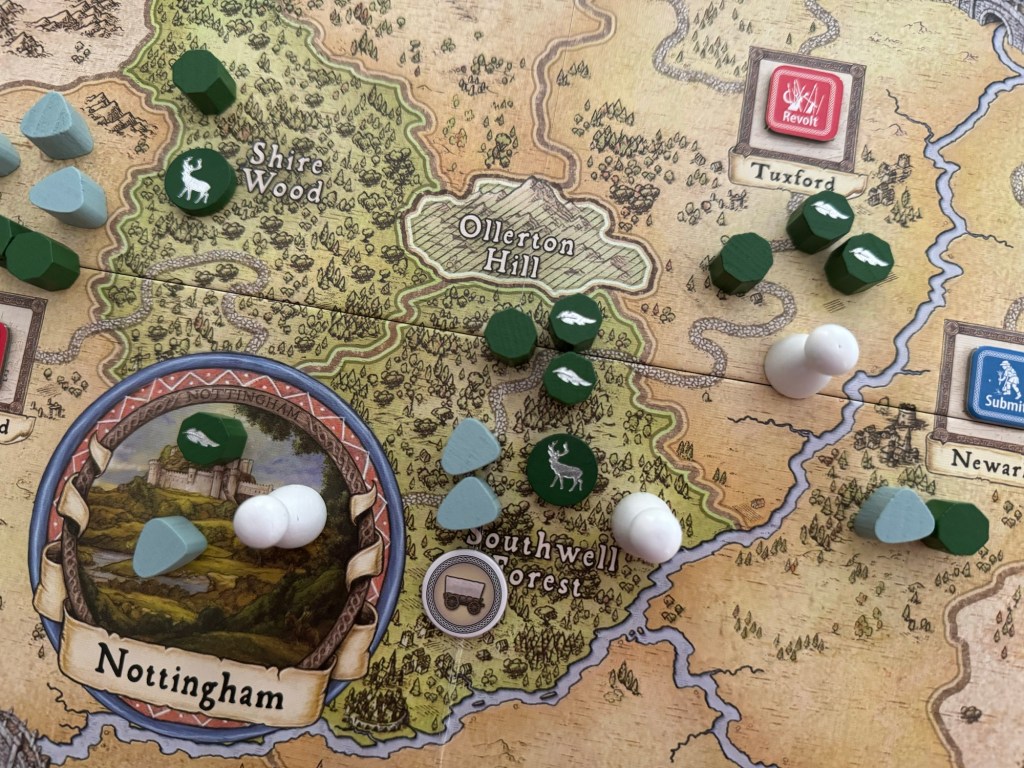
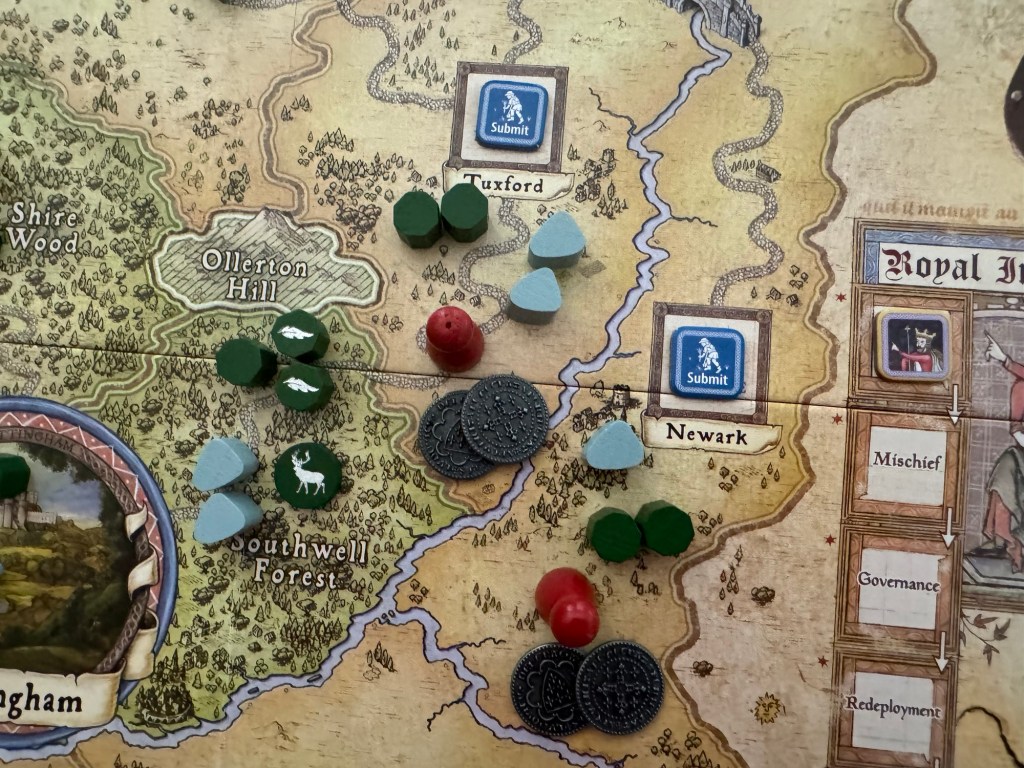
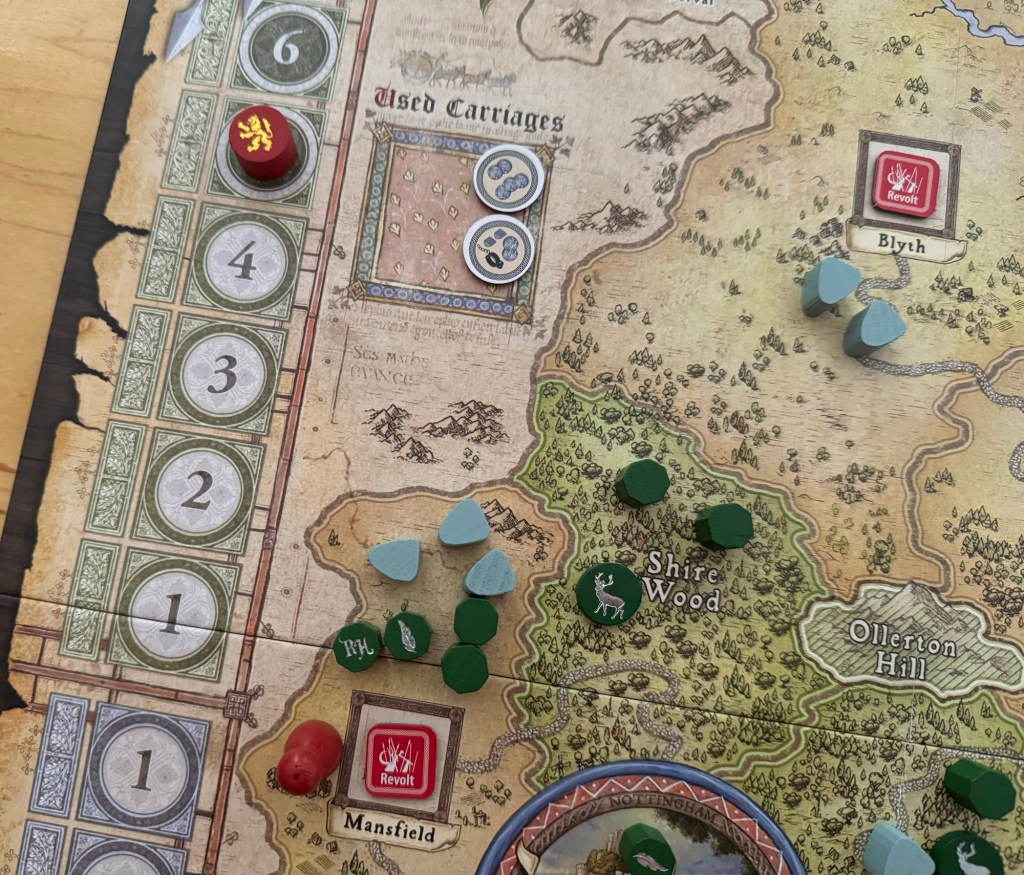
In the picture below, the Robin Hood player decides to take the Recruit Plot and places out a white token into each of the Parishes that he wishes to Recruit in. Remember that one of the requirements to be able to Recruit in a space is that it is currently Revolting or is a Forest space. Robin Hood chooses to Recruit in Tuxford, Southwell Forest and Mansfield. 1 Shilling must be paid for each space into which Robin Hood wishes to Recruit so these 3 selected spaces will cost a total of 3 Shillings.
In Tuxford, the space is currently in Revolt but there is no Camp located in this space. Because of this fact, the Robin Hood player can only place 1 Merry Man into the space. In Southwell Forest, the space is currently not Submissive (as Forest spaces are never considered either Submissive or in Revolt) but does have a Camp. This means that the Robin Hood player can place 2 Merry Men and does so bringing their current total to 3 Merry Men. This is a good move in preparation of the Carriage located in Tuxford coming into Southwell Forest on its way to Nottingham. This will make it more likely to succeed in the future Rob attempt. The final space in which there is a Recruit Plot is Mansfield and it is currently Revolting but doesn’t contain a Camp. Therefore, only a single Merry Man piece can be placed here. The Robin Hood could remove the single uncovered Merry Man piece to place a Camp but that would be a waste as the Sheriff would most likely take a Capture Plot on their next turn to simply remove the Camp.
Robin Hood is now setup nicely to possibly intercept the 2 Carriages making their way toward Nottingham as they move into the dark and mysterious Southwell Forest and Shire Wood. They also can place a few Camps in the Forest spaces in future turns to adjust the Royal Favour Track in their favor. Lots of choices for Robin Hood.
Robin Hood has a total of just 10 Merry Men available as well as their own piece along with a total fo 5 Camps and at the start of a game will have only 3 Merry Men and the Robin Hood piece deployed on the board (3 Merry Men and Robin distributed in either of the 2 Forest spaces and Remston Parish) with a single Camp placed in the Shire Wood. Getting out new Merry Men is vitally important to make sure they can incite rebellion and Rob the Carriages or Travelers to earn Shillings to fund future operations.
Sneak Plot
The Sneak Plot allows Robin Hood to move Merry Men to adjacent spaces and also to potentially flip them to Hidden to evade the Sheriff and his Henchmen. The process involves the Robin Hood player selecting up to 3 origin spaces with Merry Men. The spaces are referred to as “origin spaces” because these pieces will have to actually move from their original space to gain the final benefit of the Plot. The Robin Hood player will pay 1 Shilling per origin space, then will move any number of Merry Men pieces from origin spaces to any adjacent spaces.
There are some dangers to Sneaking into the wrong places though. If any Merry Men enter a Submissive space and the number of Merry Men entering the space plus Henchmen there is greater than 3, those Merry Men will be forced to be Revealed. If this is not the case, the player will set all other Merry Men that moved as a part of this Plot to their Hidden state. Each Merry Man piece may only move once during a Sneak Plot. No chaining movements from one space to another to get where you want to go. All things take time and when you are trying to avoid detection and not attract the attention of the Sheriff you have to move just one space at a time.
Part of the Sneak Plot is movement. If any Merry Man piece that remains in an origin space without moving will simply retain its original orientation either Hidden or Revealed. A Merry Man is not allowed to “Sneak in place” in order to flip to Hidden without first taking the movement portion of the Plot to an adjacent space. If your Sneaking Merry Men include the Robin Hood piece, the Robin Hood player should set the pieces to Hidden before placing them in their destination spaces, so that the Sheriff does not know which of them is Robin Hood. This is a very important part of the game for the Robin Hood player and the Sheriff should really just look away from the board so as not to gain any insight into where Robin Hood is being placed.
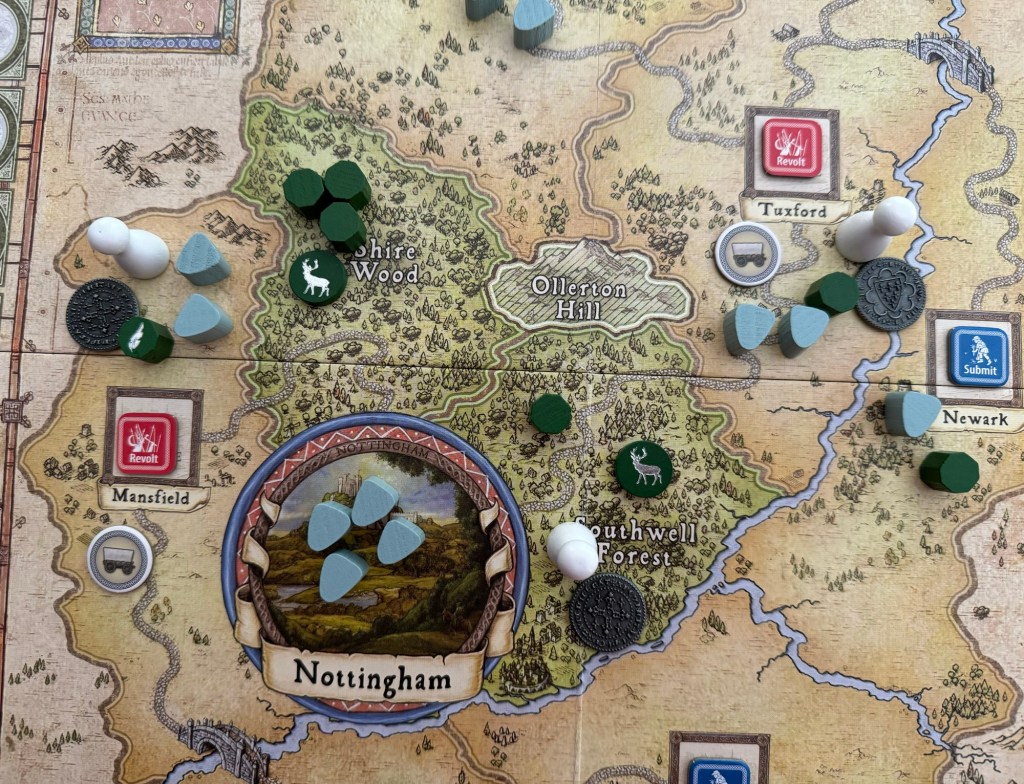
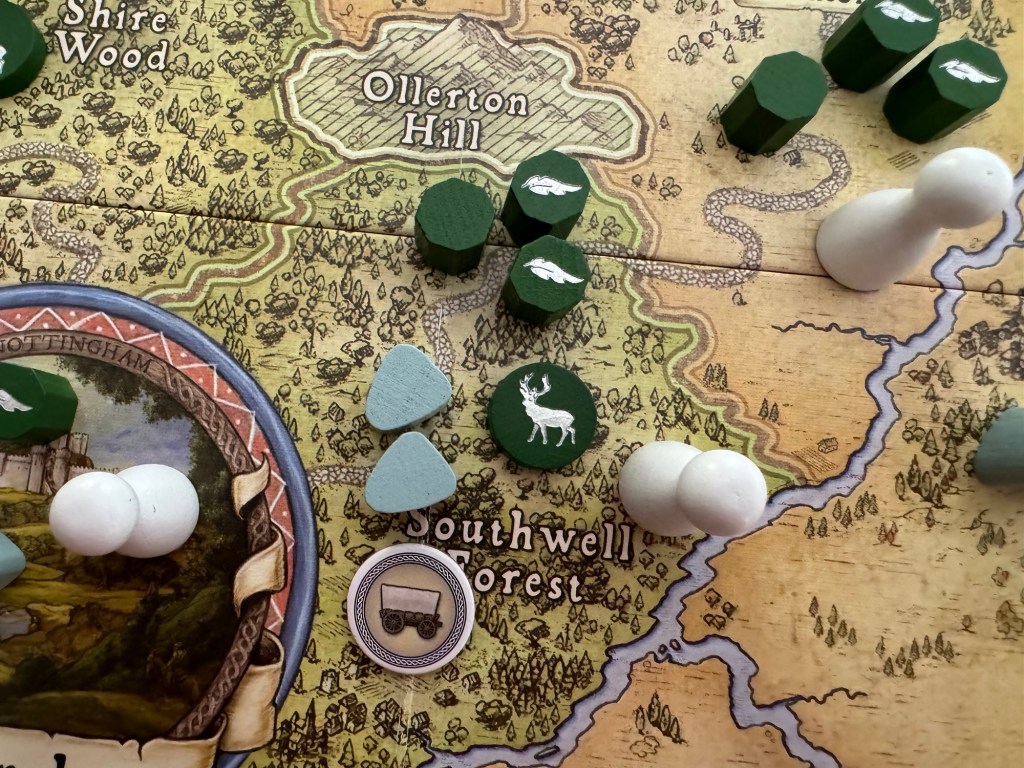
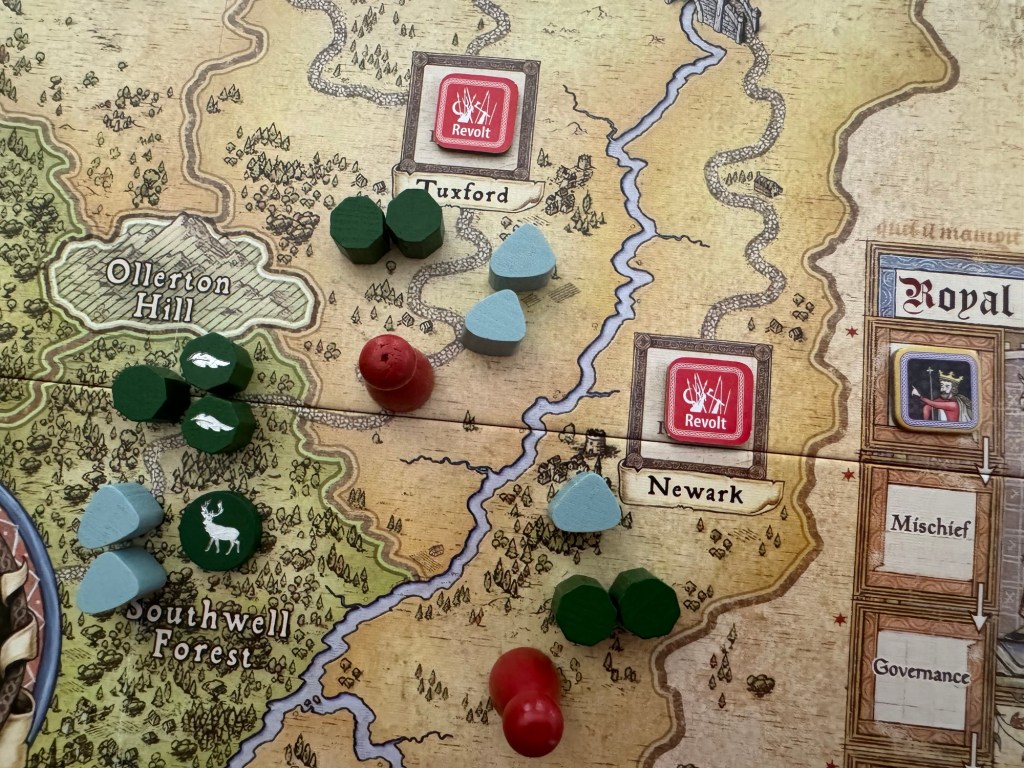
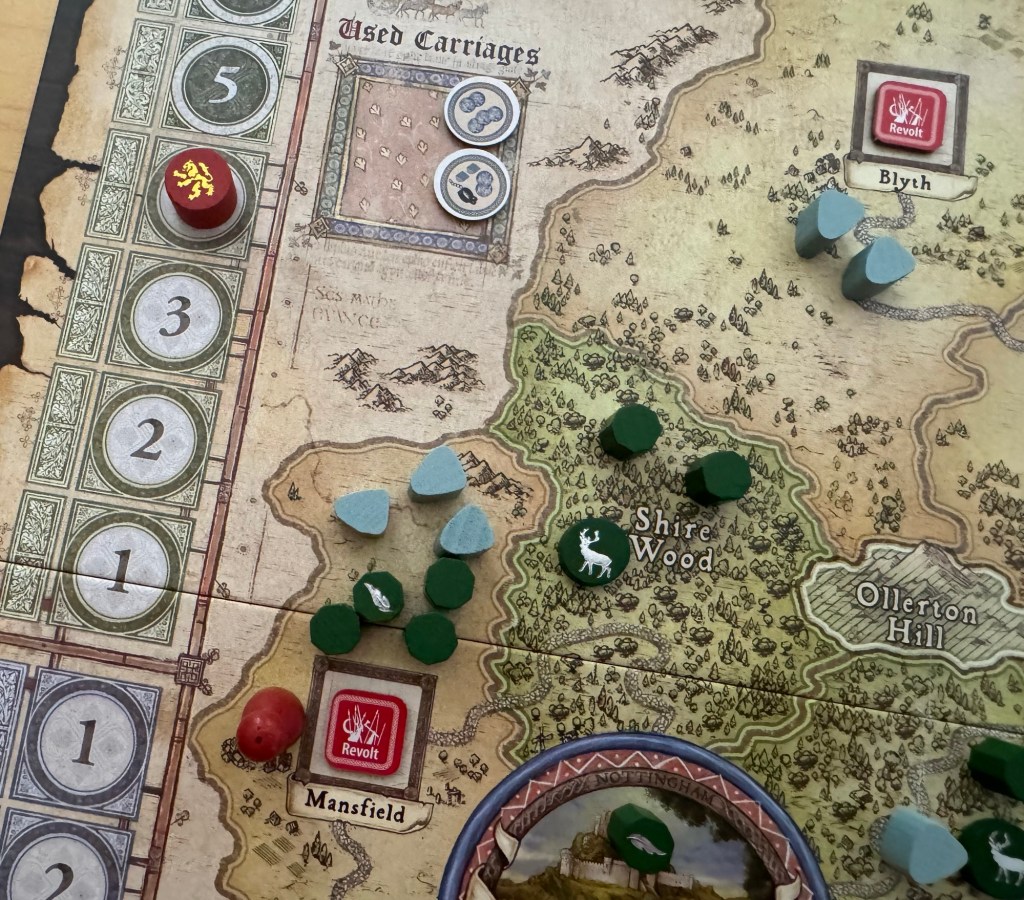
In the picture below, the Robin Hood player decides to take the Sneak Plot and places out a white token into each of the Parishes that he wishes to move from. 1 Shilling must be paid for each origin space from which pieces will be moved and Robin Hood wishes to move pieces out of (and into) the Shire Wood and Southwell Forest. This will cost a total of 2 Shillings.
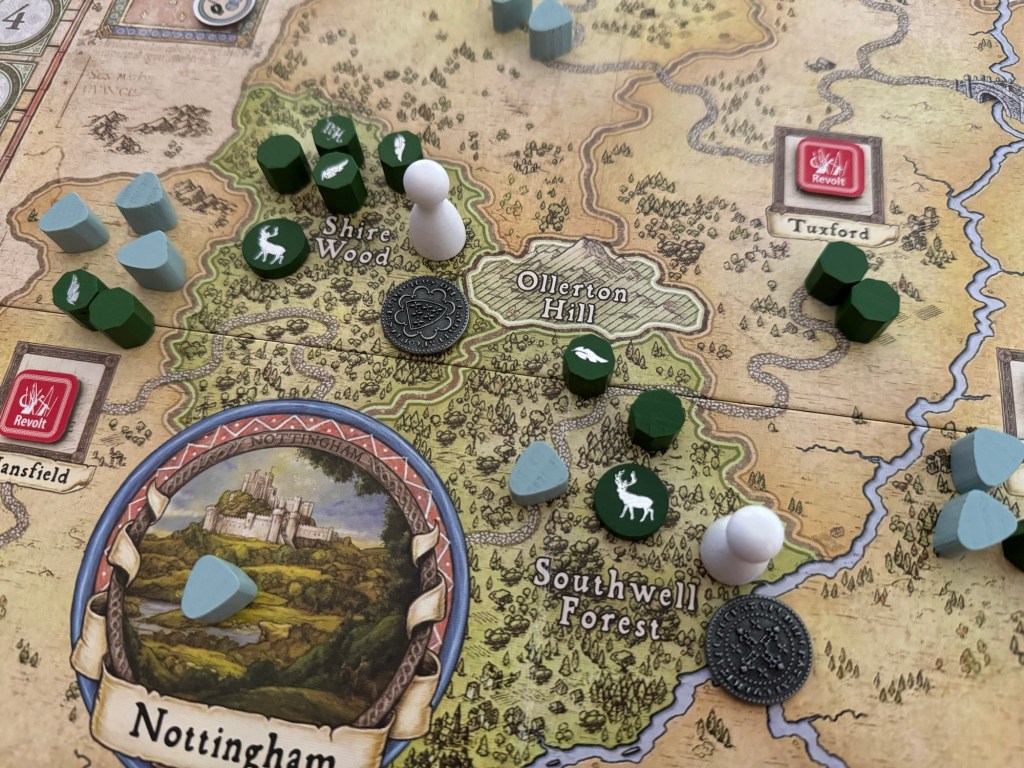
The Robin Hood player moves a total of 3 pieces from the chosen Shire Wood space, 2 Revealed Merry Man pieces as well as the Revealed Robin Hood piece. 1 Merry Man piece will be moved to occupy Nottingham, which does have 1 Henchman piece there, and Robin Hood and the other Revealed Merry Man piece moves to Southwell Forest. From the chosen Southwell Forest space, 1 Revealed Merry Man piece moves to Tuxford to join the 2 Merry Men already there.

At this point, after the movement portion of the Sneak Plot has been completed, the Robin Hood player can change the disposition of these pieces to their Hidden side by flipping them over. This can be done in all 3 spaces moved into because the total of the moving Merry Men pieces and already present Henchmen did not exceed 3.
After this Sneak Plot has been completed, there are now opportunities for Robin Hood to attempt to Rob Nottingham and also perform future Recruit Plots to place out Camps in Tuxford, Mansfield, Southwell Forest and the Shire Wood. The Sheriff has got to get busy and take some action to these unruly rabble rousers under control!
Rob Plot
Now we will take a look at my favorite Robin Hood Plot; the Rob Plot. This is the famous “rob form the rich” portion of the Robin Hood legend. The Rob Plot allows Robin Hood to attempt to steal from unwary Travellers, the Sheriff’s heavily laden Carriages, or even directly from the Treasury in Nottingham. Remember, earlier I mentioned that it is a bit harder for Robin Hood to get Shillings and this is a problem that can be solved by robbery. The Rob Plot process is for Robin Hood to select up to 3 spaces that contain Hidden Merry Men or the special Robin Hood piece. In each of the chosen spaces, the player will have to choose what target they wish to Rob. This can be either a random Traveller that will be drawn from the Traveller Deck, a Carriage in a chosen space or the Sheriff’s Treasury if Nottingham was chosen.
The Robin Hood player will then be required to Reveal at least one of their Hidden Merry Men pieces there, unless Robin Hood is in the chosen space and already Revealed, and may also then Reveal
any additional Hidden Merry Men as desired. The reason you would Reveal additional pieces is because each will add to your total to attempt to overcome the Defense Value. If a Traveller was
targeted, the player will draw the top card of the Traveller Deck and select 1 of the 2 options on the card. If a Carriage was targeted, the Carriage will be revealed by flipping the Carriage over to its revealed side if it is not already revealed. Then, the player will roll either of the special dice to determine if the Rob attempt was successful. In Revolting Parishes and Forests, the player will roll the green die. If in Submissive or Passive Parishes and Nottingham, the white die will be rolled.
And if the total number of Merry Men who were Revealed for the Rob attempt plus the result of the die roll is greater than the number of Henchmen in the space plus the Defense Value of the target, then the Rob attempt is a success. If it is less than or equal to the Defense Value plus Henchmen it will be a failure. Merry Men that were already Revealed in the space where the Rob attempt is occurring are not counted in the process. The Robin Hood special piece is always counted towards a Rob attempt in its space, even if it was already Revealed. The Defense Value of Travellers is indicated on each Traveller Card. Also, the Defense Value of Carriages is 2 for a Trap Carriage and 0 for both other Carriage types and the Defense Value of the Sheriff’s Treasury is 0.
If the Rob attempt is a success, the player will either execute the selected text on the targeted Traveller Card, take the reward indicated by the targeted Carriage type, or take 2 Shillings from
the Sheriff and shift Royal Favour once towards Justice if the Sheriff’s Treasury was targeted. If the Rob attempt is a failure, either execute the selected text on the targeted Traveller Card, immediately capture all involved Merry Men including Robin Hood if a Trap Carriage was targeted or do nothing if a different Carriage type or the Treasury was targeted.
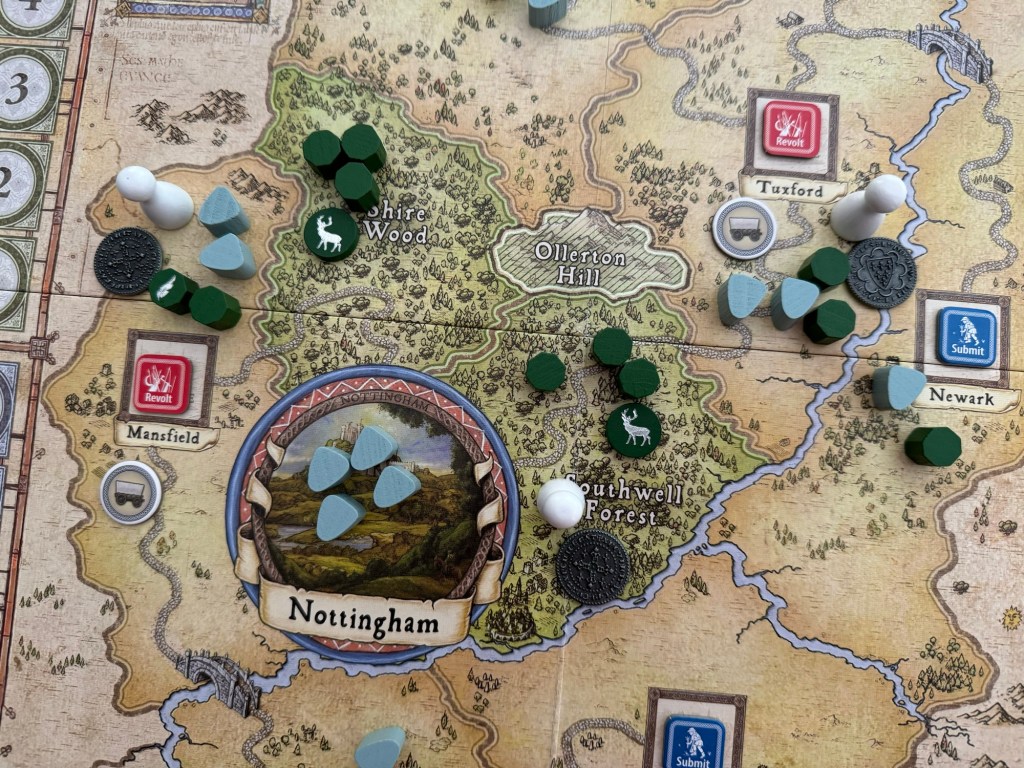
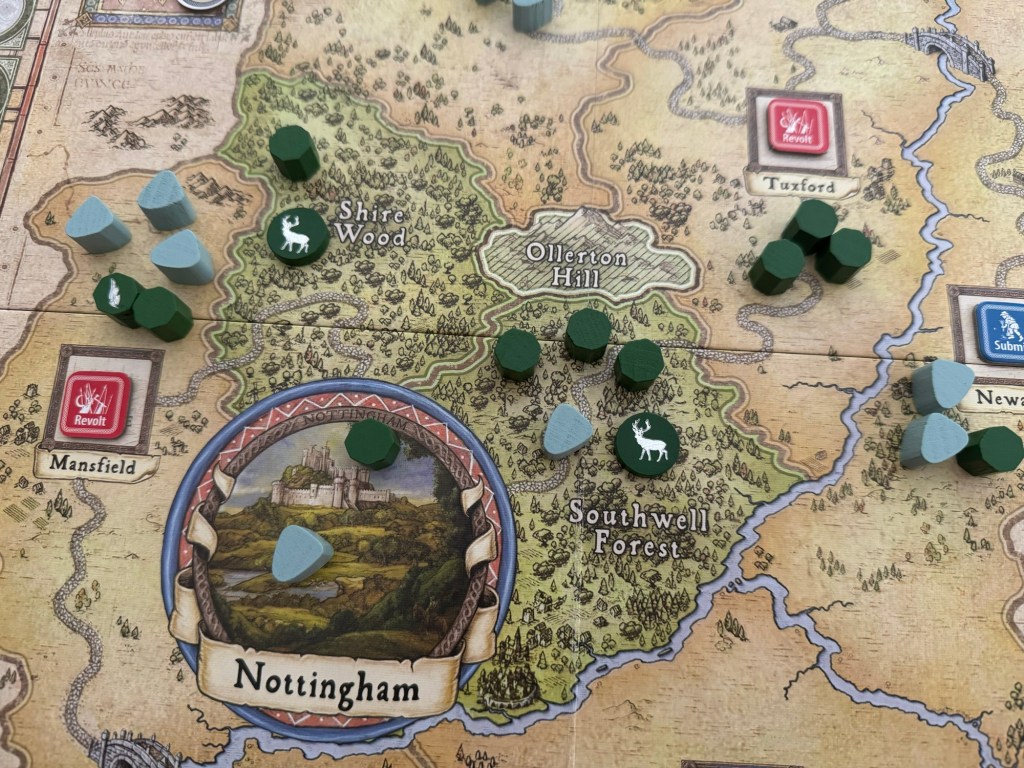
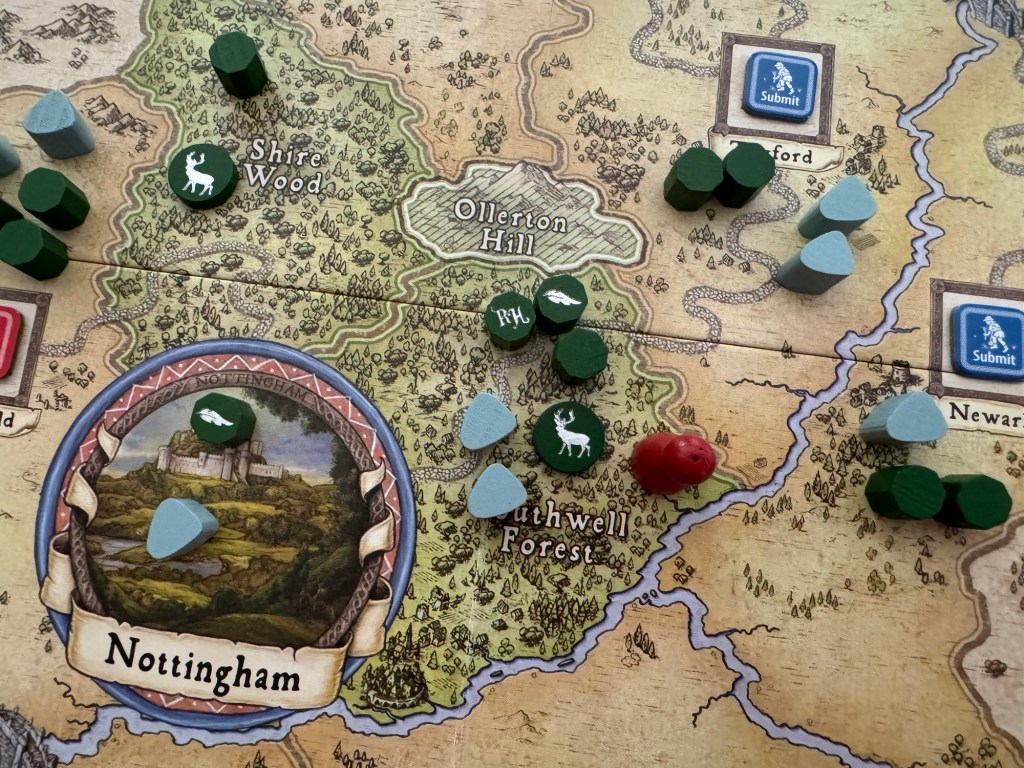
Let’s walk us through this process with the below pictures. In the first picture, you will see that the Robin Hood player has chosen to execute a Rob Plot in 3 spaces, including Tuxford, Southwell Forest and Nottingham itself. Remember that in order to conduct a Rob Plot you have to have Hidden Merry Men Pieces or a Revealed Robin Hood in the targeted spaces. In Tuxford, the choice will be to Rob a random card from the Traveller Deck, in Southwell Forest to Rob the Carriage there and to Rob the Sheriff’s Treasury in Nottingham.
The first step of this Rob Plot process is to Reveal the number of Merry Men pieces in each space where a Robbery attempt is going to be made. In Tuxford, 2 Merry Men are Revealed, in Southwell Forest, 2 Merry Men are Revealed and in Nottingham the one Merry Men piece there is Revealed. Remember, that each Revealed Merry Men piece will add a +1 to the total sum needed to overcome the Defense Value of each target. But keep in mind, you will also be rolling a die and adding its result to the total.
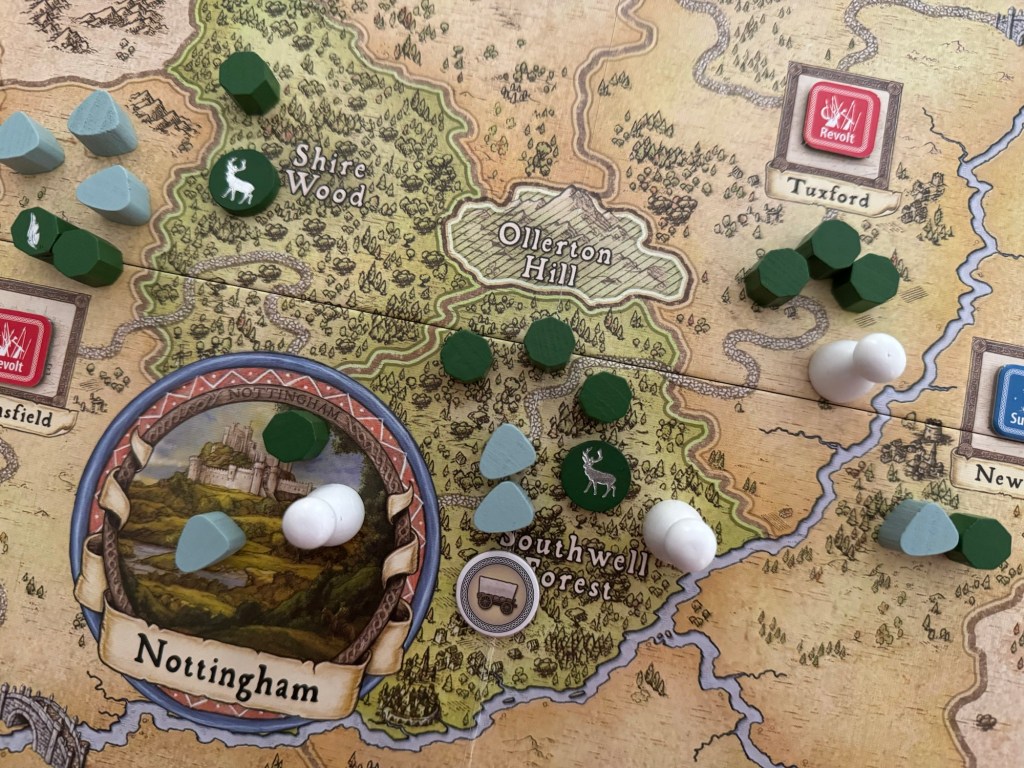
Let’s first zoom in on the Robbery attempt of the Sheriff’s Carriage in Southwell Forest. Here the Robin Hood player has Revealed 2 Merry Men and will be rolling the Green Die to determine their result.
But before the die is rolled the Carriage is turned over to show its Defense Value. This is a Tallage Carriage, which has a 0 Defense Value and will provide 5 Shillings to Robin Hood if it is successfully Robbed. There are 2 Henchmen found in the Southwell Forest space so the target number that Robin Hood is looking for is great than 2. Robin Hood will start with a value of 2 and will next roll the Green Die as the Robbery is occurring in a Forest spade and add its result to the total. The Green Die is more favorable toward Robin Hood as it has a 0, +1, +2 and +3 along with a -1 and -2. The die is rolled and comes up with a +2 result making the total 4, which is higher than the Defense Value plus Henchmen of 2.
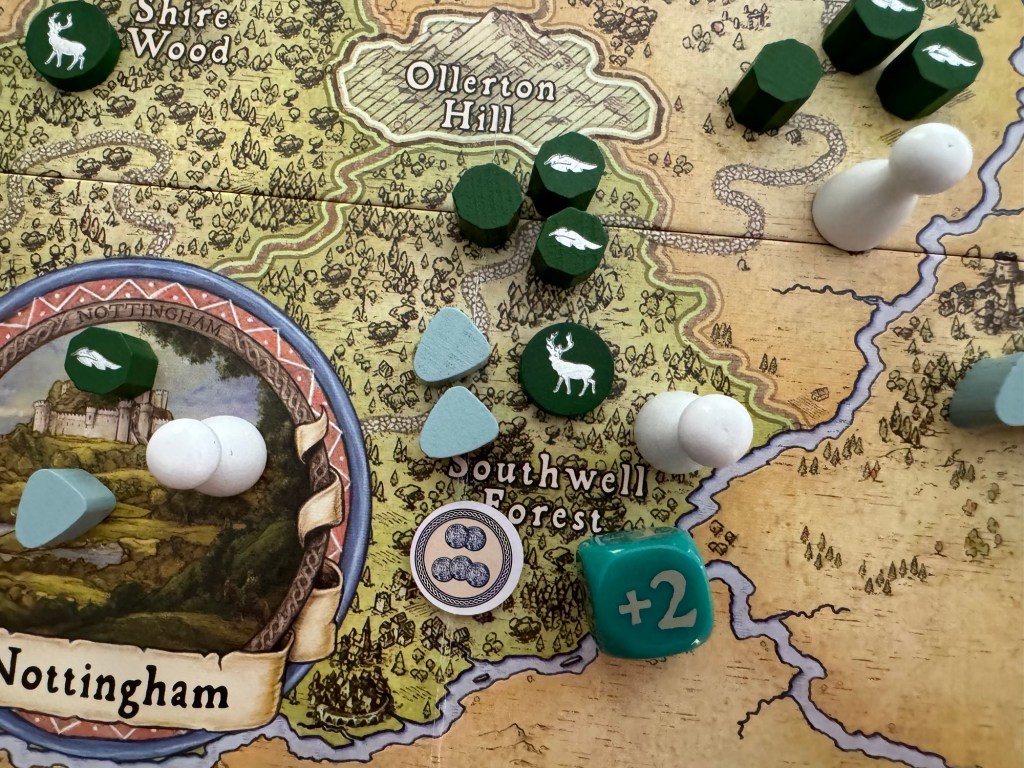
The Robbery is successful and Robin Hood will gain 5 Shillings. This was a very successful outcome! The Carriage is removed from the board and placed in the Used Carriages Box. Aside from the 5 Shilling boon, this will prevent the Sheriff from gaining an increase in Order on the Royal Favour Track if the Carriage had safely arrived in Nottingham on a subsequent turn.

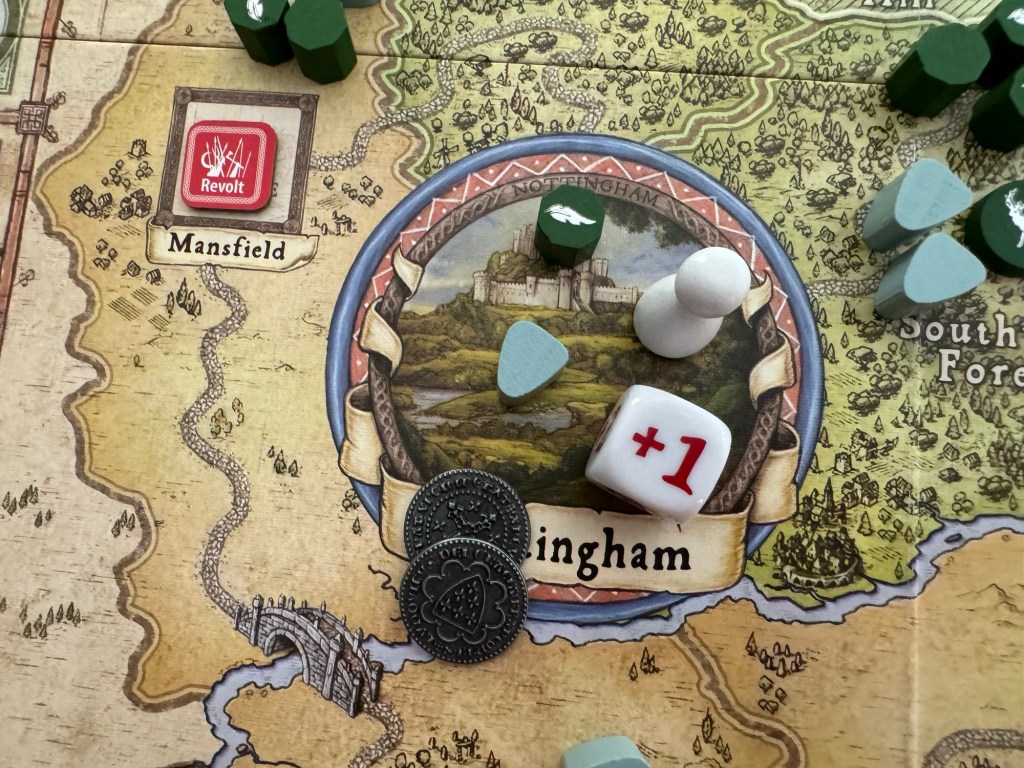
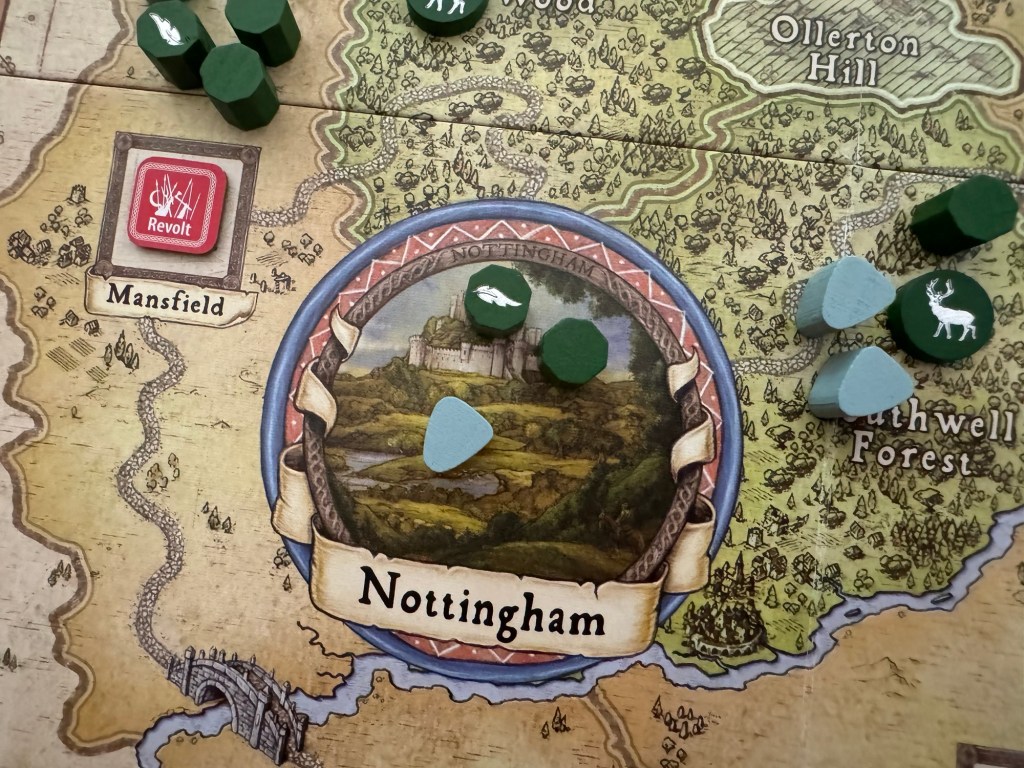
We next will turn to the Robbery attempt of the Sheriff’s Treasury in Nottingham. Here the Revealed Merry Men piece will give the attempt a +1 but the presence of a Henchmen piece will mean that benefit is nullified and the result starts at a 0. It will come down to the roll of the white die, which is a die that is not friendly to the Rob attempts by Robin Hood as it has only 2 good results in a +1 and +2 but 4 negative or neutral results with a 0, 2 -1’s and a -2. This die is not favorable at all and is being used because the Robbery attempt is in Nottingham. The die result is lucky at a +1 and makes the total 2 – 1 in favor of Robin Hood.
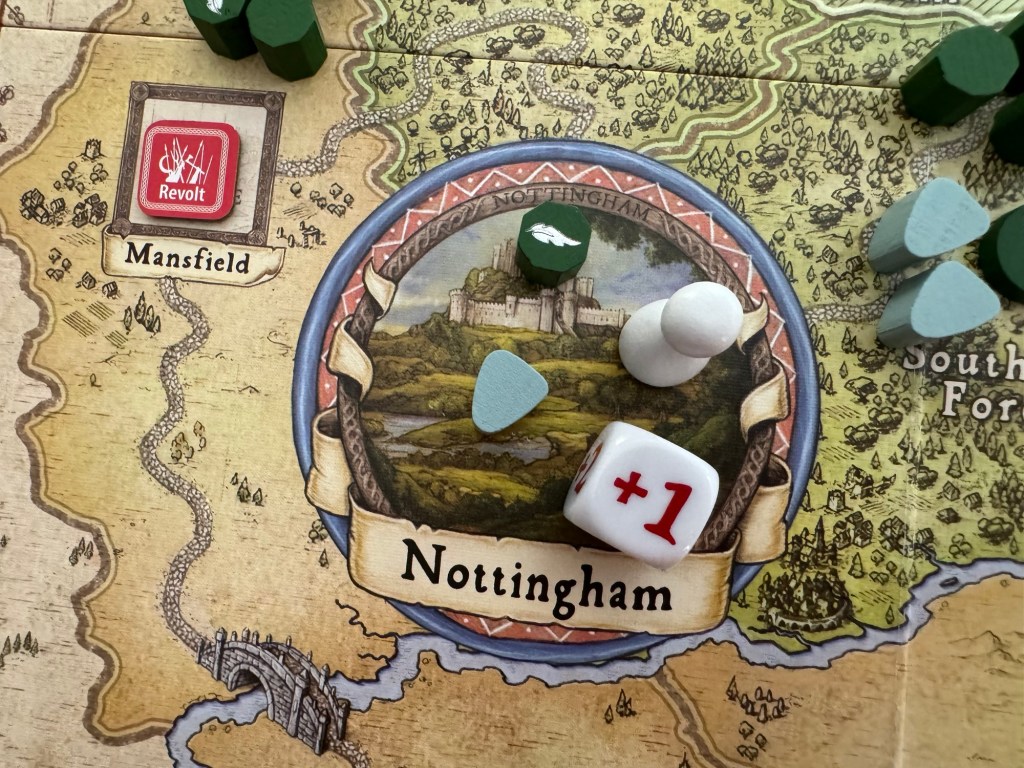
Robin Hood will gain two rewards from this successful attempt in the form of 2 Shillings but also in a favorable increase of the Royal Favour Track as it will move 1 step toward Justice.


In our final example, we will take a look at the Robbery attempt of a Traveller in Tuxford. In this case, the Robin Hood plahyer Revealed 2 Merry Men to give a +2 start to the total with a die rolling incoming. A random Traveller Card is drawn and it is not a good one as it is the Noble Knight. The Noble Knight has a Defense Value of 2 so it will be a tough attempt to be successful.
The Robin Hood player decides to go all out and choose the bottom of the 2 choices listed on the card which reads: Mug Him! If successful, gain 5 Shillings and put the card in the Victim’s Pile (which will play off of future Event Cards not in the favor of Robin Hood). If failed, Capture the Robbing Merry Men and place the card in the discard pile.
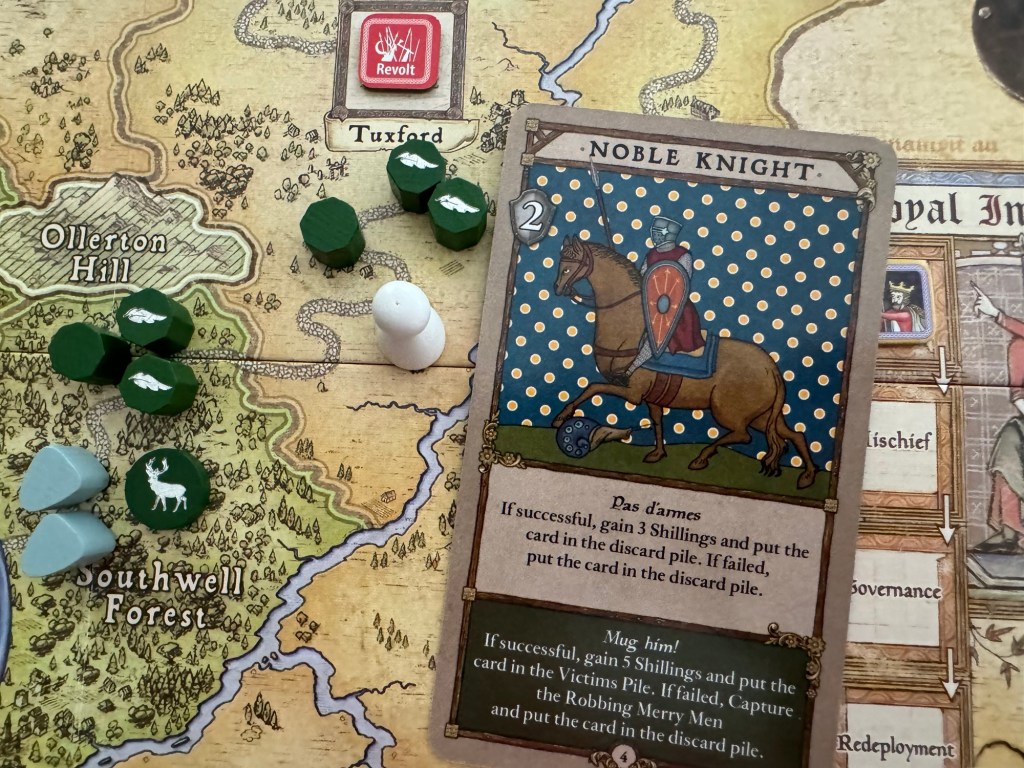
The White Die is rolled and comes up with a -1 result making the total 1 for Robin Hood (2 – 1 die roll) to 2 for the Noble Knight, which means this Robbery attempt is a failure. But remember, moreso than just a failure the text of the Traveller Card has a penalty.

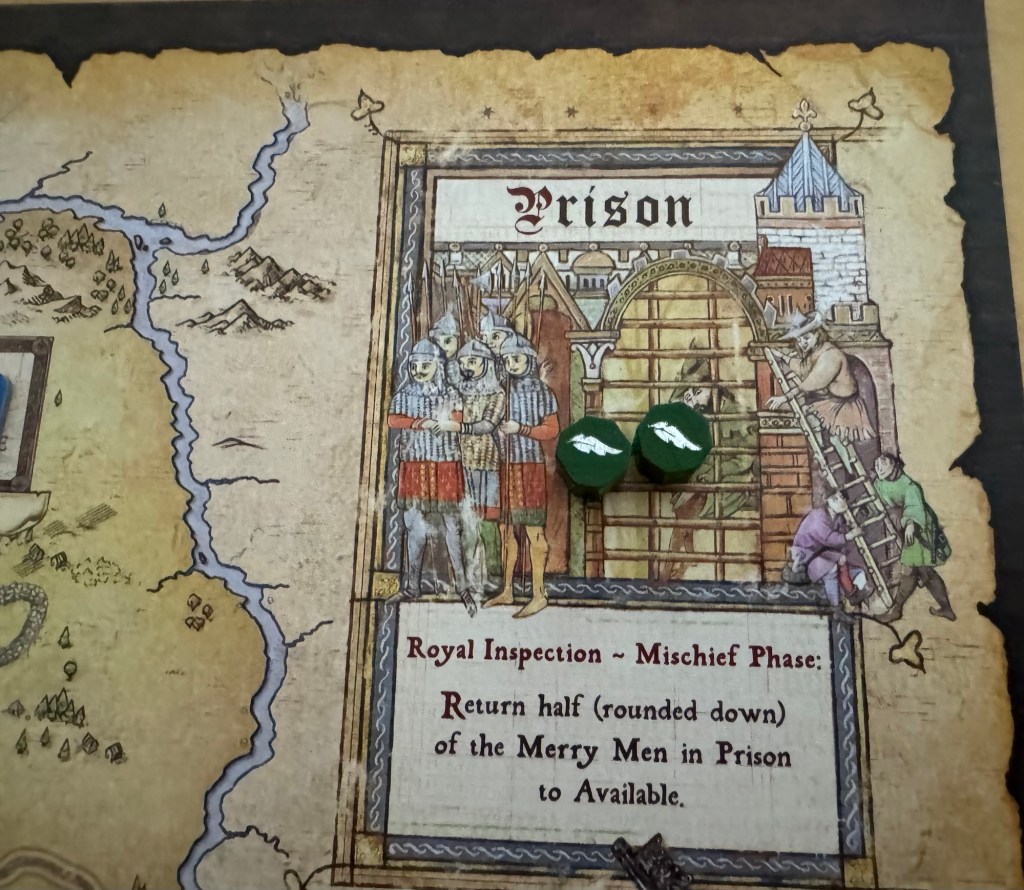
Upon failure, the Robbing Merry Men are removed from the board and Captured and placed in the Prison Box. This was not a great result but overall it was a positive turn for Robin Hood as they gained a total of 7 Shillings and a bump toward Justice on the Royal Favour Track.
Now that we have taken a detailed look at the various Plots available to Robin Hood, let’s get a good look into the accompanying Deeds.
Deeds
When a player selects the Plots & Deeds option during their turn on the Sequence of Play, they then may additionally perform a Deed after they have completed their chosen Plot in all selected spaces. Some Deeds have additional Shilling costs that must be paid before executing the Deed. It is important to remember that for any chosen Deed, each of the spaces on the board may only be targeted once by the same Deed during one turn but one space could be targeted by both a Plot and a Deed in the same turn.
The Robin Hood player may choose from the Turncoat, Donate, Swashbuckle and Inspire Deeds. All Deeds may accompany any Plot.
Turncoat Deed
Turncoat allows Robin Hood to bribe discontented Henchmen to join the Merry Men. This is a very cool Deed as it literally can tip the scales in the favor of Robin Hood by reducing the on-board presence of the Sheriff while simultaneously increasing the number of Merry Men. The process is very basic as the Robin Hood player will pay 1 Shilling to replace a Henchman piece with a Merry Man piece in one Revolting Parish where there is already a Merry Man. Pretty simple but very effective.
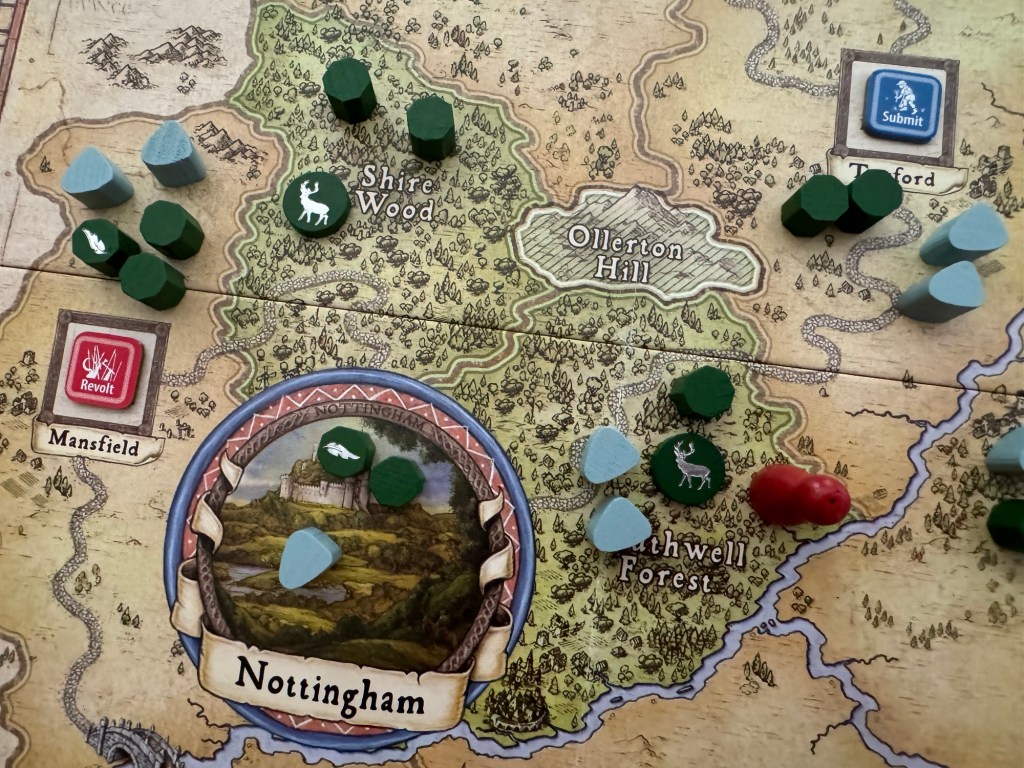
In the picture below, the Robin Hood player chooses to perform this Deed in the Mansfield Parish as it is currently Revolting. The Robin Hood player pays 1 Shilling and then simple replaces a Henchmen piece there with a Merry Man piece.

Turncoat is such a great little Deed as it really is a 2 power switch and can be used to great effect. Remember that one of the Sherriff’s Plots (Hire) allows him to change the status of the Parish that is chosen from Revolting to Submissive. But, this requires there to be more Henchmen than Merry Men in the chosen space. So, now the Sheriff cannot perform this Plot in Mansfield.
Donate Deed
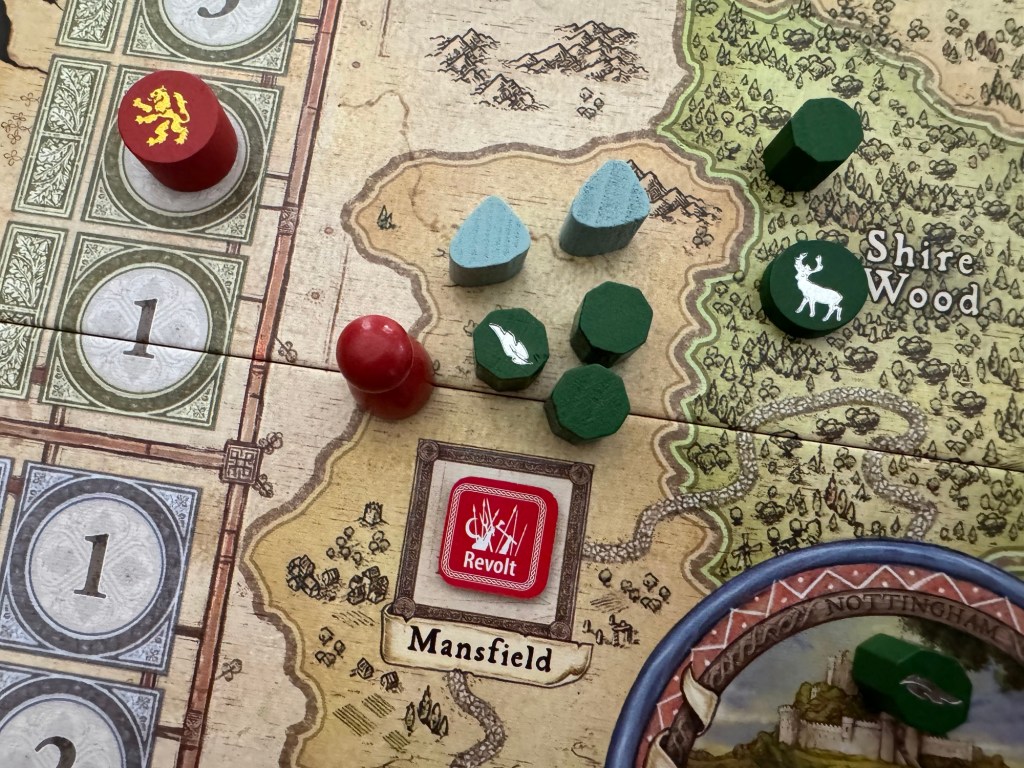
The Donate Deed allows Robin Hood to incite Revolt by distributing stolen goods from the Sheriff in Submissive Parishes. This is the famous “give to the poor” portion of the Robin Hood legend. The process is that the Robin Hood player pays 2 Shillings per Parish in up to 2 Submissive Parishes with at least one Merry Man and at least as many Merry Men as Henchmen to then set each of the selected Parishes to Revolting.
In the picture below, Robin Hood player chooses Tuxford and Newark to perform the Donate Deed. The choice was made because these 2 Parishes are Submissive and the number of Merry Men in each space is equal to or greater than the number of Henchmen.
The 2 Shillings per space cost is paid and the change is made as the Parishes are now set to Revolting. This is a very important but costly Deed as changing 2 Parishes over to Revolting can be the difference in the Royal Favour Track moving up or down during the Royal Inspection Phase of the game. The number of Submissive Parishes is checked at the start of the Royal Inspection Phase and will lead to a shift of the Royal Favour Track towards Justice or Order as follows:
5 to 7 Submissive Parishes: shift one step towards Order.
3 to 4 Submissive Parishes: shift one step towards Justice.
1 to 2 Submissive Parishes: shift two steps towards Justice.
0 Submissive Parishes: shift three steps towards Justice.
So as you can see this part can be a very large swing in the outcome of the game and players have to be aware of and focus on it. I also really like the thematic connection here as the “give to the poor” aspect really causes the local allegiance to switch from the Sheriff towards Robin Hood.
Swashbuckle Deed
The Swashbuckle Deed allows the special Robin Hood piece to move quickly and become Hidden or even to escape from Prison. The process is simply setting the special Robin Hood piece and up to one other Merry Man piece located together in the same space to Hidden, then move them both to any adjacent spaces. They may even decide to move to different spaces. In the case that Robin Hood is currently incarcerated in Prison place him Revealed in Nottingham or any adjacent space.
To me, the real power of the Swashbuckle Deed is that it may be used to get into heavily guarded Submissive spaces that it would not usually be possible to Sneak into while remaining Hidden. This Deed may also be a means of disguising the location of the special Robin Hood piece and to get it out of Prison. Remember that Sneaking into areas where there are lots of Henchmen will make the moving Merry Men be Revealed and they will then be susceptible to Capture.
In this example, Robin Hood and a single Merry Man piece are Revealed in Southwell Forest. This location is chosen and then the 2 Revealed pieces are Hidden before moving them to conceal the location of the Robin Hood piece.
The Robin Hood piece is placed into Nottingham which is an adjacent space to Southwell Forest and the Merry Man piece is placed in the Shire Wood. This will accomplish a few things as it sets up a future Recruit Deed in the Shire Wood to place another Camp and a potential Robbery attempt of the Sheriff’s Treasury in Nottingham. Now let’s take a look at the 2nd option for the space of getting Robin Hood out of Prison.
Here the Robin Hood piece is chosen to be broken out of the Prison Box and then placed into Nottingham.

Similarly to the previous example, this will set up a Robbery attempt of the Sheriff’s Treasury in Nottingham. So this one accomplished 2 things; getting Robin Hood out of Prison and also potentially getting some additional income later as well as a bump in the Royal Favour Track to Justice. This could be used to bring the game to an end in the next round if the score is in the right range to the automatic victory of 5 Justice. Very powerful and important to use appropriately!
Inspire Deed
The final Deed that we will look at is the Inspire Deed. The Inspire Deed allows the special Robin Hood piece to cause a Parish to be set to Revolting or to shift the Royal Favour Track one step
towards Justice. The process is straightforward and involves Revealing Robin Hood in a Submissive Parish to set it to Revolting or to Reveal him in a Revolting Parish to shift Royal Favour one step towards Justice. The key requirement here is that Robin Hood must be Hidden in a Parish to use Inspire.
The same as with the Swashbuckle Deed, this can bring the game to a conclusion if the Royal Favour Track reaches 5 or 6 Justice.
This is a really nice Deed for Robin Hood as it can be the Coup de grâce (blow of mercy) to bring the game to a conclusion.

To me it really highlights the need for the Robin Hood player to have the identity of the location of the Robin Hood piece so as not to tip off the Sheriff player to your intentions. On the flip side, if the Sheriff player has a chance to realistically expose and capture Robin Hood, by possibly taking a single plot to Patrol and Reveal Robin Hood and then to follow that up by going first the next round and then Capturing him, they should try their best to keep this very important piece off of the board for as long as they can.
I hope that you have enjoyed learning about the utility of Robin Hood’s Plots & Deeds and how they are executed. The game is pretty simple really but there is a systematic process to properly carrying out these actions as well as a ton of strategy that needs to be learned over many plays to hone your skills and approach to win the game.
In Action Point 5, we will check out the different types of cards in the game including Event Cards, Fortune Event Cards, Traveller Cards and Royal Inspection Cards
If you are interested, you can read our interview with designer Fred Serval at the following link: https://theplayersaid.com/2022/11/21/interview-with-fred-serval-designer-of-a-gest-of-robin-hood-insurrection-in-nottinghamshire-from-gmt-games/
-Grant

Note that you can only have one camp in a space (except by means of an event card).
LikeLiked by 1 person