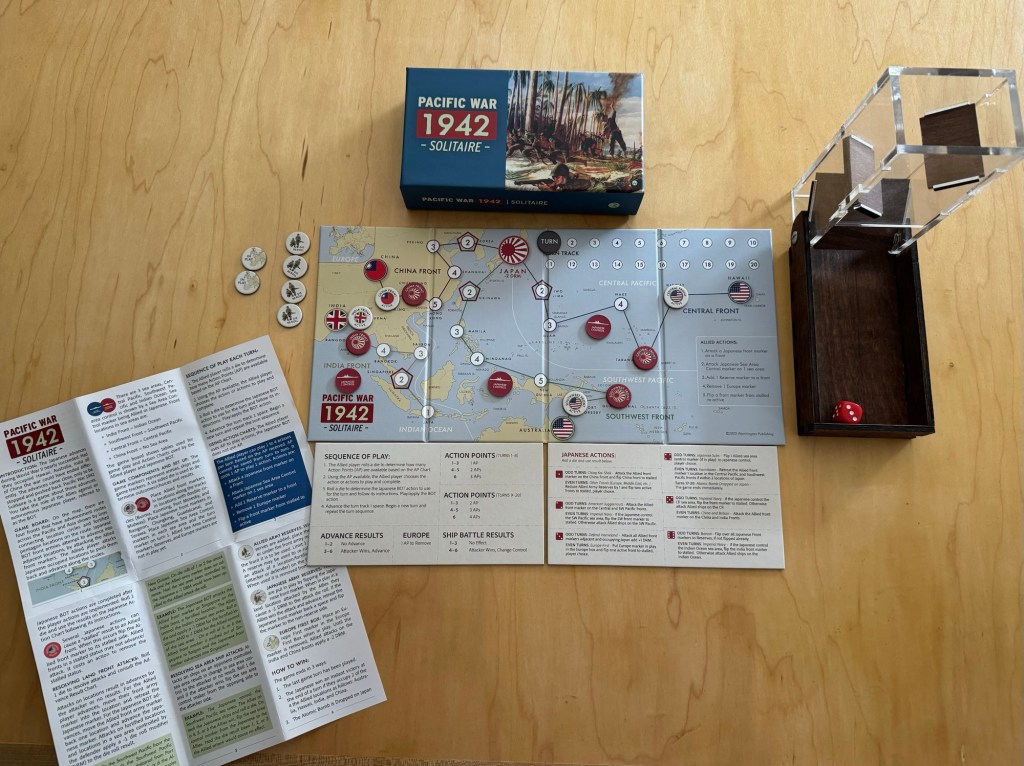
Earlier this year in February, Worthington Publishing announced a unique 2-pack of games on Kickstarter that were marketed as easy to play travel friendly solitaire games. And you know that I love a good solitaire wargame! And when I heard that these games were small, even portable, then I was even more interested. One of the games covered the Pacific Theater of WWII called Pacific War 1942 Solitaire and the other covering the War of 1812 called (you guessed it) War of 1812 Solitaire. These games are designed by Mike and Grant Wylie and each game has 4 pages of rules, a beautiful mounted board and double sided counters.
Since receiving these games in early July, I have played each of them about 15 times and have really very much enjoyed what they are trying to do. The games are simple mind you and play in about 20-30 minutes, even faster once you are familiar with the rules. I have enjoyed both but I have gravitated to the Pacific War more than the War of 1812, which actually surprised me. But in this First Impressions style post, I wanted to share my thoughts with you on the game and its package.

Simple, Fast-Playing, States of Siege Series Style Game
I want to immediately provide you an idea of what this game is and what it is not. I think that sometimes people buy a game like this and expect a really deep and involved simulation of the events of World War II in the Pacific with no real basis for that belief other than their hope or preconceived notions. I want to let you know that I really do enjoy this game. I have played it a lot of keep coming back to it. That says something about it right there. But a game that sets up in 30 seconds, plays in 20 minutes or less and gives you some choices and is solo is a pretty good deal in my opinion. The game is very simple and borrows its structure from the well liked States of Siege Series of solitaire wargames made famous by Victory Point Games starting with Darin Leviloff’s Israeli Independence: The First Arab-Israeli War published in 2008 and which now has over 40 volumes. The game uses the concept of several tracks representing the various theaters of the Pacific War including the Central Front (Hawaii through the island hopping campaign of the Central Pacific), Southwest Front (Australia through Guadalcanal and the Philippines), India Front (Burma through to Singapore) and the China Front (Kunmino to Korea) that all converge on Japan and its holdings. The main difference here though is that the player is the one who must make progress down the various tracks and are not the one defending against those advances. The progress on these fronts comes by attacking the defending Japanese units pushing them back one space at a time with the ultimate goal being to occupy Japan itself, which is a tall order. The game is very high level, strategic, and lots of elements are abstracted down to a single die roll to attack and then at the end of each Turn a die roll for the Japanese Bot to determine their actions.

The way that advancing and combat works is through a die roll and is very much dependent on luck. There are not a lot of DRM’s (Die Roll Modifiers) that players can attempt to gain but there are some negative DRM’s that they can remove through controlling the various Sea Areas. With these simple mechanics, with plenty of abstraction, the game is fast playing and meets the stated objective. I have seen some people online stating that it is too dice dependent, doesn’t require choices and is just a laugh. I disagree. If you feel that way, you probably misunderstood the thesis of the game. This game is not trying to be something other than what it is. I actually think that this system is pure genius and gives us wargamers a small sized game that we can take with us and play anywhere. In a hotel room at a convention or conference. While waiting in the airport for your flights to leave. Over your lunch break at work. While sitting in the car waiting for your children. Literally anywhere!
Control the Seas
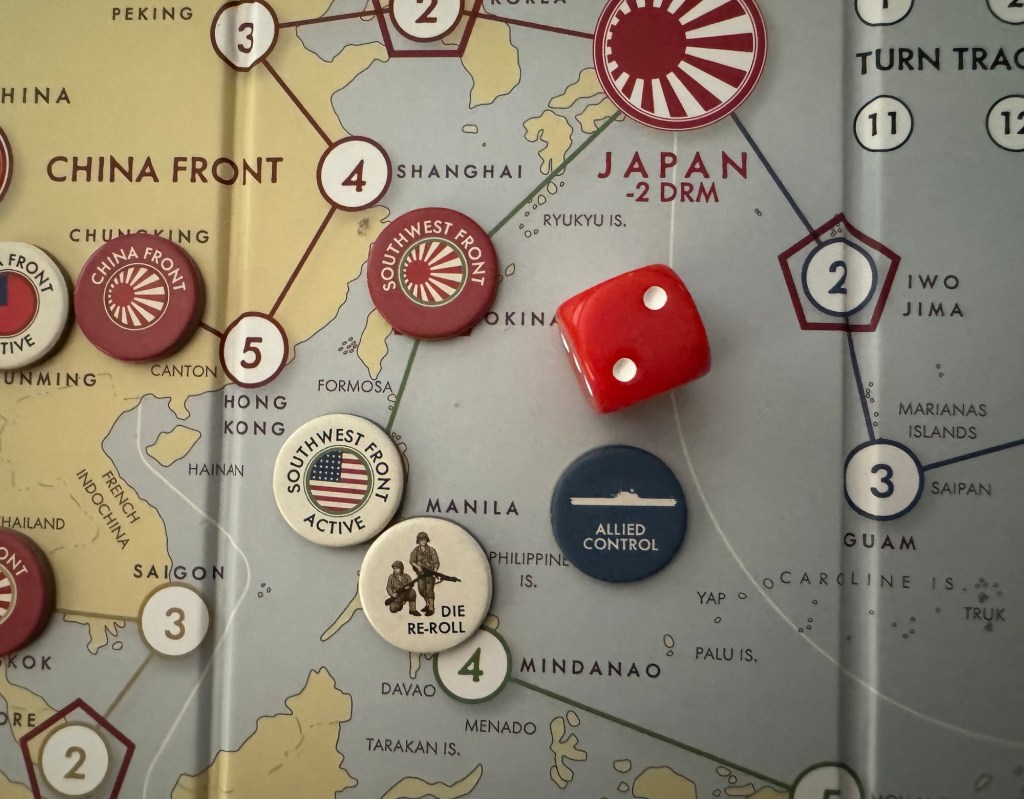
One of the aspects of the game that I really liked and thought was very well done was the part about controlling the various Sea Areas. There are 3 such Sea Areas on the board including the Indian Ocean, Southwest Pacific and Central Pacific and to start the game there is a Japanese Naval Control Marker that rests in these spaces. These markers are double sided so when control changes, you just flip over the marker to the other side. But controlling these Sea Areas grants a -1 DRM to the attacker in land combats in spaces located in the Sea Areas.

So, the first thing that players need to do is focus on controlling the Sea Areas in their planned areas of operations. If you are planning to do some combats on the India Front, you will need to take over control of the Indian Ocean Sea Area first or each of your attacks will incur a -1 DRM. If you want to go into Guadalcanal, you will first have to control the Southwest Pacific or suffer the -1 DRM. This is such an easy mechanic but I really loved the connection to the history and the game that is created. The Pacific War was fought on both land and sea and in order for the war to be brought to the Japanese defenders hunkered down in their blockhouses, trenches and fortified caves, the Americans had to win their victories at sea to allow for them to transport troops to the beaches to perform amphibious landings and attacks. And if those Sea Areas were reconquered by the Japanese this put a strain on logistics and supply and ground their campaign to a halt. This simple mechanic and its related DRM is just the perfect addition to the system to create a very good thematic experience.

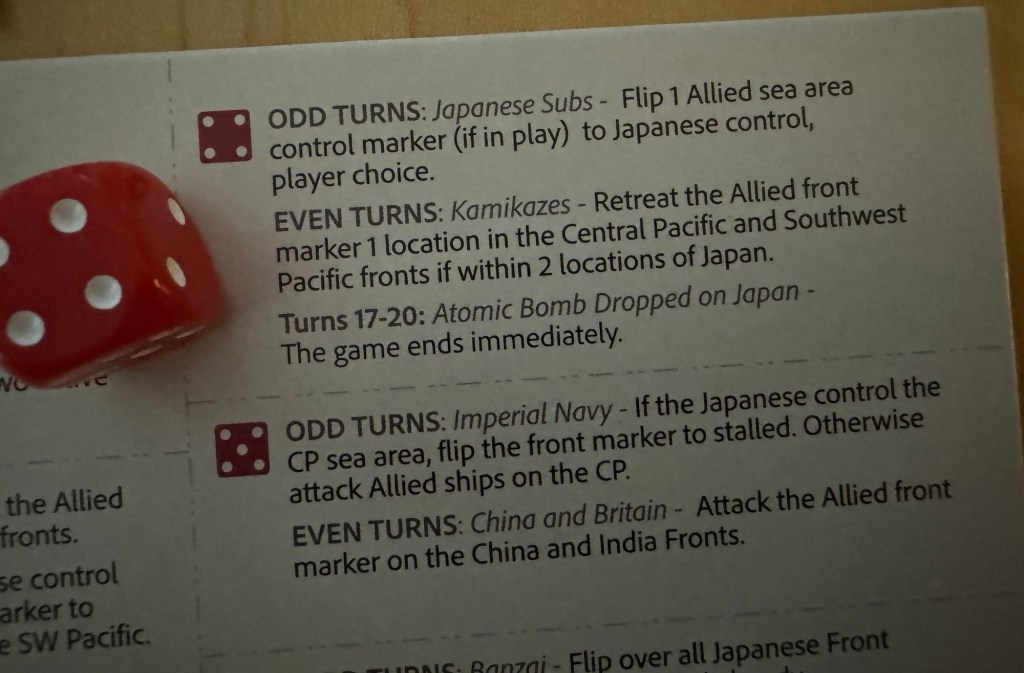
I mentioned that I have played War of 1812 Solitaire a lot as well, and that game is also very good, but it doesn’t use this type of connection to the operations on the lakes and the resulting ground campaigns and I think that that game is worse for it. Still good but I don’t really like it as much. There is also a connection to some of the Japanese Bot actions that focus on the control of these Sea Areas. When certain numbers are rolled, namely 2, 4 and 5, if the Allies don’t control the Sea Area referenced then they will have to Stall that Front by turning its marker over to its stalled side. This means that this Front is inactive and cannot attack until the player spends one of their precious Actions to reactivate and flip that marker back over to its Active side. Also if the Allies do control the Sea Area it will then be attacked by the Japanese which will require a roll of a 4-6 on a d6 to be successful. Once again, a perfect real world connection between the amphibious nature of the War in the Pacific. If you can’t get supplies through, including ammunition, fuel and food for the troops, then that Front becomes ineffective until you reestablish control over the Sea Area.

I really like the way this control of the Sea Areas made a difference in the game and really like this volume because of that reason.
Action Point Determination
Next, let’s take a quick look at how Action Points are determined. The Action Points are not determined by a card draw, as in the other States of Siege Series games, but it comes down to a die roll. What is the reason for this? Well, mainly because of the constraints of the size of the game. There really isn’t room for a bunch of cards in the box and a die roll works just as well while keeping the determination aspect lite and quick to determine.
There are two different sets of Action Point determinations though as there is one chart that is used during the first 8 Turns of the game and then a second more liberal chart that is used from Turn 9-20. I want to point out that this too is a very good historical abstraction of the concept of industrial capacity and the manufacturing might of the United States. After Pearl Harbor and the Americans being caught flat footed, it took some time to mobilize the industrial capabilities in the States and develop the workforce to switch from making baby bottles to making bullets, bombs, tanks and rifles. This is shown by Action Points being harder to come by in the first 8 Turns, which represent December 1941 to approximately August 1942, and easier to achieve from Turn 9 to the end of the game. During the first 8 Turns you will get 1-2 Action Points. That’s really it. Occasionally you will get lucky and roll a 6 earning 3AP’s. But you will have to learn your do without and to simply stay alive and keep the Japanese at bay.
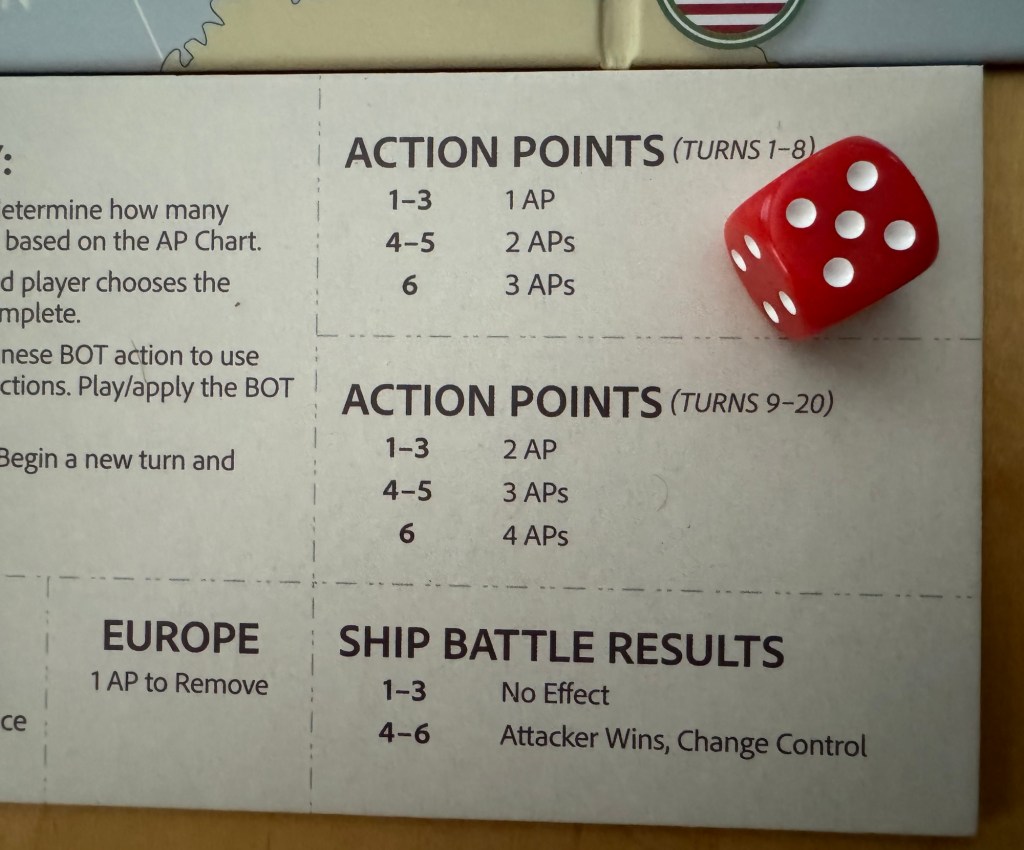
After Turn 8, you will get more like 2-3 AP’s per Turn with the occasional lucky 4. This is the time for you to make some hay while the sun is shining because you will have at a minimum 9 Turns remaining to a maximum of 12 to try to win the game. See the game will end after Turn 17 if you roll a 4.
This is a perfect way for you to determine the Action Points you will have each Turn and truly fits in with the other mechanics used in the design.
Now what can you use these Action Points for? Simple. Make an attack against a Japanese Front, attack a Japanese controlled Sea Area, remove the War in Europe Counter if it was placed on the board, reactivate a Stalled Front or add a Reserve. Simple actions. Simple choices. But once again they work in the frame of the design.
Scoring
Scoring is a very unique part of the game and you will start out in a negative position. At the outset you are at -8VP. This is calculated by simply following the scoring calculations found on the back page of the rules book. -6 because the Japanese control all 3 Sea Areas (-2 fir each) and then an additional -2 because the Atomic Bomb hadn’t been dropped. So you can see you start in a large hole. You will gain points for each step of progress your armies make on each of the 4 Fronts, 1VP per space you control, 1VP for each of the Sea Zones controlled by the Allies (and this is a huge swing as you go from -2 for Japanese control to +1VP), +6VP if you occupy Japan and another +e if you occupy Singapore. In a perfect game, the max score possible would be 30VP but don’t count on it. Also your VP total will be compared to various thresholds and your level of victory or defeat will be known.
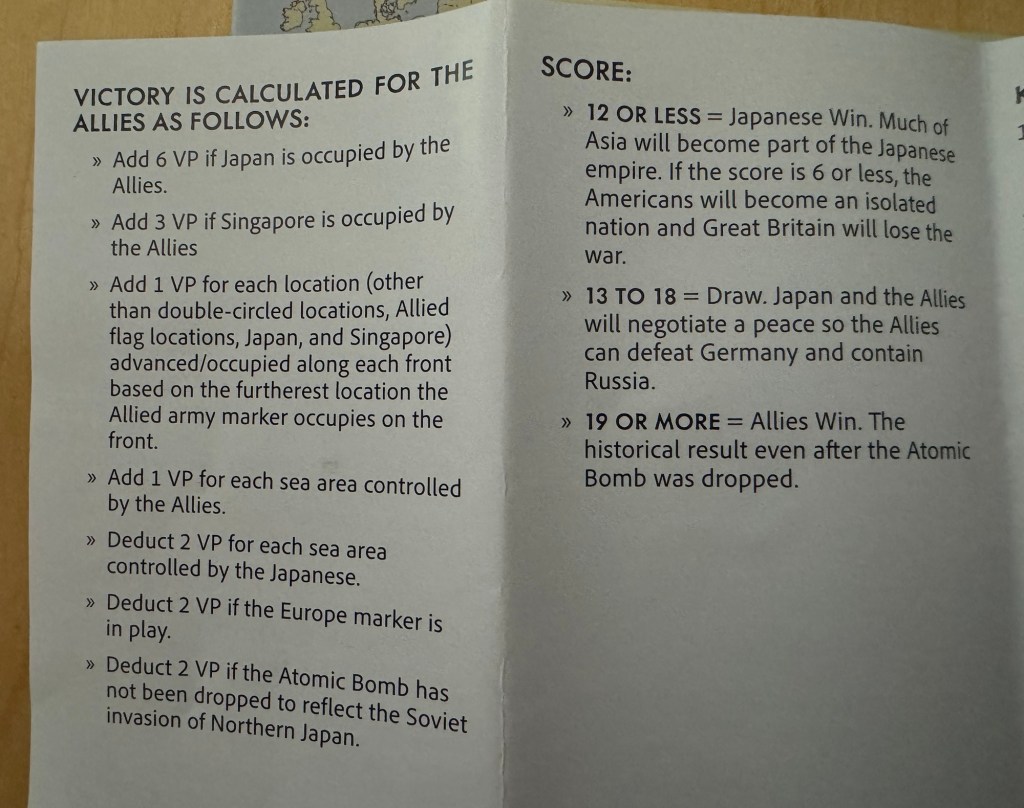
This is a really challenging game and on my first play I scored a grand total of 6VP. But I’ve learned a few things throughout my nearly 20 plays and my best score has been 23VP. It is truly a difficult game to win and I think that keeps me coming back. I just know that this time my luck will change and I will win!
Areas of Concern
Overall. There is a lot to like here but I had some minor quibbles with the rules. There are some points that need to be slightly clarified and possible an example or two more would help. The rules are not a real problem but it always frustrates me when I have to be the referee and adjudicate unclear rules.
The most vague part of the rules has to do with the result for the Japanese Bot when they roll a 1 on an Even Turn. With this result it states “Reduce Allied Army Reserves by 1 and flip two active fronts to stalled”. Seems simple but what if you don’t have any Reserves on the board? Does this mean remove 1 from the supply and you will not have access to it? Maybe. I think that if you have any on the board you should remove one but I just don’t know. It’s not clear. There are 4 such Allied Army Reserves but I really don’t find them that useful (see next section).
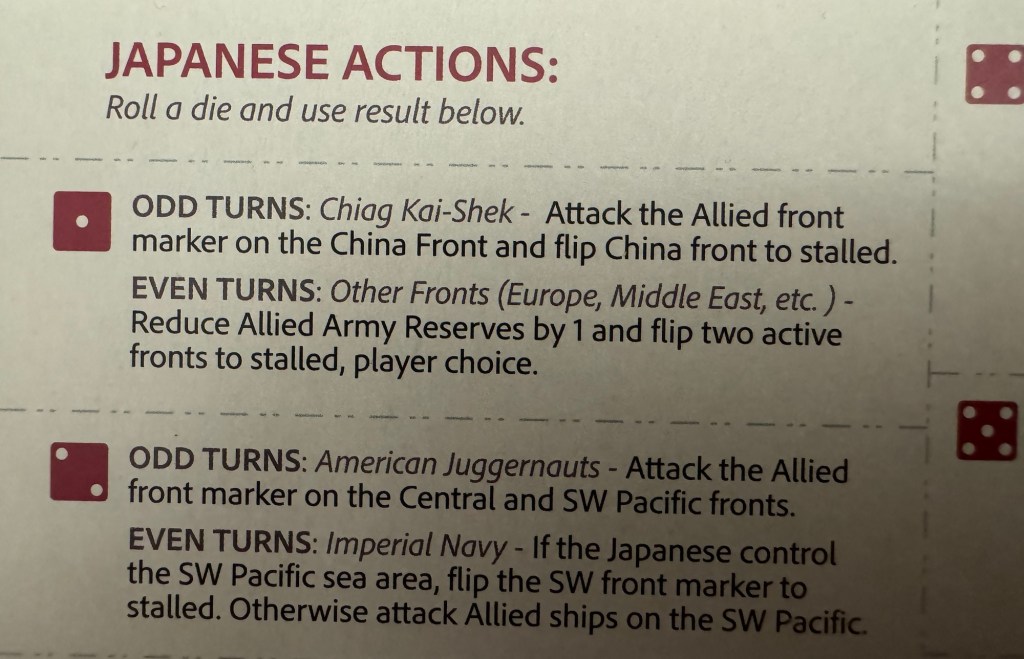
But it just isn’t clear. And I don’t think I should have to guess as to the intent of the rule but that is what you have to do. Not a big deal but it just needs to be more clear.
My next concern is with these Reserves. What purpose do the Reserves serve? In a game where you are getting 1-3 Action Points per Turn, can I really afford to spend a precious point to place out a Reserve unit that doesn’t give me a DRM or other bonus? It simply allows me a re-roll! Can’t I just spend another Action point to roll the attack again? Yes you can and that seems a better result than a re-roll. I just really don’t use them and that’s a shame. I might use them if they gave me a +1 DRM or if they allowed me to roll 2d6 and use the best result. That would have been better and would have encouraged me to use the Reserves. As they currently function, I have bought them like once or twice when I had a glut of Action Points and didn’t have other pressing needs to use them on. But maybe that is just me.
Future of the Series
The sky is the limit for this series. And they actually have just announced the third game in the series of travel-size solitaire wargames. Operation Dragoon 1944 is a strategic level game covering the Allies’ campaign in Southern France in 1944. It is a corps and division-level game covering the campaign’s big picture. You play the Allies as they must gain key ports quickly while stopping the Germans from escaping from Southern France to fight another day.

This one is designed by Dan Fournie and I really like his approach and the fact that it isn’t just rinse and repeat. He adds in some new elements that fit with the history and the situation. Other campaigns that might be good candidates for this solitaire travel-sized treatment could be Poland 1939, France 1940, Barbarossa 1941, the initial phase of the Battle of the Bulge 1944, Korea 1950, Desert Storm 1991, and Iraqi Freedom, 2003. And frankly the sky is the limit. Ancients. Medieval. Crusades. American Civil War. They all could receive their own focused rules and actions and would make for very entertaining and engaging games. I am up for whatever they choose to throw at me and I will play them with a smile.
I have very much enjoyed my plays of Pacific War 1942 Solitaire and War of 1812 Solitaire and truly love these games for what they are. Easy to setup, portable, fast playing and difficult to win solitaire games. And I encourage you to get a copy before they sell out.
If you are interested in Pacific War 1942 Solitaire, you can purchase a copy for $35.00 from the Worthington Publishing website at the following link: https://www.worthingtonpublishing.com/collection/pacific-war-1942-solitaire-travel-game
-Grant

Hi Grant,
This is such a great review, both well thought out and well set out too. Nice pics to top it off also.
Re your “issue” where : “The most vague part of the rules has to do with the result for the Japanese Bot when they roll a 1 on an Even Turn. With this result it states “Reduce Allied Army Reserves by 1 and flip two active fronts to stalled”.”
I have this cute little game, and I read this rule initially as : “you remove a Allied Army Reserve from the board, and ignore that part of the rule if there were none to remove”. However, your comments led to me reappraising both the rule and my interpretation of it.
I have decided on the following : As this Action specifies that it relates to “Other Fronts ( Europe, Middle East, etc. )” I will assume this refers to : “Allied Reserves that are currently Off Board ( i.e. not currently “In Play” )”. ONLY !
After all, “In Play” is not specified here, so it really has to be as per my note above ( or ANY Allied Reserve ) !
NB : Have you decided on a solution to this issue at all ?
Re using Allied Army Reserves in the game at all – Is it not better to spent an Action Point on adding a Reserve for future use ( as and when you make a bad roll ), rather than spending one on another attack when you make a bad roll ? I know that these two options appear to be the same thing, but you are spending an Action Point ( when you have one spare ) to create the Reserve, as against needing an extra Action Point ( when one might not be available ) in order to attack again. I hope this reads OK…
NBB : Any thoughts on this ?
Regards
LikeLiked by 1 person
You bring up compelling thoughts as well which is great. I agree with you about the reserves being reserved but it just feels a bit wrong. For the use of the reserves I do see your point and it really is “six of one half s dosed another”. It is probably about perspective. Thanks for reading and engaging. Much appreciated.
LikeLike
Ideasmaths emphasizes the practical applications of mathematics in everyday life, helping students see the relevance of math beyond the classroom. ideasmaths
LikeLiked by 1 person
This guide can discover their record, application, and some unique methods to assist you turn into a UNO pro. chailds game
LikeLike