Bursting on the scene over the past couple of years, Clint Warren-Davey is a new designer who has jumped in with both feet. His first design is called Werwolf: Insurgency in Occupied Germany, 1945-1948 from Legion Wargames and is a COIN Series inspired card assisted game about a what if scenario where the Werwolf Insurgency wreaks havoc over the final few years of World War II and continues their struggle even after the surrender of the Third Reich into the Post WWII era. He has also dabbled with a few other designs but the one that I wanted to know about at this point was an interesting looking game called One Hour World War II that is currently on Kickstarter from Worthington Publishing. I reached out to Clint and he was more than willing to discuss this new design.
Grant: What is your new game One Hour World War II about?
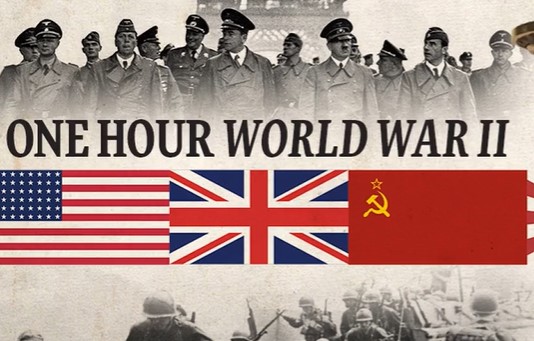
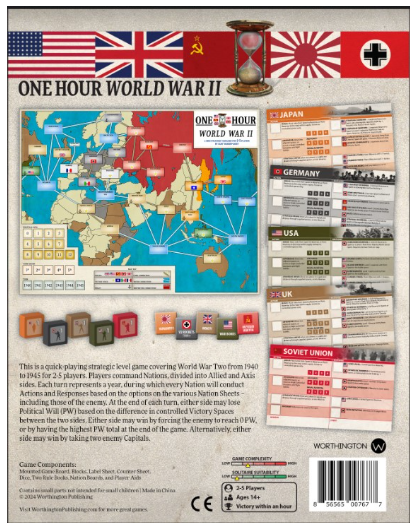
Clint: One Hour World War II is intended to be what it says on the tin – the whole Second World War crammed into an hour of play time. It is a strategic level game for 2 to 5 players and will be released by Worthington Games this year. Anyone who is a fan of Axis & Allies or similar strategic level WWII games will definitely enjoy One Hour World War II.
Grant: What was your design goal with the game?
Clint: Well, this game started as something else entirely – a postcard game. Hissy Cat Studios in California ran a postcard game design challenge where you had to make a game that fit entirely onto a double-sided 5” by 7” postcard. That means the map, the counters, the rules – everything. The game I submitted for that challenge was called ETO (European Theatre of Operations) and it was about WWII in Western Europe, 1944 to 1945. Basically, the campaigns from Normandy to the Rhine. This game had 16 counters, a map with 7 spaces and played in about 15 minutes. The game got some positive feedback in wargaming circles, and Major Ed Farren of the British Army (and UK Fight Club) suggested that I make a sequel – MTO, or Mediterranean Theatre of Operations.
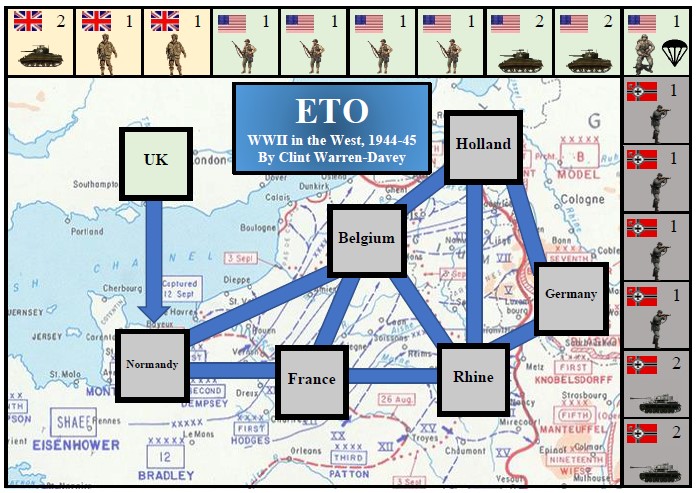
Now, ETO and MTO were not exactly like One Hour World War II, but some basic features of the system were laid out with these simple postcard games. For example – a tight map with point-to-point movement, counters with only a single piece of information (a number 1 or 2), mostly deterministic combat and a strictly limited number of actions per turn.
The next thought that came to me was an entire series that covered the whole war, including the Pacific and Eastern Front. This would be four postcard games, each lasting about 15 minutes. Then I thought – what if I made a single WWII game that covered all theatres in one hour, instead of four postcard games lasting 15 minutes each? This would be even more useful, because I could fit a game into a typical lesson at school. I am a high school history teacher and use games in the classroom all the time, but still hadn’t found a game that could fit all of the Second World War into a one-hour lesson. So, this is how the idea for One Hour World War II came about.
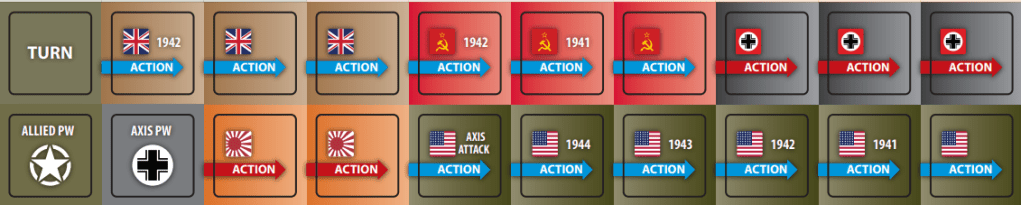
Now, when I got down to actually making this game, the design goal became a bit more focused. I could go beyond the limitations of a postcard, but I still wanted to keep it very simple and fast-playing. I decided that the game would consist of a series of discrete actions, each of which could be resolved in about 30-45 seconds. As long as I could keep the game to about 80 actions, it would fit into the one-hour timeframe.
I should point out here that your first game of One Hour World War II is not going to take only one hour. It will probably take two hours, as you learn all the different Actions and Responses available to each Nation. With a bit of experience, two-player games will typically go for about an hour, while games with three to five players will take slightly longer. It is also possible for the game to end in as little as 30 minutes, as either side can go for a quick win.
Within this time constraint, I still wanted to maintain a lot of high-level strategic decision making for all players. A typical Nation will be taking 12-20 actions over the course of the game, and every one of those little decisions counts. Of course, not everything can be crammed in. Many operations in WWII are too small to show up as discrete actions at this level, so they are abstracted out – for example, the German invasion of Crete or the Japanese campaign in New Guinea. However, the really big decisions, like whether or not to launch Operation Barbarossa, or the USA deciding on a “Germany First” rather than a “Japan First” strategy, are all in there. It’s broad-brush strokes rather than fine detail. But the overall effect is to generate a plausible narrative of the war at the strategic level.
Grant: What elements from WWII did you most want to model in the game?
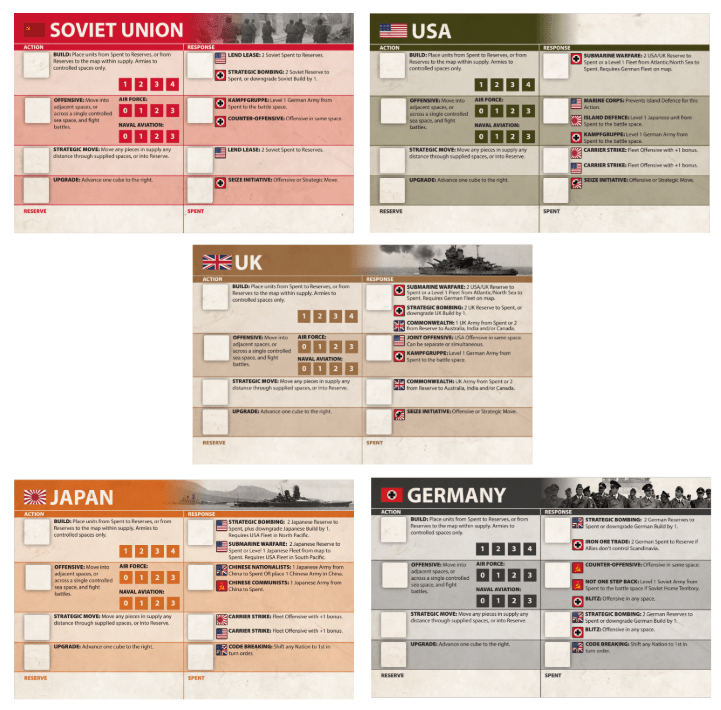
Clint: As just mentioned, the game is mainly trying to capture strategic decision making at the highest level. Within this, there are some specific features I wanted to highlight. The first is the use of reserves. I feel this is underrepresented in a lot of wargames. The release of reserves is really the primary method a higher-level commander can use to influence the course of battle. So, the battle system is centered on committing units in the “Reserves” box on your Nation Sheet (more on this later).
I also wanted to model the wide variety of different strategic options available to each country. To take one example, the USA has the option of spending Action markers its own four core Actions, but also on the following eight Responses:
-Strategic Bombing: Downgrading the enemy’s Build track and shifting units from Reserve to Spent, thus slowing down the flow of enemy units to the front line.
–Chinese Nationalists: Funding guerrillas in China to drain Japanese Armies or build up US-aligned Chinese Armies.
–Lend Lease: shifting two Soviet units from Spent to Reserve, a huge boost to the Red Army.
–Joint Offensive: Launching an Offensive in combination with the UK, massing the forces of both Nations. Hint: this is a great way to get a foothold in France or Italy in the late game.
–Code Breaking: Changing the turn order of the game, perhaps to give the USA or another Allied nation first place.
–Marine Corps: This prevents the Japanese from playing their “Island Defence” Response, making it easier for you to clear out Japanese resistance in the Pacific Theatre.
–Carrier Strike: Like Midway or the Coral Sea, this allows the USA to make a powerful naval strike in reaction to Japanese movements.
–Submarine Warfare: This automatically removes a Japanese Fleet from the board OR shifts Japanese units from Reserve to Spent, provided the USA has a Fleet in the South Pacific.
Reading through this list of Responses, you will see many aspects of the war represented – not just military, but economic and political as well. Between four Actions and eight Responses, each USA Action marker can be spent in 12 different ways. This diversity of options was a key part of the initial design goal.
Grant: What other published games have inspired your design?
Clint: So many! But I can nail it down to a few particular games which inspired the core mechanic of Action > Response.
First of all is Twilight Imperium. This is an epic sci-fi space opera game with a lot of different sub-systems. One of these is strategic action cards. Basically, all players will get a strategic action card each turn with a primary and a secondary action. When the card is played for its primary action, it allows all other players to jump in and do a secondary action. This mechanic was in turn borrowed from the famous euro game Puerto Rico.
Then there is the COIN Series from GMT Games designed by Volko Ruhnke, which has influenced me a lot as a designer. In most COIN games each faction has a list of operations and associated special activities. The Actions and Responses in One Hour World War II are roughly analogous to the operations and special activities found in COIN games – with the big exception that Responses are done during another players’ turn.
I have also long admired Martin Wallace as a designer – having enjoyed titles such as A Few Acres of Snow, Wildlands and Lincoln. Both his wargames and euro games generally follow the same structure – two actions in a turn. The idea of a turn consisting of a simple one-two punch of discrete actions has therefore been in the back of my mind for sometime.
Grant: As a 2-5 player game, how do you split up the playable factions? How much negotiation/interaction is there between the factions?
Clint: I usually play the game two-player, and this is very straightforward. One is the Allies (Soviets, UK and USA) and the other is the Axis (Germany and Japan). In a three-player game, one player is the Axis, one is the UK and USA and one is the Soviet Union. In a four-player game, one is Germany, one is Japan, one is the Soviet Union and one is both the UK and USA. Finally, in a five-player game every player gets one Nation each. You can also play “multi-handed” solo, which means pretending to be multiple players at once and play against yourself. It is easy to do this with One Hour World War II as there is no hidden information.
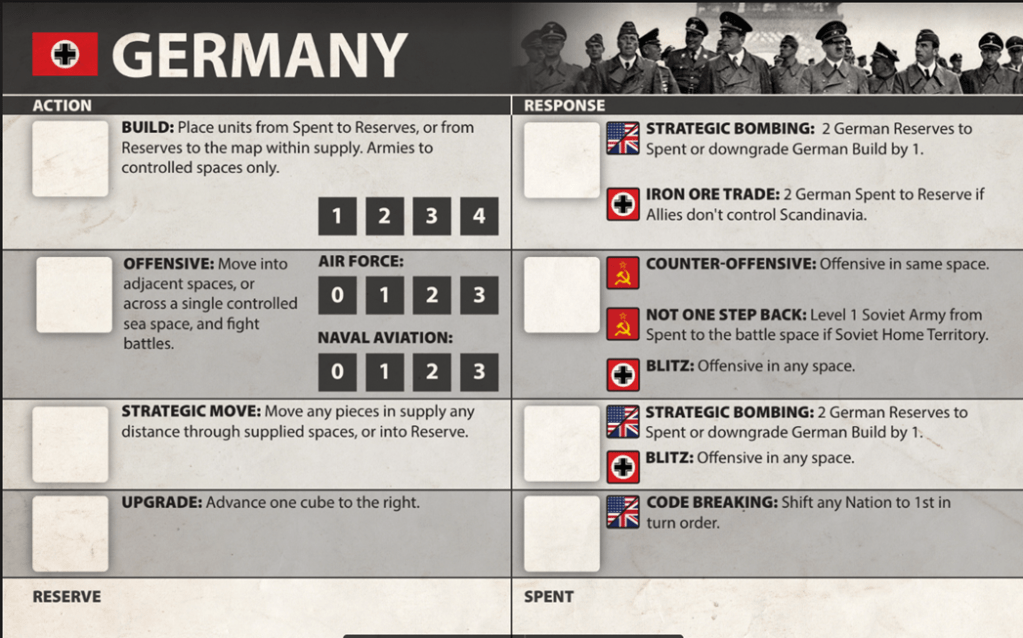
There is a lot of interaction between players, mainly due to the Action > Response mechanic. Every time a player performs an Action, other Nations (or even the same Nation) may interrupt the usual turn order to jump in and play a Response. Take a look at the German Nation Sheet below. Every time the German player performs a “Build” Action, the USA and/or the UK could then play the “Strategic Bombing” Response. Likewise, if the Germans launch an Offensive, the Soviets can Respond with “Not One Step Back” and “Counter-Offensive.” You will also notice that Nations can play Responses following their own Actions, this is like getting in a double Action. Germany has the most of these, and the most versatile is the Blitz Response, which allows Germany to launch another Offensive immediately after a normal Offensive.
This turn sequence means that all Nations are constantly looking at other player’s Nation Sheets. Indeed, I deliberately designed the Nation Sheets in this way so that you have to look at other players. I could have laid out the options in a different way so that everyone is only looking at their own action menu and that may have been slightly more ergonomic for the player. But this way, the interaction is much higher and you are much more aware of what your allies and opponents are actually doing.
Grant: What is the scale of the game? Force structure of units?
Clint: The scale of the game is highly abstract, but to cram all of World War Two into an hour some accommodations need to be made! Basically, a single unit is something like an Army or Army Group, plus the logistical tail required to support it. The 21st Army Group in Northwest Europe would be a good example. Fleets are similar, representing something like the entire U.S. Navy 5th Fleet in the Pacific Theatre. However, this only refers to the frontline units on the map. The pieces in the game go through a sort of pipeline, cycling between Spent, Reserves and the map itself. Committing Reserves to a battle (shifting units from the Reserve space to the Spent space on your Nation Sheet) represents not just throwing more large formations into a fight, but expending additional artillery shells, ammunition, replacement troops and the other necessities of war. This is also why things like Strategic Bombing move enemy units from Reserves to Spent. It is not that the bombing is wiping out entire Army Groups, but rather that several months of intense bombing is wrecking the factory and rail infrastructure of the country and thus preventing the flow of material to the front.
The relative strengths of the Nations are also not to be taken as exact 1:1 comparisons. Sorry France, I only gave you a single Level 1 Army. This is not because the French Army is small or weak, it is just that modelling the collapse of 1940 while still keeping the game balanced would require too many additional rules. Also, the French Army can be saved by the British player and eventually brought back into the field – that single piece becomes the Free French!
Players will notice that the Level 2 pieces have a different picture – tanks for Armies and aircraft carriers for fleets. This is not necessarily because they represent units with more of these types of equipment (although they do). It is simply to differentiate them visually. The Level 2 units in each Nation’s order of battle are their heavy hitters – reinforced mechanised Army Groups or Fleets containing several Carrier Task Forces.
To take a concrete example of scale, Operation Barbarossa in 1941 should be imagined in game terms as an Offensive/Blitz launched by Germany from Poland with three units – two Level 2’s (Army Groups North and Centre) and a Level 1 (Army Group South). Similarly, the battles of Pearl Harbor and Midway should be understood as being fought primarily by the single Level 2 Japanese Fleet, against one of the Level 2 USA Fleets. In both cases the frontline units are not the only pieces involved, there are many in Reserve. But this gives you a hint of the zoomed out and abstracted scale of the game, and the kinds of decisions involved.
Below is the entire unit roster for the game – 58 units in total:

Grant: What is the concept of Political Will?
Clint: Political Will is a measure of each side’s willingness to continue the war. I owe this concept to Maurice Suckling, a brilliant and prolific designer who offered advice on the development of One Hour World War II. The concept of Political Will encompasses questions beyond purely military. Will taxpayers keep paying? Will the population continue to offer up its sons to the military? Will the regime be able to maintain its grip on power? Will the country’s economy grind to a halt? Will rival political factions in the ruling class launch a coup and then negotiate with the enemy? As Political Will drops, the possibility of defeat in some form comes closer.
In game terms, it functions as a kind of reverse Victory Points, that starts off high and goes down every turn that the enemy is winning the war. If you reach 0, your side has totally collapsed and is suing for peace. Historically, this is what happened to the Axis. Japan could have technically kept fighting until complete destruction and Germany could have continued to fight a guerrilla war against the occupiers (see my game Werwolf) but both countries did not have the willingness to continue the war, so agreed to peace.
Grant: How do players go about building their Political Will while also decreasing their opponents?
Clint: Generally, each side cannot raise their Political Will. It starts off at 10 (a nice round number!) and drops during every turn that your side is losing the war. This is calculated in a fairly straightforward way based on control of enemy or neutral victory spaces (denoted by stars and flags on the map). For example, at the end of 1940 turn you might have the Axis controlling France and the Balkans, while the Allies only control their own starting territories. The Axis have taken two victory spaces and the Allies have taken none, so Allied Political Will would drop by two.
Now, if using the optional rules for Special Actions and Responses, there are many other ways to affect Political Will. For example, Germany can play the “V2 Rockets” Special Action marker from 1944 onwards, which immediately drops Allied Political Will by one regardless of territory control. This reflects the effect of German guided rockets killing civilians in London and the added pressure on the Allied armies to take ground and shut down the V2 strikes. Similarly, the Japanese can play the “Co-Prosperity Sphere” Special Action if they control all sea spaces in the Pacific. This raises Axis Political Will by one and reflects the propaganda value of Japan attaining one of its publicly stated objectives for the Pacific War.
Grant: What is the role of Minor Nations? How do players manipulate them?
Clint: There are three Minor Nations in the game: France, China and Italy. These are not playable in their own right but are attached to one of the larger, player-controlled Nations. France is controlled by the UK, China by the USA and Italy by Germany. Now, at this scale, these Nations have been compressed down to a single space and one or two pieces. France has a single Army, China has two Armies and Italy has one Army and one Fleet. These units are fully under player control and function just like other units, with a few key exceptions. For example, the Chinese Armies are restricted to operating only in China and cannot be “built” in the usual way by the USA player. The Italian units are permanently removed from the game as soon as Italy itself comes under Allied control – this represents the Italians surrendering as they did in 1943-44. Minor Nation units also do not benefit from the upgrades of their controlling Nation either, so they are generally weaker.
Now, these Minor Nations are still very important despite having few pieces, due to the overall scale of the game. Keep in mind that Germany has a grand total of 10 Army units and one of them is Italian. Likewise, Germany itself has two Fleets and the Italians have one, so any Axis naval strategy is going to heavily rely on the Regina Marina! Indeed, the Italians start off in control of the Mediterranean and can use their Army to grab Noth Africa on the very first turn – a hugely significant space as it controls access to Britain’s Eastern colonies. Likewise, the single French Army is a valuable asset for the UK player. I usually commit a UK Reserve on turn 1 to save the French Army from total destruction (thematically, sending the BEF to France in 1940), because the UK only has five Armies of its own. That extra French piece makes all the difference – bringing it back later in the war represents the Free French forces which fought in the Mediterranean and Western Europe. Finally, China will form a key component of any Allied strategy in Asia. The two Chinese Armies are very hard to actually destroy, and they can be used to tie up Japanese Armies in an endless quagmire in mainland Asia.
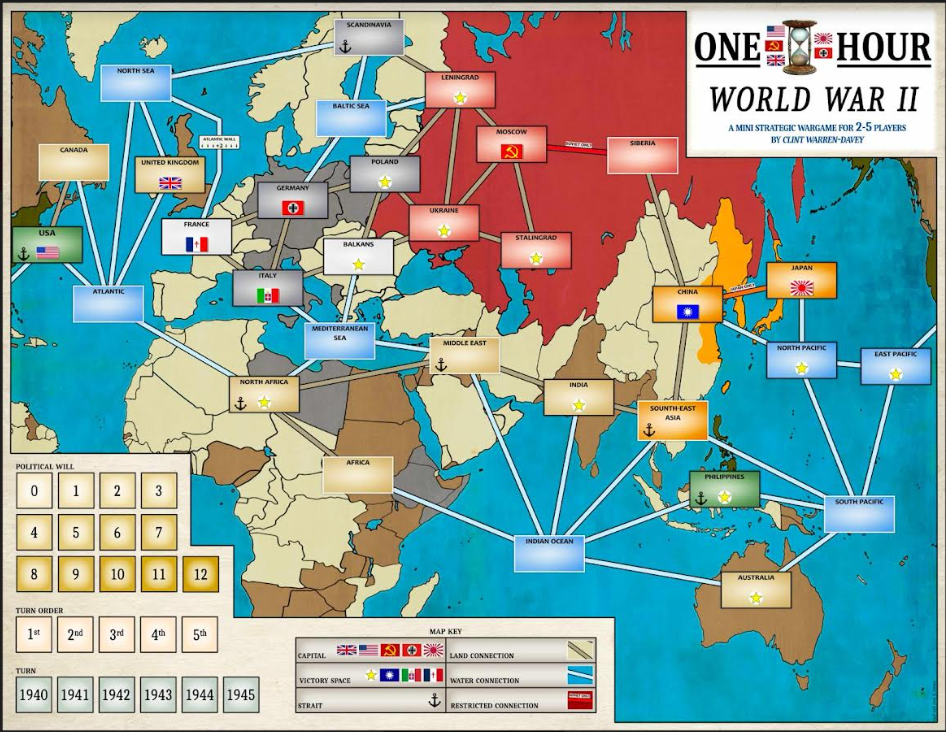
Gran: How is the map laid out?
Clint: The map depicts the world in 1940, though obviously in a very stripped-down fashion. The map includes a grand total of 31 spaces, including land and sea. This is clearly much smaller than most other strategic level WWII games – the map has been streamlined to the absolute bare minimum number of spaces needed to capture the kinds of player decisions I want to include. I will give two specific examples to show the kind of compression used here:
-Eastern Front: The entire Eastern Front is a grand total of 7 spaces: Germany, Poland, Balkans, Ukraine, Leningrad, Stalingrad and Moscow. But this still gives players some of the high-level decisions for this theatre – as the Germans, do you go straight for Moscow? Do you advance on a broad front or a narrow front? Do you divert to Stalingrad if the Moscow attack fails? Do you besiege Leningrad due to its strategic position? Do you wait until the Balkans are fully under control before launching Barbarossa? Likewise, the Soviets will have a similar set of decisions. Do you fight tooth and nail for Ukraine in the initial German attack? Do you stack up forces on the front line in an aggressive posture during 1940, or keep most troops in Reserve and man a thin front line? Do you hold Leningrad to maintain access to Scandinavia and the Baltic? Do you pull back your forces from Siberia to aid the defence of Moscow, or leave them in place to threaten Japan?
Of course, there may not even be a German invasion of the Soviet Union as in history. The German player may wish to focus on economic warfare against Britain and maintain a defensive posture on their eastern frontier. In this case, the Soviets can actually go on the offensive and invade through three possible routes – Poland, the Balkans or a sea invasion via the Baltic. I have even seen games where the Soviets invade Italy by 1943, and the Germans have to totally reorient their strategic positioning to face the threat.
–Pacific: This theatre consists of a large chunk of the map: Australia, India, Philippines, Southeast Asia, China, Japan, Indian Ocean, North Pacific, South Pacific and East Pacific. Having played Mark Herman’s Empire of the Sun, I know how intricate the Pacific Theatre really was. Thousands of islands with airfields and ports, plus multiple fronts on land. In One Hour World War II, this is compressed to 10 spaces, both land and sea. Yet the Japanese player is confronted with the same essential dilemmas. The Imperial Japanese Navy begins in control of the North Pacific and has the opportunity to branch out to the east, south or west. This could be to invade Australia or the Philippines, or to confront the US Navy and destroy it quickly in the hopes that overall Axis victory can be achieved before the USA really ramps up its production.
On land, the Japanese occupy South-east Asia but must decide whether to pursue a serious campaign in China or India. China is a crucial victory space on Japan’s doorstep, but can easily turn into a drain as both the Soviets and Western Allies can funnel aid to their respective factions in China (Communists and Nationalists). India is also a victory space and starts off undefended, so may form a juicy target for the early game. But of course, the British have the ability raise colonial troops to defend the Commonwealth and can make Japan pay for an incursion into the Raj. Finally, there is the possibility of a war with the Soviet Union, as China borders Siberia. This is rarely in Japan’s interest, but the possibility of a Soviet intervention in China must always be considered.
The map is pictured below:
Grant: Why was point-to-point movement your chosen movement mechanic?
Clint: I have mainly chosen point-to-point movement because it is simple, clear, totally unambiguous and easy to make from a design perspective. Hexes would be entirely inappropriate considering the scale and number of spaces. I considered area movement, but at this scale you need to do a lot of “fudging” to fit in the world map and you end up with lots of blank or unusable spaces. I should point out that point-to-point movement is functionally identical to area movement in a lot of ways, so it really comes down to a personal preference.
Grant: What advantages does point-to-point movement lend to the design?
Clint: Point-to-point movement has the advantage of emphasising key strategic locations and the connections between them. I think it helps to imagine the map in purely logistical terms – with the connections between points being roads, railways and sea lanes. It is also very easy to write simple rules with point-to-point movement. Adjacency and moving from one space to another are very straightforward with this kind of map.
Grant: What actions do players have access to? How are Action markers gained and used?
Clint: All Nations have access to the same four Actions:
–Build: Shifting units from Spent to Reserve on your Nation Sheet, or from Reserve to the map. This is how you get “boots on the ground” and get exhausted units refreshed, ready for battle.
–Offensive: Moving units into enemy spaces and fighting battles. This is how you take ground and ultimately win.
–Strategic Move: Shifting units any distance among controlled spaces that are in supply. You would do this when you need to re-orient your overall strategic posture, such as the USA reallocating forces from the European to the Pacific Theatre
–Upgrade: Shift one of your three Upgrade tracks one space to the right, making the associated Action more powerful. The three tracks are Build, Air Force (which affects Armies in battle) and Naval Aviation (which affects Fleets in battle).
The big difference between the five Nations is their amount of Action markers. Action markers are the central component of the game and represent a combination of economic might, logistical capability, leadership and overall efficiency. They are spent on both Actions and Responses and refresh each turn.
Here is how they break down by Nation:
-Germany starts off with three Action markers and will stay at three Action markers per turn for the entire game. Now, in 1940 this is a huge advantage. The UK has two Action markers while the Soviet Union and the USA have one each. The Germans can use their extra Action markers to take lots of ground through Offensives or spend them on Upgrade and Build to beef up their units. My preferred way to spend those three German Action markers is this – one to take France with an Offensive from Germany, one to take North Africa with an Offensive from Italy and one to take the Balkans with an Offensive from Poland. Note that this is a highly aggressive opening and leaves you vulnerable in at least two places – but it can catch the Allies off guard and secures a lot of victory spaces very quickly. By the end of the game, those three German Action markers are not going to be nearly enough to stem the tide of Allied units advancing from France, Italy and the Eastern Front – so enjoy the advantage while it lasts!
-Japan starts off with two Action markers and, like Germany, will not gain any more for the rest of the game. Like Germany, this gives them a big advantage in the early game. Their enemies do not have enough Actions to stop them or even slow them down. So, by 1942 (turn 3) the Japanese can reasonably expect to have conquered a few victory spaces like China or the Philippines and then spend their Actions on Builds and Upgrades. The key decision for the Japanese is when (or if) to attack the USA…
-The USA starts with a single Action marker in 1940. It will then gain one additional Action marker each year from 1941 to 1944 – these Action markers are placed on the turn track and given to the USA player as soon as the turn is reached. By 1944, the USA will have a whopping five Action markers – more than any other Nation and indeed equal to both Axis Nations put together. I think this adequately represents the enormous industrial might of the USA during WWII and gives players a sense of the logistical scale of American operations. For example, this number of Action markers allows the USA to simultaneously launch Offensives in the Pacific, Italy and France by 1944, as well as spending Actions on either Strategic Movement, Building or Upgrading. Aside from the Action markers gained automatically each year, they will often have one more – the “Axis Attack” marker. This is an Action marker gained by the USA as soon as an Axis Nation launches any kind of attack against them. Note that in most cases this will be an attack by Japan against American Fleets in the East Pacific or on the Philippines. The Axis Attack marker represents the surge of patriotism and national unity following Pearl Harbor and is more beneficial to the USA the earlier it is gained. It really forces the Japanese player to think carefully about when to strike the “sleeping giant”. If Japan attacks in 1941, they are handing the USA an extra five Actions over the course of the game. If the game ends in 1942 due to an Axis victory this may be worth it. But if the game goes until 1945, the Japanese decision to do an early strike against the US Navy may well be their downfall. It should be noted here that I make a somewhat controversial assumption in this design – the USA will go to war even if Pearl Harbor doesn’t happen. In other words, the USA will always be an Allied belligerent and there is no possibility of it staying neutral for the whole game. I make this assumption for a number of historical reasons:
-The USA was already fighting German submarines in the Atlantic before December 1941.
-Roosevelt was already escalating tensions with Japan by the oil blockade, which in turn was a response to unbridled Japanese aggression in China. This would have eventually led to war.
-America and the Axis were already on a collision course due to massive ideological differences. New Deal Democrats would not allow the world to be given over to fascism – it was one of their primary foreign policy goals.
Aside from these historical reasons, it just works so much better for game balance to have the USA as a definite Allied Nation.
-The UK starts with two Action markers in 1940 and will gain one more in 1942. Those initial two Action markers will have to do a lot of work. In 1940 and 1941, the UK is the primary obstacle to Axis expansion. Depending on German opening moves, the UK will probably have to spend a few Actions holding onto North Africa, which controls access to its Eastern empire. If the Germans give the Brits some breathing room, they may be able to Upgrade their Air Force track and pose more of a threat on land or try to take out the Italian Navy in the Mediterranean. From 1942 to 1945 the UK will have three Action markers a turn – enough to launch some major operations in France, Italy, the Balkans, Scandinavia or India.
-The Soviet Union starts with one Action marker in 1940. It will gain one more in 1941 and another in 1942. So, by turn 3 it will be on par with Germany and able to consider some serious offensive action. But those first two turns are a real challenge! In 1940 and 1941, the Soviets have a total of three Actions while Germany will have six. And there are so many things that need to be done – Upgrading the Build track or Air Force track, getting more units on the map, Strategic Movement to get the Armies in Siberia or Moscow closer to the front-line, possibly even funding Chinese Communist guerrillas to hit Japanese Armies in China. It is often a good idea to pass for the first few rounds and save your Action markers for the “Not One Step Back” Response, which lets you immediately place an Army from Spent to the map in a space where Germany has just attacked. The tight limit on Soviet Actions in the early game reflects the effects of Stalin’s purges and the general unreadiness of war which made the Red Army so vulnerable to Operation Barbarossa. But by the mid to late game, the Soviet Union is definitely a powerhouse, with three Actions a turn and up to 10 Armies to recruit.
Grant: How do Responses differ from Actions?
Clint: Responses are similar to Actions in that you spend an Action marker to play them. There are a few big differences though:
-Responses interrupt the turn sequence. When another Nation plays an Action and your Nation has a Response listed next to that Action, you may jump in and play your Response regardless of the turn order.
-While every Nation has the same four Actions, the Responses are different for each Nation and many of them are unique. Each Nation has between three and eight Responses to use. They are one of the primary ways that asymmetry is built into the design and include a range of historical patterns and events. For example, the Soviets and Germans can use the “Counter-Offensive” Response against each other – this reflects the back-and-forth attacks and counter-attacks of the Eastern Front. The UK and USA can use “Code Breaking” to change the turn order. The Japanese can use “Island Defence” to put up even stiffer resistance to US Offensives in the Pacific. The USA can use “Lend Lease” to build up Soviet units in Reserve.
-You cannot choose a Response following a Response. This is a subtle distinction, but it matters. One of the German Responses is Blitz, which functions as an Offensive and can be played following a German Offensive. Now, aside from the advantage of playing this in addition to a normal Offensive (thus getting a double move), it counts as a Response and not an Action. After a normal German Offensive, the Soviets could play their “Not One Step Back” or “Counter-Offensive” Responses. But they can’t do these following a Blitz, as it is not a normal Action. Responses can therefore be used to strike the enemy without fear of their own Responses.
Grant: How does Turn Sequence change and how does it affect the game?
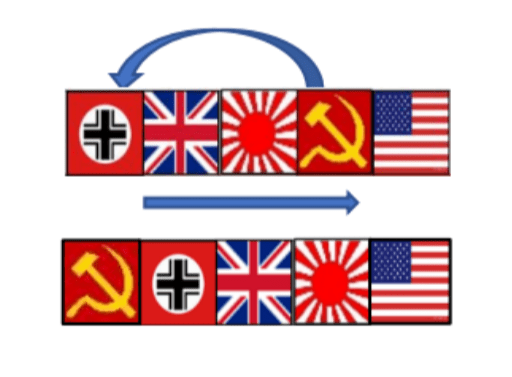
Clint: The game goes for six turns, each one representing a year from 1940 to 1945. The turn order begins as Germany, UK, Japan, Soviets, USA. This gives Germany the initiative and allows it to pull off a devastating first turn invasion of France or a wide variety of other strategies, e.g. taking North Arica with the Italian Army, building a German Fleet in the Baltic, taking the Balkans or even invading the Soviet Union straight off the bat. The USA comes last in the turn order as it is still isolationist and far from the action. This turn order will generally stay the same, but it can be changed throughout the game by the UK and USA “Code Breaking” Response. This lets the Allies shift any Nation to being first in turn order, with other Nations shifted to the right to fill in the gaps (see image below). Now, I try and do this once per game in around 1942, usually to shift the Soviet Union to first in turn order. This gives the Soviets some breathing room and even lets them take the initiative against Germany – moving first is a big advantage!
Grant: What is the layout of the Nation Sheets?
Clint: The Nation Sheets have the same basic structure for each of the five Nations. Along the left side are the four Actions – Build, Offensive, Strategic Movement and Upgrade. These are the same for all Nations. To the right of each Action is a list of Responses, with flags denoting the Nations that can use them. Finally, underneath the Actions and Responses we have two slots – one for Reserves and one for Spent. This is where units are placed when they are not on the map. The five Nation Sheets are shown below:
Grant: What is the general Sequence of Play?
Clint: The game goes for six turns, each representing a year from 1940 to 1945. In each turn, every Nation will perform one Action each, in turn order. Once all Nations have done an Action, go back to the start of the turn order and continue doing Actions. Now, while this cycle of Actions is happening, Nations can interrupt the turn sequence to play Responses. Each Action has one to three possible Responses listed next to it. So, a lot can happen in a single turn! But each Nation is limited by their number of Action markers, which must be spent on Actions and Responses. Once all Nations have passed, usually because they are out of Action markers, the turn ends and Scoring occurs. Then Action markers are returned to their owners and a new turn can begin.
Grant: How is Scoring accomplished?
Clint: At the end of the turn, you count up how many neutral or enemy victory spaces your side controls (victory spaces have a star or a flag). If you have control of more enemy or neutral victory spaces, the other side has their Political Will reduced by the difference.
This simple mechanic allowed me to chart a rough narrative course for each game. The Axis should have the advantage from 1940 to 1941. The Allies should have the advantage in 1944 and 1945. 1942 and 1943 should be the hinge of the game narrative, where the really decisive moments and dramatic swings occur. The Allies should be feeling the pressure as they mount desperate defences of North Africa, Moscow, India and the Pacific. They should come very close to losing the game in 1942 or 1943 – in fact it should be very possible for the Axis to actually win during this time. But then, if the Allies survive the crucial middle years, they should begin sweeping counter-attacks on every front as the industrial might of the USA and superior numbers of the Soviet Union are brought to bear. From 1944, the Axis should be scraping together new defensive lines and trying to hold on until the end of the war. Within this very broad historical narrative, there could be significant variation. But you will find most games follow the pattern. If the Axis win, they will win in the middle game by forcing the Allies to collapse, or eke out a “victory” by lasting longer than they did historically. If the Allies win, it will almost certainly be in 1945. It may be due to taking Berlin and Tokyo, or it may be just wearing down the Axis. But the Allies are not going to win quick.
Now, the specific scoring mechanics went through several different iterations, but the focus was always on taking ground and holding it as long possible. The main way to lower enemy Political Will is to take control of their victory spaces, and if you can take and hold a victory space it will continue to benefit you and hurt the enemy during scoring every turn. This is quite different to a system where you play to a time limit and then count up “points” or a system where you automatically win as soon as you have a certain number of spaces. It is attritional, but also encourages both sides to get off their butts and go take ground as quickly as they can. If the Germans have been occupying France since 1940 and it is 1944, you better get in there and take it back – it has already earned the Axis a lead of 4 or 5 points. Likewise, you can’t just “turtle” as the Axis. You need victory spaces and you need them soon.
Grant: How are Offensives used and the outcomes determined?
Clint: Offensives involve moving units into enemy spaces and fighting battles. This includes amphibious assaults and naval battles as well. It is very straightforward – move units in from one space to another and resolve a battle. Of course, you will need to set up your Offensives properly – you need to obey the stacking limits and you need to ensure there is a supply line to the Offensive space.
Grant: How is combat handled in the design?
Clint: Combat is mostly deterministic. You add up the total number of units on each side, with Level 2 units counting as two units each, to get a combat score. Highest score wins and inflicts one unit loss. If the ratio of scores is at least 3:1 in favour of the winner, the unit is permanently destroyed. If it is less than 3:1, the lost unit goes to the Spent box on its own Nation Sheet.
Within this basic system, there are two further things which can influence combat scores. The first is the Tactics Roll (see below). The other is the use of Reserves (again – see below).
Grant: What does the Tactics Roll represent? Why was this important to include?
Clint: The Tactics roll is simply a single die roll which can modify your score in battle. A 6 gives a +2 bonus, a 4-5 gives a +1 bonus and 1-3 is no bonus. Now originally there was no dice in the game at all – it was meant to be like Chess, Go, Diplomacy and other games with zero luck and 100% focus on player decision making. The concept of the Tactics roll was actually introduced by my developer Mark Wylie during play-testing. In his words, you needed something to “throw a monkey wrench in the works” and mess with player’s plans.
Basically, the Tactics roll represents all aspects of battle which are beyond the control of commanders at the strategic level: lower-level generals making different decisions, weather, timing, etc. There were a few reasons for this, one of them was that it gave an outmatched force a chance of survival, opening up the chance for dramatic reversals of fortune. The Tactics roll means that a force outnumbered 3 to 1 can still attain a victory in battle, if they roll a 6 and the enemy rolls a 3 or less. This is cool and I’m glad it’s in there. It means even in desperate situations you have a reason to keep fighting, perhaps launching late-game spoiling attacks like the Ardennes Offensive in the hopes of staving off defeat for another turn!
However, I will point out here that players can use optional rules to play the game as originally envisaged – no dice. That is how I generally play right now. It is far less forgiving to players, as any mistakes are all on you and you can’t blame the dice. But if you want to really prove your superiority over your opponent, diceless is the way to go!
Grant: How are Reserves used?
Clint: Reserves are units which are not on the map, but are placed on the “Reserves” slot on the Nation Sheets. If you are fighting a battle (attacking or defending) in a space that is in supply for your Nation, you can shift units from Reserve to Spent to boost your combat score. The attacker must declare how many Reserves they are committing first, then the defender.
This very simple system has several effects. First, both sides have decisions to make in every battle. Neither side is passive or just relying on luck. Secondly, it opens up the possibility of devastating counter-attacks. As the defender, you can wait and see how many Reserves the attacker is committing. The attacker may look at the defender’s Reserves and decide they need to outmatch them, thereby committing most of theirs. You as the defender can choose to commit no Reserves and take the loss – the end result of this is that you have all of your Reserves ready to counter-attack and the enemy has exhausted theirs! This is how a lot of the Eastern Front played out – first one side then the other throwing in all their might, only to be counter-attacked by an enemy who had carefully husbanded their forces. Third, it provides a measure of flexibility for players. An Army on the map is necessary for establishing control, but is tied to one location. Having lots of Reserves allows you to allocate force between multiple fronts based on current needs. This is especially important for the USA, which may be fighting simultaneously in the Pacific, the Mediterranean and Western Europe. This has the related effect of players not bunching up their Armies into a few giant stacks, but rather spreading out to advance along multiple axes. Finally, it highlights the historical importance of reserves. As a strategic or even operational level commander, this was really your main way of influencing the battlefield once contact with the enemy had been made.
Grant: How do players Upgrade their various Actions?
Clint: One of the four Actions in the game is Upgrade, which involves simply shifting a cube one space to the right on one of the three Upgrade tracks. These Upgrade tracks include the following:
-Build: Upgrading the Build track basically represents investing in your war economy. It allows you to get more units cycled through from Spent to Reserves and then from Reserves to the map. This ranges from 1 to 4, with all Nations starting on 2. This means most Nations can get a single Level 1 Army or Fleet from Spent directly to the map (1 Build to get it to Reserves and another Build to get it from Reserves to the map). One strategy I like doing as the USA is maxing out the Build track as soon as possible, and then “spamming” units from 1943 onwards, once you have seen where they will be most needed. This strategy can only work if the Axis give you some breathing room though – an early game German rush against the Soviet Union will force the USA to allocate Actions to Lend Lease instead of Upgrading. It should also be pointed that it is possible for your Build track to be downgraded – this happens as a result of the enemy using the Strategic Bombing Response.
–Air Force: The Air Force track ranges from 0 to 3 and is added to your Nation’s combat score in all land battles. This track was a way of representing the effect of air power without introducing a new type of piece or a new type of procedure into the combat system. The Air Force track is extremely powerful and Upgrading it is absolutely essential for victory. Germany starts with an Air Force rating of 1 while all other Nations start with 0 – this gives Germany a distinct advantage in the early game and represents the effect of the large and modernised Luftwaffe which proved so decisive in 1939-41. Other Nations will need to Upgrade their own Air Force track quickly to keep pace.
–Naval Aviation: This track is just like the Air Force track, except that it applies to Fleets and not Armies. Japan starts with Naval Aviation 1 while all other Nations start with 0. Considering that Japan is also the only Nation to start with a Level 2 Fleet on the board, the Japanese have a huge early game advantage at sea and will be tempted to use this to strike the American Navy while it is weak. The USA and UK will probably invest some of their Actions into Upgrading the Naval Aviation track, while it is very rare for Germany and the Soviet Union to bother with it.
Grant: How is Stacking of units handled? Why was 3 the correct number to use in this aspect?
Clint: In this game, stacking serves two main purposes. The first is historical and based on logistics. If you imagine each Army piece on the map as a large and well-supported Army Group, the constraints of the rail and road network at this scale become clear.
Let us consider a real historical example, which we have already mentioned with regards to unit scale. The largest land invasion of the war was Operation Barbarossa, the German invasion of the Soviet Union in 1941. It involved three Army Groups – North, Centre and South. In game terms, Barbarossa would be represented as an Offensive (plus a Blitz Response) launched by the Germans from Poland into Ukraine and Leningrad. The stacking limit of three allows this to occur, as well as similarly large operations like Bagration and Overlord. In One Hour World War II, moving three Army pieces is a huge decision – especially considering that those front-line Army pieces will no doubt be supported by Reserves as mentioned above.
The other reason for a stacking limit relates to gameplay and balance. During play-testing it became apparent that some Nations could follow an unimaginative strategy of marching a big stack of Armies directly at the enemy capital on a single front. This was especially unfair for Germany, which often had to face “doom stacks” coming in from the Soviet Union, UK and USA. The stacking limit helps greatly with this problem and forces players to advance along multiple fronts, build up reserves, upgrade their tracks and generally work together as allies.
Grant: How important is Supply?
Clint: Supply is absolutely critical. I knew from the very start of the design that I wanted solid rules for this. This is because I am a lifelong fan of Axis & Allies, but one of my biggest gripes I have with that game is the total lack of supply or strategic movement rules. Now, I could have taken the path of tracking resources (oil, ammunition, etc.) but decided to keep it fairly stripped down. After all, the game has 31 spaces and is meant to take an hour.
At this scale, the main effect of the supply rules is that players have to maintain a continuous line of controlled spaces back to your Nation’s capital. This includes sea spaces, so you need to dedicate some of your Fleets to occupying intervening sea spaces. Units which are out of supply cannot perform any Actions and cannot benefit from Reserves in battle. This is not as harsh as some other wargames where out of supply units are simply destroyed at the end of a turn, but it does render those units practically useless for most purposes.
The supply rules force players to follow strategies which are more historically plausible and require planning at least one year (turn) in advance. For example, the USA cannot just launch D-Day in 1941. They will need at least a Fleet in the Atlantic and a Fleet in the North Sea to maintain supply, as well as a build-up of Armies in the UK ready to cross over into France. Likewise, Germany cannot just barrel straight to Moscow, they need to leave Armies behind to occupy the spaces behind them, like Ukraine. Those units which are sitting behind the front line, controlling the supply lines, should not be thought of as doing nothing. Rather, the ships are all on transport or convoy duty – hunting down enemy submarines, providing escorts for transport ships, etc. The ground units are administering conquered territory, setting up governments, hunting down partisans or guerrillas, etc.
Grant: How is victory claimed?
Clint: There are three distinct ways to win. We have already seen how Political Will is degraded each turn based on the difference in controlled victory spaces. Either side, typically the Axis, can win instantly by reducing the enemy Political Will to 0. Pursuing this is a quick and risky strategy, where you go all out on all fronts and hope the enemy collapses before they can muster an effective strategy. The Allies have the option of winning by taking control of both Germany and Japan – they might be able to pull this off quickly if the Axis are caught napping, but usually it is a slow and deliberate campaign of marching directly towards the enemy capitals.
Both of these victory types are rather rare though. Usually it will come down to whoever has the highest Political Will at the end of the game – 1945. In the vast majority of play-test games, the difference in scores is 2 or less. Typically the game will be very close and hard fought down to the very last turn.
Indeed, one thing about the victory conditions might irk people – the fact that the Axis can be reduced to perhaps a few spaces on the map but still “win”. There are reasons for this. As the Allied player, you are aiming to at least achieve what the Allies did historically – Germany occupied and totally defeated, all of Europe and the Pacific under control, with just Japan holding on. Let’s say you have mostly defeated the Axis, but the Japanese still rule Australia, India and the Philippines. Or you have occupied Japan, but Germany still controls a third of Europe. You need total victory, by the end of 1945.
This is not just a gameplay reason either. The war absolutely exhausted and bankrupted the Allied powers. Britain effectively sacrificed its empire, the Soviets lost tens of millions of men – only the 21 USA was getting off relatively lightly. It is debatable how hard all of these countries would have fought if the war had lasted into 1946, 1947 or beyond. Would American and British taxpayers keep paying? Would Russia keep pouring out its blood? Probably yes, but at a cost that may be considered unacceptable to the various Allied regimes. If you are the Axis player, you are doing what the Axis did historically – keep fighting tooth and nail for every inch of ground until the hammer and sickle is raised over the Reichstag and the B-52’s are bearing down on Hiroshima and Nagasaki.
As a side note, nuclear weapons are not in the game as a distinct rule unless you are using the optional “Special Actions and Responses” rules. But you may notice that American Strategic Bombing against Japan is absolutely devastating. It requires having units in the North Pacific sea space, which thematically includes islands like Iwo Jima and Okinawa that the Americans needed as airbases. By the time you are Strategic Bombing Japan you have already swept their fleets from the Pacific and the game turn is probably 1945. It should also be remembered that the Soviets launched an absolutely massive offensive into Japanese-occupied Manchuria in 1945 to help force Japanese surrender. In game terms, this would be a Soviet Offensive Action from Siberia to China on the final turn. I have found that this will often be necessary to finally tip the Axis over the edge in terms of Political Will.
Grant: What are some of the Optional Rules included?
Clint: There are several optional rules which players can use to spice up their play experience.
The first one is dice-free battles. Basically, you drop the Tactics Roll when resolving battles. No luck means more emphasis on player decisions. I like this kind of playing – every move is on a razor’s edge and you need to seriously outwit your opponent. There is still scope for traps, uncertainty and unexpected outcomes – but they all stem from the decisions of the other player and not a separate factor that is beyond either of your control.
The second important optional rule is variable set up. This means all players can choose where to deploy their units before the game begins. This adds big replay value to the game and can lead to some crazy situations. So here is how I would break down the ways to play, using a combination of these two optional rules:
1. Casual Play: Standard set up, normal rules (dice). Best introduction to the game for most wargamers.
2. Chess-like: Standard set up, dice-free. My preferred way to play.
3. Advanced: Variable set up, dice-free. This will push you to the limit among experienced players.
4. Crazy: Variable set up and standard rules (dice). This can result in widely diverging outcomes, so be prepared! Good news is the game goes for about an hour so you can reset if the enemy outsmarts you and wins by 1942.
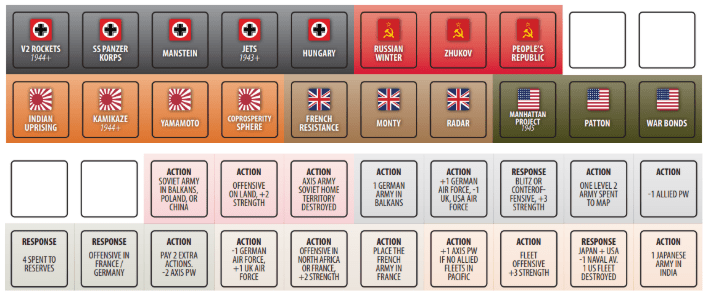
The third important optional rule is Special Actions and Responses. This gives each Nation a number of one-use only chits which they can play instead of a normal Action or Response. These were another suggestion by my developer Mark Wylie – he said there should be an option to add some more historical chrome and variability to the play experience. Things like V2 rockets, the atom bomb, jets, kamikazes, famous generals and other iconic WWII stuff. These rules do not add to play time at all, because they simple replace normal Actions and Responses without adding in more Action markers to the game. Their effects are fairly straightforward too – enough to fit on a chit – but can be decisive when played at the right moment. Some of them, like Manhattan Project, may even form the centerpiece of an overall strategy for that Nation.
All of the Special Action and Response chits are shown below:
Grant: What type of play experience does the game create?
Clint: The game creates a very “tight” and competitive experience. I’ve heard some games described as a “sandbox” and some as a “knife fight in a telephone booth” – One Hour World War II definitely is closer to the latter!
Every decision counts and there is almost no downtime. This is mainly due to the Action > Response mechanic which allows players to interfere with each other’s turns. I have played wargames where players look at their phones or wander off when it’s not their turn – you cannot do that in One Hour World War II. There is nearly always an opportunity to play a Response, either to support an ally or hurt an enemy. And if the enemy attacks you, you still have decisions to make, like how many units to commit from Reserve. While playing, you are “on” for the whole time.
This is not to say the game is all tactical or reactive – you still have to plan ahead and make investments for the future, like upgrading your Air Force and Naval Aviation tracks, building up Reserves and positioning Fleets to extend your supply lines. It just means those longer-term decisions have to be weighed against the possibility of action right now. You cannot “turtle” or build up endlessly – the pressure is on all Nations from the very beginning to get out there and take territory.
Grant: What do you feel the design excels at?
Clint: I think the design excels at showing the asymmetric positioning of the 5 major powers of the war – Germany, Japan, the Soviet Union, UK and USA. Each of them plays totally differently. For example, the Naval Aviation track is a high priority for Japan, while the Soviet Union will rarely touch it. The single German Fleet has a totally different strategic purpose than the four UK Fleets. The USA has a lot of Armies, but will take until 1945 to actually get them all on the front-line. In contrast, Germany starts with a huge force, including two of the powerful Level 2 Armies on the map from turn 1.
The other thing the design excels at is cramming a lot of historical detail into fairly simply mechanics. Everything from surprise attacks with aircraft carriers to code breaking to German Kampfgruppe doctrine is represented somewhere in the Action > Response system without it feeling bloated. There are a lot of decisions to make and many different possible courses to follow, but the mental load for players is kept at a manageable level.
Grant: What other designs are you currently working on?
Clint: Quite a lot actually! The one that is keeping me busy at the moment is a game on the Polish Underground in 1944-1947. This is really cool – it is a game for four players, each one leading one of the main insurgent factions of the Polish Underground: Communists, Agrarians, Home Army and Nationalists. There are also two “bots” – the Germans and the Soviets. The player factions are competing against each other while trying to avoid being destroyed by the far more powerful bots. The emphasis is on gathering intelligence, launching raids from the forests, rescuing prisoners, capturing supplies, negotiating with the occupying powers and leading the population in a political struggle.

I am also working on a solo/co-operative game on the 101st Airborne in WWII, from Normandy to the occupation of Germany. This is called Division Commander and is intended to be part of a series of games about division-level command. It should be released by Dietz Foundation in 2025. There are also two other designs that are a bit further away from production – one on modern cyber warfare and one on the Gallipoli campaign in WWI. Finally, there is Werwolf: Insurgency in Occupied Germany, 1945-48, which has been covered extensively here on the TPA blog. This should be released in 2024.
I have enough other game ideas to keep me busy for a lifetime – but this is the schedule as of 2024-2025. If anyone is interested in my games, I recommend following me on Twitter/X, which is the main platform I use to communicate with the outside world. I am constantly posting about all aspects of wargame design, so follow me at @Clint_Davey1 if that’s your thing.
Thank you for your time in answering our questions Clint. I really appreciate your detailed responses as well as concrete examples of how the game plays and some bit of strategy mixed in. This one looks like a great little introductory wargame that will be very strategic and fun to play.
If you are interested in One Hour World War II, you can back the project on the Kickstarter page at the following link: https://www.kickstarter.com/projects/1456271622/one-hour-world-war-ii?ref
-Grant
