I love a good North Africa wargame! To me, the reasons that I love it are several but the focus on supply and how difficult it was in this theater as well as the various elements of infrastructure used to perform that supply, such as shipping, ports, trucks, etc. are always good fun. I also love the scope and scale of the North African Theater. The front covered an area over 2,000 or so miles stretching from Morocco on the western coast of the Atlantic, through Algeria, Libya and onto Egypt. Names such as Tunis, Kasserine Pass, Tripoli, Benghazi, Tobruk, El Alamein, Malta (I realize not a part of Africa but an important cog in this theater) and Alexandria. There is something about this theater and the games we have played we have absolutely loved.
Well, when you pair this interesting theater with a great system in the ’40X Series and a great designer in Mark Simonitch, you have a recipe for a really tasty treat! And after playing the game a few weeks ago, I was amazed with how much I loved it even though many of the systems and hallmarks of the ’40X Series, such as the infamous ZOC Bonds, were not really present but there were other interesting things to take their place. I want to share my thoughts with you on this great wargame in this First Impressions post.
Not Your Typical ’40X Series Games…What is New?
One of the things that has become synonymous with Mark Simonitch and his ’40X Series are the concepts of a ZOC Bond. The ZOC Bond System is a combination of the traditional concept of a Zone of Control or ZOC with the additional concept of a Bond that extends along the hex spines from one unit to another creating an area that cannot be exploited by enemy units. In a normal Zone of Control, a unit will generate a ZOC in the hexes they are adjacent to that forces enemy units to stop when they enter. These units can on a later turn move through the ZOC, usually with a movement penalty or cost of some kind, and get at non-combat units in the rear such as HQ’s, artillery or disrupt supply.
The main difference with a ZOC Bond is that the area between 2 units that are separated by only one hex is considered to be impassible, with the exception of certain terrain features that will nullify this ZOC Bond. As an added kicker, this ZOC Bond also will prevent free retreats through the area and also will stymie supply from reaching units on the other side of an enemy ZOC Bond. This system is the perfect situation for a low counter density game. Because you don’t have as many units to create a long, unbroken line of units preventing enemy units from getting through, these smaller scale units use their maneuverability, fire power and positioning to create the same effect.
But, with North Africa ’41, there are no traditional ZOC Bonds. You might be saying “Well, Grant has finally gone totally daft!” But, the fact is that there are no ZOC Bonds. No ZOC Bond and it works out well. I think that part of this change for this volume was the terrain of the North African desert and the large dust storms that would be created from large formations or men and vehicles passing through the arid landscape. This means that tank units, recon units and even mighty Panzer tanks can subtly move through the terrain of the desert. And there is a lot open ground on the board but there are lots of rocky areas, escarpments and hills that can be used by both sides to defend and prevent breakthroughs and simply hold up or slow down advancing enemy units. This change had me a bit off kilter during the first turn and my brain reflexively had me moving my units one hex apart to create a stalwart defensive line of ZOC Bonds but after realizing there were none, I quickly was able to change and move into a more traditional unbroken line of units with tanks and other heavy hitters just behind to prevent breakthroughs and to counter attack when the moment was right and once I could get supply into position to do so. There are Limited Zones of Control as well as Overlapping Zones of Control in the game but they are different than the traditional ZOB Bonds and I think this change was very much a need here in the North African Theater to replicate the concepts of broken and inhospitable terrain, great distances and issues with equipment maintenance and breakdown due to sand overload.
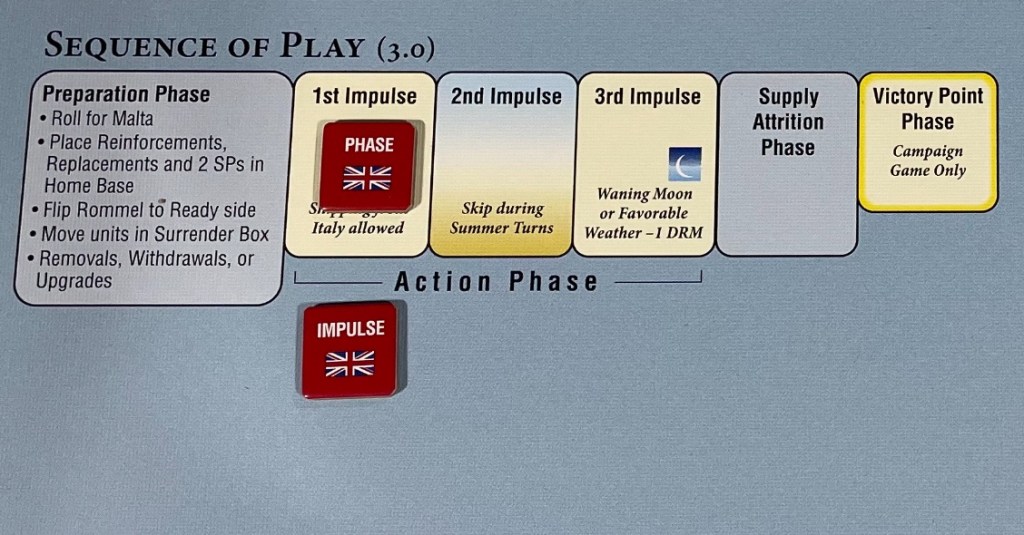
The turn structure is also very different from other games in the series. The turns are not traditional turns where each player gets to activate and move all their units and then fight and the turn ends but is made up of 3 separate impulses called the Action Phase. All 3 of these impulses have movement, combat and there are things like the Events that happen with a roll on the Events Table. You may also notice that the 2nd Impulse is skipped during Summer Turns because of the hot weather and the taxing effect it had on operations. Supply Attrition happens after the end of the 3rd Impulse which is important to take note of because you will have a full 3 activations and opportunities to put enemy units out of supply or to break through enemy lines to restore supply. The importance of supply cannot be overstated, especially for the beleaguered Allied troops holed up in Tobruk. The Axis has got to work hard to encircle them, destroying their ports and shipping to limit the number of units that can be supplied per turn, and also prevent the advancing Allied forces from the south to breaking through and relieving the siege.
This entry in the series has a focus on assets in the form of Supply and Resource Points. Typically, Supply is more abstracted in wargames and is just assumed to be there if you have open supply lines to your supply sources. But in North Africa ’41, Supply assets are critical and actually provide the ability for units and artillery to attack. We will disucss supply a bit further in the post but Supply is more of a resource than a concept and you must keep that in mind or you will find yourself unable to do much of anything but defend. There are also an important focus on Trucks and their ability to move this supply around the battlefield. The trucks are used to carry Combat Units, Replacement Units from various ports to the east and west or Supply Points to the fronts. Each of these trucks may carry either one combat unit of any size, one Replacement unit or one Supply Point using the Mechanized Movement rate. These trucks may also use Extended Movement to expand their movement potential. These trucks do not have to pay extra Movement Points to pick up or drop off units as the truck merely enters the hex where the unit is located, picks it up and then continues with movement. But if you move a unit with a truck, that unit must stay with the truck for all of its movement allotment. There is no picking up or dropping off units here and there. I really liked having to manage and juggle my trucks. The Germans can also attack and steal some of the Allied trucks and have counters to represent these commandeered vehicles. You have to make sure you are moving them efficiently as it takes a long time to move from ports to the front and you have to kind of have a chain of them coming and going. There is a Truck Special Transfer rule that allows the transfer of a Truck to a friendly Off Map Box or in any hex that contains a friendly Combat Unit that is currently in Full Supply. This transfer rule specifically is for empty trucks and once they have a combat unit or Supply Point, they will be unable to do this. This means that you have to place a few units in the rear to allow this teleporting, also an exercise in prioritizing front line versus rear troops and then placing where most needed.
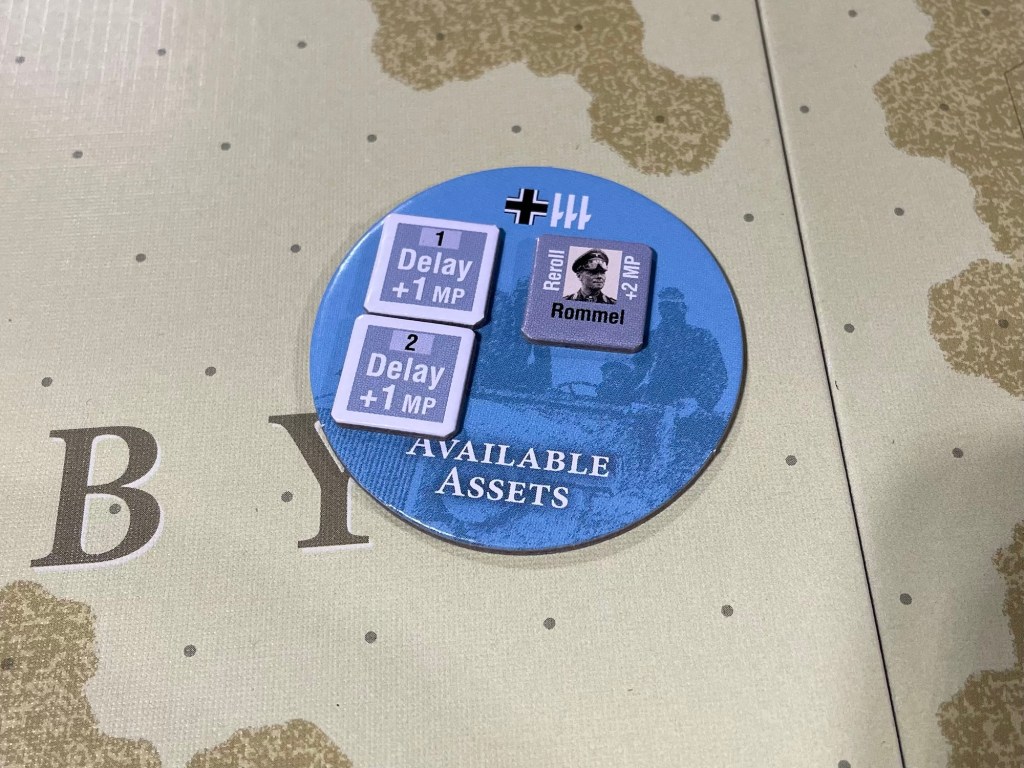
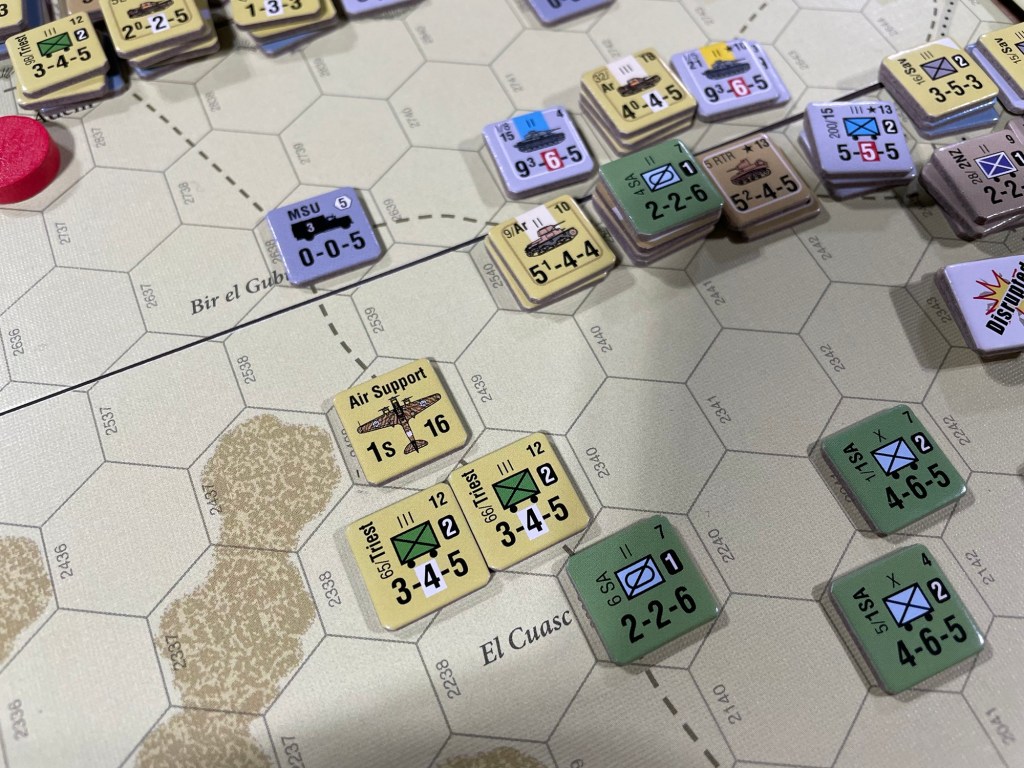
Resource Points are also important and allow the players to purchase various available assets. These assets include things like air support units, air transport, bombing raids that are important for damaging ports to reduce their supply points, forts and then finally the very important Commando Supremo chit which when used will allow German and Italian units to coordinate and attack together, which is otherwise prohibited. They did provide a nice little Available Assets cardboard circle that you can pickup and move around the battlefield reminding you of the assets you have at that time so you don’t forget them. This was a nice touch that aided in game play.
One of the major additions to this volume was the concept that in order to attack, you have to have supply to feed that attack. This statement is not totally correct as players are able to do small attacks that amount to no more than 9 Attack Factors. If the attack is to included more than this 9 Attack Factors of if the players is using any panzers or tanks in the attack they will need to be able to spend a Supply Point from an HQ unit or Supply Force that is in range of the attack. This is an amazing way of handling this as the game is focused on supply and without it the players will be unable to mount large attacks or even sustained offensives. This is one of the most limiting factors of the game but it limits both players and the players that master the use of their truck units and keep their ports clean will do well. I really enjoyed this focus on attack supply and really enjoyed having to think about my upcoming attacks and how to priorities them to make them count.
Maintaining Supply and the Brutality of the Desert
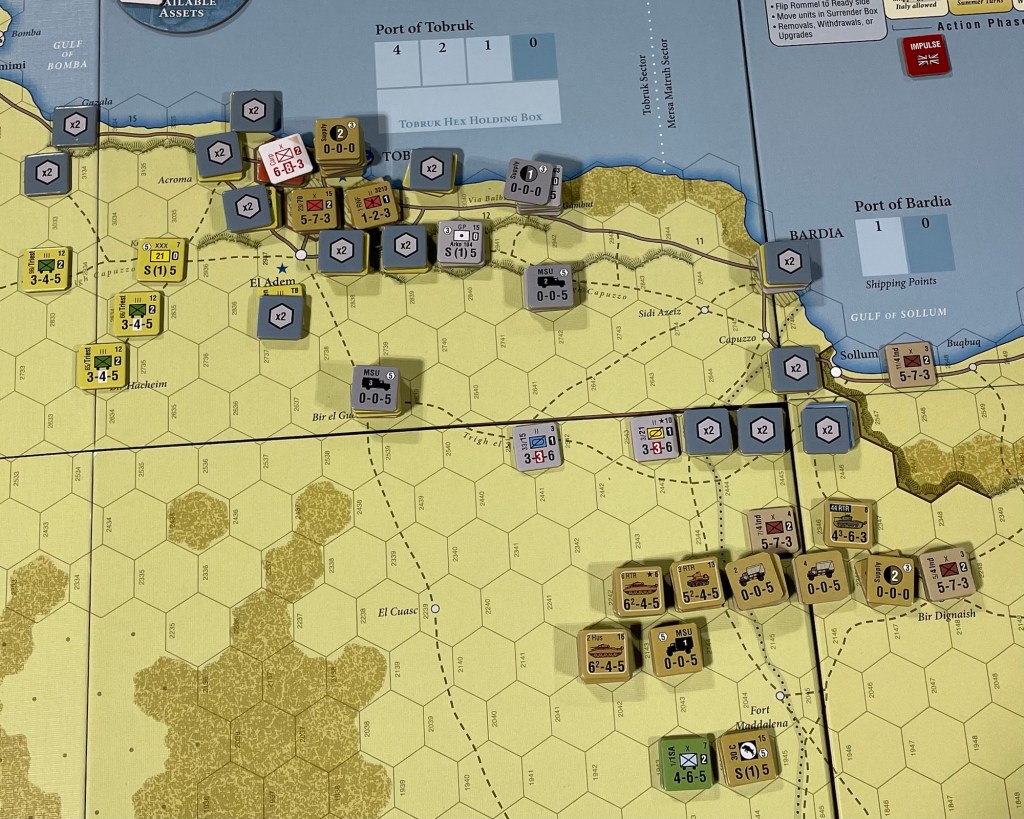
In any North African Theater wargame, supply will always be a major focus. The distances involved, including the difficulty with shipping across the Mediterranean Sea for both the Axis and Allies and Fortress Malta and the battle over this central point. The only way for the Axis player to get their units from Italy and across the Mediterranean Sea is through the port of Tripoli. They have to send all replacements, supplies and reinforcements that come on the board by the convoy routes from Italy to Tripoli. They can also send them to Benghazi but it is a bit more difficult. The Axis player will be able to supply a finite number of units on the board via these ports and will have to make the tough decisions to keep some units undersupplied if they are not needed at that very time. You cannot however allow the same units to be out of supply for consecutive turns as they will then begin to take Supply Attrition and lose steps so you have to do a macabre dance back and forth prioritizing how you use your limited supply. Also, in order for the ports to receive and keep units in supply, they have to be kept in good shape.
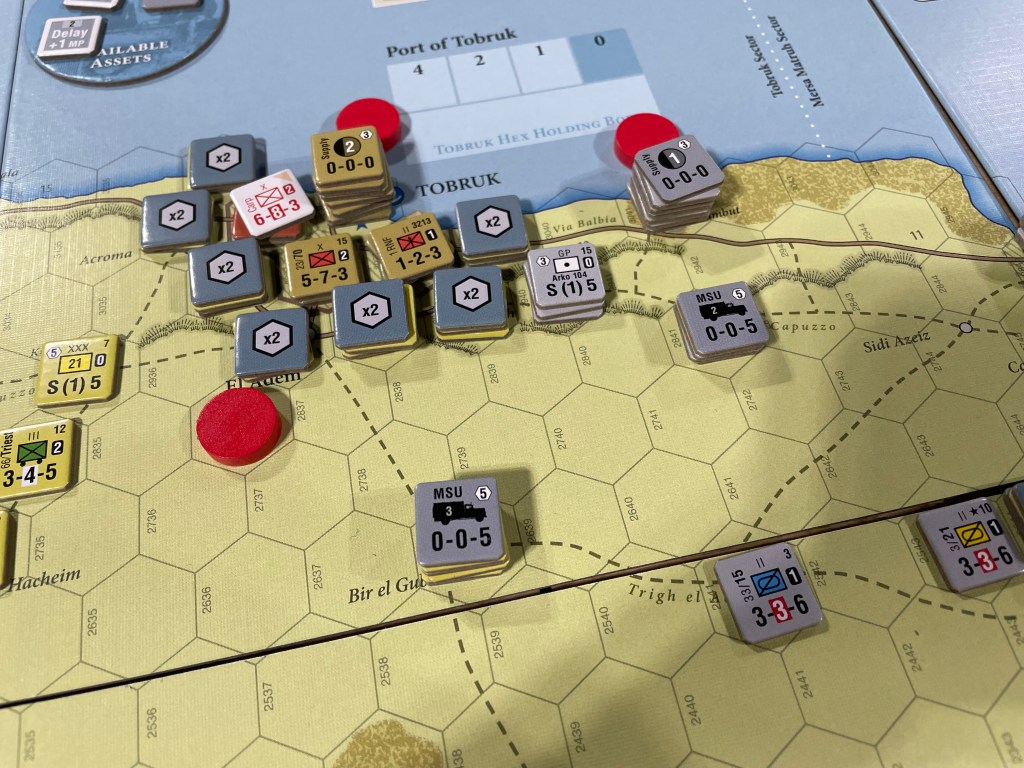
Both players will have to decide how to spend their scarce Resource Points as they can be used to bomb ports thereby reducing the number of units that can be supplied. This is especially important for the Axis player as they have to get Tobruk’s port down from its starting position of 4 to at least nor more than 2. The number showing on the port is its Port Capacity and is then multiplied by 2 to determine the number of units it can keep in supply. Port Supply is identical to regular supply except Ports may only supply these limited number of units. The player controlling the port must then decide which units are in supply and which are not during each of their friendly Supply Phases. The Axis player will get to supply a number of units on the board that totals the supply they derive from their various ports.
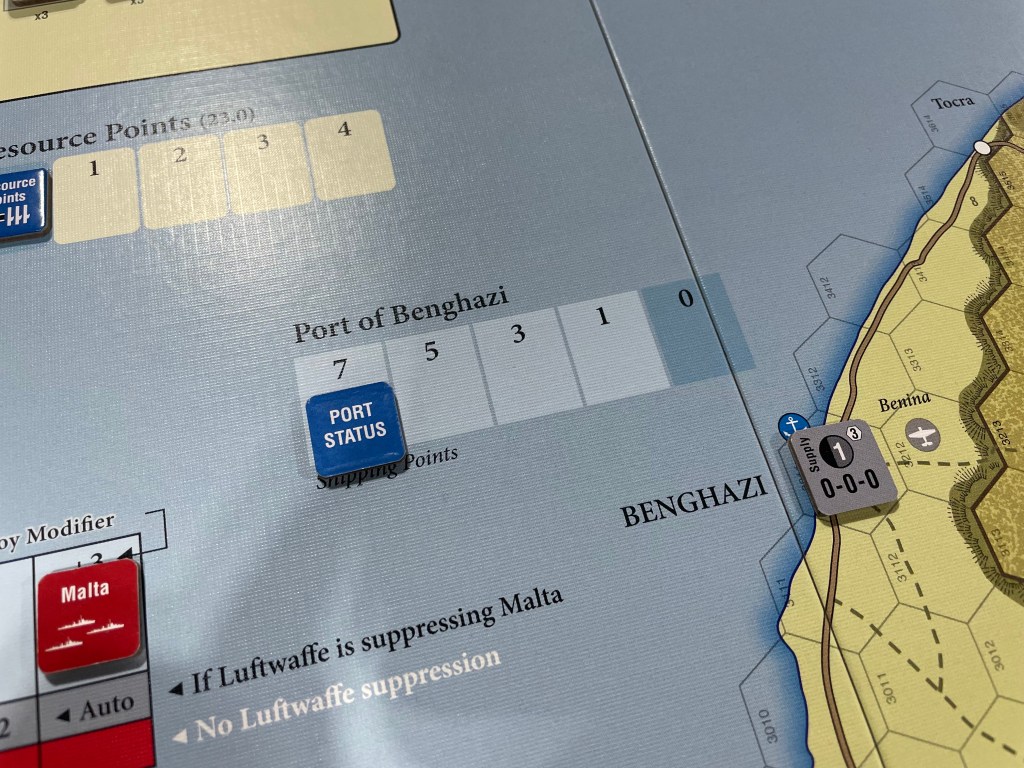
Ports may be damaged by the owning player (if in the case of having to vacate but not wanting the invader to benefit from the port) or the enemy player. No matter the case, the process to damage a port is the same and involves rolling one die and consulting the Port Demolition and Bombing Table. Each hit scored will move the Port Capacity marker one to the right on the Port Track. This is very important to the game and I really enjoyed this action. It was a bit unique for me but I readily accepted it and tried my best to damage his ports while repairing mine.
The other important part of this process is the island fortress of Malta. The Axis player can take actions to suppress Malta with Luftwaffe at the cost of Resource Points. This will be an opportunity cost for doing something else on the board and is one of the most important decisions of the game. If you suppress, you will be unable to do bombing raids on Tobruk, which we have already said was very important to breaking the backs of the defending Commonwealth forces, air support, repairing Port Capacity and other things.
Tanks and How They are Limited
I am not a true historian and don’t know everything about North Africa. But it was pretty early in the war and both sides, particularly the British and the new Americans, were working on their concepts of how to use their limited numbers of tanks in the desert. In fact, Liddel Hart wanted to keep tanks dispersed and not mass them to attack. This Tank Doctrine is enforced on the players with some pretty simple rules. The Allies can only attack with a limited number of tank steps. They may have a good amount of tanks at their disposal but they cannot use them all…and not just because of supply limitation. They can only attack with no more than 3 tank units in any given attack. This is a real limiting factor but appears to be a good reflection of history and I liked having to figure this aspect out.
Tanks are very important to both sides as they offer several different types of combat bonuses typically in the form of Tank Shifts on the Combat Results Table. The impact of tanks is modified or restricted due to terrain and the concept of Attack Supply being needed to activate any attack consisting of greater than 9 Attack Factors. The attacker can gain or even suffer Tank Shifts during combat. Tank Shifts can never be gained if the defender is in a Fortification, Jebel, or City hex. Tank Units also attacking across an escarpment or into and across any Tobruk Perimeter hexside cannot be used to gain the Tank Shift. While not gaining the shift, a tank’s presence will prevent the defender from gaining the shift. The players will have to compare the best single Tank Rating among all of the tanks that are participating in the combat. If the defender has no tank units or 88mm Flak units then their Tank Rating is . If the attacker has the higher rating, then they gain a number of column shifts right equal to the difference that difference. This will be limited however to no more than 2 shifts. There also is what is called an Elite Combined Arms Shift which is gained if they attacker has both an Elite Tank unit and an Elite infantry unit in the attack. This will lead to a favorable column shift on the CRT of one column to the right. The defender though will not earn shifts for Elite Combined Arms. I really liked the various different types of tanks involved and how they were used by both the Allies and the Axis. Tanks are key and they are the real brute force on the battlefield. Without them, attacks are not going anywhere.

How Does Combat Work?
As a wargame, attack is a very important aspect of the game and there are some interesting things about this situation. The rules specifically enforce maximums of any given attack or defense. The Attack Factors have a 30-point limit while Defense Factors have a 15-point limit. These limits make the use of Column Shifts as described above from Elite Combined Arms and Tank Shifts so important. Also having Artillery Support Units in range of combats is big for a few reasons. ASU’s can provide Artillery Support in the form of shifts but also can throw cheeseburger’s and gas to your troops to give them the needed Attack Supply. We love having to move these units around to keep them in range. Air Support can also offer a Column Shift in attacks if the player has an available air asset but also only if they have air superiority.
It is also important to know and understand the various effects of being out of supply on attack and defense and terrain. An out of supply unit will have their Attack Factors halved while a defending unit who is out of supply suffers no penalty. As mentioned earlier, Tank Shifts are lost when attacking across a Tobruk hexside or when attacking across escarpment.
Once the correct columns are found on the CRT, the attacking player rolls a D6 and consults the appropriate result on the column. In this one, the CRT favors the defender and has a very interesting looking range of outcomes. I am no CRT expert but this one was pretty interesting to me.
As is usually the case with a Simonitch design, we had a great time playing North Africa ’41. I am glad that we cut our teeth on the shorter scenario though as we made plenty of tactical mistakes and early had to learn the benefits of the different elements available to the players. I learned a lot about North Africa from this one and really look forward to exploring this game a bit more. There are a lot of other points that I just simply couldn’t cover in this post as the system has a huge amount of aspects but overall we really liked what we saw and I hope that you have the opportunity to give this one a spin.
While our video review is not out yet, you can take a look at the unboxing video at the following link:
If you are interested in North Africa ’41: The Western Desert, March to December, 1941, you can order a copy for $65.00 from the GMT Games website at the following link: https://www.gmtgames.com/p-962-north-africa-41.aspx
-Grant

Nice!
LikeLiked by 1 person
I really enjoyed it and look forward to playing again in the future.
LikeLike
Great article, much appreciated
LikeLiked by 1 person
Thanks. There is so much more to explore but this’ll give an idea of the main parts. A great game for sure!
LikeLike
How does this compare to “The Campaign for North Africa”?
LikeLike
Never played it but NA ‘41 is much smaller.
LikeLike
Nice job, Grant, of breaking down this complex game. I coincidentally have this on the table at the moment. @geekfireadmin The Campaign for North Africa is famous for being unplayable. Back in the 80s-90s we played a lot of monster wargames, mostly Europa. We owned Campaign for North Africa, but never bothered to play it. We routinely ridiculed it in fact, for such such ridiculousness as having to track water usage. It was unplayable. North Africa ’41 is not even considered a monster wargame. You can play it in a couple days. A monster wargame takes a couple days to set up, and that’s not exaggerating.
LikeLiked by 1 person
Looks like another fine game from the designers. Good article.
LikeLiked by 1 person