
We all love Twilight Struggle….and if you say you don’t, you really do but just want to be different or are a contrarian! The game is phenomenal and has done very well for GMT Games with 8 Printings as well as the Turn Zero Expansion and now a series of smaller geographically focused spin off games starting with Twilight Struggle: Red Sea – Conflict in the Horn of Africa. Twilight Struggle: Red Sea deals with just two regions located in the Horn of Africa including Africa and the Middle East. The game uses the familiar Twilight Struggle formula of Cards with both Events and Operations Points that can be used by players to perform Coups, do Realignment Rolls or place Influence in an effort to gain control of the most Countries in the Regions to score Victory Points and win the game. The game is fast, furious and only lasts 2 hands of cards (unless you choose to play the special 3 Turn variant) so there isn’t a lot of time to mess around and players must be focused on what they are trying to accomplish. The best thing about the game is that it plays in 45 minutes as compared to 3-4 hours for Twilight Struggle.
In Action Point 1, we took a look at the board and discussed the two Regions depicted, examined the various Tracks, including the Action Round Track, DEFCON Status Track, Turn Record Track, Victory Point Track, Required Military Operations Track and Space Race Track and also briefly discussed the new Strategic Sea Lanes Box and the addition of some handy reminders for how various Operations work on the board. In Action Point 2, we examined what is new in this smaller focused addition to the series including the Strategic Sea Lanes Box, Flashpoint Countries and the updated Space Race Track along with a few other new tricks. In Action Point 3, we took a look at examples of new cards for both the Soviets and the Americans as well as Neutral Cards. In this Action Point, we will review the Scoring Cards and discuss how they work.
Scoring
In Twilight Struggle: Red Sea, Scoring is virtually identical to Twilight Struggle with some very specific regional additions to reflect the conflict specifically in the Horn of Africa. First off, the board is divided into two distinct Regions including Africa and the Middle East. The countries that make up a Region share a color. You will notice that Egypt is a bit different and actually has colors of both Regions included in its Country Box (both tan and light blue), which means it counts as being located both in Africa and the Middle East. What was the decision behind this multi-color scheme? Egypt is and always will be a central country in the Middle Eastern political realm, but as far as in the Horn of Africa also plays a key role in the fragile regional balance of power with control of the Suez Canal, the Aswan High Dam and its water rights and the historical rivalry with Ethiopia.

Players will earn Victory Points through the Control of Countries and Regions. Each Region has its own associated Scoring Card, which when played earns the players Victory Points depending on how much Influence they have in the Region when the Scoring Card is played. Just as in Twilight Struggle, there are 3 categories that are examined to determine how many VP’s are scored for each player including various scoring determinations such as Presence, Domination and Control as well as how many Battleground Countries each Controls. Let’s now take a look at the definitions of these scoring determinations.
Presence means that one of the two superpowers Controls at least 1 Country in the Region. This means having the required Influence in the Country to overcome the value needed to Control. This Controlled Country can be either a Battleground or a non-Battleground Country.
Domination is a step-up and means that a superpower Controls more non-Battleground Countries and Battleground Countries in the Region than their opponent. Domination also requires that the player must Control at least one Battleground and 1 non-Battleground Country.
Finally, Control means that a superpower has more countries in a Region than its opponent but also Controls all of the Battleground Countries in that Region. This doesn’t mean that the Controlling player Controls ALL of the Countries in the Region just all of the Battleground Countries and more overall Countries than their opponent. Now let’s take a look at the new addition of Strategic Sea Lanes and see how it modifies Scoring.

The Victory Points granted from the Scoring of each Region is also very different as we can see in the table below.

It is very interesting that different values were given to each Region. Not interesting because of the world standing and importance of 1 Region over the other, but in a fast playing 2-player game, having this type of difference in Scoring is really strategic and creates some really interesting situations. What I mean by this is that the Middle East Scoring Card is a Late War Card and will not be added to the game during the first turn. Couple that with the fact that the Africa Scoring values are not enough to outright win the game, unless the Scoring player has control of the Strategic Sean Lanes Box, it makes players think about how they want to attack the game. Do they go hard and score VP from Africa initially, ignoring their standing in the Middle East? Or do they split their cards between the 2 Regions sacrificing the initial Scoring opportunity in exchange for a better chance at the higher Scoring Middle East during the Late War? This is an aspect of the design that is well thought out and that really creates some quandaries and decision spaces for players.

Strategic Sea Lanes are a very interesting new addition to the game that changes how scoring is completed. The Strategic Sea Lanes Box is a space found on the board but it does not represent a specific physical location. It is not a Country and is not connected to any other Countries. Control of this space doesn’t affect the totals in either of the 2 Regions during Scoring.
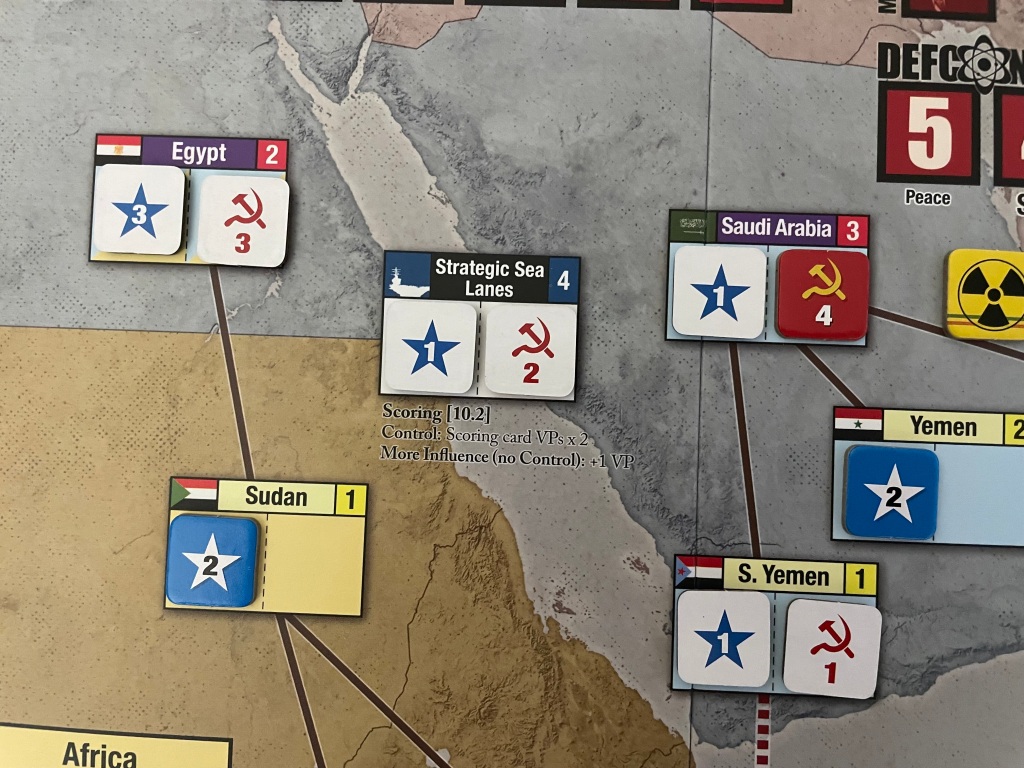
So how does this aspect changes things? Strategic Sea Lanes are scored when a Scoring Card is played and will have a major impact on the resolution. In order for the Strategic Sea Lanes to be scored, one of the players must Control the space. In order to Control the space, the player must simply have Influence equal to the Strategic Sea Lanes Stability Number, which is 4, while also having at least 4 more Influence in the space than their opponent. Basically, the Strategic Sea Lanes space works the same as every other Country on the board. In the picture below, the Soviets have a total of 2 Influence in the Strategic Sea Lanes space as compared to the United States’ 2 Influence. The Soviets DO NOT Control the space as they don’t have at least 4 Influence to equal the space’s Stability Number nor do they have at least 4 more Influence than the United States. In this example, in order to Control the space, the Soviets would need a total of at least 5 Influence there.
When a player Controls the Strategic Sea Lanes space, the effect is that this will double the Victory Points they will receive when resolving a Scoring Card. Also, the player who has more Influence than their opponent in the Strategic Sea Lanes space when a Scoring Card is played, but does not have sufficient Influence to Control the space, will receive 1 VP. And that is it…a pretty significant benefit that will lead both players to fight fiercely over Control of this space! I really like this inclusion as it simply adds something else that players have to think about and monitor as you cannot allow your opponent to get ahead in this space.
There are also a few Automatic Victory Situations that we need to discuss. If a player reaches 10 VP’s the game ends immediately and that player is declared the victor. You just need to keep in mind that you should Score both of the player’s VP awards for an Event Card or Scoring Card before determining an Automatic Victory. We don’t want any premature victory dances!
The 2nd Automatic Victory Situation is if the Africa Scoring Card has been played and a player Controls more Countries in Africa AND Controls both of the Flashpoint Countries (Ethiopia and Somalia). If this is the case, the game is over and that player will win the game.
In the picture below, you will notice that the Untied States player controls more Countries than the Soviet player in Africa (4 Countries including Dijbouti, Ethiopia, Somalia and Kenya as compared to just 2 Countries for the Soviets including Sudan and Madagascar) and also Controls both Flashpoint Countries in Ethiopia and Somalia. This means that the game will end in an Automatic Victory for the United States player.

The 3rd Automatic Victory Situation is Nuclear War. A player may declare Automatic Victory if the DEFCON Track reaches 1 while their opponent is the Phasing Player, meaning they are the active player. There are certain Event Cards that can make this happen but if a Coup is attempted in a Battleground Country while at DEFCON 1, this will force an Automatic Victory.
Players have to also keep in mind that after both Scoring Cards have been played, the game is not yet over and there still remains the end game Scoring. At the end of Turn 2, both Regions will be Scored again. The VP’s granted here will be added to the existing VP’s to determine the winner. It is also important to remember that the Automatic Victory Situation of reaching 10 VP’s does not result in Automatic Victory during scoring at the end of Turn 2. If the VP marker is on 0, the game ends
in a draw.
Certain Events may also award Victory Points. In fact, there are a total of 9 Event Cards that can grant Victory Points. Of these 9 Event Cards, there are 5 United States Cards, 2 Neutral Cards and 2 Soviet Cards. The Soviets will have to be aware of these cards and if they have the US cards in hand, have to know how best to manage them and mitigate the damage, either through making sure required situations or conditions are not met when they are played or by throwing them into the wood chipper that is the Space Race. Players will also earn Victory Points if their opponent has failed to perform enough Coup Attempts to generate the proper number of Required Military Operations in a turn.

Scoring is not just a mindless part of the game that players have to be subjected to. There are plenty of opportunities to take VP’s, setup various scoring opportunities and fight over key spaces to attempt to gain an Automatic Victory. I found in our first play that I had no idea how to use Scoring to my benefit but after a few plays it has become clear that players have to plan how to Score and how to make those Scoring opportunities count.
In Action Point 5, which is the conclusion to this series, I will provide my thoughts on this new format and implementation of a fan favorite system.
-Grant
