
A few years ago, we played the game Lincoln designed by Martin Wallace and published by Worthington Games. That game used a very interesting and unique deck building/destruction mechanic where cards drove the action of moving forces, recruiting units and being played for events but then some cards would be removed from the deck after use and new cards would be introduced in a phased approach. The system creates some really interesting choices and dilemmas with how to use those cards and we enjoyed the system very much.
Now that same system is being used to simulate the European Theater of World War II in a game called Struggle for Europe 1939-1945. Similar to Lincoln the game is a fast playing and light two-player card-driven strategy wargame that allows players to re-fight the entire struggle for Europe at a strategic level in under two hours. As the decks are cycled throughout the game, the Allied player adds some better quality cards, with the Russians and Americans entering play during the 1st and 2nd reshuffle. The Axis player will burn through their early game quality cards, becoming weaker as resources dwindle. The underlying game mechanism is one of “deck destruction” rather than the more normal deck-building.
In Action Point 1, we looked at the Game Board and the Locations and various Boxes and Tracks that are used to play the game as well as examined the various pinch points on the Point to Point Movement system that create a very interesting tactical puzzle. In Action Point 2, we took a look at the makeup of the Axis and Allied decks and discussed the very interesting deck destruction mechanic, including a comparison of the differences in the two decks and what that means for each of the players. In Action Point 3, we looked at the units involved in the game, including the Infantry and Tank units as well as static defenses in the Fortresses and how the Location Boxes work on defense and attack. In this Action Point, which is the conclusion to this series, we will examine a few examples of combat and the very interesting system of loss from battles that makes players think twice about attacking willy nilly.
Resolve a Battle
In our last post, we briefly discussed the concept of retreating when an enemy force moves into a Location that is controlled. This retreat is from the front half of the Location to the rear half and will get the retreating side out of that Battle for now. But, when an enemy occupies half of a Location where the defender is present this is now considered a Contested Location and will have to be fought over. A player cannot retreat from the rear to a new Location.
If attacking in a Contested Location, the Battle occurs in the defender’s controlled half of the Location. At any time a player may look at his opponent’s army counters stacked in a
Location before they make the final decision to attack. The Battle process is fairly simple and as discussed before doesn’t use dice of any kind. The only random element in the Battle is the surprise of a well played Event Card or the use of a higher value that expected Air Power Card. When a Battle happens in a Location the players will follow the sequence as follows:
The attacker will first play a card face down for its Air Power Value. Only one card may be used for its Air Power Value by the attacker. The playing of this card is the price that must be paid by the attacker to initiate combat. Think of this as sending in air power to soften up the defenders prior to the attack. There is no guarantee that after the air strikes have been carried there will be defenders left to fight, as they may have retreated or been destroyed by the air power.
The defender then decides if they want to stand their ground and defend in the front part of the Location or retreat to the rear effectively ending this Battle. If the defender chooses to defend, they will choose whether they will play one card face down for its Air Power Value. They are not required to play the card, assuming they have done the math in their head and believe that they either can or cannot win the Battle no matter what value of card they play.
Then the attacker first, followed by the defender may play any additional cards for their Battle Events to add to their attack total. If they choose to play these cards they are also played face down.
Both players will then reveal any face down cards being played for this Battle. The attacker adds their Air Power Value Card, as well as any values from played Battle Event Cards, to the strength of all their army counters attacking that Location for the Total Attack Value. The defender adds their Air Power Value Card if one was played, plus the Location Defense Value associated with the attackers move line (if applicable), as well as any values from played Battle Event Cards, to the strength of all army and fortress counters defending that half of the Location for the Total Defense Value.
Then comes the decision. The side with the higher Total Value wins the Battle. The defender always wins ties. Really pretty simple and well done for a game that doesn’t use dice. The decisions in Battles are many and include whether to retreat or stand and fight, whether to play an Air Power Value Card or not, whether to play a low or middling Air Power Value Card and what Battle Events to use and when. Players can think through their possible results over and over and play the what if game, meaning I currently have a 9 total attack and should I play a 4 Air Power Value Card because my opponent only has a 7 total defense but could have a 5 Air Power Value Card? What if they also have a Battle Event that they plan to play? And it grants them a +2 which could result in a tie and the defender wins ties?
After the decisions are made and the results come in, the loser removes half of their total counters, including any Fortress in the battle, rounded up while the winner removes half of their total counters, rounded down, but may never lose more counters than the loser of the battle. Losses are determined before retreat. Did you read that right? Both sides, even the winner, lose half of their counters involved in the Battle. The only difference is that the winner rounds down while the loser rounds up. This can make a big difference. Let’s say the attacker (winner) had 5 total counters with a total attack value of 9 while the defender (loser) had 5 total counters with a total defense value of 8. The attacker will lose just 2 counters while the loser will have to lose 3!
Now that you get a feel for how a Battle happens, and the step by step process of carrying it out, let’s take a look at a few examples. First up will be an amphibious landing by the Allies into Axis controlled Palermo.
Amphibious Landing
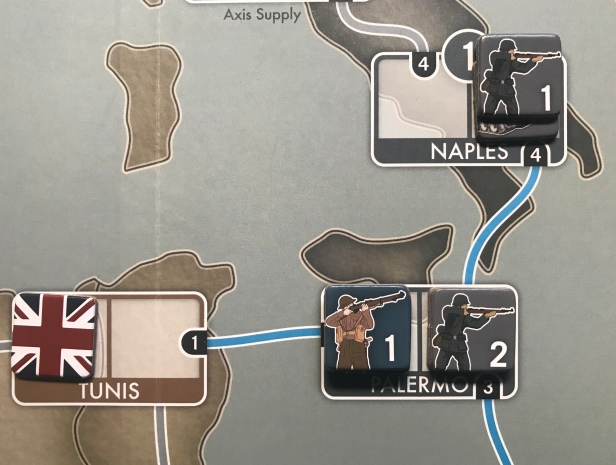
The Allies have better numbers in their stacks located in Tunisia than in Tripoli and decide to attack from there. The important thing to remember is that the Axis will have the added benefit of the Location Defense Value shown attached to the blue Naval Move Line connecting Tunisia with Palermo. The Location Defense Values are actually the same for both of the Naval Move Lines into Palermo so it really doesn’t matter from which way the Allies attack.

In order to initiate a Battle, the Allies must play a Naval Move Operation Card and they do so. Luckily for them, the attached Air Power Value was only a 2 and was an easy choice to use that particular card in this way, holding onto a higher Air Power Value Card to be played in this oncoming Battle.

The Allied player must now choose and play face down an Air Power Value Card. After they play the card, the defender then has to choose whether they will stand and fight, requiring them to also choose and play face down an Air Power Value Card, or if they plan to retreat to the rear of the Location. If they retreat, they do not play an Air Power Value Card so this can be a game of cat and mouse as the Axis is toying with the Allies but in retreating they also negatively affect their Total Defense Value as they would lose the +3 from the Location Defense Value. Also, if the defender retreats, the played Air Power Value Card is wasted and placed in the discard pile. Ouch, that can really hurt as the Allied player may have played their best card and now cannot use it and may not have better cards in their hand. Tough choices that can make for very interesting conundrums.

The Axis player decides to make a stand here against the Allies, taking advantage of the +3 from the Location Defense Value and play an Air Power Value Card face down. Notice that we still don’t know what the Air Power Value Cards will add to each sides Attack and Defense Total and we now move to the next decision point where both players will decide to play any Battle Events they have in their hands.

But first for the purposes of our example, and so that you can see what each side has in their strength from their units, let’s take a look at the makeup of the Allied and Axis stacks that are involved in the Battle.
As we spread the units out, you will see that the Allies have a total of 5 different units that combine for a Total Attack Value of 7 while the Axis have only two units (ignore the 2 Infantry Unit located in the rear of the Location as this unit is not included in this Battle) with a Total Defense Value of 6 (2 Infantry + 1 Infantry + 3 Location Defense Value). We still don’t know what the Air Power Value Cards will add to those totals but now the players must make a blind decision about whether or not to play Battle Events in their hands.

With the known information kept in mind for the Allied player (remember they have a 7 Total Attack Value to a 6 Total Defense Value for the Axis and know the Air Power Value Card they played was a 4), they know that if the Axis play a 5 Air Power Value Card that this thing could be tied and the defender always wins ties. So, they know they have a Battle Event in their hand that will add +2 to the total army strength for this Battle and decide to go ahead and play that card.
Now, each player reveals their played Air Power Value Card and any played Battle Events to calculate the Total Attack Value and Total Defense Value and then compare those numbers to determine the winner of the Battle. As you can see in the picture below the Allied Total Attack Value is 13 while the Axis Total Defense Value is 11. This means that the Allied attack is a success and they win this Battle. Now we will move to the losses phase of the Battle and see how this works.

If you remember, losses are determined by simply each side losing half of the counters they had in the battle with the loser rounding those losses up and the winner rounding losses down. So, in this case, the Allies win and the Axis loses so each will lose half their counters rounding up or down as appropriate.
The Allies had a total of 5 counters in the Battle and would normally lose half of those rounded down. Half of 5 is 2.5 so rounded down that equates to 2 losses. The Allied player chooses to lose their two 1 Strength Infantry Units. But wait, the winner can NEVER lose more counters than the loser so let’s figure the losses for the Axis.
The Axis had a total of 2 counters in the Battle and would normally lose half of those counters rounded up. Half of 2 is only 1 so no rounding needed and they choose to lose their 1 Strength Infantry Unit. Now back to the Allies. They would normally have had to lose half of their counters so it would have been 2 counters. But because the Axis only lost 1 counter, the winner can never lose more than the loser so they only have to lose 1 counter and choose to lose one of their 1 Strength Infantry Units.

The loser must now retreat and moves their single remaining 2 Strength Infantry Unit to the rear portion of the Location and stacks together with the 2 Strength Infantry Unit that was already located there. The Allies move across the Naval Move Line and stack their 4 remaining counters in the front area of the Location which now has become a Contested Location and can only be resolved with another Battle. If the Allied player had another Move Operation Card in their hand, and felt like they could possibly win, could continue the attack this round as each player can play two cards in addition to Battle Events and Air Power Value Cards per turn. It would be risky but is another decision that must be made. Keep up the pressure or allow the Axis to reinforce this Location? That is what makes this game interesting.
Now that you have seen an example of an Amphibious Landing Battle, let’s take a look at a Battle on the East Front between the Germans and Russians in Minsk.
Meat Grinder on the Eastern Front
If you remember in our first post in this series, we discussed some of the more interesting dilemmas with the way the point to point movement board is laid out, particularly on the Eastern Front. One of the most difficult decision points on the map is the confluence of Bialystok and Minsk/Kiev. This is an area where the Allies can really put up a stiff defense and force the Axis player to invest a lot of cards here in order to push toward Moscow.
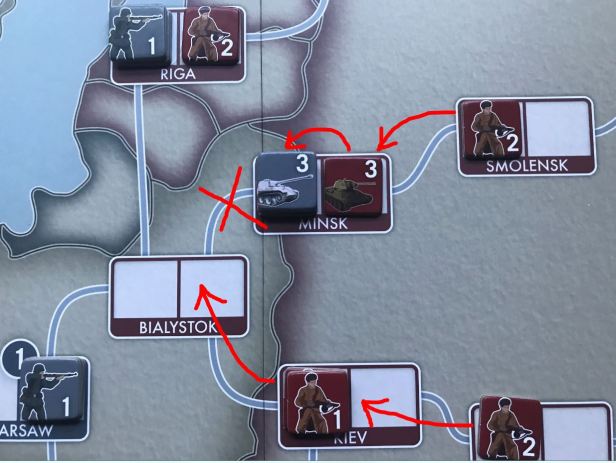
In the picture below, you see that the Axis has pushed into Russia and the East Front is hot and the race to Moscow is on. The Axis player has built up their forces in the East over a few rounds, playing several cards to build 3 Strength Tank Units in Bialystok but also push into Riga to the north in order to protect their supply line as they push further into Russia. Without taking Riga, and in this picture we see that Riga is merely a Contested Location, the Axis is in danger of a counter attack from two locations in Riga to the north and Kiev to the south. (BTW I hope you are fine with the filter I used on the pictures that follow as I wanted them to share the story of the East Front, dark, gray, bloody, hopeless, etc.)

The Axis player plays the required Move Operation Card to perform a Land Move from Bialystok to Minsk to initiate a Battle there. This is a key Battle and if the Axis lose this one, their push on the East Front will be off to a poor start and may already be decided as a failure.

The Axis player then plays the required Air Power Value Card face down and the Allied player decides to stand and fight here so they play their Air Power Value Card as well. We then array the forces out so we can see what we have and find that the Axis has 6 counters involved with a Total Attack Value of 14 while the Allies only have 3 counters with a Total Defense Value of 6. The Axis player decided that this one is probably in the bag and only played a lower 3 Air Power Value Card while the Allied player also saw it was a lost cause and just played a 2 Air Power Value Card. No Battle Events were played and the Total Attack Value for the Axis was a 17 versus the Total Defense Value for the Allies of only 8. This means that the Axis is the winner and now each side must decide what counters to lose as the Allies will need to remove 2 counters (3 total counters halved and rounded up to two) and the Axis must remove 2 counters are well (6 total counters halved and round down to only 2 as the winner cannot lose more than the loser lost). The Allies choose to lose their two Infantry Units while the Axis chooses to lose their 1 Strength Infantry Unit and a 2 Strength Infantry Unit.

The remaining lone Allied counter must retreat to the rear of the Location as the victorious Axis forces advance into the Location to make it a Contested Location. The Allies will have to stand and fight the next time the Axis attacks because they cannot retreat to the next Location but maybe they will be aggressive and initiate a counter attack. Why would they want to waste their cards in this manner against a far superior force? Well, the Axis do have better units in their stack but they are vulnerable to loss. If the Allies attack, win or lose, they will force at least one loss on the Axis and that will most likely be the one remaining fodder unit in the stack the 2 Strength Infantry. The Axis player would want to preserve their strength and not lose their Tanks which are harder to replace.
The Allies could also move on Bialystok in an effort to disrupt supply to the units in Minsk and force the Allies to break through there again to relieve their units before they become casualties to attrition.
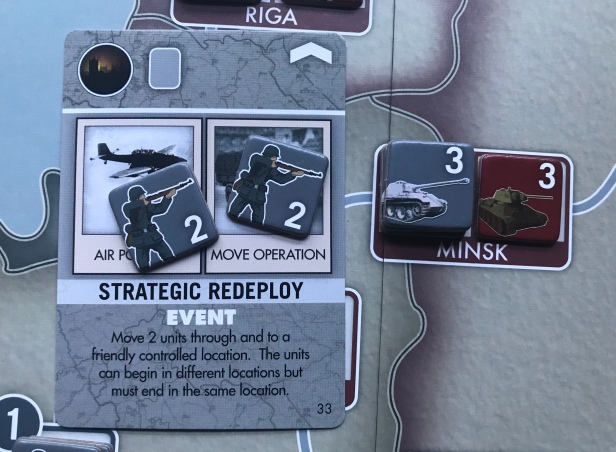
But this discussion is all for naught as they Axis still has one card to play this turn and bring out their Strategic Redeploy Event. This Event allows for the player to bring up reinforcements quickly to an area as you cannot build units in a Contested Location. With the play of this card, the Axis player moves two 2 Strength Infantry Units through their continuous line of controlled friendly Locations to end in Bialystok where they stand to defend against an attack on their flank from Kiev. This has changed the whole discussion and probably placing the Allies on the defensive as their opportunity evaporated with one card. But that is what I love about this game. Each card played can change what is happening and what you were planning. It keeps you on your toes and makes for an interesting exercise.
I know that this game seems very simple on the surface and that there aren’t many tough decisions for the players but simplicity in the rules and mechanics doesn’t equate to no depth in strategy and decisions. This game will keep players engaged during the entire 90 minutes and the different options will change planned strategy nearly each round. One of the reasons that I like this game more than I did it’s inspiration and predecessor in Lincoln is that there are more choices about how to attack and where to defend.
What I mean by that is there are at least 5 different routes that the Allies can attempt to penetrate Fortress Europe; via the beaches at Normandy, through the north by way of Bergen and Copenhagen, through the Italian Peninsula and Rome, or circumventing Italy to head up through the Balkans or with a focus on Russia and the Eastern Front. I also like that the Axis have to take Paris, which is no easy task, and build up defenses for the Normandy landings but also cannot ignore Italy, leave the Balkans unprotected and also have some risky attack choices in whether to take the battle to the Allies across the English Channel or come into Russia to advance on Moscow via Leningrad to the north. In the end, this game has lots of a strategy and players must choose how to meet their Victory Point objectives and use all of the tools at their disposal from proper use of their better events to dabbling in Strategic Bombing and Wolfpacks to attack your opponent’s hand of cards. This one will make for an engaging experience and most importantly offers replay value as you can tryout these myriad of strategy options.
I hate it when these Action Point series come to an end. I feel like I get to dive into these games and share my thoughts and strategy opinions and then when it is all done just put the game back on the shelf and move on to the next offering. As I dive deeper into the designs, I always find interesting points to share that we discovered during play and it really reinforces my love of games and the process of playing them.
For more information, here is a link to our unboxing video so you can get a better look at the components:
Here also is a look at our thoughts on the game in our video review:
Thank you for following along and I really hope you give this game a try. You won’t regret it!
-Grant

Hi Grant . Great as always!!
Let me ask you something. In your example when you attack from Tunisia. You split German forces in two in both halves of the location. I play that when you control a location the forces are not divided ( with the exception of fortresses which occuppied one halve). The rules doesn t say anything about this but i follow lincoln rules in this point. This makes a huge change because it allows to reduce the speed of the attack. Whats your approach? Thanks a lot!!
LikeLike
My interpretation of the rules lies in the concept of retreat before battle from the front of the location to the rear. Because you can do this I feel that the two different parts of the location can have units in them that don’t come together or defend together unless they have retreated. That is simply my interpretation because I agree it isn’t explicitly stated in the rules. I could be wrong.
LikeLike
Thanks Grant i see your point of view. It s a good interpretation and it makes sense.
LikeLike
Another question. I play you can retreat from the halve of a contested location. I cann t find anything about they are forced to fight…
LikeLike
I guess I messed that one up. It looks like the defender can retreat to a friendly controlled location but if they have to cross a Naval Move Line they will have to discard a Naval Move card.
LikeLike
I just found this in the rulebook: Counters can only retreat to friendly controlled locations or to the half of a contested location in which he has counters, via the retreat movement line. Counters may not retreat into a neutral location.
LikeLike
Yes Grant . In my opinion according to the rules there are two different situations:
1) If you decide to stand and fight and you lose then you would have to retreat from the entire area. ( in the rules is in the section defender retreats due to a battle loss)
2)If you decided to retreat before battle, you could retreat to the half of the area from which the attack did not originate. ( in the section defender retreats before battle).
In accordance with this rules i consider that the place of units in both halves is in principle irrelevant ( save for the fortresses).
In anycase your interpretation makes sense as well.
Thaks a lot for your review!!
LikeLike