
A few years ago, we played the game Lincoln designed by Martin Wallace and published by Worthington Games. That game used a very interesting and unique deck building/destruction mechanic where cards drove the action of moving forces, recruiting units and being played for events but then some cards would be removed from the deck after use and new cards would be introduced in a phased approach. The system creates some really interesting choices and dilemmas with how to use those cards and we enjoyed the system very much.
Now that same system is being used to simulate the European Theater of World War II in a game called Struggle for Europe 1939-1945. Similar to Lincoln the game is a fast playing and light two-player card-driven strategy wargame that allows players to re-fight the entire struggle for Europe at a strategic level in under two hours. As the decks are cycled throughout the game, the Allied player adds some better quality cards, with the Russians and Americans entering play during the 1st and 2nd reshuffle. The Axis player will burn through their early game quality cards, becoming weaker as resources dwindle. The underlying game mechanism is one of “deck destruction” rather than the more normal deck-building.
In Action Point 1, we looked at the Game Board and the Locations and various Boxes and Tracks that are used to play the game as well as examined the various pinch points on the Point to Point Movement system that create a very interesting tactical puzzle. In Action Point 2, we took a look at the makeup of the Axis and Allied decks and discussed the very interesting deck destruction mechanic, including a comparison of the differences in the two decks and what that means for each of the players. In this Action Point, we will take a look at the units involved in the game, including the Infantry and Tank units as well as static defenses in the Fortresses and how the Location Boxes work on defense and attack.
Units
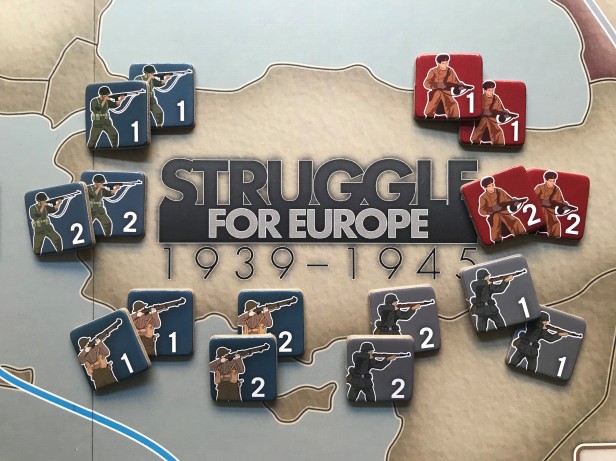
The Axis counters for their various units are gray and the Allies counters are blue, for both the British and American units, although the silhouettes used for each country are different, and red for the Soviets. The counter mix is the counter limit for the game, which I could never imagine building all of the counters that they give you as there are so many other things that can be done with the cards including the Events, Battle Events and various other actions such as Strategic Bombing.
Both the blue and red counters are considered the Allies. But, they may never be located in the same location at the same time. Blue counters can only be played into blue, tan or gray Locations while red counters may be played into red, tan or blue Locations. The other interesting thing about the counters is that they may never be broken up in order to make larger or smaller strength counters. Don’t think of the counters as a combination of a group of similar units but a more or less powerful combat effective units, i.e. Tanks are generally more powerful than Infantry.
Infantry
There are two different type of Infantry. A 1 Strength Army provides 1 strength in a Battle while a 2 Strength Army provides 2 strength in a Battle. When a card is played to Build a 1 Strength Army that card is placed into the recycle pile and will be reshuffled with the 2 Chevron cards as the 1 Chevron cards run out. This means that you will always have access to cards to Build a 1 Strength Army counter. The real value of the 1 Strength Army counter is that it is typically used as fodder to make up the required loss in units from a Battle. Remember that we have talked about this, albeit not in depth, but when a Battle is over the loser will have to lose 1/2 of their counters rounded up while the winner will lose 1/2 of their counters rounded down. But more on this later.
When a card is played to Build a 2 Strength Army that card is permanently removed from the game and placed back into the game box. The cost of playing a 2 Strength Army counter is not only getting rid of that card permanently but you must burn another card from your hand. This card is not lost to you for the game but is for the turn and you typically only have 5-6 cards so this is a big cost.

The other thing that you must pay attention to is what is found on the rest of the card that you are using for the 2 Strength Army. There is an opportunity cost to building these more powerful units and it is losing access to the other 2 parts of the card that you have to permanently remove from the game.
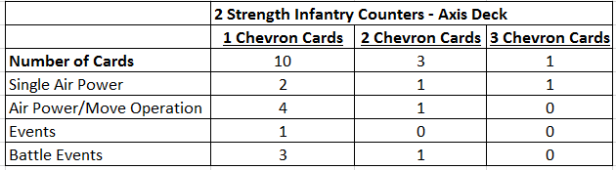
In the table above you can see the breakdown of the 2 Strength Infantry cards in the Axis Deck and their card makeup. Remember that each card has three different sections, the upper, the middle and the lower, and each serves a different purpose. As you can see, with the 2 Strength Infantry cards there are ten 1 Chevron cards in the Axis deck and there are some very powerful abilities found on the other sections of those cards. For instance, you can see that there are 2 single Air Power cards (there is an Air Power value found in the middle section of the card) and if these are used to build the 2 Strength Army counters then these Air Power cards will be lost to the Axis power. You might say “Oh well, I have other Air Power cards in the deck”, and you would be right. You do have other Air Power cards in the deck but not with a 5 Air Power value. Those two cards that you will be permanently removing are a 5 and 2 Air Power value cards. You cannot replace the 5 Air Power card. Remember, that as the game wears on, the Axis cards lessen in their power while the Allies cards increase in potency.

You will also see that four of the 2 Strength Infantry cards also have Battle Events in the bottom section of the card. These two Battle Events are your best way to increase your strength in Battle, aside from moving in more units. There are three Great Commander Battle Events and one Paratroopers Battle Events. The Great Commander Battle Event allows you to add 2 to your total army strength in a Battle (only one of these Great Commander Battle Events may be used in any given Battle) while the Paratroopers also add 2 to the total army strength in a Battle and it may be used in combination with a Great Commander Battle Event to offer a +4 army strength. If played for the Event though the Paratrooper card will be permanently removed from the game.
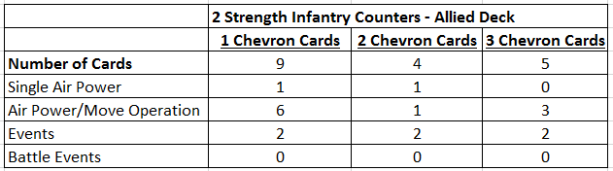
In the table above you can see the breakdown of the 2 Strength Infantry cards in the Allied Deck and their card makeup. There are nine 1 Chevron cards in the Axis deck and there are some very powerful abilities found on the other sections of those cards. For instance, there are two of the dual Air Power/Move Operation cards that have both a Land Move and a Naval Move in the middle section. This is one of the key cards for the Allies as they must have these Naval Move cards to initiate amphibious landings on the beaches of Normandy and into southern Italy in Palermo and Naples. If they cannot seem to find one of these cards in their decks, their operations will be hampered and their invasions plans delayed and the Axis is looking for any time the Allied player will give them. There are other duel Move Operation cards in the deck, a total of 24 other such cards to be exact, but some of them appear on removable cards as well and 26 out of 80 total cards is 32.5% or roughly 1/3rd. This means that when you get rid of these cards, you are thinning out your deck and making those valuable cards ever more scarce.

You will also notice from the table above that there are 6 cards with Events on them as well in their bottom section. These Events are some of the most important in the game as they allow considerable flexibility in how the Allies move, build Units and attack the Axis deck in addition to Strategic Bombing. The first Event we will take a look at is Strategic Redeploy which allows the Allies to move 2 units through and to a friendly controlled Location anywhere on the map. These areas must be connected with friendly controlled Locations but I can tell that not having these cards will bog down your offensive power as you simply will find it difficult to move your more powerful 2 Strength Infantry and 3 Strength Tanks across the map quickly enough to get involved in meaningful attacks. I will never use this card to build the 2 Strength Army unless I absolutely have no other choice. The Destroyer Attack Event is a bit more expendable although when used in combination with a sustained Strategic Bombing campaign can decimate the Axis hand getting their usable cards for their in their hand down to 1 or 2, which doesn’t give them much power or many options. Finally, my favorite Event is Weapon Development which allows the player to build 2 Armies from their hand. If the built Armies are 2 or 3 Strength then they do not have to discard the additional cards to pay for the unit (they still must permanently remove the 2 or 3 Strength Army cards).
Tanks
When playing a card to Build a 3 Strength Army counter (Tank) the card is permanently removed from the game similarly to the 2 Strength Army but there is a higher cost as two additional cards must be discarded from the player’s hand. These units are your most powerful units and must be included in your attacks as you just cannot generate the power needed to defeat your opponent consistently without them. They must be protected though as if you have to get rid of 3 Strength Army Tank counters you will quickly find yourself unable to replace them as there are not many of these cards in either of the decks.

In the below table you can see the breakdown of the 3 Strength Tank cards in the Axis Deck and their card makeup. There are only 7 such 3 Strength Tank cards in the entire Axis Deck so you will not have many opportunities to build these units.

The first thing to notice is that there are three 3 Strength Tank cards that have Air Power/Dual Move Operation in the middle section of the card. Of these three cards, there is a 5 Air Power card and two 3 Air Power cards. I would make sure that you play the 3 Air Power card first in the 1 Chevron deck before you play the 5 Air Power card and I would frankly hold onto that one and not recommend building the Tank. That 5 Air Power card is a rare thing and should be protected as you would a precious asset. The other interesting thing to note is that 2 of the double cards have the split Land Move/Naval Move option. There are only a total of 14 of these split movements cards in the entire Axis Deck so I am not sure what that tells us other than it is less than the Allies and they shouldn’t have to worry about using them as Naval Move very often. There really are only two plausible uses in my humble opinion and that is in North Africa if the Axis are forced to leave there and wish to reestablish themselves on the continent by amphibious landing in Tripoli, Tobruk or Alexandria in order to cause the Allies some grief over those few Victory Locations and their few victory points. I can never really see the Axis mounting an amphibious attack on England or on Helsinki in the east as they simply would be very difficult to take.

The final thing I will discuss for the Axis Deck is the Events and Battle Events that appear on the Axis 3 Strength Tank cards. There are a total of 4 of these Events, with three of them being Battle Events. The three Battle Events are the Great Commander events that we discussed earlier so they are very important as a means to gain added strength in combat. The other Event called Weapon Development allows the player to Build 2 Armies without having to discard additional cards from their hand to pay for the costs. This can be very important as you might plan to play a few larger strength units and then launch some Battles with your remaining cards. Once again the key here is choice about retaining future options.
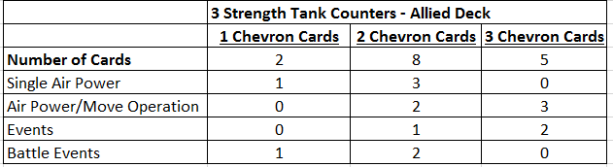
In the table above you will see the breakdown of the 3 Strength Tank cards in the Allied Deck and their card makeup. There are 15 such 3 Strength Tank cards in the Allied Deck so there are many more opportunities to build these units for the Allies than the Axis. This means you can either really go full in on Building these units in order to amass the strength necessary to break onto Fortress Europe or use and reuse these powerful cards turn after turn. It will be your choice and you must choose wisely as I feel like the onus is really on the Allies to get moving in this one.
Of the four Single Air Power cards among the 15 cards in the Allied Deck, only one of the values is worth anything (one 5 Air Power Value) and the others are definitely expendable and should be used to build the Tanks as soon as they come into your hand. The Events are also key in the Allied Deck as there are 3 Battle Events, which are all three the Great Commander Event that adds 2 strength to the Battle, and the other three are regular Events with two being Destroyer Attack, which chips away at the Axis hand size for the turn and can be really devastating if their hand size is on the lower end of the spectrum, and one Weapon Development which allows the player to Build 2 armies without discarding the extra cards. The Allied Deck really grows in power as soon as your hit the 2 Chevron cards and will quickly be able to build up and push the Axis back. The real question will be how well you managed the unit cards and what options you have left.
Fortresses
Fortresses are 3 Strength counters that are only available in the Axis Deck and may not be moved once placed in a Location after being Built. They may not move from Location to Location nor even from the front of a Location to the back. Once placed, they are cemented in and can never move. This will require the player to think carefully about where they are placed as if placed incorrectly they will never see action and their benefit will be lost. I like to look at the map and see what routes the Allies must take in order to get to my major capitals of Berlin and Rome and use them at choke points on these paths. This usually means I place them in France in Dunkirk or Normandy and then later in places like the Ruhr or in the east in Warsaw or even in Berlin if the card comes up later in the game.
I also like to use one in Italy to make it tough on the Allies to get at Rome. This means I will typically place this sole Fortress in Naples or in Palermo if I hold into the late game.

One of the things that I like about this game is the tough choices that players have to make about how they use their decks. It is not as simple as playing the cards, you must consider how your actions now will effect your play in the 2nd and 3rd decks and whether you will have hurt your chances of winning or played the card right and provided many future options to choose from.
Now let us take a quick look at how defense of Location Boxes happens and the decisions you have there.
Location Boxes and How They Work During Attacks
A Location is controlled by one player or the other when only their units have last moved through that Location. Typically a Control Flag is placed in the Location to remind everyone who controls it. There are two spaces contained in each Location and it is divided in the middle by a vertical line that matches the color of the Location being either gray (if it is an Axis Location at game start), tan (if a Neutral Location at game start), red (if a Soviet Location at game start) or blue (if an Allied Location at game start). The left side of the Location can be considered the front as it might face the oncoming enemy troops while the back of the Location is the rear.

Once an attacker has played a card for a move operation into an enemy controlled Location, a Battle will ensue. The defender will then have to decide if they are going to stand their ground in this half of the Location or retreat to the rear part of the Location. If they defend, they will then fight with the moving enemy in that part of the Location and might even have units or Fortresses in the back part of the Location. This becomes a very important strategic decision for the defender. Do they run away to fight later once they have consolidated their forces? Or do they stand and fight, because even in loss they will force losses on the enemy thereby weakening their attacking stack and also force them to use another card from their hand to play another move operation to chase them down and fight?
This retreat can be a very important decision and you will learn how best to use this to your advantage as either the Axis or the Allies throughout the game. Let’s quickly take a look at what I am talking about.
The Allies have landed in Normandy and defeated the German defenders there and forced them to retreat to Paris. They have another invasion force set up in England and plan to attack Dunkirk later in this turn or next turn depending on how this attack goes. As the Allies play their card for a Land Move to get into Paris the defender has the option of standing to fight or retreating backward to the rear of the Location. If you look at the picture below you will see that the benefit for the defender to standing in the front of the Location is that they have a Defense Value listed there as a 2 from the Normandy Location. Meaning that if they defend in the front of the Location they can add +2 to their army strength.

After they count their forces strength, which is a 12 after adding in the +2 for the Location Defense Value, and compare it to the strength of the Allies of 14, they then look at their hand and see that they don’t have a very high Air Power Value card and it might be best to retreat to the rear where they can add 3 strength from the three 1 Strength Infantry units there. The other thing for them to consider is how their losses will effect their strength. If they stand and lose (or even when they win) they will take losses and it is in a number of counters, not a number of strength points and remember you can’t make change from larger units to smaller value units. You just have to lose a number of counters. Once again a great example of the types of choices and decisions that are forced upon players that keeps the game engaging and interesting. Now that I have wet your whistle for Battle, let’s end right there and pick up next time with some more in-depth examples of different Battles.
In Action Point 4, which is the final in this series, we will take a look at a few examples of Battle, including an amphibious invasion, and the very interesting system of losses from Battles that will force the players to think twice about attacking willy nilly.
-Grant

Nice breakdown; thanks Grant!
LikeLiked by 1 person
No problem. Thanks for reading.
LikeLike
Good job!!
LikeLiked by 1 person
Thanks for reading.
LikeLike
This is great! Where di I get to Action point 4?
LikeLike
Thanks. It is posting this coming Tuesday.
LikeLike
Thanks. Have a great weekend. And btw….thanks for you super info in these action post!!!
Lynn
LikeLiked by 1 person