
A few years ago, we played the game Lincoln designed by Martin Wallace and published by Worthington Games. That game used a very interesting and unique deck building/destruction mechanic where cards drove the action of moving forces, recruiting units and being played for events but then some cards would be removed from the deck after use and new cards would be introduced in a phased approach. The system creates some really interesting choices and dilemmas with how to use those cards and we enjoyed the system very much.
Now that same system is being used to simulate the European Theater of World War II in a game called Struggle for Europe 1939-1945. Similar to Lincoln the game is a fast playing and light two-player card-driven strategy wargame that allows players to re-fight the entire struggle for Europe at a strategic level in under two hours. As the decks are cycled throughout the game, the Allied player adds some better quality cards, with the Russians and Americans entering play during the 1st and 2nd reshuffle. The Axis player will burn through their early game quality cards, becoming weaker as resources dwindle. The underlying game mechanism is one of “deck destruction” rather than the more normal deck-building.
In this series of Action Points, we will take a look at the Game Board and the Locations and various Boxes and Tracks that are used to play the game as well as examine the various pinch points on the Point to Point Movement system that create a very interesting tactical puzzle, we will take a look at the makeup of the Axis and Allied decks and discuss the very interesting deck destruction mechanic, including a comparison of the differences in the two decks and what that means for each of the players, take a look at the units involved in the game and how the boxes work on defense and attack and then take a look at a few examples of combat and the very interesting system of loss from battles that makes players think twice about attacking willy nilly.

Game Board
The Game Board represents Europe at the end of 1939 and is a Point to Point Movement map. As you look at the board you will notice various boxes that are identified by a geographical area or name of a city. These boxes are referred to as Locations and are divided in half by a vertical line in the middle. The Locations are so divided in half to determine control status, supply lines, movement paths, attack paths and retreat paths. That is one of the things that I find very interesting about the Locations in that they represent so many different things with just a few lines.
You will also notice that some of the Locations have a flag printed in them. These flags represent national capitals and are for informational purposes only. I will say that the national flags are a nice addition to the map as it is generally fairly plain and uses a palette of gray, brown and red.
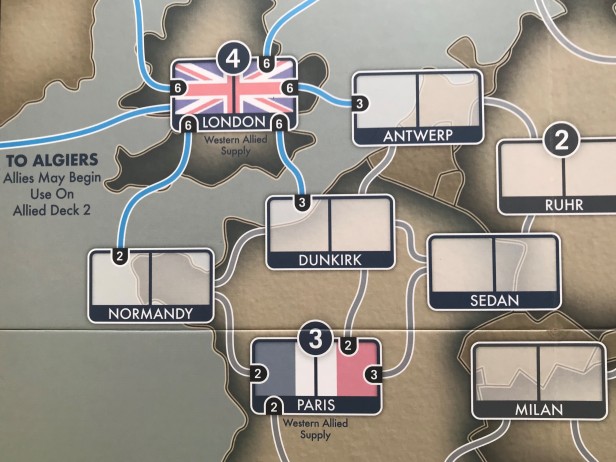
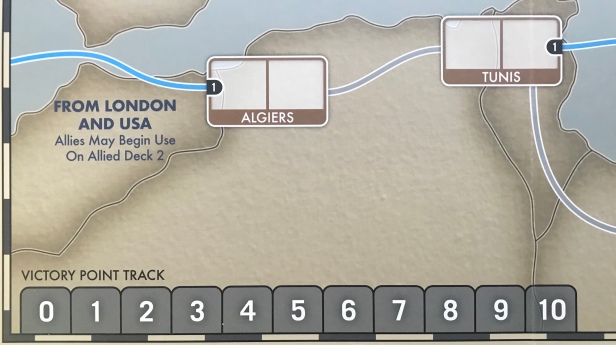
The Locations are color coded based on who controls them at the start of the game. The Western Allies control all of the blue boxes, the Soviets control all red boxes and the Axis powers control the gray boxes. Tan boxes, including Algiers, Tunis, Athens, Mosul, Sarajevo, Bucharest, Copenhagen and Bergen, are all neutral and are only controlled once entered by either Allied or Axis counters.

The only complaint that I have about the colors used for the boxes is between the Allies blue and Axis gray. They literally look identical. Here is a picture showing how close the colors are to each other and how difficult it is to differentiate them. Ruhr is an Axis controlled Location and is gray while Sedan is an Allied controlled Location and is blue. In the end, this doesn’t really matter that much but might be a bid difficult for those that are not familiar with the history and know who controlled what at the time of the game start.

Victory Locations
Victory Locations are a special type of Location that have a value located in a circle at the top of the Location. The value is a Victory Point amount that will only be awarded to an enemy player that has conquered the Location and now controls it. The Victory Point Track will be moved up for the enemy once they capture a Victory Location and then down again if the area can be liberated after an attack by the other side.
In the below picture, you can see two different Victory Locations in Leningrad and Moscow. You know these are Victory Locations due to the value in the circle at the top of the Location. Leningrad is worth 2 VP to the Axis player while Moscow is worth 4 VP.

The Victory Point Track is located at the bottom left edge of the Game Board in North Africa just below Algiers. The Victory Point Track has only one marker and it is moved and flipped to show who is leading in overall VP difference.
Location Defense Value
You will notice that there are lines that connect the various Locations, with some of those lines being gray and others being blue. As those lines connect to the boxes, sometimes there is a number printed there. This number is referred to as the Location Defense Value. This number is a value that will be added to the units of an occupying defender when an attacker enters the Location using that line. These Location Defense Values represent many aspects from the geography of the territory, including the terrain, to the general difficulty of moving an army through that area due to various static defenses, including trenches, mine fields and artillery shields. These areas tend to encourage or discourage your enemy from attacking that part of the Location as the higher the Defense Value the more difficult it will be to claim victory.

Movement Lines
Movement Lines are the lines that connect Locations and are of two colors; gray which can only be moved across with the use of a card that contains a Truck icon and blue which requires a card that contains a Naval Transport icon. This is the way that troops invade or attack a Location and the use of the proper icon is vital to the ability to move.

This can be a very challenging choice as the number of cards are limited in your hand and you have so many things that need to be accomplished. If you plan to move and invade a Location, you must make sure to reserve the correct type of movement card based on your planned invasion route being over land or across waterways. This can be a very tense and difficult thing to properly manage your hand but is at the core of the design.

The USA Box
The USA Box is for the placement of Western Allied counters that enter play at the start of the 3rd play deck. This represents the USA entering World War II in 1943 and 1944. At setup, a certain amount of units will be placed in this box but cannot be used until after the 3rd play deck has been activated with the end of the 2nd play deck. The Allied player can then play cards to move these units, attack Axis controlled Locations and move on Axis capitals.

Strategic Bombing Track
The final area that we will focus on is the Strategic Bombing Track. This track represents the strategic bombing campaign and the V1 Rockets fired on England by the Nazis that occurred during the war that was an attempt to weaken war production and demoralize the people. The marker will start on the black 0 space and after each side plays a card that moves the marker it will move against their enemy. As it moves to the right on the track, it reduces the number of cards the Allied player may have in their hand, and may also award the Axis player Victory Points. As the marker moves to the left on the track, it will reduce the number of cards the Axis player may have in their hand, and may also award the Allied player Victory Points. This is a very important part of the game for each side and you cannot ignore this track or you will find that you don’t have enough cards to carry out your operations and replace your lost forces.

Before wrapping this post up, I wanted to talk about the very interesting Point to Point Movement options on the map. You can tell that this game has been playtested a lot as the final placement of Locations in relation to each other is very interesting and causes several strategic puzzles that must be solved in order to accomplish the goals of either the Axis or the Allies. We will take a look at three of these puzzles and I will show you why these are challenging.
First, lets take a look at how the Allies will reach Berlin.
There are two possible avenues to approach in order to take Berlin, the traditional route through Normandy, Dunkirk and Antwerp or an alternate route that if left open by the Axis player will be an easier path.
First off, the Germans will always have a numerical superiority to start the game in the west as they are driving on Paris. The Allies will be unable to stop their charge but shouldn’t give up the area too easily. Make the Germans earn it by falling back if possible and ultimately saving your forces by evacuating the west to the safety of London. As you can see in Normandy, the Location Defense Values are really difficult to overcome by the Allies. That added +2 to defense in Normandy is the weakest of the three but puts you further away from the ultimate prize. I will say that the Allies must liberate Paris as that 3 VP Victory Location is key to the Allies being able to win the game. But, will they be able to amass enough troops quickly enough to possibly move on Normandy before the Germans can build up there. They only have a few turns to take advantage of the Germans in the west and must be prepared to hit hard. You will notice that landing at Normandy is generally the easy choice but I like to take a chance and go for either Dunkirk or Antwerp. These Locations are closer to Berlin and take out several bad fights that you could have. Keep in mind though that you cannot move on Berlin with German troops behind you so be prepared to fight back to Normandy if you choose this landing strategy.
The other option you have is to move on Bergen and then move through Copenhagen. This will not work often and might seem like a waste of time and effort, but I can assure you that a military presence here will keep the Axis honest and force them to build up troops in Berlin before pushing all their might to the west and the beaches. I feel that the northern approach is difficult but is more of a strategic choice to alter the enemy strategy.

Second, let’s take a look at the Allies approach from North Africa.
Too many times I have beat myself senseless building up in North Africa to try and take Italy and Rome. You must at least try to move against the boot but I will offer another very interesting choice. If the Axis player has been focused too much on the west, they will more than likely not have worried about bolstering their defenses at Vienna and Budapest and there is a straight path to these two key Locations. Through the Balkans, first through Athens and then through Sarajevo. Try landing Allied troops in Athens and see what happens. Typically, this will force the Axis to adjust their buildup focus for a few turns in the southeast of Europe which may allow you to focus on crossing at Palermo and then onto Naples. Or better yet, will give you a respite in the west to get that invasion started.

Finally, let’s look at the meat grinder that is the Eastern Front.
Of all the tactical puzzles of Locations and how to move against them, the bottleneck at Bialystok is the most difficult. You can attack in force as the Axis from Warsaw and take it pretty simply, but then is when the trap will be sprung. A good Soviet player will have spent a few turns moving units through Smolensk to Minsk and Kharkov to Kiev. Building up 3-4 SP’s in these locations is key to staving off the German advance. If the Axis attacks Minsk from Bialystok, they most likely will be unable to leave many units in Bialystok and the Soviet forces staged in Kiev will be primed to strike and cut the advance and their supply dead in their tracks. If the Axis chooses to attack Kiev, then the built up troops in Minsk can bring the pain on the vacated or lightly defended Bialystok. It seems that the Axis are damned if they do, damned if they don’t and you must make them pay for that pickle.

These are just a few examples of the strategic choices on attack routes that the very well laid out Point to Point Movement system offers players. It really is a puzzle that the Allies and the Axis must solve in order to put pressure where needed to open up attack routes. I didn’t even touch on one of my favorites, that of Leningrad and the gambit to cross over from Helsinki.
I know that this game looks rather simple, and I would agree that the rules, the process of play and the Game Board are not overly deep or complex. But this game offers a very interesting and dynamic play experience in under 2 hours. I have played several times and I seem to learn new points of strategy and tactics each time that make my experience different.
In Action Point 2, we will take a look at the makeup of the Axis and Allied decks and discuss the very interesting deck destruction mechanic, including a comparison of the differences in the two decks and what that means for each of the players.
-Grant

Lincoln is decent for what it is, and this one looks promising too, but I find the marketing label of “desk destruction” as if it’s a new concept a bit amusing. It’s very nearly the same dynamic from CDGs (Card-Driven Games) like For the People, Paths of Glory, or Twilight Struggle where you have ops or event choices on cards and many of the events are removed after play.
LikeLiked by 1 person
I understand what you are saying but there is a bit of a difference. In a CDG I can use the Op Points to do actions but that card doesn’t get destroyed. Event cards do in a CDG typically. In this format you have a choice to build a unit, but it will get thrown away, and there is a key event or icon also on the card that is useful. It’s subtly difference. I’ll cover this more in my next post. Thanks for reading and commenting.
LikeLike
Thanks a million for all your work. I agree about the map colors – I had difficulty with that. You could take a blue marker and denote the allied locations either with a dot or outline.
Best Regards, Jon Pinder
>
LikeLike
Hi Grant
Good review. Don t you take into consideration the south route yo Rusia from Turkey once conquered Alexandria. For me is the best option.
Antonio
LikeLiked by 1 person
Yes. That is another good route. I wasn’t trying to mention all the routes but just give a few for people to get an idea.
LikeLike