
Fortress Europa: Designer Signature Edition from Compass Games is a remastering of an original wargaming classic designed by John Edwards. This is a 2-player hex and counter wargame that recreates the Allied campaign in Western Europe from D-Day to March 1945. This new edition of Fortress Europa features a super-sized play area consisting of two 43″ x 34″ maps, three sheets of counters, five player aids and five Order of Battle and Appearance cards.
In this series of Action Points we are going to take a look at a few of the more interesting elements of the design including Invasions by the Allied player, including how the Germans setup their units and their special Hidden units, which was a pretty interesting part of the design and made for some major surprises, we will examine the different specialized units including Paratroopers, Rangers, Commandoes, Volkssturm, French Partisans and Mulberries, will take a look at the very interesting and well done abstraction called the Aircraft Mission Chart and how air power is used and finally we will take a look at a few examples of Combat.
Invasion
I am sure from the name of the game and the time period covered you were expecting this one to include rules to simulate Operation Overlord or the D-Day landings on the shores of Normandy, France. Well you are right on at least one of those assumptions namely that an amphibious invasion, supported by naval bombardments, air drops and massive strategic bombings of the chosen landing areas will happen. But the part you would be incorrect about is where those landings will take place. It is really up to the player to choose the location with the understanding that based on that choice the victory conditions will change and players will have differing objectives.
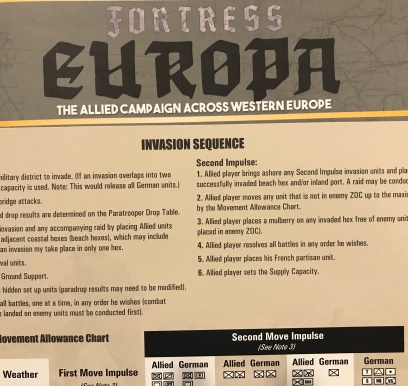
The Allied player may declare two Invasions per game. The first Invasion is executed on the first turn of the game while the second Invasion can be made on any turn August I-September IV. A player aid card is provided as a quick reference for the Invasion Sequence during any Invasion turn (pictured above).

One of the really interesting things about this design is that the game doesn’t assume that the Allied player will invade only at the historical locations. All beach hexes on the map can be invaded. Inland ports can be chosen as an invasion site if passage inland is not blocked by an enemy Zone of Control. This really makes for some very interesting choices for the Allies and conversely dilemmas for the Germans. One key element in making a decision about where to invade is proximity to ports and the Allied ability to capture them, designated on the map with blue anchors with a superscript number above them.
These ports will provide the Allied player with a supply location that can support up to the number of units shown. For example, the port shown at Le Havre can supply up to 5 additional Allied units on the mainland. This port must be captured by controlling the beach hex adjacent to it and then the Allied player can use the space to support units.

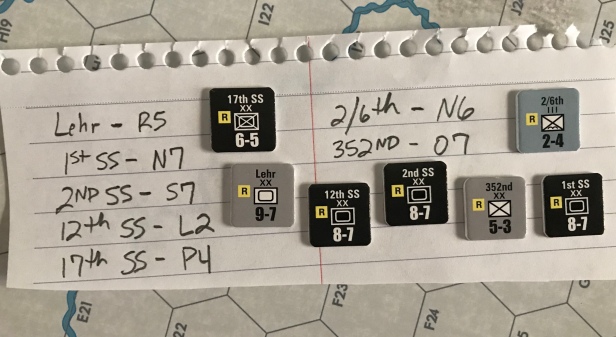
Invasions are limited however as there is only so much real estate to land, maneuver and fight on. During an Invasion, Allied units may stack only two high on beach hexes during the first move impulse of an Invasion turn. The only exception to the two high stacking limit is the British 79th Armored unit, which may stack freely during the first impulse of the first Invasion. If German units are present in invaded hexes, Allied units are placed on top of them. Our picture above didn’t show that stacking on top because we wanted to show you what was included in the stacks.

Different beaches have different Invasion capacities as designated on the map by a blue box with lines extending from it showing the range of the limits identified in the box. If an Invasion overlaps into two different areas, the lesser area capacity is used. These limits are in the form of the number of Infantry factors that can be involved in an Invasion. You literally add up the Combat Factors of each of the counters involved in the Invasion and they cannot exceed the printed limit for that beach area. I thought this was an interesting way to deal with the aspect of operational space. As we all know, in wargames scale is very important and helps us to understand the limits of units per hex and their ability to maneuver without being on top of each other and getting in each other’s line of fire. This was a novel way to handle this aspect as there is a strict 2 counter stacking limit but these stacks and the area included, can also be limited by their combat factors. Not individually in each hex but in the Invasion areas.
During the second impulse of an Invasion, units must land at hexes that were invaded during the first impulse and are free of enemy units. Another limitation is that units that land during the second impulse of an invasion turn have their movement allowance halved but always with a minimum movement of at least one.
The other important aspect of an Invasion is the choice of which mulberry to place (you have several at your disposal each with different supply factors) after the Invasion is successful. During the second move impulse, a mulberry may be placed on any invaded hex free of enemy units. This of course means that your initial wave of Invasion forces had to be successful at at least one beach site (my first Invasion was a disaster as I rolled a lot of 1’s).
Now to one of the parts of the game that blew me away. If the first Invasion fails, meaning that you rolled really poorly, all Allied attacking units are eliminated from the board. I can tell you that having some of your best Allied units simply thrown back into the counter tray doesn’t feel great. This happened to me in several hexes on my first Invasion and frankly there wasn’t much that I could do about that. You only have two units, three if you have the free stacking British 79th Armored unit, and you will not find many favorable odds on those first attacks as you simply cannot gain the higher odds you need to ensure victory. Most times you will be 1-1 with the occasional 2-1. It is possible to get up to 3-1 on the right German units but then you have kind of blown your whole salvo on that one hex. You can use your naval bombardment and air units on key beaches to give a bit more favorable odds but you only have a few of these assets and American gunboats won’t support British units in a hex and vice versa. You must plan these attacks out carefully to ensure at least some success so that you can establish a beach head and break out from there. But wasn’t this the whole risk in the attack? That the Allies would fail and be driven back into the sea? That feeling of tension and fear is palpable with these Invasions and that was one thing that I really liked about the game.

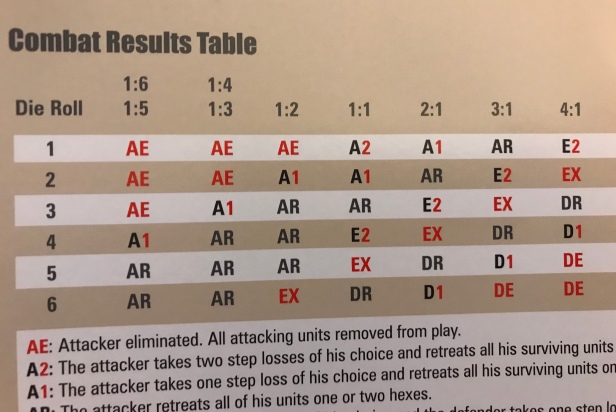
The combat procedure is pretty simple and will feel very familiar to other hex and counter games. You simply add the combat factors of the attacking units together and compare them to the combat factors of the defending units. In this picture, you will see that the Americans are attacking the German 47th Coastal Defense unit with the 8th and 80th Infantry supported by two Naval Units. The American totals their combat factors and add +2 for each of the Naval Units and come up with a total of 16 combat factors. This number is then compared to the defending unit and results in a 3-1 odds (16 compared to 5).

A single 6-sided die is rolled and results in a 5. The CRT is consulted using the 3-1 odds column which shows a result of D1, which means that the defender will take one step loss and then must normally retreat two hexes. In the case of Coastal Defense units however, they cannot take two reductions. If they have to take two reductions they are considered destroyed and will be removed as their top full status is considered Infantry inside a bunker.
This was a good result but it was because the odds were so in favor of the Allies. As you scan the remaining Invasion hexes you will notice that the odds are much less favorable for the Allied attacks. The attack led by the reduced British 79th Armor is the best remaining odds with a 3-1 as well (two 6 strength Infantry units plus +2 for the 79th (as they don’t add their combat factors in an Invasion but will once landed and are on the move) and then +2 from each of the British Naval Units for a total of 18). Every other combat is at a 1-1 odds and with a bad roll of say 1-3, will result in all of those attacking units being removed from the game. Normally a 4 is an acceptable result as it will be an E2 or Exchange 2 steps and will at least eliminate the defending unit and leave the Allies alive, although beat up, but at a minimum holding the hex.

One other element about the first Invasion that was very interesting was the German hidden units. German hidden set up units are revealed after the placement of Naval Units and after allocation of any Allied Ground Support so that it makes it really hard to plan for them. Let’s take a look at this.
German Setup of Hidden Units
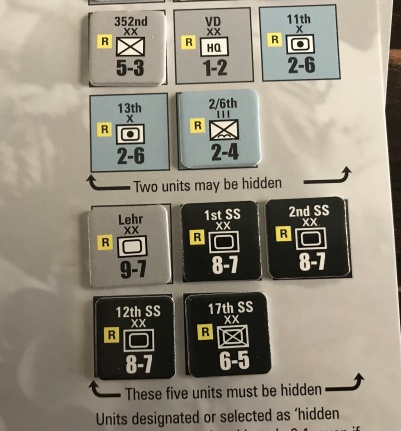
The German player sets up first, placing all units listed on the German Initial Game Set-up Display in the proper areas on the board. Each German unit that starts the game as part of one of the five Military Districts (Netherlands, 15th, 7th, 1st, and 19th) may not move from that district until it is released which happens in one of several ways including if the Military District line is crossed by the Allied units, the July IV turn starts, or they can be switched out with other units in other locations. Units not specified to start in specific cities or specified as free setup units must be set up in any hex within their correct Military District which is shown by the number or letter in the yellow box on the left side of the unit. All Coastal Defense units must be set up in beach hexes while free setup units may be placed anywhere on the board. Units designated as hidden units are set up by marking their locations on a piece of paper and keeping the units themselves in a convenient location off-board so that the Allied player cannot see what they are. Once the Allied player has established their Invasion hexes, the German player now sets up these hidden units on the map according to their previously marked locations.
As you can see, there are only up to 7 Hidden units so they won’t make a huge difference but can be quite a surprise when Invasion beaches are chosen and all of a sudden you are dealing with an SS unit you weren’t expecting. In the example I showed you above, there most likely would have been a hidden unit placed in that hex by the Germans as it is fairly obvious that this is a weakness and will be targeted and the final result might have been very different. These types of decisions make for a much more interesting situation for the defending Germans and a bit of tension and trepidation for the Allied player and is an aspect that I am glad was included to spice things up.
I hope you were able to get a good feel for the Invasions, which is the initiating event of the game, but this one is more than a one trick pony and offers lots of challenges for the players as the Allies have to race across Western Europe and the Germans must defend and fall back in an effort to search out their time and place to launch their major counteroffensive and stop the Allies.
In Action Point 2, we will examine the different type of specialized units in the game, including Paratroopers, Rangers, Commandoes, French Partisans, Volkssturm and Mulberries.
-Grant

I had the original, I thought published by JEDKO, but I may be wrong.
Great game with a lot of little rules to add flavour.
Excellent review.
LikeLiked by 1 person
I never played the original so I’m not sure. I’ll look at that closer and make a change. Thanks for reading.
LikeLike
I don’t know if it was the original edition or not, but the one I played when I was a kid was from Avalon Hill.
LikeLiked by 1 person
Very likely
LikeLike
I really like large counters and hex size. I have been playing for over 50 years. My friends and I need help seeing the original counter size. This is a great improvement.
LikeLiked by 1 person
These counters were large and easy to read. The board is also easy to pick out major cities and terrain was very clear. It is a solid game.
LikeLike
Hey there, great review and great channel! Thanks for all of what you post here and on Youtube, I’m really enjoying you guys talking wargames. Fortress Europa was the very first wargame we played me (40 years ago) and my best friend. I think we were lucky that this was the first, because it’s a really interesting game and it got us hooked. Like you Grant I rolled badly for weather on my very first invasion and I still remember it! 🙂 He still has the Avalon Hill edition and I grabbed a copy myself, but it was sadly incomplete, so I just ordered the new DSE and we’ll try to play by post (current events being as they are). Keep it up, I enjoy reading your posts and watching your videos. 👍
LikeLiked by 1 person
Thanks. I’m glad you are liking our content.
LikeLike
In the preview of the game no mention of air power being used in the invasion i.e. when odds are calculated at 3:1 in one case when with air power using TAC it could have been 4:1, 5:1 or even 6:1 depending on how many German aircraft contest the battle with the particular hex in question. I think it very important to have good knowledge of the rules before previewing a game. You do a good job usually Grant but you slipped up on this one.
LikeLike
You are right. I was thinking I’d reserve that fir discussion in the section about the Aircraft Mission Chart but I failed to. My statement about most attacks being no better than 3:1 is true though. Thanks for pointing that out and for reading.
LikeLike
Firstly thank you for answering my point – I hasten to add it was in no way intended to criticize. As it happens can I ask does an armor unit have an advantage up against an infantry unit, there seems to be no reference in the rules to this – again thanks for your answer, Rob Lowery firm supporter of Compass Games.
LikeLike
No armor shift for tanks versus infantry.
LikeLike
Amazing! Its really awesome paragraph, I have got much clear idea
about from this post.
LikeLike