
This past weekend, I was on Facebook when I started to see some posts from David Thompson as he was playing through his upcoming game By Stealth and Sea on Tabletop Simulator and giving a kind of After Action Report including the play-by-play of the game. This game follows elements of an Italian commando frogman unit during World War II called Decima Flottiglia MAS. Under your command, teams of frogmen will pilot manned torpedoes in attacks against the Royal Navy in the heavily guarded harbors of Gibraltar, Algiers, and Alexandria.
The game is scheduled to hit Kickstarter as of February 25th and I am currently working on an interview with David Thompson as well as playing a prototype copy of the game and shooting a review video with my thoughts for the campaign. I thought this would be an interesting and informative item to bring to you to give you a better idea of how the solitaire game works.

By Stealth and Sea playthrough. Mission B.G.2., Gibraltar, 30 October 1940.
Historical Recap
The submarine Scirè, commanded by Junio Valerio Borghese, left La Spezia on 21 October, with three SLC’s in their pressure-resistant canisters and four crews. The primary crews were Birindelli with Paccagnini, Tesei with Pedretti, and De La Penne with Bianchi, while the reserve crew consisted of Bertozzi with Viglioli.
The Scirè arrived in Algeciras Bay on 29 October. Borghese positioned it a few hundred meters from the mouth of the river Guadarranque, well within Algeciras Bay and directly opposite of the Rock. This would serve as the drop-off position in all future missions. The crews were assigned their targets: the battleships HMS Barham and HMS Renown.
All operators had difficulties with their SLC’s right after extraction from the canisters: Birindelli’s and De La Penne’s had trouble with their ballast pumps and the crafts could not stay surfaced. De La Penne’s had also issues with the batteries and the craft eventually suffered an internal explosion that forced the crew to abandon the mission. Tesei and his second operator were plagued by troubles with their breathing gear and also the spare gear was found faulty. This, coupled with the difficulty of keeping the craft surfaced, led Tesei to the decision to abort the mission. They separated the warhead and set the self-destruction mechanism and let the craft sink. Both crews swam to safety on the beach at La Linea where they were picked up by agents of the Italian secret service and eventually repatriated to Italy.
Birindelli and Paccagnini pressed on despite the difficulties with the buoyancy of the craft. Eventually, Paccagnini’s breathing gear was also found faulty and he had to use the spare one. They used the line of ships in the roadstead to cover their approach to the inner harbor and after three hours and forty minutes of having left the submarine, they passed the inner harbor obstructions on the surface undetected. Their target — the Barham — was a mere 250 meters dead ahead when the oxygen bottle of Paccagnini ran empty and he had to leave Birindelli alone. Birindelli approached the target submerged. At about 70m from the Barham, the SLC stopped, dead in the water. Birindelli tried to drag the craft to the target and also tried with the warhead alone, but was eventually overcome with fatigue and exhaustion. He decided nevertheless to activate the warhead and tried to flee the harbor. He was turned in by the crew of a ship where he had tried to hide. Paccagnini was fished out of the water in the morning. Both were taken
prisoners.
The mission was a failure, mainly due to the faults in the crafts, but had important consequences: one SLC was found by the British and triggered into motion their countermeasures. Another failed to self-destruct and was found intact on the beach at La Linea by the Spanish. The British were allowed to take some pictures, but not to take it with them.
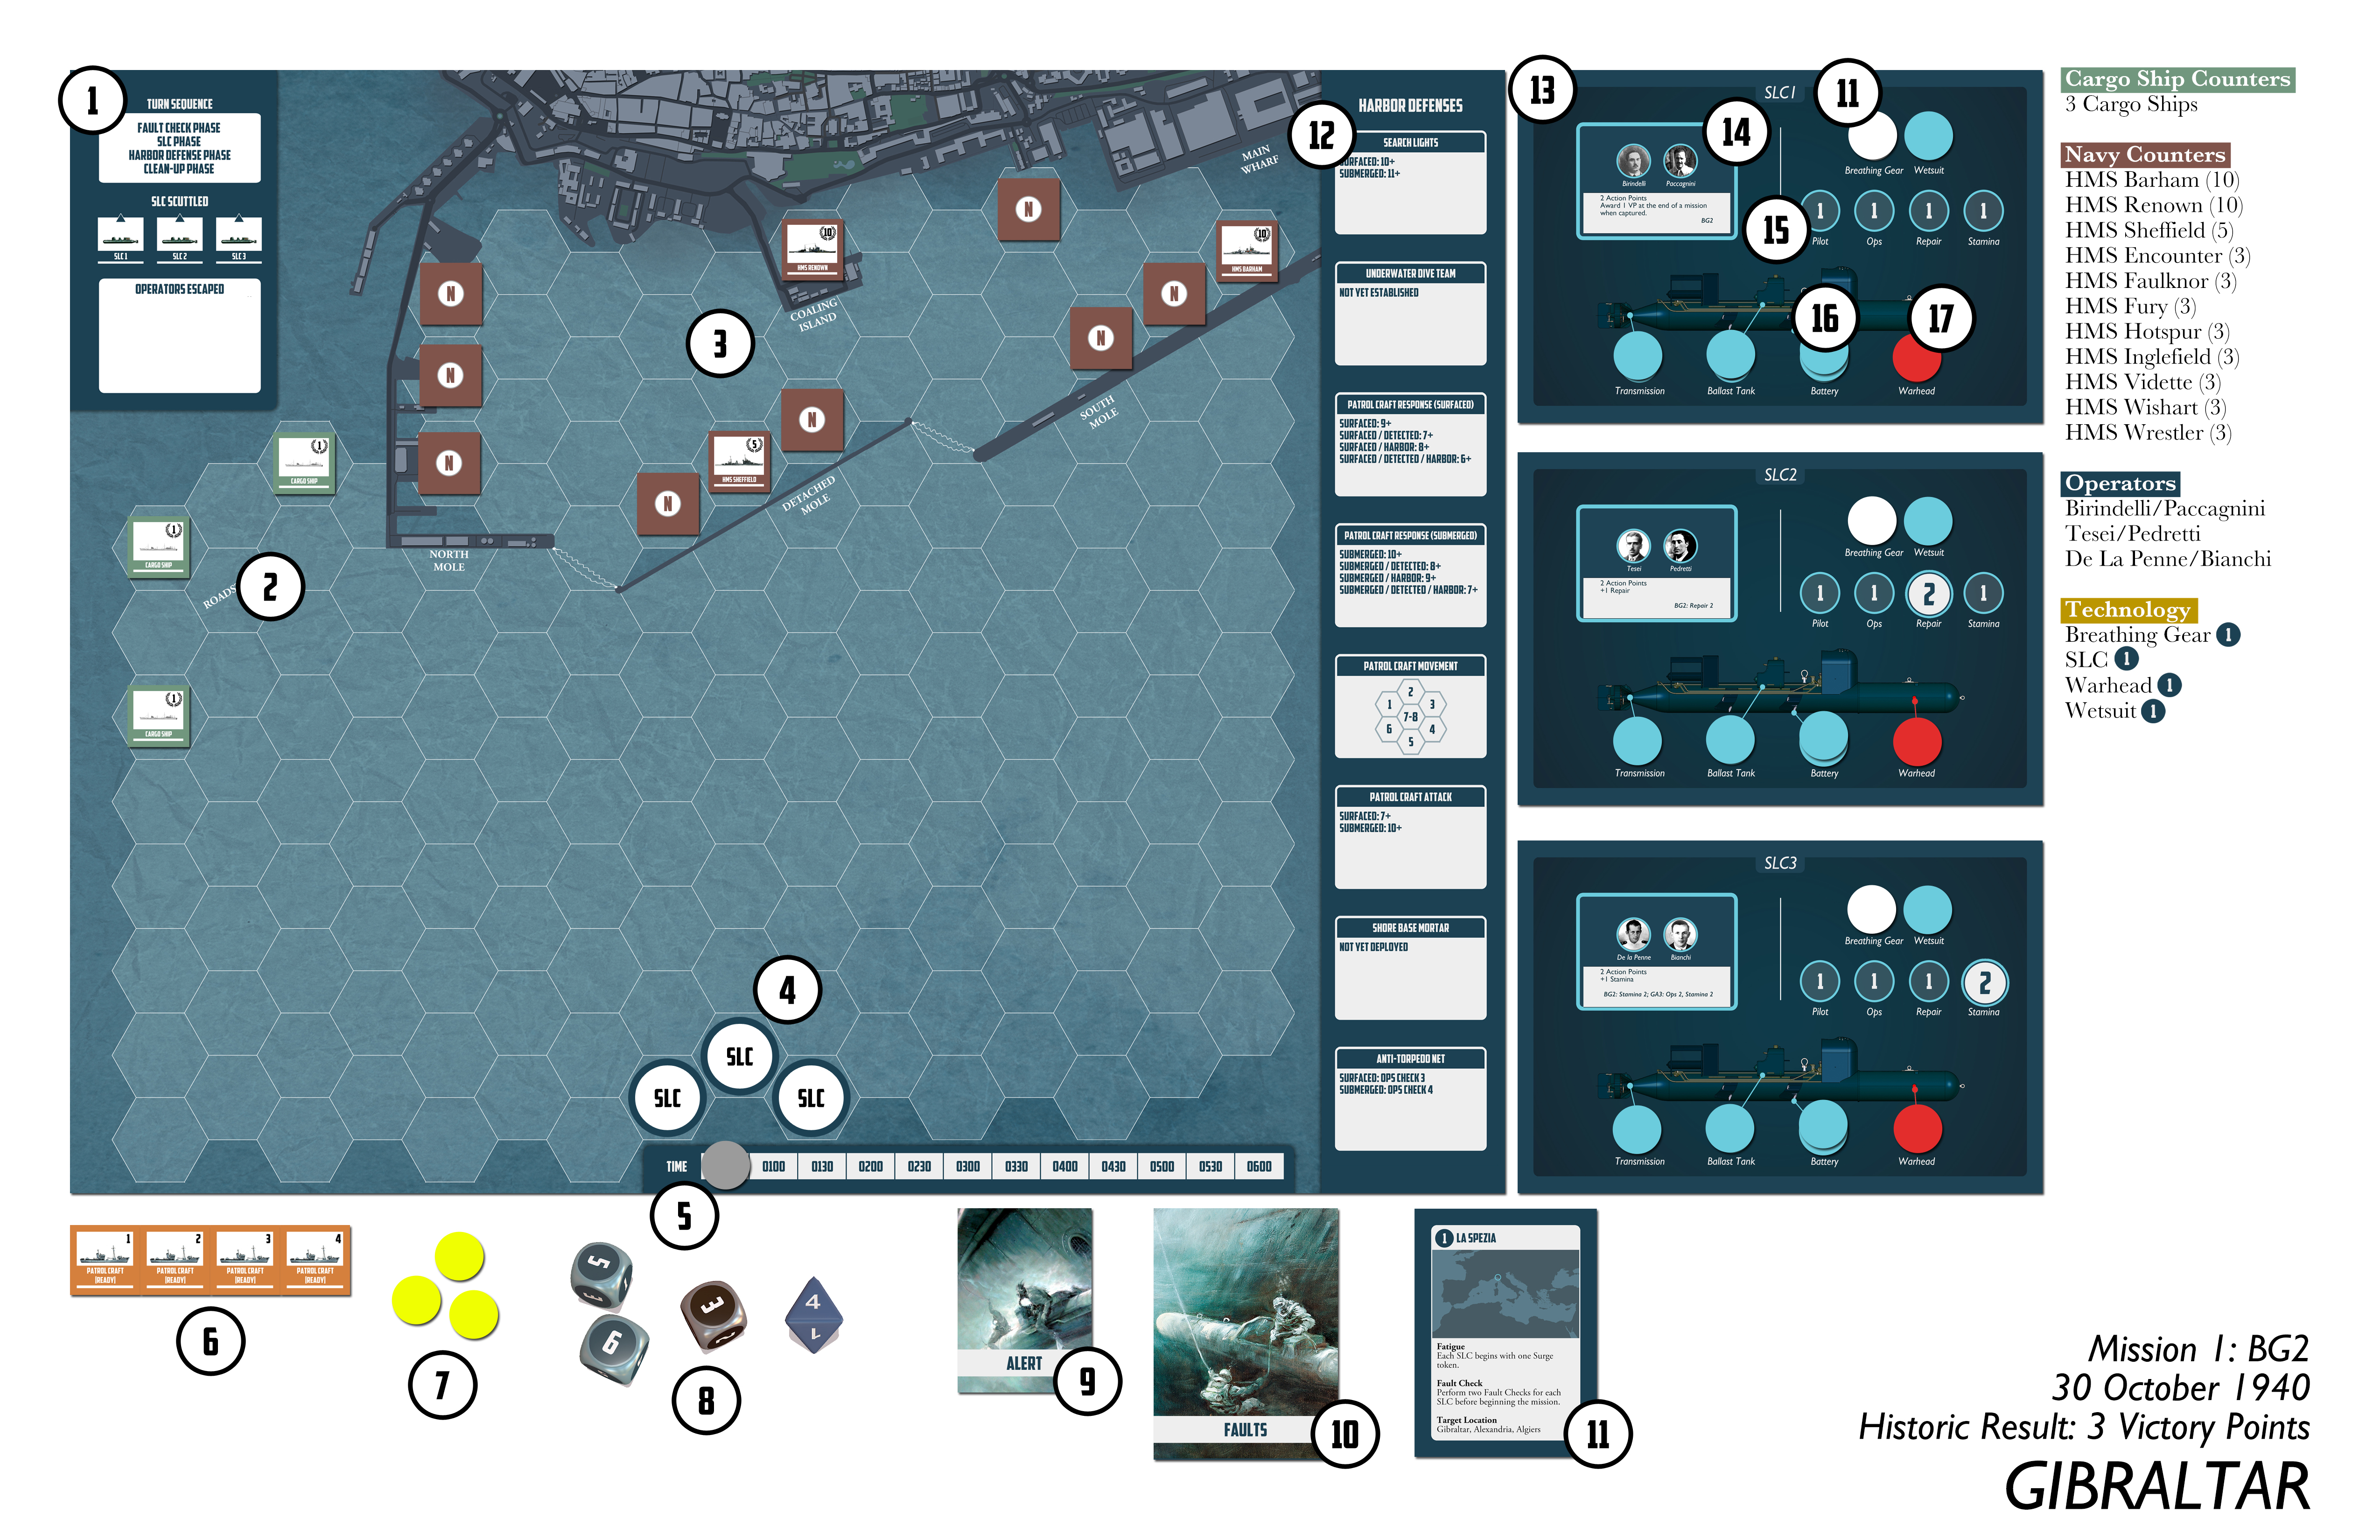 Forward Positioning Phase: This phase occurs at the beginning of the game. In this phase, you make fault checks for the SLC’s. Unfortunately, due to the long distance of travel for the first mission and the poor quality of the prototype SLC’s in the first mission, faults are very common. SLC 1 experienced ballast tank and transmission faults, while SLC 2 experienced a warhead fault. Not a great way to start the mission…

ROUND 1
Having a ballast tank fault is very dangerous – it means that an SLC can’t submerge (and therefore, is much easier to detect). Because of this, the operators for SLC 1 dedicate their turn to repairing the ballast tank. Meanwhile, the operators for SLC’s 2 and 3 dive in order to avoid detection.
Unfortunately, because the operators for SLC 1 spent their entire turn repairing the ballast tank fault, they couldn’t also dive. That left them vulnerable, and sure enough they were detected by a patrol craft (the yellow token on SLC 1 indicates it has been detected).

ROUND 2
At the beginning of each round, you make a fault check for one of the SLC’s. This represents the constant struggle the Italian operators faced due to the mechanical unreliability of the SLC’s. The operators for SLC 2 fail their check, and the SLC experiences a transmission fault. Transmission faults reduce the speed of an SLC.
SLC 1 now has a difficult choice. The operators could spend their entire turn diving, which would ensure success. But they would still be detected. Alternatively, they could use one action point to try to dive, and a second action point to move, which would mean they were no longer detected. This is one of the core concepts of the game – balancing action efficiency with probability of success. In this case, they play it safe and spend the entire turn submerging.
The patrol craft near SLC 1 moves towards the SLC (because it is still detected) and attacks successfully. This stuns the operators (reducing the number of action points they have per turn from 2 to only 1).
SLC 2 spends the turn repairing their transmission fault.
SLC 3 begins moving towards the harbor. The operators need to change direction. But because the SLC is submerged, the operators need to make a pilot check to navigate (and rotate the counter). The operators fail their pilot check. Unfortunately SLC 3 is also spotted, despite being submerged.

ROUND 3
One of the operators for SLC 1 gets a rip in their wetsuit. Normally this would force a Stamina skill check, with failure leaving the operators stunned. However, they are already stunned, so they take no further penalty.
Detected and stunned, SLC 1 is desperate to escape the patrol craft. The operators use their 1 action point to move forward. When a submerged SLC moves, you remove a detected token if there is one on the SLC. The operators have bought themselves a little time to try to recover.
Unfortunately, SLC 1’s poor luck continues. The patrol craft spots it again and moves in to attack. What’s worse is that SLC 1 and SLC 2 are both in the same hex, which means the patrol craft gets to make an attack against each SLC. The attack against SLC 1 succeeds. That means the SLC is sunk and it forces the operators on SLC 1 to try to escape, which is a stamina check. Different conditions in the game affect the likelihood of the operators’ escape. In this case, they benefit from not being in the inner harbor and the attack being so early in the night, but are penalized because there is a patrol craft in their space. They fail their stamina check and are captured.
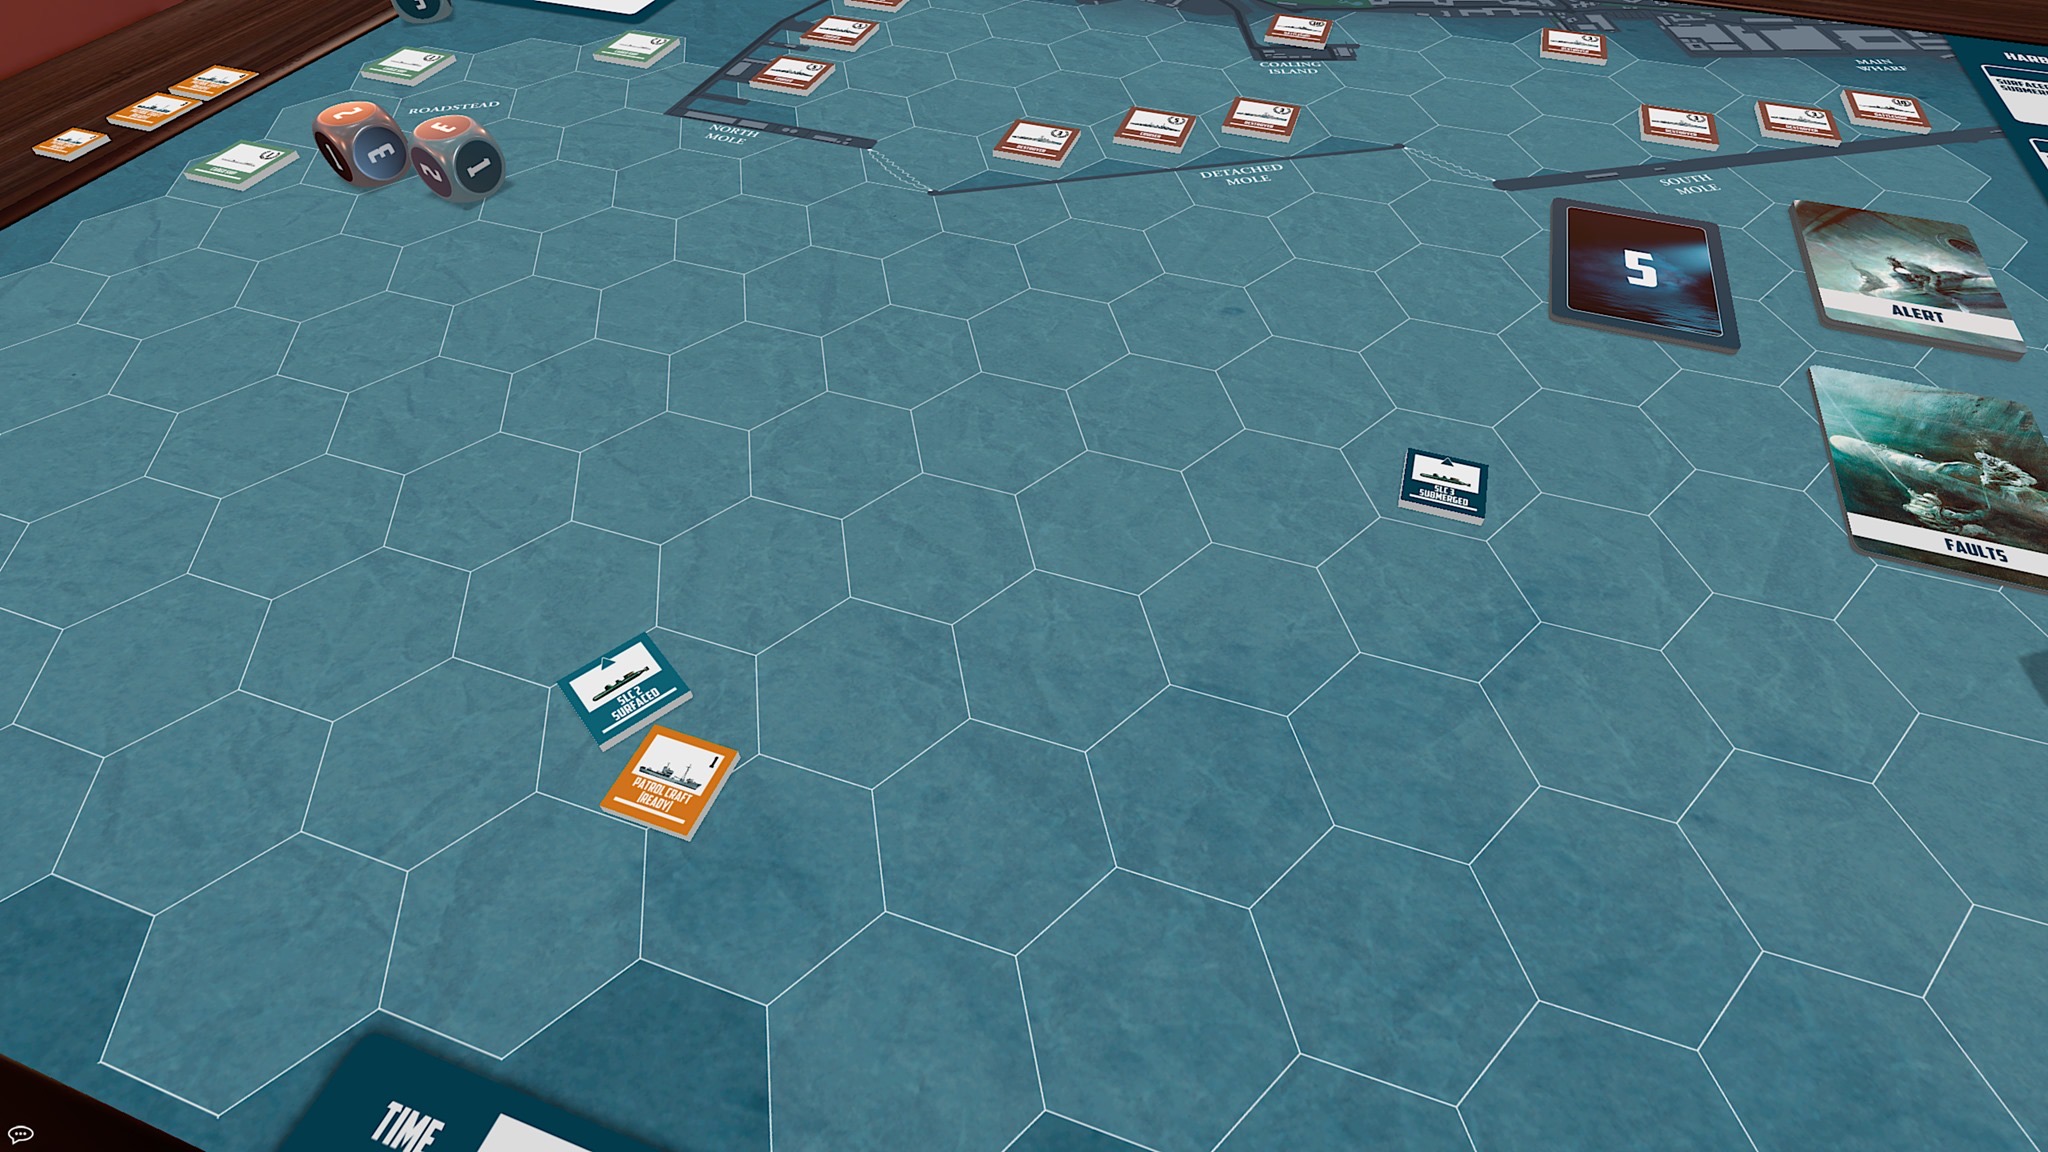
SLC 2 takes a Full Move action. This allows the SLC to move two spaces.
SLC 3 wants to change course (towards the harbor) and move, which would remove the detected token. The only way to pull this off is to spend one action making a successful pilot check (to rotate the SLC counter) and then a second action to move. And the pilot check is successful! The SLC rotates, moves 1 space, and removes the detected token.
Patrol craft 2 loses sight of SLC 3 and begins searching for it.

ROUND 4
The operators’ struggles continues. SLC 2 suffers a ballast tank fault, forcing it to surface in the same hex as patrol craft 1.
The operators for SLC 2 recognize the danger and spend the turn repairing the ballast tank. However, they are still surfaced at the end of their action. Amazingly, SLC 2 goes undetected despite being surfaced. But patrol craft 1 continues to operate in the hex and attacks SLC 2 (though unsuccessfully).
Meanwhile, SLC 3 continues towards the harbor.
At the end of the round, Patrol craft 2 is removed from the board because it is too far away from an SLC to be relevant.
ROUND 5
One of the operators for SLC 2 also experiences a tear in their wetsuit, but is able to overcome the fatigue with a successful Stamina check.
SLC 2 spends the round diving, ensuring success.
SLC 3 closes in on the anti-torpedo nets that guard the inner harbor entrance.
Unfortunately, the Royal Navy seems to be on full alert now (as the mission goes on, the deck of cards that determines the alert level of the harbor defenses gets increasingly more challenging). Both SLC 2 and 3 are detected, prompting the arrival of more patrol craft. Patrol craft 1 attacks SLC 2, but fails.

ROUND 6
The breathing gear for the operators on SLC 2 begin to fail. This means stamina checks will be more difficult for the rest of the mission.
SLC 2 makes a full move, advancing two hexes and removing the detected token. It seems to have lost patrol craft 1 and 2, which begin searching the waters nearby.
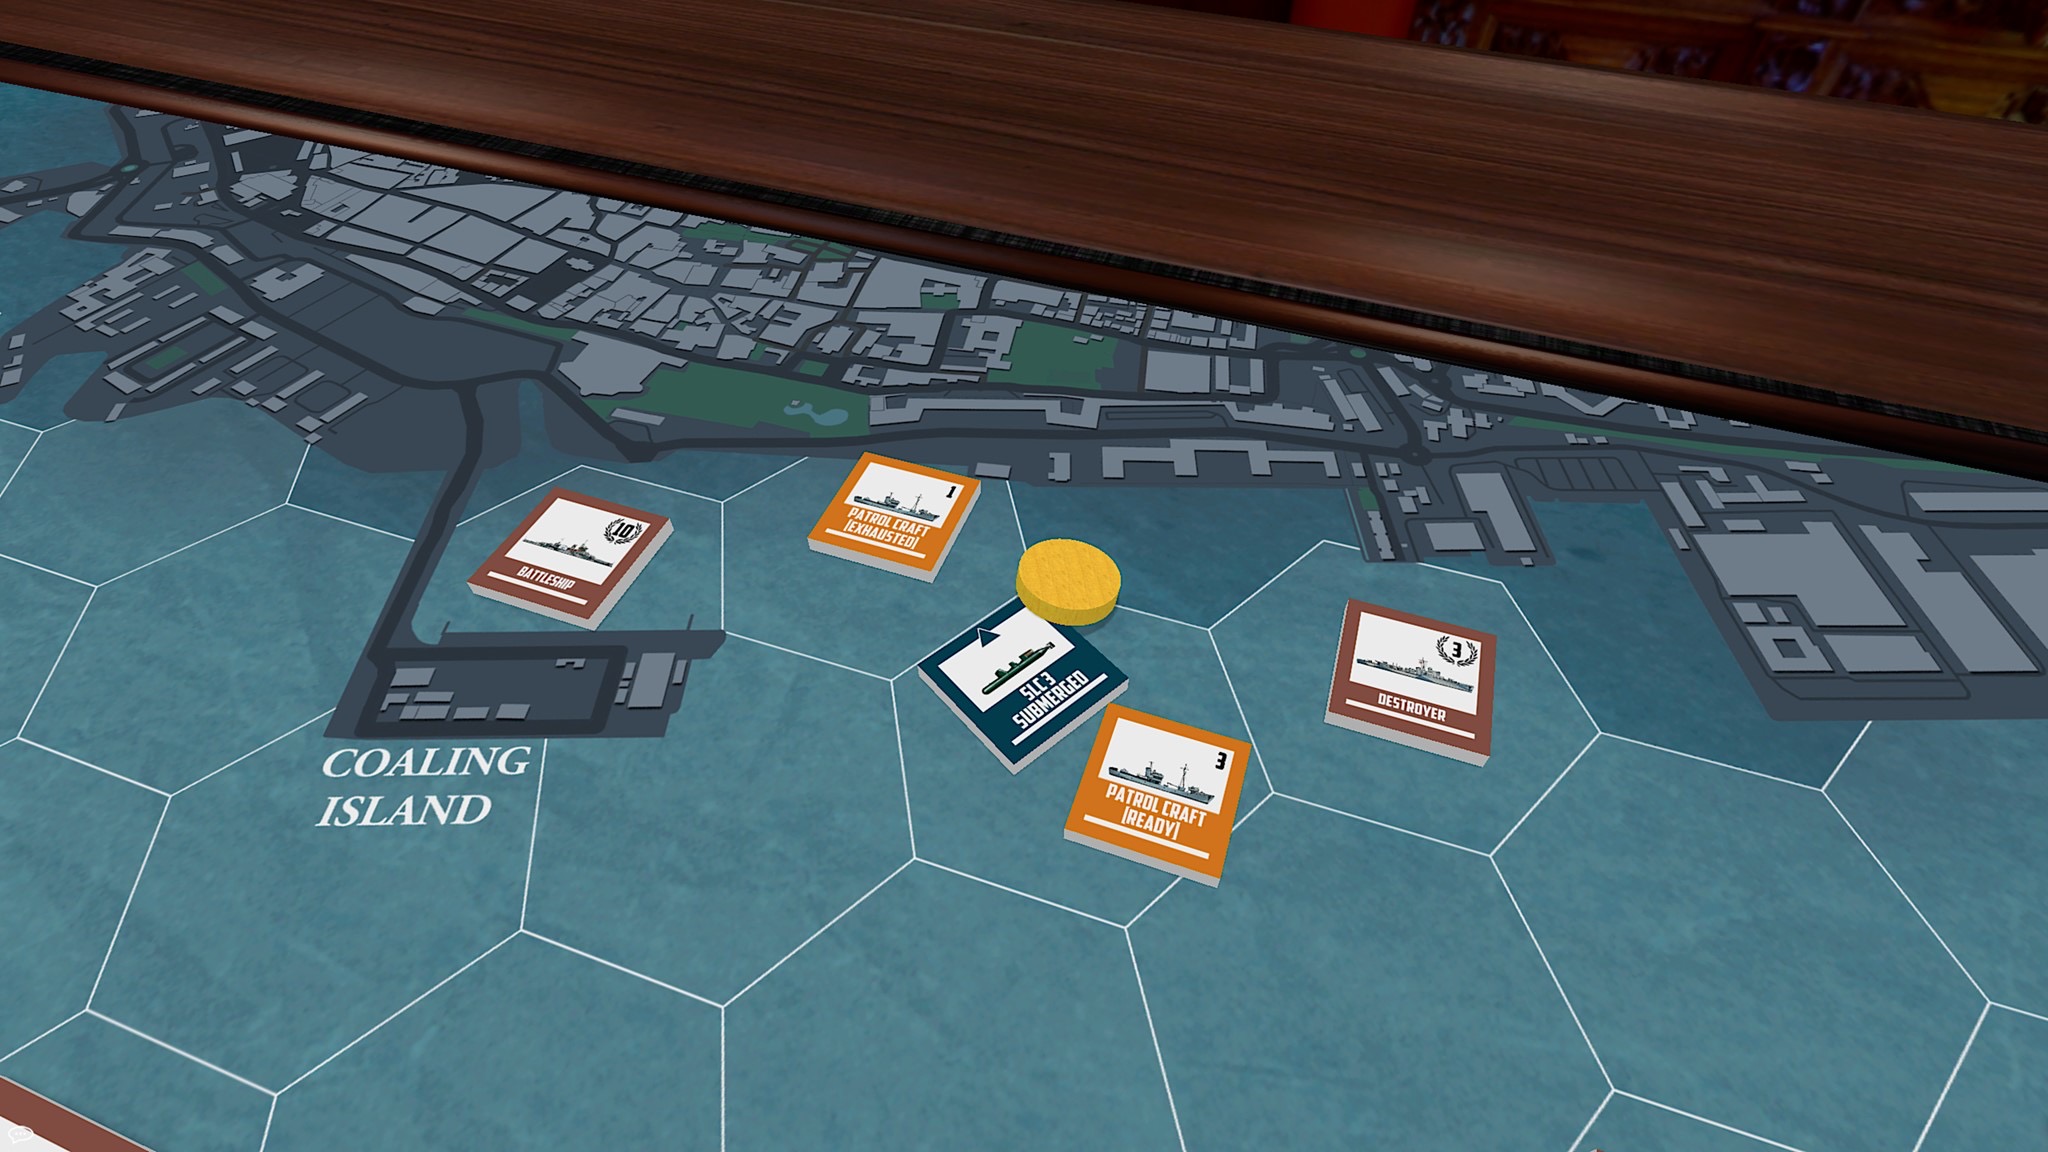
SLC 3 moves forward one space, removing the detected token. It is now in the same space as patrol craft 3 and adjacent to the anti-torpedo net. In order for the SLC to enter the anti-torpedo net hex, it must make an Ops check, which is does. SLC 3 is now in the inner harbor.
Meanwhile, SLC 3 is spotted by the patrol craft, which gives chase and attacks. Fortunately the attack fails.

ROUND 7
SLC 2 advances towards cargo ships in the roadstead, while SLC 3 makes for a battleship in the inner harbor. SLC 3’s movement removes the detected token, but the patrol craft refuses to give up! It spots SLC 3 again and gives chase. Fortunately its attack misses.

ROUND 8
SLC 2 has now almost made it to the cargo ships in the roadstead, and remains undetected.
The chase is starting to take its toll on SLC 3, which experiences a warhead fault. The operators on SLC 3 won’t be able to detach the warhead from the SLC until they first repair the fault. But their immediate concern is escaping – and making it to the battleship. They spend their turn piloting the SLC and rotating the counter. Time is starting to become an issue now. They only have four more turns before sunrise.
Patrol craft 1 reappears in support of patrol craft 3. Patrol craft 3’s attack against SLC 3 fails again, but things are looking grim. The likelihood that the operators on SLC 3 escape now are very slim.
ROUND 9
SLC 2 reaches a cargo ship in the roadstead and the operators are able to repair the warhead fault the SLC experienced at the beginning of the mission.
Meanwhile, the operators on SLC 3 carefully consider their options. They are very close to a battleship, and destroying it would be a major victory. But their chances of success are slim at this point. The only chance they have at survival would be to break off the attack now. If they wait any longer, they will be doomed for sure.
This is a critical decision in the custom campaign. Operators accrue skill either by destroying ships (cargo or naval) or penetrating the inner harbor. The operators on SLC 3 have already met the conditions of advancing one of their skills at the end of the mission. But if they are captured, that critical skill advancement will of course be lost. On the flip side, earning 10 victory points for sinking a battleship is a massive reward. It would unlock valuable tech upgrade points.
The operators on SLC 3 press their luck. They move forward (removing the detected token) and then make a pilot check to change direction. They are spotted. Patrol craft 1 and 3 both move in, but both fail their attacks.

ROUND 10
Round 10 is critical in that it is the last round where operators have a bonus to escape. The clock is ticking…
SLC 2 experiences a battery fault. A single battery fault has no effect, but a second fault would render the SLC unable to move. The operators on SLC 2 spend the round detaching their warhead and readying an attack. (the red token on SLC 2 is the warhead).
SLC 3 moves forward (removing the detected token), and positions itself under the battleship. The operators attempt a Repair check to repair their warhead but fail. However, they still have a Surge token. Surge tokens are associated with the operators’ breathing gear. You can discard the surge token to make a re-roll, but if you run out of Surge tokens (or experience faults with breathing gear), it will will give a -1 penalty to Stamina checks. With the re-roll, the operators are successful in repairing the warhead.
The Gibraltar searchlights spot SLC 2 operating in the roadstead. It has been detected, but no patrol craft respond. Meanwhile, SLC 3 is operating undetected, and the patrol craft in the inner harbor begin their search.
 ROUND 11
It’s 0530 now and will be dawn soon.
The operators on SLC 2 attach the warhead to the cargo ship. They have successfully sunk the ship! Now they need to scuttle their SLC and escape.
The operators on SLC 3 make an Ops check to detach their warhead, but fail to attach it. They’ll have one more round to make an attempt. Suddenly SLC 3 is spotted, and the patrol craft respond by moving in to attack. One of them is successful, and stuns the operators on SLC 3.

ROUND 12
SLC 2 spends the entire round taking a Scuttle SLC action, ensuring success. After completing a Scuttle SLC action, you also immediately resolve an escape action for the operators, which is a stamina check. The check is successful. The operators on SLC 2 — Tesei and Pedretti – have successfully destroyed a cargo ship, scuttled their SLC so it cannot be found by the Royal Navy, and escaped to safety.
The battery on SLC 3 experiences another fault. It’s unable to move, but that doesn’t matter. The operators aren’t going anywhere and they know it. There’s no time to scuttle the SLC and escape. Their only hope now is a successful attach warhead action with their single action point. Incredibly, they make the check. They have sunk a battleship (the HMS Renown). But they’ve run out of time. The mission is over. With the SLC still on the board, they’ve failed to scuttle it, and the operators have been captured.

POST MISSION
Now it’s time to fill in the Custom Campaign After Action Report and the Custom Campaign Operator Roster.
In the after action report, I capture the fact the operators destroyed a cargo ship and a battleship, scuttled an SLC, and one set of operators escaped. This results in 13 victory points. In addition, one of the Operator cards featured a special attribute that awarded me 1 VP in the event that the operators were captured (this is tied back to an historical event related to the specific operators). So the total VP at the end of the mission was 14.
I spend VP to increase tech levels. In this case, I improve the location from which the Italians launch their attack (which helps reduce the number of fault checks per mission and adds surge tokens to the operators), I advance the tech level of the SLC’s (making them easier to repair), and I improve the type of warhead used.
I also calculate the alert value based on ships destroyed, SLC’s not scuttled, and operators captured. This alert value determines the alert level for the next mission. In this case, the alert level went all the way from 0 to 3, which is a significant improvement for the Royal Navy’s harbor defenses. Lastly I update the Operator roster. On the roster, I note which operators received skill increases, if they earned medals for their efforts, if they received a promotion, and if they were captured (or killed). Medals and promotions have no in-game effect, but they reflect especially impressive feats (such as sinking a battleship!).
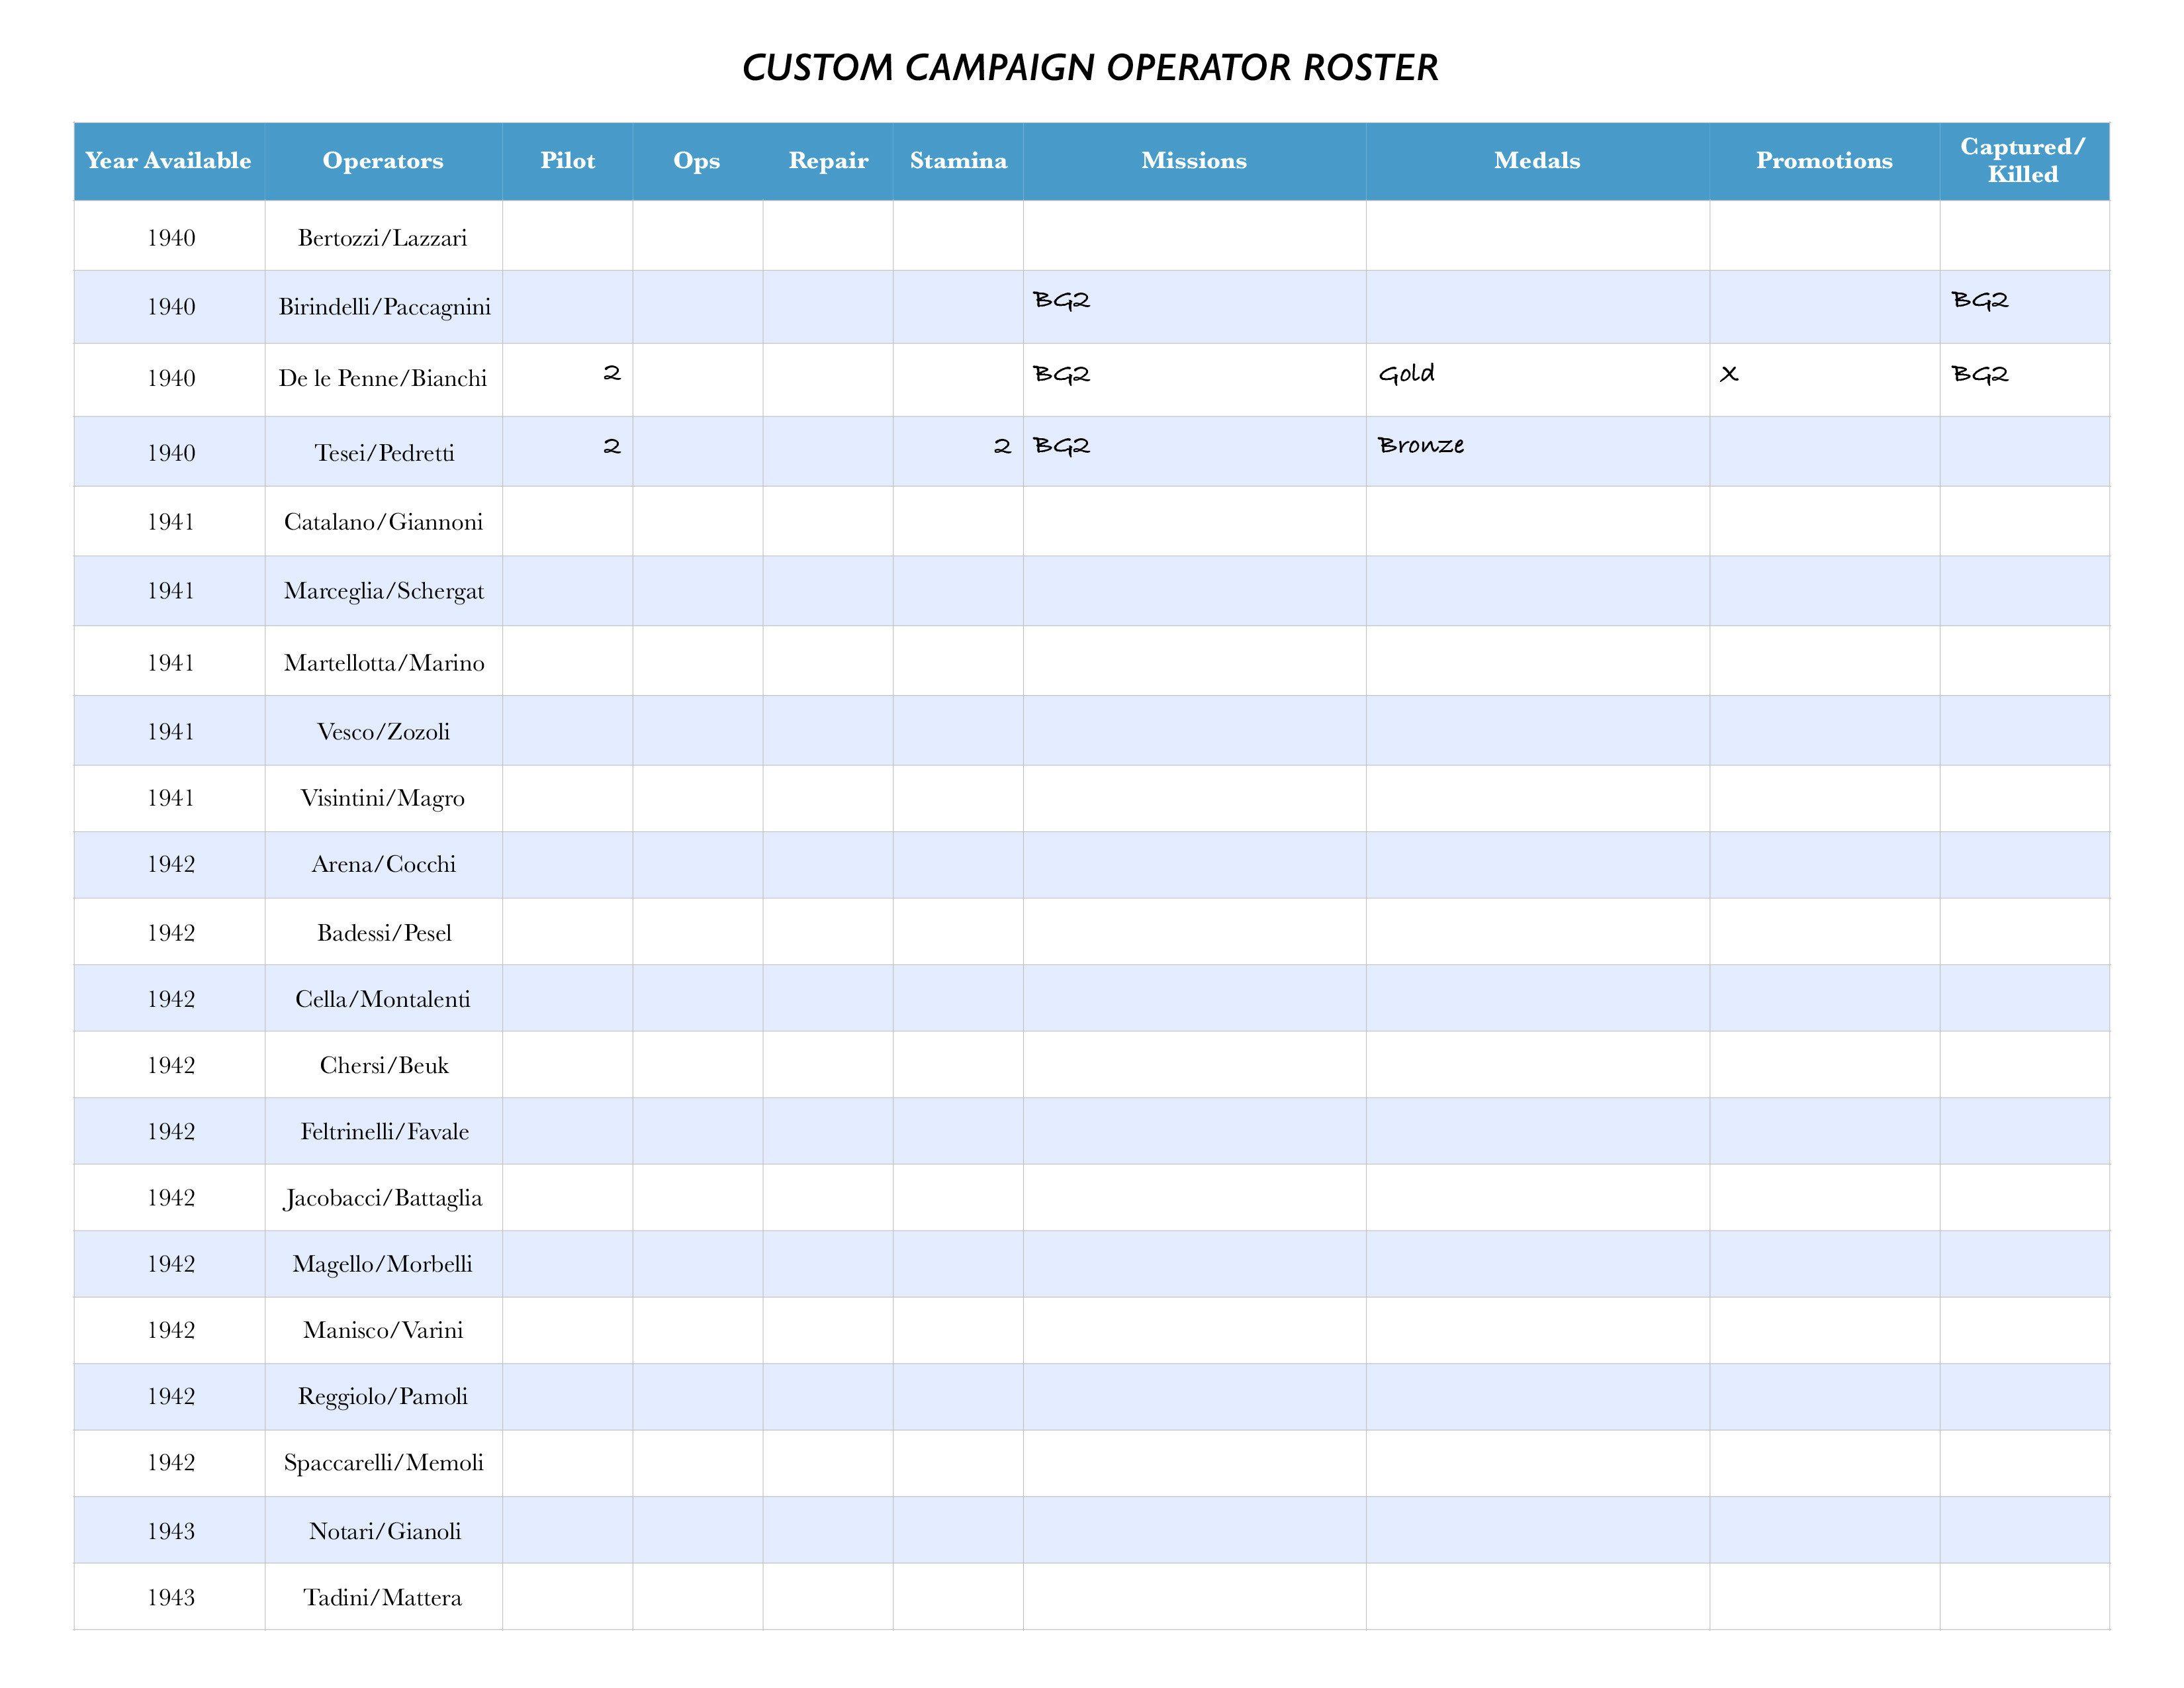 In this case, Birindelli and Paccagnini were captured. De la Penne and Bianchi entered the inner harbor and sunk a battleship, which earned them a skill increase, but they were also captured. And Tesei and Pedretti sunk a cargo ship, earned a skill increase, and escaped.

Thanks to David for taking the time to put this playthrough AAR together to give us a better idea about how the game plays. As I mentioned, the game will be going to Kickstarter on February 25th and here is a link if you are interested in checking out the campaign early: https://www.kickstarter.com/projects/danverssengames/dvg-by-stealth-and-sea?ref=amg58e&token=a29b1af7&fbclid=IwAR0j7TUYhx6ykdUYcltey5fUklkjFmGOQZ2KEvvz7R0nj34-tUwH6YDk-W8
In the meantime, we are working on a written interview with David Thompson to get a better idea about the inner workings of the design and we have a prototype copy that we will be playing and then doing a preview video for the campaign.
-Grant

Thanks so much for sharing this with the community, Grant!
LikeLiked by 1 person
Looking forward to it David 🙂 Besides we solitaire game designers have to stick together!
LikeLiked by 1 person
Ad you probably know, the SLC were commonly known as “Pigs” by their crew
LikeLiked by 1 person