
Field Commander: Alexander from DVG is a very interesting and varied solitaire game where the player finds themselves controlling the life of Alexander the Great of Macedon when he comes of age in 338 B.C. as he attempts to dominate the ancient world. You will decide what units to purchase and train, what advisors to listen to and seek guidance from and what cities you will sack along the way as you try to realize and fulfill various ancient prophecies.
In Action Point 1, we discussed the different campaigns available in the game and the way that you can customize those campaigns to have them play differently and ratchet up the difficulty. In this Action Point we will examine the basic Sequence of Play taking a deeper look at Conquest and how Alexander’s army moves around the board and interacts with prophecies and obtains different advisors.
Sequence of Play
As with any typical solitaire game, the Sequence of Play is key to how the game plays. I like a clear and consistent sequence when I play these solo games because it makes them comfortable after you play a few times and you begin to be able to play through them more quickly.
In Field Commander: Alexander the Sequence of Play is broken up into three distinct parts: Preparation, Conquest and Resupply.
In this post we will only look at a part of the Conquest step.

Army Movement
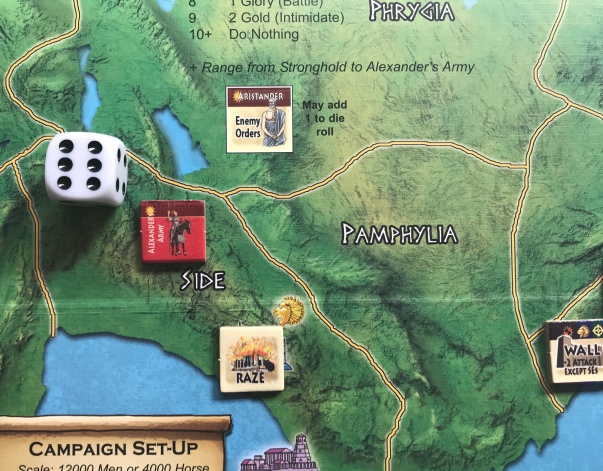
If the player wants to move their army, and they will most decidedly wish to do this every turn if not multiple times per turn, they first choose the adjacent area they wish to venture in and then they will perform a Scouting Roll to determine a few things. The level of armed resistance in the area and the level of forage available for the army.

In the picture above, Alexander is going to move from Lycia into Side to assault the fortified City located there. But before he moves he must perform a Scouting Roll to gauge the area.

The player checks the number of his forces before he rolls and notes that he has 7 forces (including Alexander). They roll and the result is a 4. So what does this mean?

If the Scouting Roll is lower than the total number of forces in the army this means that you were unable to find enough forage to feed them and in order to move you will have to pay Gold equal to the difference. In this case, the player would pay 3 Gold to make the move. This mechanic is simple but thematic showing the problems of moving larger armies through hostile territory. An army fights on its stomach after all!

Let’s assume that after the first Scouting Roll, which was successful although it cost 3 gold to obtain food and ship into the area, that Alexander destroyed the fortified City in Side and chose to press his luck and move again. During the battle, Alexander lost a few units and now he has 5 total forces remaining in the army.
He is attempting to move into Pamphylia in order to get one step closer to his next target in Tarsos. The player rolls and gets a result of 6 which is higher than the total number of forces. If the Scouting Roll is higher than the forces in the moving army, the army has encountered enemy soldiers and resistance in the area and must take a Hit to his units equal to the difference. In this case, the player will have to apply one hit (6-5 = 1) to his forces and chooses to assign that hit to his Infantry unit which flips it to its reduced side.

If the Scouting Roll is equal to the number of total forces in the moving army this is referred as Clear and the move is free.
Players can disband forces at any time, even after rolling a die. This can be done to avoid paying for the move. I don’t recommend it but it would allow a move if you didn’t have the Gold to pay for lack of foraging.
Also remember that after the Scouting Roll, the player can choose not to move. I love this choice! If you don’t really feel you can sacrifice Gold and rolled poorly needing to pay 4 Gold to move, you just stay put and end your turn. If you encounter fierce resistance and don’t want to have to kill your best Phalanx units, you just stay put and end your turn. Their are choices a plenty and you must make the wise choice if you hope to win the campaign.
You also have a choice about the size of your armies. Small armies can typically find forage to feed their armies but if they encounter resistance they will lose forces through attrition. Larger armies can avoid hits from resistance but has a hard time finding enough food. If you have the Gold, larger armies are typically better than small armies but they will cost you to move and maintain. Really well done mechanic that provides some intrigue and difficulty on your choices.
Prophecies
Alexander was alive in a time of mystical belief in fate and multiple gods. Many people believed in ancient prophecies and there fulfillment through their deeds.
In the game there are 8 different Prophecies that are represented by Oracle counters that are randomly placed on the board during setup, usually 1-2 per campaign. When a player moves Alexander’s army into an area that contains an Oracle counter, they expose the counter and have to make a decision about accepting the prophecy and trying to complete it within the allotted time frame or rejecting the prophecy and foregoing its benefit.

The 8 different Prophecies are as follows:
“A wall of wood alone shall be uncaptured” – During the next 4 turns, Conquer a Pivotal Area and Raze it.
“Care for these things falls on me” – At any time during the next 4 turns, you must have 2 or more Conquered Pivotal Areas on the map.
“Let go of me, you’re unbeatable” – During the next 4 turns, Conquer a Pivotal Area and Govern it.
“Make your own nature, not the advice of others, your guide in life” – During the next 2 turns, you must not use any Advisor abilities for one of those turns starting from the “Advance Turn Counter” step until the end of that turn.
“Pray to the Winds. They will prove to be mighty allies of Greece” – At any time during the next 2 turns, pay 5 Gold from your Treasury to complete this Prophecy.
“The serpent in craftiness coming behind thee” – During the next 2 turns, discard 1 of your Advisors. The Advisor cannot be re-purchased during the campaign.
“The strength of bulls or lions cannot stop the foe” – During the next 2 turns, build 1 new City.
“With silver spears you may conquer the world” – Have 15 or more Gold in your Treasury at any time during the next 3 turns.
So why are Prophecies important? They provide a way to increase the prowess and leadership of Alexander.

If you complete a Prophecy within the turn limit you have the ability to increase Alexander’s counter. The new counters increase his fighting ability and also provide him with a superscript value that will provide extra hits in battle.
If the Prophecy’s condition is not met before the Turn Counter is moved past the Prophecy counter, you have failed to complete the Prophecy. You will then discard the Prophecy counter. When this happens, you can either lose one level of Glorification by reducing Alexander’s counter, or remove one of your Advisors for the remainder of the campaign. If you cannot do either, you lose the campaign.
You will need to weigh the pursuit of Prophecy against your goals for each campaign. The successful completion of Prophecy equates to an improved Alexander and his ability to defeat other Leaders in battle. But some of them are costly and will hamper your ability to Refit your armies after battles and your ability to recruit new forces.
Alexander’s Advisors
Alexander was surrounded by some of the greatest teachers, scholars and warriors who would guide him in his choices and offer advice when necessary. In the game, players are given 1-2 advisors of their choice to use in the various campaigns and then can purchase additional advisors with Glory they have earned from battles.

These advisors are as follows:
Antipater (Commander) – You are allowed to purchase Temples, Cities, and Forces during each Resupply step. Without Antipater, you can only purchase one of the three types each turn.
Aristander (Seer) – After seeing each Enemy Orders die roll, you may add 1 to the roll.
Callisthenes (Chronicler) – When you win a Battle, Conquer a Stronghold, or eliminate an enemy Leader, gain +1 Glory.
Hephaestion (Hero) – Adds +1 to Alexander’s Battle value. This adds to Alexander’s chance of successfully attacking in battle, and the number of Battle Plans you get to choose.
Parmenion (General) – The enemy receives 3 fewer Battle Plans in battle.
I love the inclusion of these advisors as they give you a little extra ability to aid you in your task of defeating the campaign. Some are way better than others. In fact, it is hard for me not to use Parmenion each campaign as limiting the number of battle plans your enemy has access to improve your chances of victory.
I hope you have gained greater insight and understanding into the thematic nature of Field Commander: Alexander from these Action Points. In Action Point 3, I will show you the various units and their abilities, show you how Battles work and the various choices you have with the Battle Plans you have access to. We will also cover Razing or Governing cities that the player has conquered and the advantages of both approaches.
-Grant

“Alexander was alive in a time of mystical belief in fate and multiple gods” – I can’t help it, I must think of TPA’s very own Alexander reading this and other sentences 😀
LikeLiked by 1 person
I thought of that too as I was writing it.
LikeLiked by 1 person
I’m hoping for a Dan Verssen Civil War game: Field Commander: Grant!
LikeLiked by 1 person
That’d be pretty awesome. Both because of the subject and the fact that we’d both have a DVG game named after us! 🤦♂️
LikeLiked by 1 person