
I initially set out to do a straightforward review of this game, but I remembered that Alexander had taken a crack at it sometime in the recent past (nearly 1 year ago as of this writing). I read it again in preparation for this article and noticed he actually listed it under Preview! I can’t blame him, he was only barely able to scratch the surface. I recommend you go read it if you haven’t yet. My intent is to expand on that original article and provide a guide of sorts on how to approach this game of Exoglobalization.
At the end of his article, Alexander made an excellent point: the game badly needs a “How To” guide for new players to ease them into play. The 3rd edition does have one book (The Training Guide) that is meant to help in this regard. For some folks it works, for others it’s just more confusing. There’s no one perfect way to introduce players to this game. It’s a testament to its reputation as the ultimate sand box for exploration and exploitation of our Solar System. For the gamer with a keen interest in gaming and astronomy seek the road that best suits you. They all eventually lead to Rome (er.. Space).
Previously on High Frontier…
Alexander touched on some High Frontier basics. As a small recap, you’re in charge of a space agency that will bid in auctions for technology that will allow you to assemble rockets, send them to sites in space, prospect for minerals, establish factories and sell industrialized goods back to Earth. The game ends when the required number of factories are built, which is variable depending on the number of players.
It is SO much more than this of course.
There are space ventures, glory missions, colonists, bernals (big space habitats), freighters, next generation rockets distinguished by their power output (Gigawatt and Terawatt thrusters), AI, labs, war, 3D printing, solar system politics and end game futures. Game mechanics aside, this game works best as an experience (much like all of Phil Eklund’s science heavy games). In other words, you usually play for the ride not the victory points. Yet it still works as a competitive game between experienced players, which I will examine in a future post.
T-Minus 9 Minutes and Counting…
The way I see it, you have three general ways to play the sandbox, depending on the time available and the experience you want. I will call them Basic, Legacy and Colonization. Of the three only Legacy is not officially recognized as a game type; the rules only discuss Basic and Colonization. Legacy is more a specific set of options to use while playing the “Colonization” part of the game, which is heavily modular in nature (meaning there are components you can put in or leave out as desired).
Basic only uses the right side of the map (where Earth is naturally), but still includes all of the inner Solar System: Mercury, Venus, Moon, Mars, Vesta, Ceres and many chunks of space rocks plus a few comets. In other words, plenty of real estate to cut your teeth on the game when you’re starting out. There is value in reducing the options available when having too much can overwhelm the player. In that vein, Basic only uses three card decks: Thrusters, Robonauts and Refineries. This is a very good starting point for the novice.
What I (and many others) call Legacy, refers to the fact that the original High Frontier back in 2010 came out with just basic game rules, although they contained an “Advanced” game that required a zip lock bagged expansion. This included the other half of the map, depicting the rest of the asteroid belt plus the outer solar system up to Saturn. It added three more decks, the “Support” cards; Generators, Reactors and Radiators. This incorporated random events, slingshot maneuvers, politics (plus war) and radiation hazards. High Frontier plus its original expansion has come to be known as the Legacy game.
When the expansion called “Colonization” came out, it included this original expansion material but added much more. The map also extended to the rest of the Solar System and added the following decks: Colonists, advanced Thrusters (Gigawatt/Terawatt) and Freighters. Not to mention, a boatload more of additional support cards and the new space habitats (Bernals). The game was extended now that the goal was no longer just industrialization of the solar system but also achieving “Futures” which were present on the backs of the newly introduced cards (a lot of which includes highly speculative science and engineering, from transcendence, starshots and even plowing a comet into Venus or heck, end all life on Earth). This stuff is really only for the hardcore fan who has mastered the legacy game play and wants to reach “Charles Stross” levels of epic sci-fi gaming.
The third edition of the game includes all of the above but made some changes to streamline movement, updated all of the crew cards to include thrusters (in the original game only some space agencies had crews with self-sustained powered rocket boosters), and made glory/ventures cards rather than spaces on the map. The rules were re-structured to enhance the modular aspect of the game.
Back to Basics
The dinosaurs became extinct because they didn’t have a space program. And if we become extinct because we don’t have a space program, it’ll serve us right!
— Larry Niven
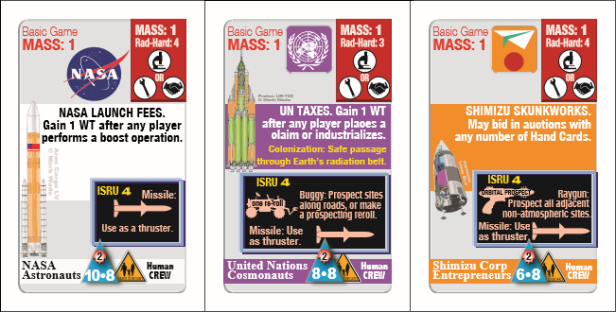
Whatever way you choose to play there are some inescapable tenets of playing High Frontier you need to be aware of to properly put yourself in the right mindset to start your game. Your primary role (who you are in the game) is essentially the CEO of a space program. You’re distinguished by the color of your pieces yes, but more importantly the crew card you start the game with because it lists the name of your agency and what special ability you have in the game. In Colonization, Bernals extend this identity by providing a faction specific space habitat which can also give another special ability unique to you. This can deeply impact your game as you choose how and when to use your particular benefits.
There are two sides to your space program: Administration and Mission Control. These are personal terms in that it allows me to properly categorize what are actions in the game that correspond to the “grounded” portion of my space agency (which is collecting income, researching & selling technology and trading with other players) and which ones address the practical matters of space flight and operations (movement, boosting components from Earth into space, prospecting, industrialization, production, refueling, etc). Administration is what you do to define your strategy and place yourself in a position to achieve your goals. Mission Control is the execution of this strategy as you attempt to accomplish your objectives.
The way High Frontier classifies all these actions boils down primarily to two things: operations and rocket movement. Just about everything in the game that isn’t rocket movement is basically an operation. The exceptions are the so called free actions which are really just a few common sense activities that don’t merit the cost of an entire operation like rearranging your cards, fueling your rocket at Earth, putting a card back into your hand, etc. When it’s your turn to play, you can always move your rocket, however you can only do one operation (barring Colonists, but that’s an entire can of worms I will not open at this time). You need to choose wisely WHAT you’re going to do on your turn. Despite the fact that the sequence of play is simple, the complexity comes in when you’re trying to think several turns ahead as you try to visualize the sequence of operations and rocket movement that will achieve your goals with maximum efficiency (meaning minimal cost and wasted turns).
Because it’s There!
We choose to go to the moon in this decade and do the other things, not because they are easy, but because they are hard…
— John F. Kennedy
How do you formulate a strategy? How do you start? Where do you go? One part of the problem is that your starting card, the crew card, is an important piece but nowhere near enough to get you anywhere by itself. You need technology cards. There are three primary types: Thrusters, which are tech components that dictate how you MOVE your rocket. Robonauts, which dictate how wet a site you can prospect and claim, and the Refinery which allows you to industrialize a successfully prospected site (but must be used in conjunction with a Robonaut to actually create a factory).

These cards have various attributes that impact your strategy. To begin with these cards have letters (top and center). They match up with the letters on the site spaces on the map, that means the card’s black side needs a factory on a site with the same letter to be put into play. Black sides represent advanced technology that can’t be built on Earth, only in space and you need a factory for that. Alexander mentioned water being both fuel and currency. The part that is relevant here is the Mass of a card, the number means how much mass the tech is as a component in a rocket ship. The bigger the number the more costly it is in terms of water to boost to Earth Orbit and the more fuel you’ll need to push that mass in a rocket ship to get it anywhere. Generally speaking Mass is a huge constraint when planning missions. Consider whether that wonderful and fantastic card is worth it at 5 mass points, rather than less flashy cards at mass 2 or 3.
I mentioned robonauts and their capacity for prospecting (in fact crew cards can also prospect), how good it is at doing that is represented by the ISRU rating on the card, anywhere from 0 to 4. Notice that all sites have a number of water drops. The number indicates how easy it is to extract water from it. The more drops, the “wetter” it is. The rating on the card tells you the minimum number of drops a site has to have in order for the robonaut to attempt prospecting it. Obviously a 0 ISRU robonaut can prospect anywhere while a 4 ISRU robonaut will be comet hunting or landing on Mars and Ceres. For the most part the early tech cards (the white sides) will tend to have higher ISRU numbers while the black sides will have lower (better) ones.
Thrusters have a colored triangle with at least two numbers (all crew have thrusters and some robonauts can double as thrusters!). Ignore the color for now. The number on the left is the thrust capability, the higher the better because you can move farther each turn (assuming you have the fuel) and it tells you how big a site it can land or take off from. That number directly correlates to the site size number. A thruster with a value of 7 for example can take off and land on any site size of 6 or less. The second number is efficency, the lower the better because it tells you how much fuel is burned every time you want to make a powered move. Crew are ridiculously inefficient with solid rocket boosters of value 8 efficiency (Talk about a fuel hog). You will find that the most efficient thrusters tend to be low thrust ones. Note that you’re not limited to a single thruster in your rocket, it’s perfectly acceptable to use an efficient low thrust thruster to get to where your going and then switch to the big thrust monster for take offs and landings. Some thrusters may have a third number in a flame above the other two, that means it’s capable of a small boost to thrust at the cost of extra fuel (similar to the way an afterburner in a jet engine works, this is formally called Open-Cycle Cooling).
It’s this combination of mass (how much water is it going to cost to send something into space and move it around), thrust (how big a site you can land/take off from), efficiency (how much fuel do you spend when moving), ISRU (how wet a site is required to prospect and refuel) and letters among all these cards that you need to collect and assemble a workable set for the target sites you have in mind for industrializing. Take into account some sites (particularly with atmospheres like Mars) allow you to parachute down, so big thrust isn’t required to land. One final note regarding site size. Successful prospecting depends on a regular die roll being less than or equal to the site size. This means anything size 6 or higher is automatically prospected and claimed when you make the attempt and anything less involves risk (with comets and their size 1 being the most risky). Some robonauts can mitigate that risk (via re-roll) but generally speaking the smaller the site the less likely you’ll have success.
Keeping all these factors in mind while you try to collect technology will help you decide which targets are worthwhile. Your starting crew card is also a big factor, three of them have thrust 10 which gives you access to take off and land anywhere on the map (assuming you acquire an efficient thruster to get there), size 8 means the biggest target you can land on is a dwarf planet and size 6 means you are mostly restricted to non-spherical chunks of rock unless you acquire tech with high thrust. Only the top card of a deck is available at any time so while you cycle through them there’s a balancing act between getting the necessary technology to reach and industrialize a target or simply grabbing what’s available and see what sites it allows you to land on and develop.
No wonder people’s heads explode despite the deceptively simple sequence of play: just move and take an operation (COIN this game is NOT). The Training Guide has some suggestions of sites to aim for. It’s worth perusing to get an idea of what’s involved.
Going Once, Going Twice…
As I hurtled through space, one thought kept crossing my mind — every part of this rocket was supplied by the lowest bidder.
— John Glenn
HOW do you get cards anyway? Through the Administration part of your space agency. You start the game with 4 water tokens, you primarily get more using the INCOME Operation (add 2 more water tokens to your reserve). These water tokens can be used to bid on technology via the RESEARCH operation. You choose a deck and pick the top card off. You can see its black side and this also lets you know what the next card in the deck will be available for future auctions. All players may bid in the auction. Highest bidder wins, current player wins ties. Assuming you win the auction you pay your bid in water tokens to the “bank”, if another player wins he pays YOU. This can be an interesting way of getting water assuming you read the table right and you drive up the price for stuff other people want.
Finally, one other way of getting water is the FREE MARKET operation. Assuming you have cards in your hand you can sell one back to the bottom of its corresponding deck for 5 water tokens (in the advanced game this price can vary depending on politics). Selling can be important since you’re not allowed to participate in an auction if you hold 4 or more cards in your hand. The market is one way of getting rid of cards but for the most part you want to use your hand cards to advance your space program. This is where Mission Control comes in.
Go Flight.
The most basic way of putting your cards into play is using the BOOST operation. You pay a number of water tokens equal to the mass of the set of cards you want to boost to low earth orbit (LEO) located in the lower left corner of your mat. When you boost cards they usually go on your mat, white side up (always), in the LEO stacking space of your player mat. Note that anything to the left of that is your rocket stack (the cards are considered to be part of a rocket). If you have no rocket on the map, you can use cards on the LEO space, move them into your rocket stack space and place your colored rocket piece on the LEO space of the map (right there next to earth, it even has the word “Start” on it).
Note that the game has other stacks (outposts for example) so it’s possible to build rockets out of those too but your very first rocket will be built from LEO (unless you’re playing with Bernals, but that’s an advanced game module; let’s keep it simple… ish). Cards can also return to your hand from your stacks using the DECOMMISSION free action. Sometimes this is voluntary; when you no longer want the card on a stack and you want to sell it, trade it, etc. Sometimes it can be involuntary when the stack containing the card is destroyed due to a hazard for example.

The most important mechanical aspect of the game is mastering the rocket diagram (yes I know it says fuel strip but that’s a holdover from when that version was actually a strip of paper, diagram is more intuitive). This marvel of cardboard design simulates your rocket’s movement capabilities and distills the complexities of the rocket equation into three markers and a chart. On the top you will find a simple track that displays your current spaceship thrust. Under that, is a chart that looks like something out of trigonometry or physics class. A thick black wavy line moving up and down and towards the right with circles. Along the bottom of the wavy line you have deep blue colored circles with numbers indicating ship mass in points (from 1 up to 32). When you assemble your rocket you must determine the combined mass of all the cards (known as the rocket’s dry mass) using the blue transparent chip on the player mat in the proper numbered circle of the rocket display. If you have three cards and their total mass is 6, you would put your blue chip on the 6 space.
At this point you can add fuel in the form of water tanks to your LEO rocket from your water reserve. You convert tokens into tanks on a 1 to 1 basis. Put the water tokens back into the “bank” and place a blue colored rocket figure on the mat indicating how many tanks of fuel you added. Note this is in addition to the dry mass of the rocket. You start at the 6 space, and if you add 4 tanks, the rocket figure would need to move to the 10 space. This increases the overall mass of the rocket, this is known as wet mass. You have 6 mass points worth of cards and 4 points worth of fuel. Note that when you add fuel, you always add whole numbers of tanks, that is, you go from number to number towards the right (the red dotted lines form a path that helps), in some cases you may have a partial tank of fuel (say 7 1/2) and when you add a tank you’ll end up partial again (8 1/2), just follow the red dotted lines and you’ll be fine.
Fuel expenditures are always in steps of fuel, and you go along the thick black line towards the left of the chart. For example, spending one step of fuel starting on the 8 1/2 spot with the blue rocket figure would mean moving to the whole number 8. Spending one step of fuel starting on the 4 2/3 spot would move you to the 4 1/3 spot. Wait a minute! A step of fuel is 1/2 of a tank around the 8 mark but just 1/3 around 4? Yes. This means that a single step of fuel is not a constant cost, it depends on the rocket’s wet mass. Essentially ,the more massive your rocket the more fuel you are spending as a step becomes more expensive (eventually after mass 25 a single “step of fuel” is two tanks!). Keep that in mind when planning your missions.
Whenever you move your rocket you go through a small procedure to determine what your net thrust is this turn. After that just move and burn fuel as required. Here is how you determine net thrust:
1) Choose WHICH thruster you’re going to use this turn in your rocket (remember your stack can contain more than one and it can be any card with a thruster “triangle”)
2) Place a blue transparent disk on the thrust track in the space equal the basic thrust value of the card you chose (the left side number inside the triangle)
3) If your thruster is capable of open cycle cooling (afterburning, the little flame symbol in the triangle), you can spend steps of fuel equal to the number inside the flame symbol and add 1 to your thrust (immediately subtract this fuel from your wet mass, move that figure).
4) Depending on where your blue rocket figure is sitting it will be in a colored part of the chart that indicates its MASS class, meaning that the high mass effectively makes it harder for your thruster to push the rocket and really low mass makes it easier. The classes have given names to make them descriptive, they are Wisp +2, Probe +1, Scout +0, Transport -1, Tug -2. Whatever the value is, add or subtract to your thrust.
5) Other factors can modify your net thrust. If your thruster is solar powered (indicated by the sun symbol in the triangle, not to be confused with the flame one), you would check where your rocket is sitting and add or subtract thrust according to the solar zone in the map (Mercury zone is +2, Venus zone +1, Earth zone 0, Mars zone -1, etc.).
Note that the writing along the top of the thrust track contains a summary of these steps.
The Right Stuff
That may have been ‘one small step’ for Neil, but it’s a heck of a big leap for me!
— Bruce McCandless
As far as the actual rocket movement goes, it’s not a complex mechanical process, you take your rocket token and move along the path to the next space. If the space is a magenta colored circle you have to pay fuel to enter it. This is called a “burn”, and typically we express how much fuel a destination requires in terms of burns. This is because how much fuel is spent during a burn depends on the efficiency of your thruster. Remember the number on the right side? That tells you how many steps of fuel a burn costs. Just like you moved your blue rocket token figure along the thick black line in the rocket diagram to pay for “after-burning”, you use the same mechanism to pay for a burn.
Look closely at your crew cards and you will find the cost to be exorbitant: 8 steps of fuel for one burn! No wonder you can’t get anywhere with just old chemical boosters! They take an insane amount of fuel to get anywhere. Most thrusters in the deck will be far better than this. Many are rated between 1 and 4.
As you move your rocket figure on the map any time you reach a circle space you are allowed to change your direction along any colored lines. Nominally they should be brown but some are colored to indicate a possible route to an interesting destination. Take for example the orange route to Mercury or the lily colored route to Venus. Remember, each magenta colored space costs a burn. Ignore the radiation figure spaces for the basic game, treat them like an empty circle (it’s one of the advanced game’s hazards that requires you to roll a die to see if your spacecraft is harmed). Note that some routes cross creating intersections (but some don’t actually cross by cutting the route to make it seem like they pass over/under the other route, there are examples below).
These intersections are locations you can also stop at and change direction but it costs a hefty 2 burn penalty to do so. However, if you decide to stop at the intersection and not move, you can wait until your next turn. Then you are allowed to move again in any of the four directions of the intersection for free. This is meant to represent the difference between being in a hurry and making an expensive orbit change or waiting at the intersection to transfer your orbit cheaply via celestial mechanics (which take time, hence the one turn wait). Often the route to cheaply going somewhere involves waiting various turns at intersections in order to conserve fuel.
One final thing to keep in mind is the net thrust you calculated also limits how far you can move in a turn. High Frontier describes the concept as TMP (Thrust Movement Points). Basically you can’t spend more burns than you have net thrust. If you have a 3-1 thruster, even if you load a lot of fuel, you won’t be able to use more than 3 burns per turn moving. High thrust cards allow you to move farther in a turn but typically have high fuel cost, so it is rare to take advantage of it.

The snapshot above shows 3 major destinations: Venus, Mercury and the Moon. Let’s examine each one and their cost that reflects just how hard it is to get there. The Moon is the easiest one since you can get there from LEO via HEO, then the radiation space, finally through the magenta circle with legs and finally the actual hexagon site.
At this point it would be good to point out that the magenta spaces with the circular “space invaders” logo is a special kind of “burn” space called a “lander burn”. It functions exactly like a regular one except you’re not allowed to stay there; it represents the gravity well of a major astronomical body. If you stayed there you would be pulled in and crash. The rules say you can’t enter such a space unless you can reach another space beyond that one. They are always attached directly to a site or daisy-chained together to a larger site (see Venus for two of these in a row). The complementary rule is the take off and landing that requires your thrust to be higher than the site size number. In the moon’s case it’s 9. So you need a thrust of 10 to land or take off. The high thrust 10-8 crew cards can do this, but also hog fuel to make the actual landing (8 steps for the lander burn).
Going back to our routes, we conclude the moon requires 1 burn, 1 lander burn and thrust of 10 or more. You can get around the first burn by using an efficient low thrust card, but the final landing requires a high thrust burn! Similarly for Mercury, if you follow the orange route it contains 6 burns, plus 1 lander burn. At least there’s an empty space you can stop at and use an efficient thruster for most of the trip, but the final landing will require a high thrust burn.
Venus can get around the landing problems by using the parachute route (the dotted line indicates it’s a one way trip to the site). From LEO you go to HEO (burn), move to Earth Luna L3 (burn), Sol-Venus L1, parachute to the acid clouds space (which requires a lander burn) and then parachute further to the actual site. Venus is 2 burns, 1 lander burn and no high thrust requirement. But the lily colored route requires two parachute spaces and a skull & crossbones site (hazard!). These spaces are risky in that you must roll a die to find out if your spacecraft made it safely to the space. On a 1 your rocket is destroyed. Simple and Deadly.
Failure is not an Option!
Danger, Will Robinson! Danger!
— Robot
The game allows you to minimize risk for these hazards. It assumes you can upload expensive and advanced software assisted maneuvers to avoid the problem. Since water is currency, it is paid with water tokens from your cash reserve (NOT The rocket fuel). Each hazard space costs 4 water tokens to automatically navigate it successfully. To make Venus a sure thing, you would need 12 water tokens. That’s rather expensive, depending on the rocket’s thruster you might instead take a more direct burn route and only pay the 4 water tokens for the final unavoidable route and make a powered high thrust landing. To quote Dirty Harry: “Are you feeling lucky punk?”
Note that these are very large size 9, 10 and 11 worlds. Venus is quite dry (no water drops) with Mercury and the Moon having only one of two sites with plentiful water (three and two drops respectively). This means you usually need advanced tech (black cards) to exploit these hard to reach places. You are better off landing on smaller sites with no lander burns (or half of one in the case of Vesta and Ceres).
To exploit a site, you use the PROSPECTING operation. This involves using a card with an ISRU value equal to or lower than the number of water drops on the site. Then you roll a die (which you can’t pay for like hazards!). If it’s less than or equal to the site size then you’re successful and you place a disk of your color on the site if you fail the site is “busted” and you put a blue disk indicating it’s not viable (no one can attempt another prospecting operation on it for the rest of the game). This often means wet (3 to 4 drops) sites of sizes 3-6 generally constitute the early game targets. Even if you are unsuccessful in prospecting a tiny size 1 world, if it has a lot of water drops your ISRU card can refuel your rocket with an operation. For this reason Deimos, one of Mar’s moons, is considered to be the gas station of the solar system; it is easily reachable from Earth with two burns and landing on it can be done with nearly any thruster.
Speaking of refueling, that’s an operation as well, or rather SITE REFUEL is. You can freely add any number of water tanks to your rocket on LEO (up to whatever water tokens you have in reserve). But if you’re on a site, then a only card with ISRU capability can refuel your rocket. The number of water tanks you can add is 1, plus the number of water drops minus the ISRU value of the card. In other words if you can prospect a site, you can refuel (even if it’s busted, you can still refuel). Otherwise you can’t. Unless you add dirt to your rocket. Wait what? Dirt!

Most thrusters or cards with thrusters have a blue triangle. That indicates you need water as fuel. Keep in mind, we really mean propellant; reaction mass you throw out of the spaceship so you can push against something and move forward. Newton’s third law is very much a going concern. Some thrusters have a black triangle indicating they can use dirt. You can add dirt easily enough from just about any site and you don’t even need ISRU for it. You can add up to 10 tanks per operation. If you perform site refuel at a Factory, you’re allowed to add up to 20 dirt tanks or 8 water tanks to a more conventional rocket. To indicate you are using dirt you use the (you guessed it!) black rocket figure on your rocket diagram.
My God, It’s full of Stacks!
Up till now we’ve discussed only two stacks, LEO and the Rocket Stack, but the diagram allows for two outpost stacks (and a freighter stack, but let’s not get ahead of ourselves). These are are similar to LEO but allow you to park or otherwise simply place boosted components in a different space on the map for safekeeping. These are your storage lockers… in Spaaaaace. Creating an outpost stack is as simple as moving one or more cards from a different stack (usually your rocket) to one of the outpost stacks. Doing so is a free action. The usefulness of an outpost can’t be overstated. Your rocket doesn’t need to come back from where you send it to. You can always convert it into an outpost and create a new Rocket someplace else. It provides great flexibility for planning missions in stages.
One of the most common problems I see new players run into is trying to successfully send a very large rocket (mass 15 or more) to a destination (trying to take everything but the kitchen sink with them) but run into all sorts of mass and fuel problems. Nothing in the rules say that you have to send everything in just one flight. Your space program can easily send components to space in stages to minimize fuel and mass requirements and place them in outposts as you go along. This is especially useful if you have cheap thrusters that are basically disposable. In other scenarios maybe you have a great but expensive rocket, in that case you can always refuel it on the site and send it back to Earth to pickup the refinery or other follow up components. The point is to be flexible and not stuck on a particular way of doing things.
Half the fun of High Frontier is figuring out the puzzle of how to go from A to B as cheaply and as quickly as possible. Do you do one trip or multiple trips? Do you decommission the thruster to recreate it back on Earth or do you refuel it and send it back? Do you park your stuff in a useful mid-way point, assemble and THEN make the final trip to the site you’re exploring? Do you send out a small rocket as a probe to explore sites, gain a successful claim and THEN send the big rocket? The possibilities are endless.
So you want to Build a Space Factory
Mars has been flown by, orbited, smacked into, radar examined, and rocketed onto, as well as bounced upon, rolled over, shoveled, drilled into, baked and even blasted. Still to come: Mars being stepped on.
— Buzz Aldrin
Once you put a claim disk on a site this allows you to build a factory on it once you have a robonaut and a refinery on it. This is an operation called INDUSTRIALIZATION. What trips most players is the fact that you don’t need to have matching letters on your robonauts or refineries to build a factory. It’s only required to have a matching letter for producing a card on the factory site. This is what allows you to use the black side of a card and its advanced technology. You have small cubes that represent factories and you place them on your claim disk to represent them. The robonaut and refinery go back into your hand (via DECOMMISSION).
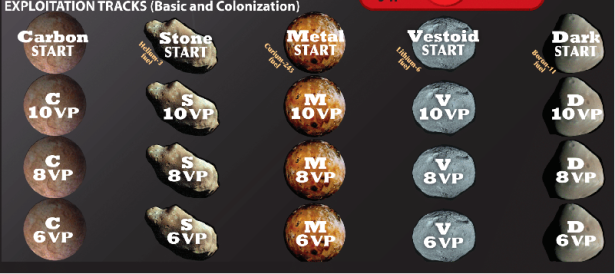
Cubes and disks are worth 1 VP each. In addition, factories of each letter are worth additional VPs according to how many are on the map. You keep track of this with blue disks on the table marking the appropriate number. If there’s only one it’s worth 10 VPs. For two factories you shift the marker one row down, for 8 VPs. If there are three or more then the factory is worth 6 VP. This is important in that as factories get placed on the map they diminish the value of existing factories (and the value of black cards, see below).
As an aside, crew cards can be returned to your hand if they are at a factory in order to form a space colony (there’s a figure for that too). These add more points for you. I bring it up because crew cards are the only card you normally aren’t allowed to simply remove from the map (via DECOMMISSION). It’s one thing to discard rocket components in space, it’s quite another to simply toss away astronauts… unless you’re China!
If you build it, they will purchase it.
I am proud to be part of a species where a subset of its members willingly put their lives at risk to push the boundaries of our existence. They would have been the first to leave the cave and see what was on the other side of the cliff face. They were the first to scale the mountains. They were the first to sail the oceans. They were the first to touch the sky. And they will be the first to land on Mars. But somebody has to write the check. When nobody writes the check, we stall on the last broached frontier.
— Neil DeGrasse Tyson
The operation that puts black cards on the map is called E.T. PRODUCTION (Yep, extra terrestrial). When you produce such a card it must go on a stack, you can either put it in an existing stack that is in the same location (typically a rocket stack that just delivered the refinery to build the factory). You can also create a new stack with the card assuming you have one available; rocket, outpost or freighter. Yes let’s talk about the freighter stack. In the basic game the freighter stack represents this very simple propulsion mechanism with a huge water balloon (fuel) that can carry one component card of any size. It’s almost like a very basic rocket except that the thruster is a completely abstract 1-0 component (meaning you don’t track fuel for it) and you don’t apply any other kind of thrust modifiers to it. It’s represented on the map with a big cube of your color and it basically moves one burn per turn. Note that this movement is in addition to your rocket movement. You’re not forced to choose either your rocket or your freighter, you can always move both.

Once you move the card from the freighter stack to another stack (outpost, rocket, LEO) then the freighter ceases to exist and the big cube is removed from the map. Note that this advanced tech can be used by your space agency like any other component card in a stack or sold via the FREE MARKET operation (just like you would any card in your hand) as long as the black card is in LEO. The value of a black card is the same as the VP on the resource exploitation table. This can give you a considerable amount of water tokens.
Aside from building factories, claims enable you to acquire one of the various Space Venture cards. They require you make 3 or 4 claims with the same letter to collect the associated venture. This is worth 3 victory points. You can spend 5 water tokens to flip the venture to its other side and it will confer a special ability in addition to its VP value.
To Infinity… and Beyond!
In the long run, a single-planet species will not survive…
— Michael D. Griffin
This covers the tip of the Iceberg. This is enough knowledge to get traction in a Basic Game. Making space factories is the primary way to get victory points. Claims by themselves also give you points. The Space Venture cards give you a further boost. I have yet to mention the Glory cards. These feats primarily involve sending a human crew to some location and then bringing them back to Earth for the ticker tape parade. That involves getting the human crew to the proper site, and then returning to LEO. Once there you’re allows to put the card back into your hand and claim the proper glory card.

There isn’t one for landing on the moon (we did that already!) , but you can get one for Mercury, Mars and other major bodies of the solar system. Some involve scientific discoveries (for which you may need to roll or prospect a particular type of site). They enrich the narrative of your game so that it’s not all about being Space Henry Ford. There’s even one for performing a Heroic feat which is purposely vaguely defined so that all players have to agree on what it is to award the card. It usually involves a stunning landing overcoming hazardous odds or exploding in a blaze of glory (hah!).
This wraps up my already exceedingly long post introducing the “High Frontier”. There’s plenty more to write about. The Legacy game, Colonization, Space Habitats, Colonists. Futures, Rockets that can zoom from Earth to Pluto in a single turn (yes really!).
Stay Tuned…
-Francisco

Would you consider High Frontier a “game” or more a “simulation?” Important to me because I sorta want it for my son but can’t figure if it is fun way of learning or really a cardboard textbook.
LikeLike
It can FEEL like a cardboard textbook if you jump into the deep end of the pool from the beginning. It definitely leans more on the simulation side, but it’s still a pretty good game. I will write in the future about how use High Frontier 3rd edition to play “Legacy” High Frontier (2nd edition style plus expansion).
LikeLiked by 1 person
This game is on my wish list. I’m intrigued by what it has to offer, from reading articles like this.
LikeLiked by 1 person
This is Phil Eklund, former aerospace engineer and designer of High Frontier. For the next edition, High Frontier 4, we are considering publishing a modular series of games, the basic game plus add-ons, so the customer can buy the desired level of complexity. Wondering what potential customers think about such an approach?
LikeLiked by 3 people
I’m all for more customer choice, though I’ll probably get everything because I’m that kind of guy 🙂
LikeLike
I think it is a good idea for spreading the game more.
My experience was really positive when I brought the game in my local gaming association. A lot of people wanted to learn the game just to try something that seems a NASA rocket simulation.
The basic game has quite a good fanbase, many gamers I know will just buy the basic. It is not more complex than many more modern boardgames.
LikeLike
Thanks Raffaele.
LikeLike
I’m an all-in kind of guy, but I think this makes sense to improve ease of entry for what appears to be a complex game. If you need a play tester, I’m desperate to try this game…
LikeLike
I would prefer to have a full base game of High Frontier, plus perhaps an expansion, but something whose size is bounded — not like some living card came or the more recent games of Victory Point Games with multiple ‘booster packs’ following a games release.
LikeLike
We are now deep into the design of High Frontier 4 edition, with an emphasis is on ease of introduction. The Kickstarter date is October 27. There will be an Introductory Game “Space Diamonds” introducing movement in the High Frontier universe, both with and without fuel. There will be a Tutorial Playthrough: “Race For Mars”, that introduces patents, rocket design, prospecting, and factories. The Core Rulesbook introduces events and supports. Perhaps 4 expansion modules: Commerce (Freighters & GW thrusters), Colonization (Colonists & Bernals), Politics/Combat, and Interstellar.
LikeLike
Thanks for the in depth review Francisco — I very much enjoyed it! I fell in love with the idea of owning this game from the moment I saw the 3rd Edition board, but this game is difficult to find at the moment. It must be popular, its out of stock everywhere I have looked.
LikeLike
The 4th edition of High Frontier is due for release next year.
LikeLiked by 3 people
Fantastic! I’ve been desperately trying to find a way to play 3ed without paying $300 for it. I have the rules and the vassal map and I’m in the process of getting board and players aids printed, but I’ll have to use VASSAL to do the cards, because I can’t find image/pdf files of them anywhere. But a 4th ed next year would make all this unecessary…
LikeLike
For the gamer with a keen interest in gaming and astronomy seek the road that best suits you. The High Frontier is a very good documentary about the life and work of Gerard K O’Neil and his impact on modern space exploration.
LikeLike