
In our first Action Point covering Old School Tactical: Volume 2, we looked at the various types of combat, including Fire Attacks, Fire Groups and my personal favorite, Melee. In this Action Point, we will take a look at the Impulse Point System that drives the action in the game as well as some of the more interesting aspects of the Old School Tactical: Airborne Expansion.
Impulse Point System
The game runs on an Impulse Point System that is intended to simulate the uncertainty and confusion present on the battlefields of World War II. In my humble opinion, the Impulse Point system is very revolutionary and does a very good job at its stated purpose simulating the difficulties and uncertainty of battlefield command. The amount of Impulse Points that each side has to work with each round is determined by a dice roll during the Turn Sequence. Each side rolls a number of dice depending on the scenario and its circumstances, and then marks that number on their Impulse Points track to use over the course of each round.

In the picture above, I am trying to show you how each scenario gives information on the number of IPs that each side has. At the top, you will see the greyed in bar that contains the information about the Gut Check and Impulse Points for the German 91st Infantry Division and at the bottom the same information for the 82nd Airborne Division. As you can see, each scenario gives a number of d6 that will be rolled to determine the IPs available to each side. In the scenario shown above, the 101st Airborne has a slight advantage as they will roll 4d6 as compared to the Germans who will only roll 3d6. This means that the Americans will have 4-24 IPs as compared to the Germans only having 3-18 IPs. The difference from scenario to scenario varies. In some scenarios, the American units only have 1d6 while the Germans have 3d6, etc. Sometimes, the Impulse Points will read as follows, 1d6 + 6 which means you will roll 1d6 and add 6 IPs.
These IPs are then used in order to activate individual units or stacks of units to take actions such as Move, Assault Move or Fire. Each of these actions costs 1 IP, or if moving or firing an entire group, it will cost 2. The Impulse Point System is designed to simulate the rigors of battle including poor communication, lack of ammunition, fear or courage under fire and many other considerations that existed during combat. This system can be extremely frustrating at times, especially when you roll poorly and end up having only 2 or 3 points while your opponent rolled extremely well and has 15 units. This means that you will be able to take less actions this round while your opponent gets more. More actions leads to greater results on the battlefield and can truly determine the outcome of the game. If a player has less IPs than his opponent, he can pass his turn and take no action without losing a point. If a player has more points and decides not to act, then they must sacrifice one point that round. This part of the system is really good as you have to decide how best to use those points. Do you wait to perform an Opportunity Fire on your opponents move when they come into range and are caught in the open with no terrain benefit? Or do you seize the advantage and move across an open field in order to take up defensible positions in that small structure before your enemy can benefit from it? Great decision points with this system that create significant opportunities for strategy and definitely an aspect that doesn’t feel “old school” but more modern.
One of the major differences in Old School Tactical from many other older wargames is the difference in the use of the Impulse Points where each player moves one unit or a group of units and then it is the other players turn. The Opportunity Fire is a further step away from ‘old school’. When an enemy unit or units are moving, the other player can announce a halt in their movement at any point and may Fire at those units if they are in Range and their is a Line of Sight to the target. This action requires 1 Impulse Point and if the attack misses and has no effect, the group may continue their movement to the end. During the Opp Fire, the attacker can only target one unit in the group but may fire on that group as many times as they have IPs and while the moving unit hasn’t reached its final movement hex. I love Opp Fire and its proper use can truly affect the outcome of a battle more than direct Fire Attacks as when units are moving they are generally out in the open, rather than hunkered down behind a Stone Wall and their defense is easier to overcome giving the attacker better columns to consult on the ICT which leads to generally more lethal results.
The big benefit that the Impulse Point system has over its counterparts is the level of engagement of the players. You no longer have to wait for your opponent to move all of their units before you get a chance to move yours. Old School Tactical forces you to pay attention to each and every move your opponent makes and to constantly survey the board and plan your reactions. I think that you would have to work pretty hard in OST to not be be engaged due to the fact that at any moment, your opponent could make a critical miscalculation or assume you aren’t paying attention and move an inviting target within range and in Line of Sight of one of your units allowing an Opp Fire action. The Impulse System is as close as you are every going to get to recreating a real-time battle on the table.
As you can see, I really enjoyed the use of the Impulse System. It is very different than the more traditional I-Go-You-Go prevalent in many older wargames and is definitely a more modern design that works very well with this game. One very interesting aspect of the system is the pass rule, where if you have less IP’s than your opponent, you can decide to pass without having to forfeit one of your points. Normally, if you decide to pass, but have more points than your opponent, you have to spend an IP to do so. This was a great design choice as it really does make a good attempt to address any discrepancy in IPs due to an unfortunate low roll.
Now, onto a look at some of the Airborne units actions in the Airborne Expansion.
Aircraft Loadouts, Flight Paths and Paradrops
Isn’t this the reason we play these wargames? To relive history and to experience some of the more interesting and unique elements of various conflicts. I have always had a great interest in the Airborne forces used in World War II. What a daring and innovative way to wage war. I have played lots of games that involve Airborne troops. Most recently, I enjoyed my play of Holland ’44: Operation Market-Garden from GMT Games. In fact, it made it into my Top 10 Wargames of 2017 at #8. But, the Airborne Expansion for OST Volume 2 has some pretty interesting elements added to the game to cover this part of the history of World War II.
The Airborne are at their heart, elite mobile troops that can insert themselves behind enemy lines to attack key elements, such as long range artillery and communications facilities, ahead of larger invasions. To do this, they utilize C-47 aircraft that carry them over their drop zones and deliver them directly onto the battlefield ready to fight at a moments notice.
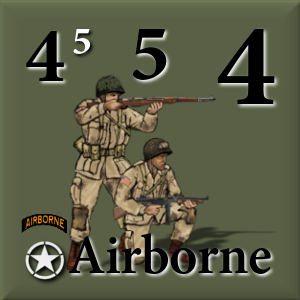 First I wanted to show you one of the Airborne units. As you can see, they are pretty hardy troops with the standard 4 Fire Power and 4 Move that is on par with other Rifle units. Where they are considered better is in their Defense. Rifle units have a Defense of 4 as compared to the Airborne units Defense of 5. This may not seem like a big difference but it really is and makes a huge difference in the Infantry Combat Table, as remember, every Fire Attack in OST uses the following formula: Attacker Fire Power (FP) – Defender Defense = Attack FP. So, when being Fired upon, the Airborne units can be tough to hurt as they will take away at least 5 from the enemy FP, plus more if they are used smartly and are holed up in covering terrain that offers a defensive benefit such as Light and Heavy Structures, Woods or Brush or are moving behind covering Smoke. The real advantage that they have over their German enemy though is in their Gut Check value. In 5 of the 6 Airborne scenarios, the Airborne have a 6 Gut Check as compared to a 7 or 8 for the Germans. This means that they will ignore the placement of a Shaken or Broken counter more often than their enemies. This is powerful as it allows them to be a bit more aggressive without having to worry so much about the effects on their fighting prowess.
But, back to the Aircraft Loadouts. A C-47 aircraft can hold up to 3 squads or crewed Machine Guns plus any attached Support Weapons and Leaders. Also, you can carry up to one crewed heavy weapon such as an Anti-Tank Gun. When the aircraft is loaded, you will simply stack the counters of each unit in the order that they will be dropped from the aircraft with Leaders on top of the unit it is attached to and the Support Weapons below the unit. The top most unit will be dropped first and he must be ready to be fired upon so I tend to drop my units with the Leaders attached first.

In each scenario, the setup of your aircraft will be identified. The aircraft must be a minimum of 4 hexes apart, so as not to have midair collisions I suppose, and once they are all placed on the map, the aircraft must all fly in the same direction and will follow the flight path straight ahead based on the direction of the red triangle in the front of the C-47. It is important to remember that ground troops cannot engage the aircraft as they follow their flight path. No antiaircraft guns in OST!

The aircraft will then move 3 hexes and at the point that each of the 3 hexes is entered, the passengers will be paradropped. In our example picture, the flight path will include hexes MM11, LL12 and KK12. Each of the units will drift automatically from the hex that it jumps from the plane. The player will roll 1d6 to determine the direction they drift, using the direction marker on the map, and then roll an additional 1d6 to determine the number of hexes in that direction. As the C-47 makes its first of 3 moves, it will first enter hex MM11 and the hex that is just to the north of it will be hex MM10.
To illustrate what I am trying to describe, I will use the picture below. So, as the C-47 moves into the first hex, I roll 2d6 (I used one black die for the direction and one white die for the number of hexes drifted) for the first unit that jumps which is the Airborne unit with the attached Leader Lt. Corbett. I roll a 4 (black) and a 2 (white) which places that unit in hex MM13. Remember, the first die is the direction based on the six hexes around the C-47, with the northernmost pointing hex being 1. So, when I rolled a 4, I moved around that dial four spaces. I then refer to the 2nd die as the distance that my nit will drift in that direction. In this case, I rolled a 2 so I move two hexes straight out from the hex. If the terrain that the unit lands in is not open, it will be considered a hard landing. The owning player will look at the type of terrain landing in and then roll an attack on the Infantry Combat Table. If the terrain is structures, either Light or Heavy, Woods, Orchards or Streams, the -3 Column will be consulted. If the landing terrain is any other terrain, the -5 Column will be consulted. I was lucky and landed with this unit in Bocage and rolled on the -5 Column. I rolled a 7 on 2d6 and no result occurred. I followed this procedure for all three units and all three units landed in Bocage and rolled low enough not to experience any damage. I was lucky but it also was a result of proper planning!

One other particular, if the Airborne units paradropping land in or adjacent to a hex with an enemy unit, that enemy unit gets a free attack against that landing unit. This attack is only at half Fire Power but happens before the landing, so it is possible that they are attacked for free by the enemy and take damage and also land in difficult terrain and take damage before they are even in combat. This can be really nasty and I don’t recommend it so make sure you plan ahead and keep the worst case scenario in mind when you choose your flightpaths. As you can see, this is somewhat random and it is important for you to choose a good flight path to avoid being attacked or landing in damaging terrain. But, remember you don’t want your units to land and be in the open where they are easy targets either. Very interesting way that this was handled in the design and I like it very much.
I hope that you enjoyed this look at the Impulse Point System and the new Airborne Expansion for Old School Tactical Volume 2. If you want to learn more, you can check out our unboxing video to get a better look at the components and also check out our video review with our quick thoughts on this take on tactical combat that we like very much.
-Grant

Grant thx much for describing the impulse points system. Sounds very intriguing; perhaps this is the Old School game I’ve been looking for since Squad Leader got way too complicated for me back in the early 80’s. 😀 I actually like like Combat Commander system a fair bit having played it last year after getting back into board gaming. but I HATE it’s modeling of squad support weps ala LMGs etc. Hoping OST does that better.
LikeLike