
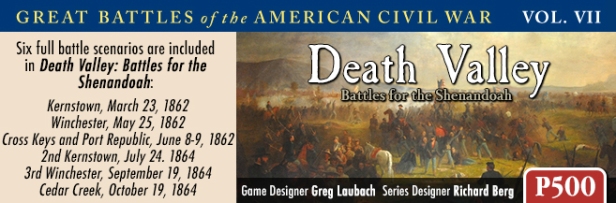
When I first saw Death Valley: Battles for the Shenandoah from GMT Games appear as a new P500 offering in their September Monthly Update, I knew that I had to have it! Obviously, many others felt the same thing as the game “made the cut” with 522 orders in about 40 days (currently has 659). I love wargames, but don’t have a ton of experience with Civil War games. I own and have played The U.S. Civil War from GMT Games, but haven’t really explored this history much to date. Well, it looks like this is my opportunity and this game looks really good. I reached out to Gene Billingsley with GMT to see if I could get a connect to the designer Greg Lauback and he provided my information and I got a contact back, not from the designer, but from Bill Byrne who is acting as Game Developer. I haven’t had that happen often but I will take information however I can get it and Bill did a really good job in answering my questions, as well as providing some really cool and nice looking pictures of the game in progress, both on the table and from Vassal. Keep in mind that all components, counters, graphics, etc. used in this interview are of playtest quality (although I think they look really great) and are not yet finalized. So, without further ado, I present to you Mr. William Byrne and a little bit about Death Valley:

Grant: Bill, thanks for answering the call to discuss Death Valley. First off tell us a little about yourself. What games do you like to play? What games have you either designed or acted as the Developer for?
Bill: Compared to a lot of guys I’m a relative newcomer to the hobby, having started in earnest about 15 years ago. I bounced around for a while finding my niche, but in 2007 settled on the American Civil War at the tactical/grand tactical level after reading Shelby Foote’s trilogy and discovering Richard Berg’s Great Battles of the American Civil War. Apart from GBACW, I enjoy the Gamers’ Civil War Brigade Series and GMT’s Musket & Pike, and look forward to exploring Richard Dengel’s Rebel Yell.
Death Valley is my first effort at development. Just for the record, I am “Game Developer” for Death Valley. John Alsen is GBACW’s series developer.
Grant: What is so vitally important about a Developer? What is the responsibility of the Developer in the design process?
Bill: Death Valley‘s progress has made it clear to me that war games take a lot of work to create, even if they’re parts of established series. Maps, orders of battle, scenario research, special rules, playtesting, and proofreading all take time.
I’d say it’s the need to divide the labor and have a second pair of eyes that leads designers to seek a developer’s assistance. While each Designer/Developer team probably works out its own modus operandi, my main foci have been proofreading, organizing the playtesting, and suggesting special rules which, although historically based, channel each scenario in the direction testing indicates it needs to go.
Grant: What events from history does Death Valley focus on?
Bill:Death Valley features multiple battles from Stonewall Jackson’s 1862 and Jubal Early’s 1864 Shenandoah campaigns. It also includes the Battle of New Market, which preceded Early’s arrival in the Valley.


Grant: How did you come to be partnered up with Greg Laubach on this design? Why do you guys work so well together?
Bill: When I was a GBACW newbie playing Gleam of Bayonets, my opponent would refer rules issues to Greg, who not only authored the Cyberboard gamebox we were using, but gameboxes for just about every entry in the series. Besides rules counseling, Greg was kind enough to give me some CB tips. At some point we started PbEM’ing scenarios from Red Badge of Courage and Dead of Winter. Before long, we were attempting to devise a variant for Baton Rouge that dispensed with the “Turn Continuation Table” featured in the original.
While the Baton Rouge variant played to mixed reviews, it set a precedent, and I was eager to help when Greg started designing Cedar Mountain for the GMT series. That project prompted Richard Berg to dust off his South Mountain design and pair it with Greg’s in the Twin Peaks package. I learned plenty from the Twin Peaks experience and jumped at the chance to again assist Greg when he began work on Death Valley that same year (2014).
Greg is currently GBACW’s prime mover. That would be reason enough for a fan of the system to do everything possible to help him out, but for me it’s only part of the story. When you work with a guy for so long, you get to know something about him. That process has been a joyful one for me, including two visits to Greg’s abode on the Texas coast. On top of that is the thrill as Death Valley takes shape. Looking back it seems remarkable we’ve come this far. I still have to pinch myself occasionally to make sure I’m not dreaming. It’s not every day you share that kind of experience with a fellow hobbyist.

Grant: What criteria were used to decide which battles of the 1862 & 1864 campaigns would be used in the design?
Bill: Given what Death Valley does cover, it’s more a question of the criteria used to exclude battles. Among the 1862 battles, McDowell was fought on such rough terrain, and the two sides were so mismatched in armaments, that we doubted GBACW could handle it without a disproportionate effort for a battle that small. Front Royal was also too small, as were the 1864 battles of Berryville and Charlestown. Toughest to decide has been the choice between Cool Spring and Fisher’s Hill.
Grant: Was there a battle you really wanted in the game but just couldn’t make work?
Bill: Not yet, but let me get back to you — we’re still working the kinks out of a couple of them!
Grant: What battles are included from the 1862 campaign? From the 1864 campaign?
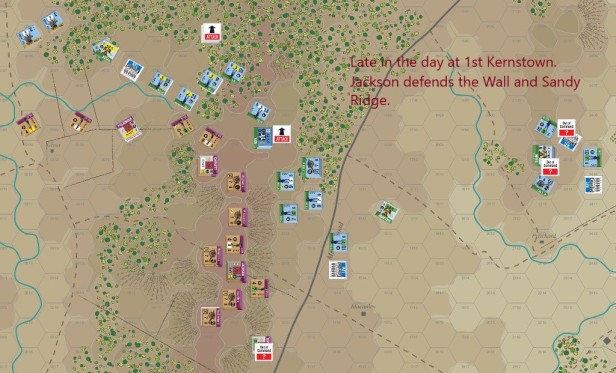
Bill: The battles included in 1862: 1st Kernstown, 1st Winchester, Cross Keys and Port Republic.
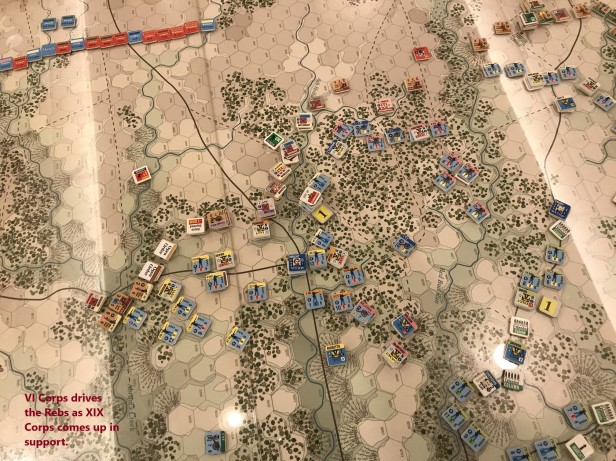
1864: 2nd Kernstown (including Rutherford’s Farm), 3rd Winchester, and Cedar Creek.
1864 battles to be added: New Market and Fisher’s Hill.
Grant: What was significant about those battles chosen for inclusion that you wanted to model?
Bill: Stonewall Jackson stunned the western world with the audacity of his 1862 Valley campaign, rocking the North’s newly-won confidence. Yet, our hobby has completely ignored 1st Winchester, and while older versions or precursors of GBACW covered 1st Kernstown, Cross Keys, and Port Republic, these battles deserve an updated treatment.
Similarly, the Battle of New Market, although almost as small a clash as 1st Kernstown, attained legendary status due to the participation of the Virginia Military Institute cadets under the command of John C. Breckinridge, former vice-president of the United States. I know of two company-level games covering New Market, but we didn’t want to miss this one.
Lastly, Jubal Early’s 1864 drive to the gates of Washington partially dislocated Grant’s effort at Petersburg, exactly as Lee hoped it would. When Union forces prematurely broke off their pursuit, Early badly embarrassed George Crook at 2nd Kernstown. Grant responded by giving Phil Sheridan an army big enough to clear the Valley, but despite 1:3 odds, Early nearly fought the Yankees to a standstill at 3rd Winchester. Although Sheridan then routed the Valley Army at Fisher’s Hill, Early came close to turning the tables four weeks later at Cedar Creek. Of these four battles, our hobby has covered only Cedar Creek at the regimental level. I don’t think there’s anything at all on 2nd Kernstown or Fisher’s Hill.

Grant: I know the system used in Death Valley is based on Richard Berg’s original GBACW. Why do you feel this tried and true system models Civil War battles so well?
Bill: In my opinion, the modern version’s chit-pull activation mechanism, variable “Efficiency”, and restrictions on changing orders combine to produce a nerve-wracking Fog of War. A given series of activation draws can produce the tactical upsets which so frequently occurred in these battles, but which are less likely in an IGO-UGO system. At the start of a given turn you have a good idea of your own capabilities, but your opponent’s are a mystery. The veil lifts only gradually, as the turn progresses. A skillful GBACW player must therefore think in the longer term, hedging his bets until he has sufficient information to justify risks. Sure, there may be instances in which you know the other guy has shot his bolt. That may lead to dramatic success but happens only about as often as it did in reality.
Grant: I understand the rules used in Death Valley attempt to compare the development of the cavalry, and the changes in infantry and artillery organization and tactics in 1862 and 1864. How does this happen?
Bill: The comparisons are not explicit. Rather, the rules governing the three arms reflect organizational differences between 1862 and 1864. Advances in armaments and tactics account for the rest.
In the 1862 battles, artillery is attached to brigades or divisions. In the latter case they can be parceled out to brigades. There are still plenty of 6-pound smoothbores and 12-pound howitzers in use. By 1864, artillery is attached to corps, artillery brigades or battalions can be parceled out to divisions, and Napoleons and 3-inch ordnance have largely replaced the older models.
Much of the infantry in Death Valley‘s 1862 battles carries smoothbores or rifled muskets of European manufacture. In the 1864 battles, they’re all toting better rifled muskets, except for the U.S. units equipped with repeaters. But the big change is in the tactical realm. While the 1862 battles include optional Skirmishers, just as Twin Peaks did, the 1864 battles feature a formation new to GBACW, Open Order, which seeks to simulate the looser formations used later in the war.
The Confederate cavalry has the edge in the 1862 battles, but both sides’ horsemen are best advised to stick to screening, unless they can catch an enemy unit isolated and disordered. By 1864 the Union cavalry is better organized and carries improved carbines or Spencers. When they dismount, it’s best to steer clear of them, unless you can adopt Open Order. Confederate cavalry can no longer compete, although the Reb “mounted infantry” can dish out plenty of pain, if they can dismount in time.
Grant: What elements are important to include to properly model cavalry?
Bill: Whether mounted or dismounted, 1862 cavalry was pretty much toothless versus infantry. I think Death Valley continues the good work Twin Peaks did in depicting this. What’s more, cavalry was expensive, and Death Valley does Twin Peaks one better in this respect — lose a cavalry strength point, and it costs you a victory point.
1864 cavalry is a different matter. The Union cavalry is armed to the teeth and likely to exact a stiff toll even if it meets with a bad end. Its elan (cohesion) is significantly better than in 1862. The Confederates are so outnumbered in 3rd Winchester that they must use their cavalry. Problem is, most of it isn’t really cavalry, but mounted infantry. These guys fight well enough on foot, but are likely to get hurt if they ride into battle.

Grant: How does the Activation System work? Why do you think this is a good way to model this phase?
Bill: The GMT version of GBACW uses a chit-pull mechanism to activate what are typically division-sized formations. How many times a given division will activate depends on several factors, not all of which are predictable. And when it will activate is, of course, unknown, except for the first activation of the turn.
This mechanism captures the era’s command & control problems in a more playable way than any other I’ve seen. It can produce the kind of sudden tactical upsets which characterized 2nd Manassas, Chancellorsville, the Wilderness, and the Petersburg Breakthrough battle; on the other hand, it can also thwart a player’s expectation of achieving such feats.
Grant: How do you go about the process of assigning efficiency ratings to various commanders?
Bill: We consult the secondary sources (including Blue & Gray magazine, R.I.P.), taking into consideration a given commander’s overall record as well as his performance during the battle in question.
Grant: One thing that intrigues me about the rules is the refused flanks option. How does this work?
Bill: By way of preface, let me say that what I like best about GBACW is the array of tactical choices it offers players. Each has its advantages and disadvantages. Refused flanks are a case in point. A unit can increase its “frontal” hexes from two to three by spending a movement point to Refuse its flank. However, that does not increase its overall firepower. Instead, it must split its firepower between its regular frontal hexes and its Refused frontal hex.
Grant: Also, how do extended lines and extended columns affect the battlefield? Why was this important to include?
Bill: GBACW allows up to seven strength points (350 men) to fire from a hex. Some regiments are quite a bit bigger than that. They can increase their firepower by extending their line. In fact, that’s the only way the Fire Table’s more lethal columns come into play. Additionally, those big regiments are choice targets for artillery unless they extend. As stated earlier, however, you gotta take the bad with the good. Extended Lines are far more unwieldy than one-hex units.
Regiments larger than seven SP must use Extended Column when under “March Orders” (think column of fours). When under “Advance Orders” (think ordre mixte, as in the French Revolutionary wars), big regiments must extend if they wish to benefit from thoroughfare movement rates. Even then, they cannot move as quickly as units under March Orders. Whether under March or Advance Orders, such units are, of course, more vulnerable when extended. There’s rarely a free lunch in GBACW.
Grant: How does combat work? I understand there are various range DRMs. Why is this important to include? Doesn’t it just bog down battle?
Bill: Combat is of two types, fire and assault (Shock). Each weapons type indeed has its range DRMs. Whether this bogs things down is a matter of taste. I happen to revel in the details.
All other things being equal (which is often not the case), fire combat features both the “phasing” and the “non-phasing” units firing simultaneously, with the results being applied after the fire rolls. Each phasing unit moves and/or fires separately, and there’s no limit to how many times the phasing brigade can target a given non-phasing unit. The latter can withhold all or part of its “Return Fire” for use versus later assailants, but will typically fire with everything it has the first chance it gets. While the Phasing units tend to have the advantage, a non-phasing unit will take only so much punishment before retreating, which usually means living to fight another day.
When the phasing brigade completes all fire & movement, it may opt to Shock. Depending on their orders, the defenders may or may not be able to Retreat Before Shock. If they cannot or choose not to, they may still flinch, with more or less dire results. If they manage to stand at all, they can fire at their attackers, and in some cases may repulse them before the shock hits home.
Shock is a two-edged sword, of course. The attacker may heavily damage the defender and can sometimes sweep away (rout) multiple defending units; on the other hand, he will never end Shock in as good shape as when he started, unless the defender runs away before the actual attack. If things really go wrong, it will be the attacker who flees the field (routs), which can have dire effects on adjacent friendly units. As a player will typically refrain from Shock if such a setback is at all likely, it’s the defender who usually does the sweating in such instances.
Grant: How does Shock Assault work with mounted cavalry?
Bill: If under Attack Orders and terrain permitting, mounted Cavalry has a chance of “Charging”. It gains certain advantages thereby. If ineligible to charge, mounted cavalry may still Shock in the same manner as infantry. Whether charging or Shocking, cavalry disordered at any time during Shock suffers “Blown” status afterwards. While Blown it’s particularly vulnerable. The rules for Blown Cavalry sort of flew under my radar until I started playtesting our 1864 battles. Their heavy emphasis on cavalry quickly cured my blind spot.
Grant: What optional rules are being considered in the design and why?
Bill: It’s more a question of what we’ve done with existing optional series rules and at least one basic series mechanic.
Small-arms ammo depletion has always been a GBACW optional rule. It is in Death Valley, too, except in our 1st Kernstown game. But we’ve compressed GBACW’s four-step depletion mechanism into two steps. Thus, incurring even the first step is a severe handicap to effective fire. We expect less fire overall, as players will opt more often to spend an activation resupplying their “Low Ammo” units, rather than firing with them and risking “No Ammo” status. Less fire is just fine, as we tend to fight our cardboard armies to the last man in any case.
Fatigue is optional in the GBACW series rules, but not in Death Valley. Players can do what they want, of course, but we do not wish to encourage practices we feel compromise the system’s simulation value. Would players ignore “formation hits” in GMT’s Musket & Pike?
As in Cedar Mountain, Greg’s stacking rules do away with the limit on the number of units which can stack, while retaining the limit on strength points. The reason is simple: by 1864 Confederate regiments were often mere shadows of what they’d once been. If we were to use the system’s stacking limits, the Reb lines in those later battles would often constitute no more than a “thick skirmish line”, and they’d almost never win a shock combat versus the mostly beefy Union units.
 Grant: What Special Units are included in the design? How can they affect the outcome of battles?
Bill: The 1862 battles feature “breakdown battalions” for large regiments. This alternative to Extended Lines appeared in Cedar Mountain and is based on the way Red Badge of Courage handled the big new units which marched off to war in July, 1861. As usual, the additional flexibility “breakdown battalions” afford is balanced by their increased fragility when not adjacent to each other.
As already discussed, the 1864 battles feature the lethal late war Union cavalry. These battles would be much tougher to game were it not for the Confederate Sharpshooter units. Each CSA infantry brigade has one. They can serve as line units or adopt Open Order. Sharpshooters are elite troops and feature corresponding capabilities. Our source for them was Fred Ray’s book, Shock Troops of the Confederacy.
The 1864 battles also feature CSA Mounted Infantry, as mentioned earlier. While they cannot go head to head with the Union cavalry when mounted, they may very well get the jump on them when dismounted. Unfortunately for the Rebs, their mounted infantry force dwindles from battle to battle, until at Cedar Creek they are barely present. Fisher’s Hill and Tom’s Brook were not good days for the Confederate mounted arm.
Grant: What about Death Valley makes it unique from all the other volumes of the GBACW? What are you the most proud of?
Bill: — Greg’s maps feature terrain more nuanced than in any previous GBACW game.
— The series rules governing cavalry and Spencer-armed units get a more thorough work-out than in any previous game, unless you want to talk Rebel Sabers from the older version.
— I think it’s fair to call Death Valley the most ambitious package in the series. The battles included range from encounters between reinforced divisions (1st Kernstown and Rutherford’s Farm) all the way up to 3rd Winchester and Cedar Creek, both of which were larger than the battles in Twin Peaks. Their number and diversity far surpasses those in any earlier series entry, no matter how far back you go.
— The Open Order and Sharpshooter rules are completely new, and I am personally most proud of these. I remember Greg’s reaction the day I sent him my notes on Shock Troops of the Confederacy. I think at that moment, we both knew we had an important key to gaming the 1864 battles.

Grant: What has changed through the playtest process? What elements still need work?
Bill: Many of the scenarios have undergone significant transformation through testing. Scenarios for battles that ended in quick and decisive defeat for one side or the other are tough to balance, particularly if the goal is to offer a game interesting for both sides. That being our goal, some scenarios still need work.
Grant: What has been the reaction of playtesters?
Bill: First, let me take this opportunity to thank all our playtesters. Death Valley is a big package, and it’s been a long haul. Some changes, like the compression of ammo depletion, are so recent that I could not tell you how our playtesters are reacting. Others, like the Open Order/Sharpshooter rules for the 1864 battles, pre-date the playtesting team. Early on we received some very favorable feedback on those rules. I haven’t heard much lately, and will have to make a point of asking the team about their recent experiences with them. On the whole I think the team has embraced the changes.
Grant: With the game already surpassing 500 orders, it has made the cut. What would you expect is a reasonable timeline to see the game get printed?
Bill: Given GMT’s production schedule, I’d guess it will be about a year before publication.
Thanks to Bill for his great insight into the design for Death Valley: The Battles for the Shenandoah. If you are interested in the game, you can pre-order a copy on the GMT Games’ P500 page for $59.00 at the following link: http://www.gmtgames.com/p-659-death-valley-battles-for-the-shenandoah.aspx
-Grant

Great interview and write up! Thanks Grant!
LikeLike
I’m loving these interviews! As you can see, I’m catching up. 🙂
One question for you, Grant.
How do you do these? Do you send the subjects the questions and they respond? Or is it more conversational over a series of emails/chats?
Great job with these.
LikeLiked by 1 person
I send the questions to them and they respond at their pace. I then read them over and send clarifying questions or even additional questions back to them. Sometimes it takes several back and forth tries.
LikeLiked by 1 person