
The Battle of Tarawa was a battle fought in the Pacific Theater of World War II and it took place at the Tarawa Atoll in the Gilbert Islands, and was part of the larger Operation Galvanic, the U.S. invasion of the Gilberts. Nearly 6,400 Japanese, Koreans, and Americans died in the fighting which took place over a 4 day period starting on November 20th, mostly on and around the small island of Betio, in the extreme southwest of the Tarawa Atoll.

The Battle of Tarawa was the first American offensive in the critical central Pacific region. It was also the first time in the Pacific War that the United States faced serious Japanese opposition to an amphibious landing. Previous landings had met little or no initial resistance, but on Tarawa the 4,500 Japanese defenders were well-supplied and well-prepared, and they fought almost to the last man, exacting a heavy toll on the United States Marine Corps. The U.S. had suffered similar casualties throughout the duration of other previous campaigns, for example over the six months of the Guadalcanal Campaign, but the losses on Tarawa were incurred within the space of only 76 hours.
The American invasion force to the Gilberts was the largest yet assembled for a single operation in the Pacific, consisting of 17 aircraft carriers (6 CVs, 5 CVLs, and 6 CVEs), 12 battleships, 8 heavy cruisers, 4 light cruisers, 66 destroyers, and 36 transport ships. On board the transports was the 2nd Marine Division and a part of the Army’s 27th Infantry Division, for a total of about 35,000 troops.
As the invasion flotilla hove to in the predawn hours of November 20th, the island’s four 8-inch guns opened fire. A gunnery duel soon developed as the main batteries on the battleships Colorado and Maryland commenced counter-battery fire. This proved accurate, with several of the 16-inch shells finding their marks.
Following the gunnery duel and an air attack of the island at 06:10, the naval bombardment of the island began in earnest and was sustained for the next three hours. The plan was to land Marines on the north beaches, divided into three sections: Red Beach 1 on the far west of the island, Red Beach 2 in the center just west of the pier, and Red Beach 3 to the east of the pier. Green Beach was a contingency landing beach on the western shoreline and was used for the D+1 landings. Black Beaches 1 and 2 made up the southern shore of the island and were not used. The airstrip, running roughly east-west, divided the island into north and south.
 The supporting naval bombardment lifted and the Marines started their attack from the lagoon at 09:00, thirty minutes later than expected, but found the tide had not risen enough to allow their shallow draft Higgins boats to clear the reef. Only the tracked LVT “Alligators” were able to get across. With the pause in the naval bombardment, those Japanese who had survived the shelling were again able to man their firing pits. Japanese troops from the southern beaches were shifted up to the northern beaches. As the LVTs made their way over the reef and into the shallows, the number of Japanese troops in the firing pits slowly began to increase, and the volume of combined arms fire the LVTs faced gradually intensified. The LVTs had a myriad of holes punched through their non-armored hulls, and many were knocked out of the battle. Those ‘Alligators’ that did make it in proved unable to clear the sea wall, leaving the men in the first assault waves pinned down against the log wall along the beach. A number of ‘Alligators’ went back out to the reef in an attempt to carry in the men who were stuck there, but most of these LVTs were too badly holed to remain seaworthy, leaving the Marines stuck on the reef some 500 yards (460 m) off shore.
Early attempts to land tanks for close support and to get past the sea wall failed when the LCM landing craft carrying them hung up behind the reef. Some of these craft were hit out in the lagoon while they waited to move in to the beach and either sank outright or had to withdraw while taking on water. Two Stuart tanks were landed on the east end of the beach but were knocked out of action fairly quickly. The battalion commander of 3rd Battalion, 2nd Regiment found several LCMs near the reef and ordered them to land their Sherman tanks and head to Red Beach 2. The LCMs dropped ramps and the six tanks came down, climbed over the reef and dropped into the surf beyond. They were guided in to shore by Marines on foot, but several of these tanks fell into holes caused by the naval gunfire bombardment and sank. The surviving Shermans on the western end of the island proved considerably more effective than the lighter Stuarts. They helped push the line in to about 300 yards (270 m) from shore. One became stuck in a tank trap and another was knocked out by a magnetic mine. The remaining tank took a shell hit to its barrel and had its 75 mm gun disabled. It was used as a portable machine gun pillbox for the rest of the day. A third platoon was able to land all four of its tanks on Red 3 around noon and operated them successfully for much of the day, but by day’s end only one tank was still in action.
By noon the Marines had successfully taken the beach as far as the first line of Japanese defenses. By 15:30 the line had moved inland in places but was still generally along the first line of defenses. The arrival of the tanks started the line moving on Red 3 and the end of Red 2 (the right flank, as viewed from the north), and by nightfall the line was about half-way across the island, only a short distance from the main runway.
In addition, Maj. Michael P. Ryan, a company commander, had gathered together remnants of his company with diverse disconnected Marines and sailors from other landing waves, as well as two Sherman tanks, and had diverted them onto a more lightly defended section of Green Beach. This impromptu unit was later referred to as “Ryan’s Orphans”. Ryan, who had been thought to be dead, arranged for naval gunfire and mounted an attack that cleared the island’s western end.
As night fell on the first day, the Japanese defenders kept up sporadic harassing fire, but did not launch an attack on the Marines clinging to their beachhead and the territory won in the day’s hard fighting. With Rear Admiral Shibazaki killed and their communication lines torn up, each Japanese unit was essentially acting in isolation, and indeed had been since the commencement of the naval bombardment. The Marines brought a battery of 75 mm Pack Howitzers ashore, unpacked them and set them up for action for the next day’s fight, but the bulk of the second wave was unable to land. They spent the night floating out in the lagoon without food or water, trying to sleep in their Higgins boats. A number of Japanese marines slipped away in the night, swimming out to a number of the wrecked LVTs in the lagoon, and also to the Saida Maru (斉田丸), a wrecked Japanese steamship lying west of the main pier. There they lay in wait for dawn, when they would fire upon the U.S. forces from behind. The long night dragged on, but lacking central direction, the Japanese were unable to coordinate for a counterattack against the toehold the Marines held on the island. The feared counterattack never came and the Marines held their ground. By the end of the first day, of the 5,000 Marines put ashore, 1,500 were casualties, either dead or wounded.
That was the results of the fighting just on the first day. Later, various leaders would share their assessment and thoughts on the overall campaign.
Writing after the war, General Holland Smith, who in his biography was highly critical of the Navy, commented:
“Was Tarawa worth it? My answer is unqualified: No. From the very beginning the decision of the Joint Chiefs to seize Tarawa was a mistake and from their initial mistake grew the terrible drama of errors, errors of omission rather than commission, resulting in these needless casualties.”
War correspondent Richard Sherrod added this in reflection on both the waste of life and the acts of heroism that he saw:
“Last week some 2,000 or 3,000 United States Marines, most of them now dead or wounded, gave the nation a name to stand beside those of Concord Bridge, the Bonhomme Richard, the Alamo, Little Bighorn, and Belleau Wood. The name was Tarawa.”
So where does the name “One Square Mile of Hell” come from? Well, it was supposedly a reference to the size of the island, being about 1 mile square, and to the ferocity of the battle. It was said that there was no way the troops could retreat, as there was no where to go so they simply slugged it out with all that they had.
After the battle in 1944, the US Army commissioned the making of the short propaganda film titled “With the Marines at Tarawa”. The film used actual battlefield combat footage in color showing the ferocity of the battle. After the film was complete, Hollywood couldn’t allow the showing of the film to general audiences because the footage was simply too graphic. President Franklin Delano Roosevelt gave permission for the film to be shown after speaking with Richard Sherrod who said:
“Our soldiers on the front want people back home to know that they don’t knock the hell out of them every day of every battle. They want people to understand that war is a horrible, nasty business, and to say otherwise is to do a disservice to those who died.”
D-Day at Tarawa from Decision Games
A game that I think does a superb job of modeling the invasion of Tarawa is D-Day at Tarawa from Decision Games. The game is designed by John Butterfield and is the 2nd in a series of D-Day games focused on various landings during World War II. The first in the series is D-Day at Omaha Beach and the third entry is D-Day at Peleliu. These game are solitaire only and have a really well developed system to simulate fields of fire, beach landings and the ferocity of the combat with a unique card drawing system.
The reason that I think the game does a great job with the battle is that it focuses on the Amphibious Landing Phase during each Operations Phase by providing a mechanic where players draw two cards for each LVT that is attempting to land troops on the beaches. The first drawn card tells you what happens to the orientation of the LVT including No Drift, Drift 1L, 1R (you literally move the boat one row to the left or right) or PR (pivot right). You then refer to the 2nd drawn card to see the result of the landing which will tell you how many Units survived the ride in, whether or not the LVT is hit or destroyed and where the units end up either in the water (having to then spend a few turns wading to the beach, all the while taking fire from the positions), on the beach or Inland 1 or 2 spaces. This system is an ingenious way to deal with this phase of the game. It is very tense as you flip the cards over to see what happens! Will my units make it? Will they be so wounded to make them ineffective? or will they have to spend a few turns walking to the beaches?)

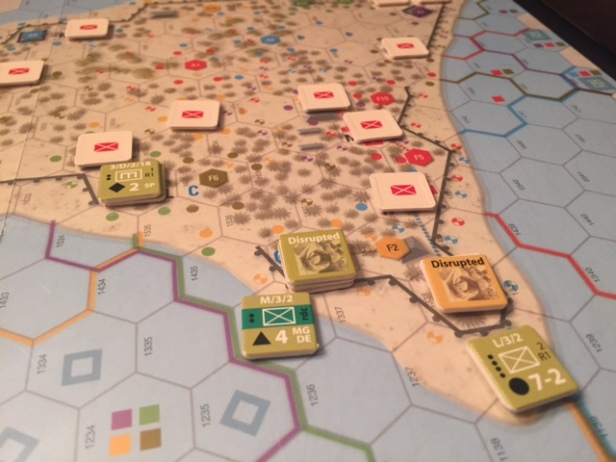
I also really enjoy the solo mechanic that controls the Japanese and decides when and where fire happens. It too uses cards but relies first on the map. In the picture showing the map below, each area hex on the island contains various colored dots that correspond to a certain Japanese position on the island. When US units enter those areas, they can be fired upon if that areas color card is drawn. When the colored cards are drawn during a Japanese fire action, the colored boxes with various symbols tell you which Japanese positions will fire that round and what type of units they will hit. The colored areas also tell other information about the actions that can be taken in later rounds and add qualifiers to the ability to fire.

I hope you enjoyed this entry of On This Day in Military History. I encourage you to try out D-Day at Tarawa, especially if you enjoy interactive solo games that are well designed and can be learned pretty easily. I will warn you though that this game is very difficult. I have played it 3 times now and have yet to win, and frankly, don’t know that I have ever really been that close to winning. This game is a challenge and will keep you asking yourself how you could have done that round better in the future.
-Grant

Great article and I love that Roosevelt quote.
LikeLike
Wow. What a fight. God bless our veterans.
LikeLiked by 1 person