This past weekend, we played Lock ‘n Load Tactical: Heroes of the Pacific for the first time. After our play, I had enjoyed so much about the system (but also experienced some difficulty and frustration as is common with any new system you are learning and playing for the first time), that I wanted to share my initial thoughts with you on the game and how it plays. As I said, we have only played this system once and have not had an opportunity to experience each aspect but feel that we gained enough insight to be able to put together some cogent thoughts on it.
If you weren’t aware, Lock ‘n Load Tactical is a series that is published by Lock ‘n Load Publishing and has entries into several eras of combat, including World War II, Vietnam and the more Modern era to name a few. The system is designed by Jeff Lewis and has been around for quite a while, stretching back to the late 2000’s.

Heroes of the Pacific is a module of the World War II Era, which covers engagements stretching from 1930 to 1959, and has representation in all theaters of the war, including the most recent released Heroes of North Africa. In the picture above, you will see the Core Rules Manual v4.1 for the World War II Era of the system along with the Module Rules and Scenarios for Heroes of the Pacific. I really like the thicker, more hardy version of the Core Rules Manual, as it has been updated and have clarified many rules, usually denoted by those clarifications being written in blue font. This rule book is very well done as far as presentation, but in my opinion has some problems with clarity and detail. More on that complaint a little later.
The Heroes of the Pacific module takes the fighting to the Pacific Theater of World War II where the United States Marine Corps and United States Army is pitted against the Imperial Japanese Army in 12 scenarios designed around the battles fought during the Pacific island hopping campaign. Included in the 12 scenarios, there are 3 focused on Guadalcanal (Raid on Taivu – September 8, 1942, Welcome to the Jungle – October 23, 1942 and Gifu – January 2, 1943), 2 on Tarawa (Red Beach, Red – November 20, 1943 and The Battle of Buariki – November 27, 1943), New Guinea (Lone Tree Hill – May 28, 1944), Saipan (Counterattack! – June 17, 1944), 2 on Peleliu (White Beach One – September 15, 1944 and Armored Assault – September 15, 1944), Iwo Jima (Nishi – March 7, 1945) and 2 on Okinawa (That Damned Hill – April 9, 1945 and I Wanna Take That Ridge – May, 1945).
What I Really Liked About the System
Counters – Usually I am simply looking for clear, easy to read counters that are functional. I admit that I used to not really care what the counters looked like, or what color they were, or whether or not they had historical detail like unit designations, or whether they had cool silhouettes of the units. But now, since being exposed first to Old School Tactical from Flying Pig Games (thanks Mark!) and now Lock n’ Load Publishing (thanks again Mark!), I have finally come to appreciate what a good tactical game counter can and should look like.
The counters in Heroes of the Pacific are good sized, which means you can really very easily read the information printed on them. A squad counter is 5/8″, a Weapons Team is represented on a 3/4″ counter and a Vehicle or Fixed Wing Aircraft is represented by a larger 7/8″ counter. They are also really thick and are pre-rounded, which means you don’t have to clip them once you pop them out of the sprues! I love to clip, as it is very therapeutic for me, but if I don’t have to, I am on board with that. The counters are also very well done with beautiful art and great silhouettes that change as the unit is reduced. My only complaint is where the counters attach to the sprue you have a small nub that sticks out. This nub cannot be removed by clipping and is a minor irritant to me in an otherwise gorgeous production. I guess you could file them off with a small file or maybe clip them off with fingernail clippers.

Here is a link to our unboxing video where you can get a better look at the counters, the maps and the player aid cards. This game really looks great on the table and the components are really solid.
Maps (X-Maps) – I love modular boards or maps, as having them just opens up so many possibilities for replayability as well as varied custom scenarios. The maps in Heroes of the Pacific are cards that have numbers printed in the very bottom left corner of each. Each scenario simply tells you which numbered maps to use and also shows you how the maps are to be set up. Below in the picture, you can see the map card that comes with the game as compared to the X-Maps, which is an upgrade that can be purchased separately. The hexes are about twice as large on the X-Map and really make playing the game mechanically more simple as there is some room to maneuver your units within the confines of the hex. After having played on the X-Maps, I don’t know why I would ever consciously choose to use the smaller map. Maybe because I don’t have the table space to use the larger maps, but that is the only reason I can think. Get the upgraded X-Maps. You will thank me!

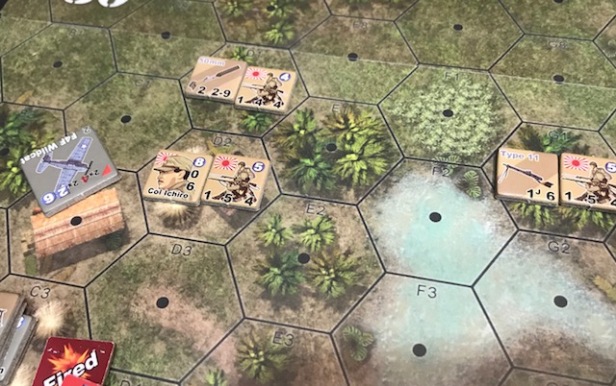
The maps are really great looking and take tactical maps to a new level of detail that helps immerse me in the theme of the battle. On the map shown in the picture above, my USMC Raiders were invading Taivu on the island of Guadalcanal. As you can see from the map, the tranquil sands of the beach, and the surf as it touches the sand, looks almost like a vacation spot, but the Japanese are set up just to the north of the beach on the next map card and immediately began shelling my Marines with their knee mortar. I love the palm trees shown as light jungle terrain, the detail of the Bamboo Huts, as well as the clearly written number identifier on each hex. My only complaint with the maps was the difficulty in telling some terrains apart. Light and Heavy Jungle looked very similar, especially where a road was cutting through. Other than that, great part of the game that adds to the theme of the battles.
Impulse System – During the Operations Phase, players take turns with alternating impulses. During a single impulse, players can activate one hex and all the units contained in that hex to take various actions such as Fire, Move, Lay Smoke or any other unit-eligible action, of which there are a bevy to choose from, more on that later. Each of these units can take actions together, such as a combined Fire action as long as they Fire at the same target, or they can each do their own action like taking cover in surrounding hexes or moving to surround or flank the enemy. I guess what I am trying to say is if you have multiple units together in a hex, on one impulse, you can fire with certain units (and then mark them as having Fired), and then during a later impulse, you can Move with other units (and mark them as having Moved).
If a Leader is activated, he can in turn, activate units that are not located in his hex but in surrounding hexes. This makes for a great need to maintain tight command and control of troops, but also provides great options. I liked this system a lot and feel that it allows me as the player a great deal more control over my units and their actions than in some other tactical combat games I have played. Not being reliant on a card being drawn allowing a certain action was very liberating (I’m referring to Combat Commander, which is still in my opinion a great system that I love to play) and I felt that I was actually commanding my units successfully. Once all units have activated and taken actions, or when there are three consecutive passes from the players, the round ends.
Asymmetry of Units – In the picture below, I want to show you the differences in the units and how they are effected by successful Fire attacks against them. The system used in Heroes of the Pacific is a very asymmetric attempt to show the differences in the fighting forces. As we know from history, the Japanese were typically the defender who was protecting his homeland and their Emperor from the invaders and fought to the death. Whereas, Americans had a different attitude about life and death. This is reflected in the way the different sides deal with casualties.
As you can see, the Japanese Rifle Squad at full health have a 5 Morale (shown by the blue number in the upper right corner of the counter) with a 1 Fire Power, a 5 Range and a 4 Movement. When they take a reduction, their Morale drops by a factor of 1 to a 4 and their Range drops to a 4. Finally, on the final reduction, their Morale increases to a 6, which is actually higher than a full strength unit and their Range further reduces by 1 to a 3. The Japanese units don’t have a Shaken side (although they can be Shaken and will gain a Shaken counter) and it is a little harder for them to become such. Most of the results on their Direct Fire Table are Reductions, Wounds or Eliminations. This means that they typically can stay in the fight and still be somewhat effective in combat.
Conversely, you will notice the differences in the Marine units below. The Marines typically become Shaken when they are Fired upon successfully and their Shaken condition renders them totally ineffective until they can Rally. As you can see, they cannot Fire and have no Range. The interesting part about their Direct Fire Table is that there are more results for Shaken, Wounded and Casualties, which means that you replace a Squad with a 1/2 Squad (as shown with the 1-6-4 unit). Also another interesting aspect is that the USMC units Morale doesn’t increase or decrease when Shaken, but stays the same at 6, while the US Army units have their Morale reduced by 1 to a 5 when Shaken. Marines are simply better at handling adversity under Fire it appears.

One other distinct difference in the units shown in the picture above is the red box around the Movement value for the USMC units. This red box means that these units are eligible to use the Assault Move action, which allows them to Move and Fire during a single activation. A very powerful ability, although there are negatives associated with the ability.
I really enjoyed the differences in the units and found that I had to think about my units and their different abilities and weaknesses but also had to remember what would happen to the Japanese units when I was trying to Fire upon them. Great addition to this system as it really highlights some of the actual historical differences.
Tactical Options – I really loved the variety of tactical options that were available to use with my troops, allowing me to take advantage of their positions and abilities. These options included such tactical actions as Assault Move, Double Time Movement, Low Crawl and Laying Smoke.
Assault Move is probably my favorite as it allows units that have a red box around their Movement value to move up to half of their printed Movement allowance and still Fire either as a part of the movement or later in the round as a part of an Opportunity Fire on your opponents turn. There are negative modifiers to this attack but it is a really powerful and well done option.
Double Time Movement is also very good as it allows units to increase their Movement Factor by +2 as long as there is a Good Order Leader in the hex that moves along with them and they don’t surpass the movement allowance of the Leader. I used this action quite a bit in our first play as I had reinforcement Marines that came in late in the game and were far from the action, so they had to Double Time it in order to get into the battle to make a difference. Without this additional 2 MF for those reinforcements, I would have been totally unable to even consider reaching my end game goals.
Low Crawl is also very good as it allows a unit or stack of units to use their entire impulse to simply advance one hex. The advantage is that these units are not automatically spotted by the enemy and also don’t incur the +1 bonus to Fire Power from enemies who fire on them. This action doesn’t seem like much, but it really is pretty good in order to get closer to your enemy, say by getting in range to Fire the next round while avoiding Opportunity Fire, or in order to get into better cover without being Spotted. The downside is that if you Low Crawl into a hex adjacent to your enemy, you can be Spotted and Fired upon. Great little tool that I used well to avoid being targeted.
Finally, Laying Smoke is always a good thing as it provides cover to units that must move through open terrain in order to get into Range to engage the enemy. Players can lay smoke either in the hex they are in or an adjacent hex and it acts as a blocking terrain to provide temporary cover while you Move as well as offers a +1 Terrain Modifier.
These are only a few of the action options that are available and really sets this game apart from other tactical games that I have played.
Off-board Artillery Missions and Air Support – As the Marines, I had access to very powerful Off-board Artillery Missions from a few named ships, including the USS McKean and USS Manley. This are very powerful weapons and can do a lot of damage, if you can get a good Spot to locate your targets. You first must have a Leader who is in Line of Sight of the target and then do a simple calculation and roll 2d6 (one which is white and the which is red). This is to determine drift. If the roll is favorable and you can impact a hex either where your target is adjacent, it then does a Fire Attack at the target hex as well as the surrounding 6 hexes using the FP listed in the scenario. Really cool and fun calculations that I used a couple of times to do some damage to my enemies. I really liked that the Leader can abort the Fire Attack if the location is not favorable so you don’t waste this powerful ability. I also really liked the Air Support missions as well supplied by the Cactus Air Force. As of a determined round, I could call in a single fixed wing aircraft, in our scenario’s case it was an F4F Wildcat, to perform an air attack. I say that I can call in the attack, it is really determined by a die roll during the Rally Phase of the turn. If either player rolls doubles attempting to Rally a unit, the air support arrives in the first impulse of the following Operations Phase. The aircraft must fly in a straight line across the map and where it enters is determined by a die roll. A Leader must be able to spot the hexes it attacks but it will get a Fire Attack into all of the hexes that is in its line of sight. Really pretty powerful. The other cool thing is that in certain scenarios, these air support missions can be shot down by AA fire and in this case, they crash and can attack units in the crash hex and create a wreck that offers cover and changes the battlefield. Really neat examples of historical abilities used in the game. I liked them quite a lot.
Corpsman and Medics – I really loved the Corpsman (same as a Medic, just with higher Morale) that was given to me as a part of our scenario. The Corpsman can perform the same function as a Medic which is too either self Rally or Rally or Heal other units that are in their same hex and at their same elevation. One thing about the system that is really tough, but also realistic, is the fact that in order to Rally a unit, that unit must be in the presence of a Leader. With only 2 Leaders provided in our scenario, this proved to be problematic as you simply cannot keep all of your units together at all times. But to the rescue comes the Corpsman who acts as a Leader for the purposes of Rallying or Healing units. To Rally or Heal, they have to pass a Morale test by rolling 2d6 and roll under their Morale value of 7. If the Corpsman is in cover that offers a positive Terrain Modifier, this roll is modified by subtracting 2 from the roll. I really enjoyed this element and used it often to remove my men’s Shaken conditions, or remove Wounds.

Snipers and Spider Holes – In the scenario, the Japanese player was provided with a Sniper unit as well as a Spider Hole. First, the Sniper is a special unit that has no Movement factor and initially don’t get placed on the map like other units. Once the game starts, the owner can place the Sniper at any time and in any hex on the board as long as that hex is not enemy occupied. You wouldn’t want to put his unit in harms way anyway but this is a really neat element as you can hold this until you have a need for it be placed. It can attack any single unit within its line of sight and rolls 2d6 when Firing. If there are more than one unit in hex it targets, you determine the target randomly. Another benefit Snipers have is that they double their Terrain Modifier when they are alone. In the picture below, this was near the game’s end and my opponent had retreated this Japanese Rifle Squad to attempt to hold the buildings.
Snipers also can come with a special attachment known as a Spider Hole. This is simply spawned with the Sniper and allows the controlling player to force his opponent to reroll his Direct Fire Attack roll after he has seen the results of the roll but before he has rolled. Really cool thematic element that goes well with what a Sniper is good at, hiding and frustrating your forces while picking them off one by one.

Spotting – This was an element of the system that I really liked but also that seems to be too tough and tends to slow down a firefight and make it difficult sometimes to really do any damage. In tactical games, I want the action to be fast, furious and bloody. What Spotting does is replicate the confusion and cover on the battlefield. If units are secreted away in Jungle or Kunai Grass terrain, then it is hard to see where exactly they are and acquire a target to shoot at. So, in order to Fire on a hex and the units located in it, you must first spot that hex. This is pretty simple and really well done. To Spot, a player simply activates a unit, such as a Leader or other Squad and rolls 1d6. The result needed to Spot the target is based on the type of terrain and is also well done. If the Terrain is Blocking, meaning you can’t see through it, then you have to roll a 2 or less. If the Terrain is Degrading, such as Kunai Grass, you have to roll 3 or less to Spot. This roll can also be modified by Leadership Modifier. If you successfully Spot the hex, you place a Spotted marker and can then Fire on that hex. Units in a hex that have Moved or Fired, or are in Open Terrain, are automatically spotted. I will talk a little more about why I don’t like this below.
Support Weapons (SWs) Variety – Units have a Fire Power number written on their counters but also can be given Support Weapons that will add to that Fire Power number when equipped. These Support Weapons include the Browning Automatic Rifle (BAR), Tripod Machine Guns (MGs), Satchel Charges, Flamethrowers and Mortars. These weapons must be equipped to fire and a unit can carry up to 2. If a unit Fires while equipped with an SW, they will add their inherent FP to the FP printed on the SW to come up with their total FP. For example, a USMC Squad equipped with a BAR will have a total Fire Power of 3 (Inherent FP 2 + 1 FP for BAR = 3FP). If a unit fires both of its carried SWs, they will lose their inherent Fire Power and simply add the two SWs FP together to determine their total Fire Power. I really like that you are able to add the FP of the Support Weapons to your attacks. This feels really right to me and I am really glad to see that in the system. I also liked, although it made moving and Firing more difficult, that the MGs need to be Dismantled to Move and then setup again as part of the Rally Phase before they can Fire. Once again, a really cool little detail that adds to the realism of the battlefield and makes this system shine.

What I Didn’t Like or Struggled With
Basic Maps that Come with Game are too Small – As shown in the picture above, the basic card stock maps that come with the game are highly detailed and of really good quality, with great detail in the terrain and clearly marked numbers in hexes. What I didn’t like about them though was they were too small. When using larger counters, such as the 5/8″ Squad counters, the 3/4″ Weapons Team counters or the 7/8″ Vehicle or Fixed Wing Aircraft counters, those hexes can become really jam packed and make for difficulty in moving them around. I like the bigger hexes that are provided on the X-Maps but this is an upgrade and will cost you. I wish the basic maps included were simply bigger.
Rule Book – Overall, the Rule Book is fine in Heroes of the Pacific. But, occasionally, it is either vague, or doesn’t fully clarify things that leads to discussion among the players as to what was intended. Some of the instances that we had difficulty in understanding the rules were with Melee attacks, Spotting, Air Support and Snipers. Generally, the information is there in the main paragraphs, or is sometimes found a few paragraphs down where it is simply missed. We also found a few grammatical and formatting errors but not enough to become distracting.
Spotting – As mentioned above, I stated that I really liked Spotting and felt it was a good thematic element that added to the realism associated with tactical combat. I stand by that statement but, I also feel that this addition might be a level of detail and complexity that actually takes away from the enjoyment of the system. I enjoy tactical combat because it is typically pretty fast and furious, is rules light, or at least has rules that are quickly understood and adjudicated, and leads to bloody battle. In our single play, we found that if you are in a Blocking Terrain, it can be very difficult for the enemy to Spot you in order to allow for an attack. Near the end of our play, I had a few Marines with MGs and a Leader 4 hexes away from a Bamboo Hut. Inside that Hut, there was a single Japanese Rifle Squad equipped with a Type 92 MG. I literally tried to Spot that unit for nearly two full turns before finally rolling a 2 (I only had to roll a 3 or less due to my Leadership Modifier). This ultimately led to my defeat, and I am bitter about it. I won’t lie! But, it just seemed too difficult and slowed our combat down at a point where the tension was building, as we were entering Turn 8 of a 10 Turn scenario, and I had to only take those last 2 Bamboo Huts to gain victory. Due to my difficulty in Spotting the units in order to Fire, I got impatient and ran two of my Marine Squads up to the Hut trying desperately to engage in Melee. But between the Sniper in the Hut across the way to the west and the 2 Rifleman snugged up in the two Huts on the east side of the map, both of those units succumbed to Fire and were Shaken. Also, I will say that once they Fired on my charging Marines, the remaining Squads left behind were able to Spot them but at that point it was too late. Now that I write this down, it actually was really pretty cool that I had to charge, but doesn’t change the fact that I was frustrated with the Spotting rule and how difficult that task can seem.
Fire Combat System Complexity – When you do finally Spot the enemy and decide to Fire on them, the system can seem somewhat complex. First, if you have Spotted the units, you first make sure you are in Range to Fire, and then add your total Firepower to your roll of 1d6. You can modify this roll with several things. First Leadership Modifier, whether your target is marked as Moved (which adds +1 to our attack), degrading terrain modifiers or other special circumstances. All that to get your total Fire Attack. Doesn’t seem too bad yet though does it? You then have the Defender roll a d6 and add their Terrain Modifier and compare that number to the Fire Attack number. If the modified Fire Attack is greater than the Defenders, the attack is a hit. Simple. Wait, there’s more? Yes.
If it is a hit, you then take the difference between this number and the Defender performs a Damage Check by rolling 1d6 and adding the difference between the Attack and Defense roll above. You get a number and then must consult several Direct Fire Tables found on the Players Aids (which are very well done) for the final results.


That is a lot of work and a lot of calculating and then referencing of tables on the Player Aids. The most difficult part is picking the correct column of the DFT Table to reference for the results. Then you have to do more calculations to see if the result is less than Morale, less than or equal to Morale, greater than but less than 2x greater than Morale, greater than 2x Morale but less than 3x Morale or simply a whopping nuke attack that is 3x greater than Morale. Whew! That is a lot to then determine what happens to the unit that was Fired upon. Once again, I like fast and furious. This was fast, but the fastness was slowed by doing math in my head for 5 minutes each time we did a Fire Attack, and always ended with ferocity. I simply need more time with the system and I am sure that it will come as second nature and I won’t have to think about it so much. But, one other thing that you have to keep in mind is that my gaming buddy Alexander is terrible with math in his head. He wants to get out a calculator to do these calculations and I am always like, whoa nerd, I can do that in my head (you see, I am somewhat of a Rain Man and can do calculations in my head pretty quickly…most of the time! Wapner anyone?
Summary/Conclusion
As I said at the beginning of this long post, we have only played Lock n’ Load Tactical: Heroes of the Pacific one time! Once! So I really shouldn’t even be writing anything about it. But, I enjoyed so much about the system and had such a good time (even though I ended up losing) that I just had to share my thoughts with you. This system is really good. It tends to be a little more complex than some other systems that I have played with, namely Combat Commander, but it really brings a lot of very interesting and realistic elements to the squad level tactical combat genre. Also, the game is set in the Pacific Theater of World War II, where the fighting was extremely brutal, as the Japanese were a bit fanatical and fought to the death more often than not, and where the vaunted and ferocious United States Marines assaulted beach after beach to bring victory. This game is good, teetering on greatness. I just have to play it a few more times to understand the system better, get more comfortable with the rules, work some of my doubts and concerns out to allow me to then in unfettered fashion unleash Hell as I storm those beaches.
-Grant


Outstanding article, Grant! The level of detail you put into your reviews matches the games mechanics and features detail of the games themselves.
I don’t just read the articles & reviews at The Players Aid, I devour them. Many thanks to you and Alexander for making this site and all the work you do, so highly appreciated and has me always looking forward to what you guys have coming next!
LikeLiked by 1 person
Thanks John. I’m glad you find our content tasty! I am generally long winded and try not to overwrite but sometimes the words just flow and I can’t help myself. Thanks for the kind words and for your interest.
LikeLike
Based on what you wrote about spotting you are applying principles of other games to this game. You generally dont spot then fire, most scenarios are not long enough for this. You draw fire by moving a squad, or you move adjacent, thus spotting the unit automatically.
This draws the enemies fire, then allows you to return fire or advance on them into melee. – This leads to all sort of interesting tactical situations where you need to evolve good overwatch, choose when to Opp fire etc.
As for fire combat it is FP+126 + one likely mod: the unit being fired at was moving.
Defense is 1d6+terrain 90% of the time.
You then each roll. Compare #’s.
Now a dumbed down system will then kill or break a unit.
Here however the quality of units comes into play. – You save against unit and/or ldr morale based on difference from results of the above rolls. Higher quality units die harder.
While I appreciate the long blog post and all the detail, there is a lot of noise to the signal here that makes it hard to
Hope you have a change to experience more of the system
LikeLike
Really great rundown.
My only familiarity with the Lock & Load system comes from the computer game, Lock & Load: Heroes of Stalingrad and your overview gave me a lot more insight into the system.
So thanks, Grant!
LikeLiked by 1 person
Grant,
Great coverage and a job well done for your first play of this game. You hit on some great points. I showed a ASL gamer the system and he said “I heard you need to spot for everything”. When I told him no, the look on his face was one of astonishment because of the misinformation he had received.
Correction to the 1-5-4 reduction, the Morale goes up every time (see page 34). 1-5-4 Morale 5,
then 1-3-4 Morale 6, then 1-2-4 Morale 7.
Thank you for the review.
LikeLike
Lock’n Load Tactical is a great system. The more I play it the more I realize its beauty compared to other tactical systems. I actually enjoy and feel that I understand the spotting rules. When one really thinks about it, it makes a lot of sense and as Kev pointed out, it makes for some interesting tactical situations and decisions.
As much effort as Lock’n Load puts into the components of these games I am disappointed by the maps (their size). These games, especially the latest reprints, should come standard with the larger X-maps. The fact that they charge an extra $20.00 dollars or more per set for these larger X-maps, obviously offering them after having identified the problem of maps with hexes that were too small, is a bunch of crap if you ask me.
I love quality components but I do not like companies who just nickel and dime their customers. Beyond this issue I love this series of games.
LikeLike
Do you plan solo with the solo module or just play both sides?
LikeLike
We have the solo module but in my plays of Heroes of the Pacific I had s live opponent. Have yet to try the solo module.
LikeLike