 Being rather new to the wargaming crowd, I have found myself extremely lucky in being able to access some of the greatest minds in design. Thanks to Alan Emrich with Victory Point Games (also one of those great minds!), I was able to get connected with Frank Chadwick to talk to him about his upcoming wargame Thunder in the East covering the East Front of World War II. Frank indulged me in the interview and provided some really good and thorough answers and Alan followed that up with some comments as well as great graphics to show you more about the game. With that introduction, here is the text of the interview:

Grant: Frank, tell us a little about yourself and your career in Wargame design. How did you get into design? What is your favorite part? What games do you play and what games have most inspired your designs?
Frank: My first Avalon Hill wargame was Afrika Korps back in 1966, when I was still in  high school. I’d just gotten interested in military history and had been reading about the desert campaign, so when I saw someone had actually made a game about it I was very excited. I still think that old AH wargame has a wonderful feel for the campaign–maybe not so much the actual campaign, but the popular image of the campaign from those first mass market books about it, particularly Desmond Young’s Rommel the Desert Fox and Paul Carell/Schmidt’s The Foxes of the Desert. So of course I started designing variants, and those were my first real attempts at game design.
After graduate school, in 1973, Rich Banner, Marc Miller, Loren Wiseman, John Harshman and I formed GDW, and I was president until it closed in the 1990’s. Did a bunch of wargames, including many of the original Europa designs.
 My favorite part? It’s probably still the research. I love reading about these campaigns and trying to figure out how to capture the feel of history in a game. These days I mostly play historical miniatures, but the design issues are very similar. Without naming a lot of specific titles, I’d say that the games which have made the strongest impression on me have been those with simple mechanics but which produced very sophisticated results. The very, very old SPI game Barbarossa, for all its limitations, probably made more of an impression on me than any other East Front game. It left me alive to the possibilities for a game at approximately that scale, and I don’t feel that any game since then has realized those possibilities.
Grant: What is Thunder in the East? What do you hope to accomplish with its design?
Frank: Thunder in the East is a moderate-to-large treatment of the war in the east, from the German invasion to the expulsion of the Wehrmacht from Soviet soil. The principle unit scale is corps for the Axis and armies for the Soviets, although both sides have some units one echelon smaller. Ground scale is about 30 miles, time scale is one week. That fairly small time slice for a turn, particularly for a game at this scale, means you get a lot more tactical detail, more back-and-forth, than you would think. I wanted a pretty traditional tactical combat system covering the huge scope of the campaign in fair detail, but I didn’t want a million counters. The counter density is actually pretty low, particularly after the first couple of weeks of Barbarossa when the front widens out. I like the look of the game: a mid-sized monster but without walls of tall counter stacks you have to dig through every turn to see what you have.
Grant: I understand it is the first part of a series. What is this series called? What other games are planned for the series?
Frank: The series is called Frank Chadwick’s ETO. The second game is The Middle Sea, which covers the Mediterranean, Balkans, Italy, and North Africa. Third game is Crusade in Europe, covering both the German invasion of 1940 and the Allied counter-invasion of 1944 (or possibly earlier). The fourth game is Northern Fire, covering the Russo-Finnish Winter War, the campaign in Norway in 1940, and the Finnish Continuation War from 1941-44. There will also be a strategic module (which, in size, will be a fifth game) called Victory at All Cost; it ties them all together with the Battle of the Atlantic and some additional maps (out to the Urals, Iraq and Iran, etc.) and some possible additional armies (like the Turks).
Grant: What makes TITE different from the other ETO games out there on the invasion of Russia?
Frank: Probably the most striking thing is the simplicity of the basic ground combat system, which is virtually identical to the movement and combat system in my free give-away game design of many years back called Battle For Moscow. Beyond that, the fact that the logistic system manages to really drive (and sometimes hold back) progress without being either complicated, arbitrary, or highly abstract.
Grant: How are event cards used and can you give us a few examples? As well as some pictures.
Alan Emrich: To quote the rules: “The Event card system in Thunder in the East represents political, territorial, and economic adjustments occurring outside the scope of the game’s core systems.” Basically, it is a designer’s and developer’s tool box for handling lots of polychromatic details without writing a lot of special cases and exceptions into the rules book. The way I see them, is that they help “tell the story” the game is trying to tell. Thus you’ll see cards for the German Blitzkrieg!, Soviet Emergency Mobilization, Soviet Militia, etc.


Systemically, you select one card per month (two, if they’re “small events”) and can hold a limited size hand. Mostly, they tweak things around the edges, helping you deal with resources, partisans, offensives, etc. They’re not shuffled or random. As in a previous game I worked on (Totaler Krieg!), you have the deck and make your selections from it. Some cards are playable only once per game (e.g., Soviet Emergency Mobilization), others once per year (e.g., the Axis Blitzkrieg!), and still others can be played once per quarter, maximum.
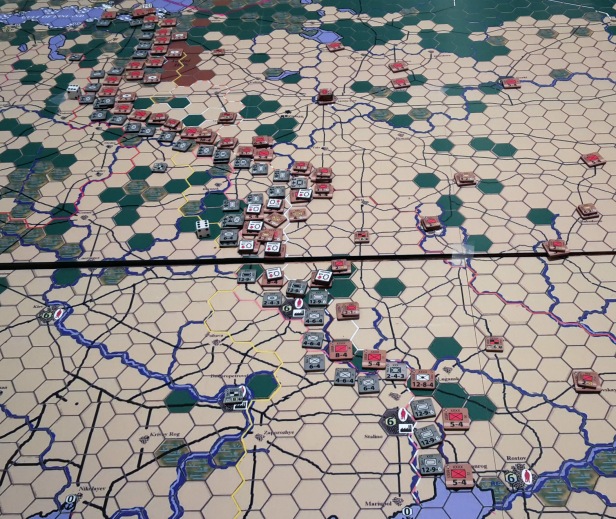
Grant: I love the map. Who is the artist? What role does a good map play in a proper Wargame?

Frank: Not sure which version you’ve seen. The original playtest maps were done by me in a fairly simple paint program and I think they are workmanlike and fine for playtesting, I also tried to get the feel I was looking for from the final maps. The artist for the final maps is Tim Allen, and you may have seen some of his early art which is way more polished than mine. The map is the canvas for the game, if it doesn’t work the game won’t work.
Grant: What is the Sequence of Play and what generally happens in each phase?
Frank: That is a really enormous question. I’m going to have Alan fill you in with the graphics he’s developed to show that.
Alan Emrich: Here goes…basically, it’s 1) Logistics (game turn preparation housekeeping); 2) Special Movement (Rail, Sea, Air, and restricted overland ground movement, particularly if you’re in an EZOC); 3) Combat (which is pretty cool with the way Air units interact over the Ground combat system); 4) Regular Movement (no Rail, Sea, or Air, but all the ground units move normally).
Some neat things in the Sequence of Play are that you check your opponent’s supply state at the beginning of your turn, and that’s the state they remain in until your next turn. Even better, it’s usually very fast and obvious what the supply situation actually is. I’m not a big fan of complex logistics in wargames, and Thunder in the East works just right for me to get playability without sacrificing realism. Here is the Sequence of Play text from the rulebook:
[6.0] Sequence of Play
Play in Frank Chadwick’s ETO is procedural. That is, you play the game’s “Weeks,” Months, and Seasons in Phases, organized into Steps, divided into Segments, in their exact order.
[6.1] Campaign Game Season Start Phase
See Campaign Game Rule 201.0.
[6.2] Weekly Game Turn Sequence
Each Weekly Game Turn (these typically represents approximately 7.5 days, but sometimes roughly 11.5 days, or even 15, depending on the Weather and Weather Zone) consists of two Player Turns, in order, Axis and Soviet, and ends with a Housekeeping Phase to prepare the next Game Turn.
Each Player Turn consists of four Phases performed in the exact sequence listed below. First, the Axis completes their entire Player Turn, and then the Soviets conduct their entire Player Turn. When the Soviets go first, only the “last half” (i.e., the Soviet half) of the first Game Turn is played.
- Logistics Phase:
Supply Step: Determine your opponent’s Ground units’ status (7.0):
- Remove opponent’s Isolated HQs from the map (4 turn delay + Booty).
- Mark your opponent’s other Unsupplied and Isolated units.
- Roll for attrition of your opponent’s Isolated units.
- Remove your opponent’s Air Supply and “abandoned” Defense markers from the map.
Repair & Recovery Step: “Behind the scenes” activities take place (8.0):
- Repair by one level each of your on-map Disrupted Supply and Port Cities.
- Place for free one Improved Defense (Å1) marker (per 9.4): every turn for the Soviets, on odd-numbered turns only for the Axis.
Note: During these Segments of the Soviet turn, only half (#) of their aircraft in the Flown Box (Soviet player’s choice) recover, regardless of weather:
- Recover your Ready Flown aircraft by moving them to the Available
- Recover (i.e., flip) your Damaged Flown aircraft by improving them to Ready Flown.
- From among your recovering Air units, remove half (#) of their Suppressed
- Advance one (maximum) Damaged Destroyed aircraft to Damaged Flown for 1 FP.
- Opponent may Rush Recover their Flown aircraft one readiness level each (maximum), paying 1 FP per Air unit to do so.
- Theater Reserve Administration: Move Ground units in the Newly Arrived Units Holding Box on your Theater Reserves mat to a Theater Reserve Box or the Air Transport Holding Box per 102.2 (making them available for deployment).
OOB (Order of Battle) Step: Place Reinforcements and spend your Resource Points (9.0):
- Perform withdrawals (Axis only; on the first turn of indicated Months).
- Perform substitutions (Axis only; on the first turn of indicated Months).
- Place reinforcements units in your Force Pool or on the map, as instructed.
- Soviets receive one free Partisan Detachment marker (per 107.1)
- Spend Resource Points to build/rebuild units, purchase markers and OPs, and replace depleted units on the map (per 9.3).
- Speed Limit: Maximum PPs and EPs per OOB Step = 10% (#) of pool, +1; e.g., if you began this Step with 11 PPs, your total expenditures this Step could not exceed 3 PPs.
- Elite/Event Time: Only on the first Week of that Month:
- You may select 1 Major OR up to 2 Minor cards from your faction’s deck and place them in your Hand per 25.2 (it is usable immediately, if played during your OOB Step).
- You may spend up to 1 PP, maximum, to build/rebuild Specialist units for each Nationality (9.3.5) and, yes, this does count against its PP spending “speed limit” that turn
- The Soviets promote one Corps unit to Guards status (13.3)
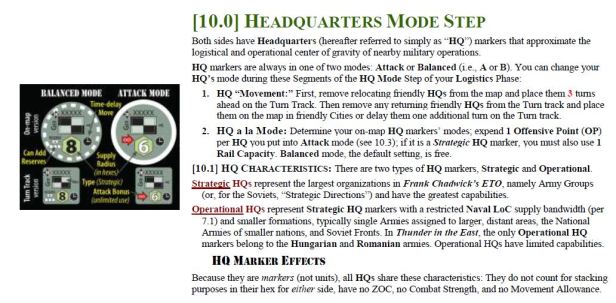
HQ Mode Step: Determine the status of your HQ markers (10.0).
- HQ “Movement:” First, remove relocating friendly HQs from the map and place them 3 turns ahead on the Turn Track. Then remove any returning friendly HQs from the Turn track and place them on the map in friendly Cities or delay them one additional turn on that track.
- HQ a la Mode: Determine your on-map HQ markers’ modes; expend 1 Offensive Point (OP) per HQ you put into Attack mode (see 10.3). Strategic HQ markers (only) also use 1 Rail Capacity to place in Attack mode.
- Special Movement Phase:
Special Reorganization Step: Prepare your units as follows (15.2):
- Demobilize, Disband, & Scrap your units in to recover some of their RP value per 203.0.
- Soviets may voluntarily remove on-map Early Mechanized Corps (revealed or unrevealed) for +1 EP each (replacing them on the map with a ?-4 Rifle Infantry Corps unit, if available) per 15.1.
Special Movement Step: Move your (Ground, Air, and Naval) units. Ground units can voluntarily break down, move via Rail Movement (per 15.4), Naval Transport (106.0), enter your Theater Reserve Newly Arrived Units Holding Box (at HQs in Balanced Mode), OR exit your Theater Reserve (from HQs in Attack Mode). Form and place your Air units Mission Packets and Groups on their target hexes (18.0).
- Combat Phase:
Battle Declaration Step: First, declare all your Battles for this Phase, designating their units (19.1). Use the Odds markers to help keep you organized, if you desire.
Opponent’s Reaction Step: Opponent designates Intercept Packets vs. your Missions, Defensive Close Air Support (CAS), plus their Escort Packets on their own Missions at this time. Soviet Fleet units can also intercept Axis Naval Transport.
Phasing Interception Step: Designate your Intercept Packets to combat your opponent’s just-performed Defensive CAS Missions.
Aero-Naval Combat Step: Perform these Segments in order (20.0):
- Opponent’s Interceptors combat your Mission Packets.
- Your Interceptors combat your opponent’s CAS plus Escort Packets.
- Resolve uncontested non–CAS Missions per 18.0 (i.e., Airfields and Interdiction Strikes, Bombing Airfields, etc.); return those Air units, Ready, to the Flown Box.
Partisan “Bomb Throwing” Step: Partisan Detachment markers conduct their attacks (107.2).
Resolve Ground Battles Step: Resolve your Battles, one at a time, in any order you desire, per the Ground Combat Sequence (21.0). Your units Advancing After Combat (21.8) may voluntarily break down.
Air Return Step: Perform these Segments in order:
- Tidy up all remaining Air units still “in flight” after completing their Missions; place them in the Flown box of the Air Display mat.
- Opponent applies Airfields Attacks Suppression results to their Air units (per 18.3.3).
- Regular Movement Phase:
Opponent’s Reaction Movement Step: Opponent may commit via Movement up to 1 available Theater Reserve unit from each Strategic HQ marker in Balanced Mode (per 102.3).
Regular Recovery & Reorganization Step: Prepare your units as follows:
- Reset your Rail Capacity Used marker to the 0 box.
- Remove Interdiction markers from your Ground units.
- Build up your Ground units stacked together into larger-size formations (12.5).
Regular Movement Step:
- Ground Movement: Move your Ground units (again); Ground units may break down, enter your Newly Arrived Units Holding Box (at HQs in Balanced Mode), OR exit your Theater Reserve (from HQs in Attack Mode).
- Naval Transport: Land Ground units transported by ship (z of 1 = returns) per 106.2
- Air Transport: Reinforce hexes Airdropped into this turn (see 104.2).
Opponent’s Morale Step: Opponent suffers Morale Point (MP) losses due to unit losses during your turn. Check all Immediate MP losses that occurred this turn and account for them (202.0).
After the Soviet Player Turn is complete, conduct the…
- Housekeeping Phase:
Game Turn Step: Advance the Weekly Game Turn marker and, when a new Month commences, the Month Turn marker or, if the last turn of the game was played, stop and determine the winner per 23.1.
On the First Week of Each Month: Note any Monthly reinforcements, withdrawals, and substitutions as noted on the top of the Faction mats. During each faction’s first Week’s OOB Step that Month, you select cards, build/replace Specialist units, and the Soviets promote Soviet Guards.
Weather Step: The Soviet player rolls for next turn’s weather per 23.2
Grant: How are Personnel Points, Equipment Points and Fuel Points gained? How are they used?
Frank: There are recruiting, industrial, and fuel resource cities located on the map, and many of them have more than one resource. (Almost all industrial cities are also recruiting cities). Each quarter, players get one Equipment Point per industrial center, two Personnel Points per recruiting center, and six Fuel Points per fuel center. The most numerous resource centers are Personnel, then Industrial, and finally Fuel.

For example, the Soviet Union has 19 recruiting centers, 9 industrial centers, and 3 fuel centers. Germany is unique in having more industry and recruiting centers (because several of it’s cities in the Ruhr count double for production). It has 9 recruiting centers, 11 industrial centers, and 1 fuel center (representing its synthetic oil industry).
These points are used to buy units, and usually one point gets you a step of a particular type unit. (There are some exceptions, but that’s close enough). Equipment gets you heavy units (armor and mechanized) and you also need it for your navy and, to an extent, your air force. Personnel gets you infantry. Fuel lets you buy units as motorized, if they are available, and fuel is also used to replace aircraft losses, accelerate the turn-around time for aircraft maintenance, and sortie large warships. Finally, Equipment Points and Fuel Points together buy Offensive Points, which are basically fuel and artillery ammunition to let you conduct offensives.
Fuel is the critical choke point if you want to fight a mobile war: motorized units, aircraft, large naval units (battleships and carriers), and offensive supply. There are only two Axis fuel resource centers on the map (one in Germany and the Romanian oil fields) and three Soviet (all in the Caucasus). The Western Allies get theirs from off-map.

Grant: What role does National morale play in the design and how is it affected? How is morale recovered?
Frank: National morale is how the campaign game is won, and it’s also how you drive the minor nations out of the war or make them switch sides. A nation’s morale goes down for losing cities to the enemy, suffering significant combat losses while defending, defection of other minor allies, strategic attacks (such as bombing of cities and attacks on vital convoy lifelines), and some event cards. Morale goes back up when you recapture your own cities, conduct successful strategic attacks on the enemy, and keep a big reserve of personnel points unused at the end of a quarter, representing manpower left in the civilian sector.
Grant: How are Headquarters used in the game? Are there different types? How are they best used?
Frank: Headquarters are mostly mobile supply sources, but in Offensive mode they also provide some attack column shifts. They have to be in a city in rail communication to function, and they become a supply source with a fixed radius from that point. Their standard mode is Buildup, which has a longer supply radius. If you spend an Offensive Point (basically fuel and munitions), it flips to Offensive mode. The supply radius is a little less, but units get a column shift in attack and the supply radius is doubled for motorized units, letting you keep them supplied farther out there than you can in Buildup mode. But you have to keep paying an Offensive Point each turn you want to keep them in that mode.
HQs cannot move in the conventional sense. If you want to relocate them you take them off the map and put them on the turn chart several turns later. When they come back you place them in any friendly city with a rail line of communication. So when it’s time to move your supply head forward, it’s a big deal and takes some time. In the mean time you either need to supply from another HQ or (more often) from one of the major supply cities on the map, assuming you hold one in the right place (but even those take some weeks after capture before they’re again full supply sources).
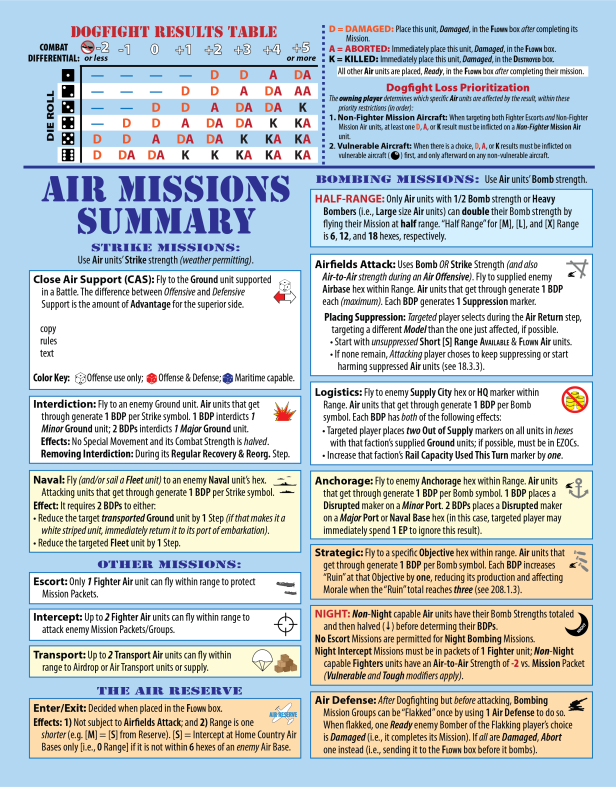
Grant: How are aircraft used in battle? Are there other types of battle support like artillery?
Alan Emrich: Having survived so many wargame Air systems with hair-pulling details and procedures, basing oodles of counters on the map, again I’m happy to report that Thunder in the East has found a great sweet spot for playability without sacrificing realism. (Frank is a wizard at game systems like that.) In the ETO Air system, the Air units are based “off-map” on a theater air display and “fly” from on-map Air Bases (i.e., supplied cities) during your Special Movement Phase (or the opponent’s Combat Phase for interception and defensive air support missions). Their ranges have been boiled down to a single letter for Short, Medium, Long, and eXtra Long.
[18.1] Aircraft Ranges: All Air units have a Range, shown as a letter, in the lower-right corner. This Range is the distance from a friendly Air Base that Air unit can operate:
[S] Short Range: 6 hexes; cannot cross Theater Boundary Lines.
[M] Medium Range: 12 hexes; can cross Theater Boundary Lines.
[L] Long Range: Entire Theater; can cross Theater Boundary Lines but only within 6 hexes of a friendly Air Base in their Theater. See sidebar article.
[X] Extreme Range: Entire Theater; can cross Theater Boundary Lines but only within 12 hexes of a friendly Air Base in their Theater. See Sidebar article.
You basically fly Missions (e.g., Air Support, Interdiction, etc.) with a Bomber unit (or two), with an escort Fighter unit, and your opponent has a chance to fly Fighters to intercept. Air-to-Air combat uses a clean differential CRT and die roll.
You know, there are a lot of cool features to gush over the Air system, and I could write whole articles about it. However, let me sum up with this: the ETO Air system is fast, friendly, and generates a handful of interesting situations on the map just about every turn. When we ask players what they liked about the game, the Air system has been unanimously mentioned on their lists. Frank has brought a lot of design lessons from over the years to this game, and the Air system is a real marvel.
Grant: How does the combat system work? Can we see an image of the CRT? What DRMs are used?

Frank: The combat system is essentially the same as in Battle for Moscow, which means it’s going to be familiar to any wargamer out there. Odds based, D-6, familiar range of outcomes.
Alan Emrich: Any wargamer reading the Combat Results Table player aid will be an expert by the time they turn their eyes to the next thing. It’s that intuitive to grognards (and there are no DRMs). Now, to it, we’ve added an Overrun system (so you can’t just leave tiny “sacrificial lamb” units in your wake and expect them to buy you all kinds of space and time against the enemy’s Monster Units). It’s high-risk, high-reward, though, and a test of a player’s mettle to see how hard they’ll push (and how many steps they are willing to pay).

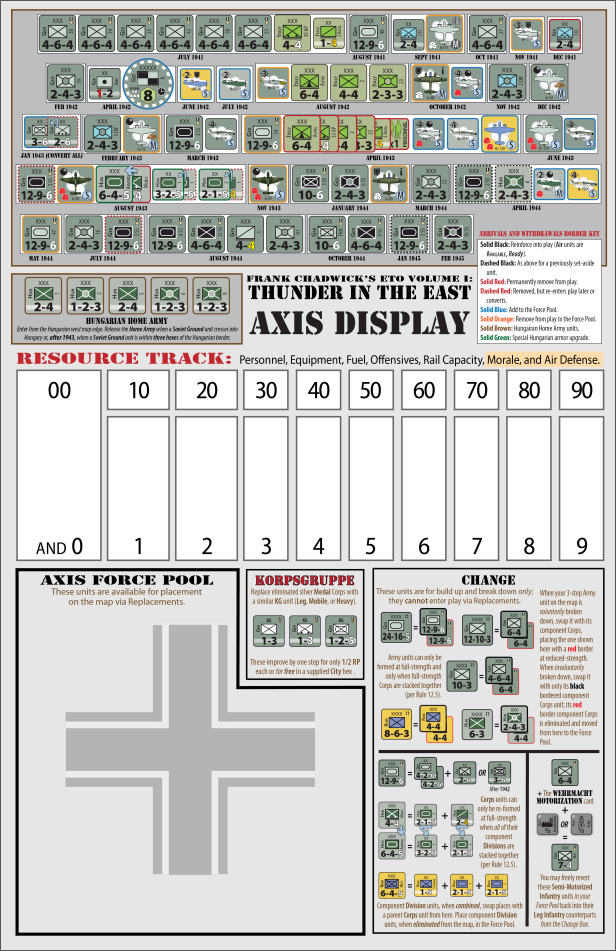
Grant: Are units reduced or only eliminated? How can these units be bolstered or replaced? How are reinforcements handled? Can we see a few images of counters and can you explain the information listed on them?
Frank: Corps and armies are reduced, division-sized units are simply eliminated. Large armies take two hits and are then replaced by one of their component corps, which then can take more punishment. Most corps flip over to a reduced strength. The Soviets are an exception in that their corps are smaller and have only a single step. For the Germans, they’re best corps units also have a “Korpsgruppe” remnant step when they’re eliminated, giving them a bit more longevity and allowing them to be reformed at a small savings in Resource Points.

Grant: What are the stacking limits? Why did you decide on this limit?
Frank: The stacking limit is one large unit (army) one medium unit (corps) and one small unit (division), but you can always substitute a smaller unit for a larger one (so you could also have two corps and a division or three divisions).

I wanted a simple stacking limit and one that didn’t end up with towering stacks, but that also let you put together the concentrations you need on a narrower front, particularly the campaign in the west. I also wanted the limit to be about span of command, not just counting up how many guys you can pile into a hex,
[11.1] The Physical Stacking Limit: A maximum of 3 friendly Ground units can stack together in a hex (excluding markers, which are always “stack free”), within these restrictions:
- Each hex can have a maximum of 1 Large (i.e., Army [XXXX] size) Ground unit.
- Each hex can have a maximum of 2 Major (i.e., Large or Medium) Ground units.
- Therefore, a hex’s maximum (3) Ground unit stacking limit must look like one of these combinations:
- 1 Large + 1 Medium + 1 Small Ground unit; OR
- 1 Large + 2 Small Ground units*; OR
- 2 Medium + 1 Small Ground unit; OR
- 1 Medium + 2 Small Ground units*; OR
- 3 Small Ground units*.
- The key to stacking, though, is that not every unit can attack through a single hexside. A fully-stacked hex cannot concentrate all its power through a single hexside:
- *No more than 1 of which can be a Garrison or Hardened Garrison unit.
- The number and size of Ground units that can attack out of a hex is limited. No more than 2 Ground units (total) can attack across a single hexside, and of those, no more than 1 can be a Major (i.e., Large or Medium) unit. An advantage of Small units is that, when stacked with a Major unit, they can attack together across a single hexside and provide some extra punch.
Grant: How is weather handled in the game?
Frank: Each theater in the game is also a climate zone (and the theaters are based mostly on climate boundaries). You roll separately for weather every turn in each climate zone and there’s a different table for each zone. The Mediterranean climate zone we broke into two theaters just for game purposes: the Southern European, and the Black Sea/Middle East. So the theaters in the game are Western Europe (which is based on the Maritime Climate zone), Eastern Europe (based on the Continental Climate zone), Arctic, Desert, Southern European, and Black Sea/Middle East (the last two based on the Mediterranean Climate zone). So in the Desert theater, weather is almost always clear but there are chances of intense sandstorms a few months out of the year. Southern Europe has a lot of mud in the winter but not much snow or intense cold, which Eastern Europe has a fair amount of. In Western Europe you have severe storms and more overcast than elsewhere. Weather can affect ground movement, particularly mud, but it has more effect on air operations.

Grant: What scenarios are included in TITE?
Frank: Barbarossa (Summer ’41), Typhoon (Fall ’41), Blau (Summer ’42), Uranus (Fall ’42-Winter ’43), Citadel (Summer ’43), and Bagration (Summer ’44). Any of these can be extended into a campaign game with production and morale included (these are fixed in scenarios, each of which is about 10-12 turns long).
Grant: How does each side achieve victory?
Frank: In the scenarios victory is determined by number of Objective cities held at the end of the game. In the campaign game it’s determined by breaking the Soviet Union’s morale (or not).
Grant: I saw a thread on Consim where the statement was made that logistics should drive the game. Why? What type of experience does this create for the players?
Frank: A lot can happen in a short time in the game, but historically you couldn’t sustain that level of activity due to logistics. Offensives outrun their supplies and come to a halt, and then there’s an operational pause while you push your supply head forward. We wanted the game to have exactly that alternating tempo between intense offensives and pauses to reset but without a lot of arbitrary-feeling rules. We wanted it to flow naturally from the game’s logistics rules. So how logistics works is supply mostly affects your ability to attack (attack halved if beyond supply range), not to move or defend (unless you are completely isolated, which then limits your movement and starts producing heavy attrition).
You trace supply a fixed number of hexes from a major supply city or from a friendly HQ unit. The catch is that it takes several turns to relocate an HQ, and it’s completely out of service while you’re doing so. It also takes several turns from the time you capture an enemy-held supply city before it comes on line for you. The effect is that “operational pauses” are built into the system and “feel right.”
Grant: I also saw the following statement from a playtester: “This system just seems to flow smoothly and leaves me with the feeling that I am determining strategy and not fighting the system.” Are you pleased with this? How did you accomplish this in the design?
Frank: I’m very pleased to hear that. That’s exactly what we’ve been aiming for. For me I want as much of the game’s action to be taking place on the map, as opposed to off-map flow charts and events tables, as possible, and I want the rules we have to represent something it’s possible for the player to visualize. Alan Emrich’s got a good catchphrase for that, he says something like this “story boards well.”
Grant: What are some of the significant changes that have come about through playtesting over the past few years? Please give specific examples.
Frank: One change was having a player in his own player turn determine supply for his opponent instead of himself, which has two advantages.
First, it eliminates the sudden-death effect of cutting someone off, but also eliminates the need to remember when a unit was cut off. If you determine the enemy supply status at the start of your turn, the opponent has already had a player turn to try to break units out of encirclement, so it’s a way of giving a one player turn grace period without using markers to remember how long ago it departed supply.
Second, we discovered that people naturally think they have put all of their troops in supply so don’t look that hard to find guys who aren’t in supply. They do, however, look very hard to find enemy units out of supply.
A second idea which came from playtesters was battle groups. Corps currently have step reduction but that last step felt like too big a drop. Playtesters suggested that strong corps which become eliminated should get a weak battle group instead. For the Germans, this is a generic leg or motorized unit, quite weak, but it’s still there to plug a hole or to rebuild to a reduced strength corps, and we give them a discount for doing so as opposed to rebuilding it from scratch.
For the Soviets, a reduced strength rifle army which is eliminated is replaced with an “untried” rifle corps, which is to say a corps which could be any of a variety of strengths (mostly pretty weak) which you don’t reveal until it’s in combat (the playtesters’ lugubrious cafeteria nickname for them is “Mystery Meat”). We already had this mechanic in the game for the Soviet early war mechanized corps, so it made sense to extend it to reduced strength Soviet rifle units. It adds a lot of excitement and uncertainty to the game. Ask any Axis player about to Overrun one…they really pause and have to consider that!
Grant: What is the schedule for TITE? What is the planned MSRP?
Frank: We plan to have Thunder in the East kickstarted later this year and printed next year. Then one major release every year or two until series completion, depending on the breaks. Since we started with all the parts designed in a meta sense, the first actual game release–ironing out the rules systems and scenario formats, map art, etc., is the biggest single task and, while the others won’t be trivial projects, they will be less complicated from a production point of view.
Alan Emrich: The MSRP, as it is for most games, is based on the cost to manufacture and ship. What can we say? Thunder in the East is going to have a lot of components and weigh a ton, so it will be expensive. We haven’t shopped it for printer quotes yet, but I wouldn’t be surprised if the retail price eked over $100 (plus shipping). We’re taking a “spare no expense” attitude about component quality (because, Lord knows, three years of playtesting has certainly delivered the game quality). We want this game to have a place of honor on your game table and not your game shelf, because TITE is a real “player’s game” that will remind you of the fun you had when you first started playing wargames “back in the day.” That’s what we were after, and I’m confident that is what we’ve achieved, and the game’s production will be what wargamers wish for as they study the map and push the pieces around.
Grant: What has it been like working with Alan Emrich and Victory Point Games?
Frank: Very good, and I think a learning experience for all of us–in a good way. It’s very gratifying to work with a team this committed to the project and working so hard to get every detail right.
Thanks for both of your time Alan and Frank. I appreciate the interview and know that our readers will thoroughly enjoy it! As for me, I will say that I will definitely keep on the lookout for this game’s Kickstarter campaign later this year and also am very interested in it’s follow up games in the series.
-Grant


Thank you for this interview with Mr. Chadwick. I enjoyed his Beda Fomm a lot and I am hoping Hellfire Pass (currently on GMT’s P500) will come to printers soon. (I have a soft spot for North African front in WWII).
LikeLike
I playtested an earlier version of this system, and found it very interesting. My major concern was that the Battle for Moscow scope was a bit too constraining to take full advantage of the very effective systems (particularly HQ/Supply) – the entire East Front should be perfect to allow the system to shine. I’m going for it as soon as it’s announced.
LikeLike
It looks great. Frank surely knows how to design a good Wargame so I’m optimistic that it will be VERY good. Thanks for reading.
LikeLike