
Before I start my review, I wanted to state that I have not played any other World War I wargames in the past (although I have played The Grizzled by Cool Mini or Not Games) and Fields of Despair has been my first attempt at exploring this conflict. I have tended to focus on World War II, and it is not that I don’t care about World War I, it just has not necessarily piqued my interest enough to explore, probably due to incorrect perceptions on my part. Well, I am pleased to say that after playing Fields of Despair for the first time, my preconceived notions about a static, slow, plodding and uninteresting war mired in trench warfare have been shattered. Everything about this game is unique, vastly different than expected, very strategic and gamey and most of all FUN to play!
What is Fields of Despair About?

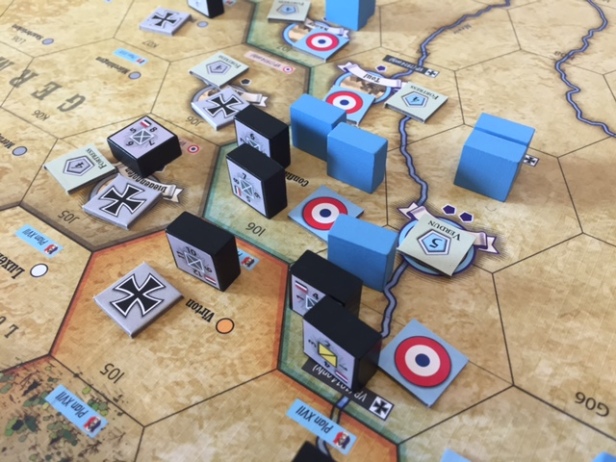
Fields of Despair: France 1914-1918 is a recent P500 game from GMT Games that shipped in mid-January that is a medium weight 2 player hex-based strategic level block war game set on the Western Front of World War I. Players take control of either the Allies, including France, England, Belgium, the United States and an abstracted Russia or the mighty Central Powers fighting the war not only on land, but also at sea, and most importantly and probably one of the better and more interesting parts of the game, in the air all while having to focus on and make tough decisions about your economic and technological progression.
FoD uses a very unique and revolutionary block system designed to maintain the confusion and uncertainty of the Fog of War throughout the entire game. The reason that I consider this system revolutionary is that in most block games, the combat values of individual blocks usually range from one to four, so as you scan the battlefield and after a quick calculation in your head you can come up with a pretty good guesstimate of what force power is arrayed against you, while in FoD the combat value of blocks ranges from zero (dummy blocks) all the way to a maximum of twenty. This difference in value ranges alone has completely changed the block wargame and has created a very strategic game that can be quite deceptive and difficult to play well. The reason for this deception is that you can build up one block in a hex to 20 when in other block games this would require 4 or 5 blocks that have tipped your hand and help your opponent to gauge your strategy and react more effectively to counter that. But, this deception does have its limits as air reconnaissance, one of the best parts of the design, allows players to scout out the strength of units and remove that deception. But, you cannot simply scout with no opposition as your opponent can place his air units in that hex you are scouting to initiate aerial dogfights that will ruin your recon attempt.
Movement in the game is also very straightforward and simple and can be used as a deceptive tool as well in addition to the use of dummy blocks. Players are allowed to “make change” during the movement phase, which means a larger block can be broken apart into 2 separate blocks or can even be done in reverse by consolidating a few smaller blocks into a larger force. So after the movement phase, you will not be 100% confident in your enemy’s strength and will have to sometimes just throw your hesitancy out the window and attack.
The Fog of War also isn’t lost after first contact with the enemy. Blocks remain hidden even when enemies occupy the same hex and stay hidden until one player decides to allocate an air squadron for reconnaissance or sends his men across no man’s land to attack.

Components – As is becoming standard with all of GMT’s recent releases, the components in FoD are of the utmost quality and add an additional level of depth to the gameplay itself. I love the art chosen for the box cover as it truly conveys that feeling of dread that seems to have permeated the entire World War I experience and sets the tone for the game right off the bat. I love the little things that make the game stand out, such as the plush, colored draw bags for the Naval Warfare (blue) and Eastern Front (red) that further immerses you in the game, as well as the beautifully laid out and very functional Player Aid cards.
Sequence of Play – Now to the meat of the game. The Sequence of Play is broken down into 7 very easy to follow steps that at first can seem like a lot, but once you have played a turn or two, become second nature as you dive into the game itself. I wish to focus on only 4 of the 7 steps as the Advance the Turn and USA Entry Marker, Action Phase 2 (once we have discussed Action Phase 1) and the Scoring Phase, are pretty self explanatory.

Resolve Eastern Front – This phase of the Sequence of Play is an abstracted take on the war on the Eastern Front but is done very well. This phase is meant to model the drain on the Central Powers resources that fighting a 2 front war had and each scenario of the game has a starting value for the Eastern Front Track markers. Each scenario also tells the players how many Russian (red) and CP (black) Economic Points or cubes to place in the Eastern Front (red) draw bag or the CP player can also spend his EPs to add cubes to the draw bag (more on this later). After adding the appropriate cubes, players reach in and draw out 3 cubes at random. If any red cubes are drawn, a d6 is rolled and then players consult the Eastern Front Loss Table. The losses are reduced on the General Information Track and if the Eastern Front marker reaches the Bolshevik Revolution, Russia then exits the war and at the start of the next Strategic Reorganization Phase, the CP player gets to place any CP blocks with SPs equal to the Eastern Front marker’s value on the GI track into any uncontested, friendly controlled or front line hexes.

In the rare instance that all three cubes drawn are red, this is considered a Major Russian Victory and one of those 3 cubes will be removed from the draw bag and placed in one of the 3 Major Russian Victory boxes on the game board. If this happens three times, then the game will automatically end as this represents the fact that Berlin has fallen to the Russians. We have not seen this happen yet but have seen 2 such Major Victories and it does make this segment much more tense than usual. This is pretty rare as when it happens you are removing red cubes, which is minimizing the chances of 3 being drawn in the future, and any good CP player should be spending at least some of their EPs to put one or two cubes in this bag as it ensures that this most likely won’t happen.
One thing that I really liked about this phase was that the CP player can choose to improve his chances of winning the war on the Eastern Front by buying EPs during the Production Phase. This of course comes at a cost as it will reduce the available resources he has to buy planes, repair fortresses, advance technology or add artillery counters. All in all, this was a great way to simulate the Eastern Front conflict in a game that was billed as focusing on the Western Front.
Production Phase – The Production Phase is generally considered the placement phase as you can now place new blocks on the board but can also spend your accumulated EPs on various upgraded assets of war. Prior to the new blocks being placed though, each side must reduce their values by one for their various Maintenance Tracks including supply (the number of blocks you are allowed to have on the board at once), artillery (how many artillery markers you can have) and air (how many plane markers you can have). This phase is a thematic choice to show how the economies of Europe were in fact degraded as more and more resources were put into the war machine but also represents the general disruption to the economy of soldiers fighting rather than working, railroads and other transportation assets being destroyed or harassed (such as shipping by the U-boats) and the destruction of manufacturing space. The genius of the phase though is that players get to decide how to split up their available forces in whatever denomination of blocks they choose, while remembering their Supply Capacity. For example, if the French are receiving 20 SPs in blocks according to the reinforcement table, they can put out a 20 SP and or can further break those down into a 10 SP and two 5 SP blocks providing they have those blocks in their supply and are at or under their Supply Capacity. These SPs must be placed in their nation’s deployment hex (Paris for the French, Koblenz for the CP and England for the British) so there are limits. You must remember that this was the beginning of the 20th century and transportation options were limited. Their is also a stacking limit of 3 blocks but these blocks can be huge, depending on how many SPs the player chooses. Such a great part of the game that makes it very deceptive and strategic!
Players will also determine Manpower Attrition depending on what round of the game it is. The trench warfare during World War I was brutal and the living conditions of the men were deplorable leading to rampant disease and maladies such as Trench Foot, Trench Fever, Lice and Typhoid Fever. Simply roll a d6 and consult the Attrition Table and then each player must take these losses in Frontline hexes of their choice by simply reducing their blocks by the result.
Naval Warfare – Another abstracted phase that I also really like how Naval Warfare plays out. This phase is intended to show the effects of the Royal Navy blockade as well as the German U-boat offensive. Both of these elements have the goal of taking away enemy EPs and if used well, can definitely make a difference in your effort to win the war. Similar to the Eastern Front draw bag, there is a blue draw bag that holds EPs and from which players will draw cubes. The cubes included in the bag are black (CP), blue (Allies) and white (neutral and nothing happens). But first, the CP player must declare what type of Naval Warfare he will conduct, either Prize Regulations or Unrestricted Submarine Warfare (USW). If PR is chosen, the cubes drawn will only reduce the Allies production but if USW is chosen, the British will lose SPs based in England. The phase is very quick but becomes very important as neither side can really afford to lose EPs or SPs. If the CP player conducts USW, this will cause the USA Entry Track to advance toward the USA entering the war if there were 2 black cubes drawn. This must be managed as you want to delay the USA entry into the war for as long as possible. Just the same as the Eastern Front, the players can spend their EPs to add a cube to the draw bag, thereby improving their chances. I like to do this secretly and we each take the draw bags and our cubes in hand and place them under the table in order to hide whether or not we are investing in these areas. Great gamesmanship involved in these draw bags!
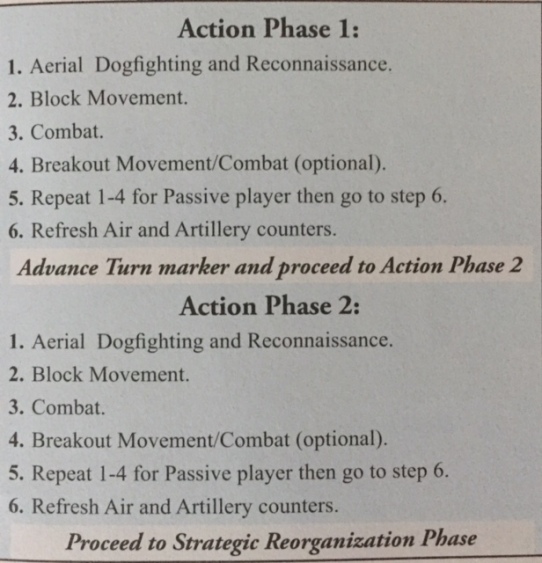
Action Phase 1 (followed by Action Phase 2) – You will notice that there are 2 different Action Phases, Action Phase 1 and Action Phase 2. Each of the phases entails one player performing items 1-6 completely and then the 2nd player doing the same and then moving to the next phase. The player with initiative goes first followed by the non-Initiative player.
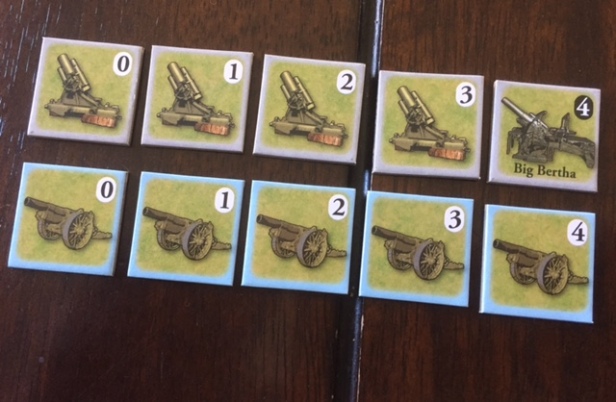
Step 1 is the Aerial Dogfighting and Reconnaissance step. In this step, the active player is  trying to reconnoiter the blocks of the enemy in various hexes and determine their strength points for possible attacks in step 3 Combat. Dogfighting is not permitted until Turn 2 as the planes at the outset of WWI were not equipped sufficient to dogfight. Each player takes their available Air Squadron counters and can place one in a hex with enemy blocks that is no more than 2 hexes away from a friendly, in-supply infantry block. Each player has the option of placing a counter, or passing, and the placement phase doesn’t end until both players have passed successively. You will notice that there is a counter that has a 0 value and this is a dummy counter used to bluff and hopefully draw your opponent into placing a counter in response in that same hex wasting it.

Dogfighting is very simple. You add up the total value of your counters in a given hex and then roll that many 6-sided dice and consult the table above for the result. For example, if you have 4 total value worth of counters, you will roll 4d6. On a roll of 1-4, there is no effect as this is a miss but a 5 is considered an Abort (which simply means that one value of the Recon attempt is reduced) and a 6 is a Hit and does an “Air Damage” to the opponents planes and also reduces the recon value. So, if your opponent has 4 recon value but takes one “Air Damage” and an Abort, he can examine up 2 blocks in the hex and these blocks must remain face-up until the end of the current Action Phase. Players can also invest in Aircraft Improvements by spending EPs during the Production Phase. These improvements include adding higher power counters, adding your Ace to your pool of counters and increasing your Air Maintenance Track allowing you to use more and more counters.

Step 2 is Movement. Movement is pretty simple and each player can move some, all or even none of their blocks during this step. Infantry blocks can only move 2 hexes, while Cavalry can move 3 hexes. Deception blocks can never be moved from hex to hex. Movement does allow for control of hexes if there are no enemy blocks or fortresses in that hex. This step is about moving your troops into position for battles but also is about “strategery”, or meaning to take over various hexes to threaten supply of your opponent or control hexes for the Scoring Phase. Prior to movement, a player can decide to break down larger blocks into smaller blocks. Movement into a hex that contains an enemy block or fortress forces the movement to stop and this hex now becomes a contested hex. An interesting design choice is that two enemy blocks in the same hex do not automatically pin or reveal the SPs of the other blocks in the hex. The designer said that he visualized a forward trench where forward movement was blocked but lateral movement was allowed and confused the enemy as to the exact makeup of the opposing force. You know the trench is occupied but you don’t know by how many troops. Genius decision Kurt!
Step 3 is Combat and starts with Artillery fire. Each player takes their Artillery counters, and similarly to Air Recon, places them facedown in an enemy hex or passes. The other player now has the option to place an Artillery counter or pass and the placement is completed once two consecutive passes have occurred. Artillery fire then occurs in each affected hex separately where each player rolls the number of dice associated with the strength of his counters and compares those results to the Artillery Fire Results Table where a 1-3 is a miss, a 4 is a hit if and only if the player has researched Chlorine or Mustard Gas and 5 and 6 is a hit, unless a fortress is in the hex which then eliminates the hit on a 5. It is important to remember that Artillery fire can never clear a hex completely of their blocks. After Artillery fire, the Active player has the option of ending the combat in each hex he fired into or continuing with combat. I like this element as it is thematic due to the fact that if the artillery was effective, thereby reducing the enemy force, a commander can choose to continue with the attack or call it off if the artillery aim was faulty. Combat is pretty simple as players add up their SPs and then roll 1d6 per SP with hits occurring on a roll of 5 or 6. Blocks are then reduced or removed and if the attacker defeats each block in the hex or the defender chooses to retreat to an adjacent hex, he can call a Breakout Movement and move into the adjacent hex chasing down the retreating enemy or attacking another hex. This is the part of the design that I really liked and that was so surprising to me as the early war was very mobile and Cavalry was used to run down retreating troops (Cavalry can move up to 2 hexes as part of a Breakout Movement while Infantry can only move 1 hex). The image of trench warfare and typical stalemate that we all have in our minds didn’t come about until later in the war.

After each player gets their combat turn, they reset their Air and Artillery counters and enter into Action Phase 2, which is similar in every way to Action Phase 1.
Strategic Reorganization – The best part of the game is the Strategic Reorganization Phase. This is the strategic movement phase that keeps your plans secret and confuses or misleads your enemy. The advantage of this step is that players can transfer their SPs over greater distances than is normally allowed to improve their position on the battlefield and to better defend certain key areas. The transfer also doesn’t mean you have to physically relocate blocks from one part of the board to the other but you can simply reduce one block and increase another in another hex. If you had to move stacks of blocks around, it wouldn’t really be that sneaky, now would it? I even like to simply rotate blocks in some hexes without really changing the SPs there by either over rotating (going back to the original spot) or simply moving blocks around in the same hex. See, this is all done at the same time and your opponent can’t really watch you do your reinforcements as they have to focus on their changes, so you can use this to bluff. The amount of SPs that may be moved is not governed by a set limit but is governed by the situation including the amount of blocks in your force pool, the situation on the front or what areas are in or near to being out of supply. You can also move your Deception blocks in this phase, whereas you cannot move them during the Movement phase.
What I Liked About Fields of Despair
Components – As mentioned above, this game is a beautiful masterwork piece of art! Each block is gorgeously selected and meticulously chosen to match their country’s color (I love the orange Belgian blocks!). The counters are very well done and the map is deserving of being framed and hung on the wall and that is saying something as this area of Europe was a total mess during WWI. Very well done GMT!
Eastern Front and Naval Warfare Abstractions – Before playing the game, I was a little bit worried about the abstraction being used for these two critical elements to the war on the Western Front but after playing and seeing how they work in person, I have to say it is one of my more favorite parts of the design. I love how the CP and Allies have to focus on these elements and how they can detrimentally affect your effort if ignored. I have tried to focus on them when playing by using some of my EPs to buy cubes to put into the bags but also as I mentioned before, I just love the gamesmanship of the whole idea. We take the bags and hide them under the table in order to hide whether we are investing in the bags as we really enjoyed this element. I think this was a very elegant design method to incorporate this important and impactful part of World War I into the game play without bogging it down. It is quick, it is fun to do and adds another level of gamesmanship to the whole process.
Logistic Point System – I didn’t really cover this above in my previous explanation of the game but the Logistics Point System is also a very good design choice for the game. A Logistic Point is an asset that allows players to take a very unique action at a cost. These can be purchased using EPs and really add another level of strategy to the gameplay. The LPs can be used to do any of the following actions: Aircraft Repair (remove damage markers), Big Bertha Artillery Fire (fire Big Bertha as a Rail Gun to remove those pesky fortresses from your path), Emergency Reorganization (move up to 5 SPs from one hex to any other hex, even frontline hexes to reinforce), Reinforcement (reinforce where Artillery Fire in ongoing), Re-Supply (remove OOS marker) and Retreat Before Combat (run away to fight another day). These are great during the game and I have found myself always making sure I have at least 1-2 available per round, which means spending my scarce EPs to buy them. Really nice addition to the design that adds some variety and also allows for some really miraculous actions that can change the course of the game at that point.
Artillery & Aerial Reconnaissance (Dogfighting) – I discussed this thoroughly in the above description but I love the Artillery and Aerial Reconnaissance. I love that the game is about trying to keep hidden the power or SPs of certain hexes. I have found that I like to try and fight to the death (using my Air counters) to keep secret the fact that I only have 5 SPs adjacent to Verdun or some other major area, as it keeps my enemy guessing and forces his hand to reinforce that area to keep me guessing. Many times we have ended a combat and looked at what was there and laughed because we were totally fooled or thought something very different than the reality. I have found that Reconnaissance is so very important and I love the mechanic to get that done but I also love the Aerial Dogfighting and trying to keep my units hidden. This was probably the biggest positive surprise for me in this design and I love it.
Strategic Reorganization – Along the same lines as my previous comments above on the gamesmanship involved with Aerial Reconnaissance, I feel the same about Strategic Reorganization. These two design elements make this game and have changed my preconceived notions about World War I from my Grandfather’s dreary trench warfare mired in stalemate to a very dynamic and strategic game that involves a significant amount of bluffing, subterfuge and strategic distraction.
What I Didn’t Like About Fields of Despair
Bucket of Dice – I love the feeling of rolling lots of dice! But to be honest, in my humble opinion, dice have no place in wargames. I feel like wargames pit two players against each other with the goal of out strategizing and outthinking the other. It is just a real shame to see a very well laid assault come down to the luck of the dice. I know that there has to be a determining mechanism to decide the outcome of battles but I hate dice and they hate me! The good news about this aspect in Fields of Despair is that there is a predetermined table included (Combat Tables for Hits on 5 or 6 and Combat Tables for Hits on 6) that provides hit results based on the number of dice being rolled. We have used this table and it actually mimics the results of dice rolling. I’d love to see this type of table used in other wargames.


Ineffectiveness of Poison Gas Technology – Due to the difficulty with assaulting fortresses and the benefit they provide to the defender (that of only hitting on a roll of a 6), I thought I would really get a lot of utility out of investing in the Poison Gas Technology and in our plays have heavily invested in its development. Two problems with this that I see. One, it still only adds a hit on a roll of a 4 and two, the other player can develop gas masks that nearly eliminate its effectiveness. It was such a focus of the Germans during World War I and we all have seen photos of the horrible effects of Mustard Gas but in the game design it just seems to have been relegated to thematic window dressing only. I don’t know how to fix it, but I feel like this is a weapon that doesn’t necessarily offer a significant advantage to the player that spends his EPs in developing it. I would prefer to simply develop my airplanes and focus on buying artillery counters rather than wasting resources on researching Poison Gas. A missed opportunity!
Fortress Power – As mentioned above, Fortresses are powerful and the Allies start with  several dug in positions that make the battle very difficult. My concern with Fortresses is two fold. One, the CP really gets no beneficial Fortresses to start any game. They have them but they are not necessarily beneficial as they are generally always on the offensive. Two is that they can generally be repaired pretty easily simply by expending an EP to do so. I know that they can never be repaired by more than one SP in any given turn but it is also a little difficult to repair a fort while you are under constant bombardment. I understand the need for the Fortresses and I even understand that they act as SPs that are included in the OoB for the French to even out the game but they are very frustrating to assault. Actually remind me considerably of the Forts in Wilderness War and have the same feel to them as you assault.
Supply Too Easy to Achieve – Supply is tracked in secret on your Player Board. The number of hexes that you are allowed to have blocks in must be equal to or less than your Supply Capacity. If you’re over this number then that many hexes must be marked as Out of Supply and I feel that the OoS penalty is just not that bad. The penalty includes movement restriction on your blocks (blocks can only move towards your map edge) and your blocks only fight at half-strength. Given that everything can move on the board and also given that you can reinforce your front lines using Logistic Points or simply wait for the Strategic Reorganization Phase, it’s not that hard to get blocks back in supply. You just reduce your number of blocks through consolidation. Yes this probably causes you to pause from your current offensive to get back into Supply but there really is no truly lingering penalty.
Summary/Conclusion
If you can’t tell from my review, I love this game and believe that it is an early entry for 2017 Wargame of the Year. I love that it is so unique with the Strategic Reorganization element as well as the continuous battle for reconnaissance with the airplanes. I have played several block wargames and the way this is handled is very revolutionary and I am sure will be replicated in future block wargame designs.
I also am very impressed with the tightness of the rules and how easy they are to understand and apply. For an ambitious wargame covering the entirety of the Western Front of World War I, a 24 page rule book was a shocker. But it is done very well and has very few rules problems.
I would suggest that you get out there and buy a copy of FoD immediately. I know that the P500 run was modest at only 875 copies but I am sure that GMT has a good 400-500 copies in their warehouse so please get a copy before they are gone. You will thank me…that I promise you!
If you are interested, I was able to do an interview with the game’s designer Kurt Lewis Keckley that gives some great insight into the game and his thoughts on the war and we also shot a quick Video Review sharing our initial thoughts after our first play through of the game. We also did an unboxing video as well so you can get a clearer look at the various components.
Finally, we also like to do what we call Action Points after our plays of new wargames by creating fake headlines using an online headline generator to share insights into our play with highlights of certain gaming mechanics and strategy. Here are Action Point 1 and Action Point 2 for Fields of Despair.
I’d love to hear your thoughts on my review as well as your thoughts about the game and would encourage you to leave your comments here.
– Grant

Any thoughts on the solitaire component included in the game?
LikeLike
Didn’t get to play solitaire yet. That is why I didn’t include that part in review. I was hoping to do that as a separate review later. Sorry.
LikeLike
Grant,
if you want to learn more about WWI in very user-friendly and digestible format I wholeheartedly recommend “The Great War” YouTube channel:
https://www.youtube.com/channel/UCUcyEsEjhPEDf69RRVhRh4A
It was started in 100th anniversary of WWI and has a weekly episode, with summary what happened during that week a century ago. Also, it has specials on specific topics (liek prelude to war, warring nations, important personalities), and episodes where viewers questions are answered.
What is best about it? That each episode is 7-10 minutes, so no problem with finding time for this – you can always squeeze it somewhere. However, be aware that addiction comes quickly and it i shard to stop after one…
LikeLike
Cool. I am all about learning and will definitely check it out. World History in 7 minutes is right up my alley!
LikeLike
This game is a blast. Review is accurate to what I also feel. The introduction scenario provide a good feel of the game but many aspect of the game are skip in a 3 turns scenario (invest in gas for Allies have no impact after 3 turns, CP can get the bonus for the last turn. The Eastern Front also have no impact for a 3 turn scenario). The intro scenario is in fact the 3 first turn a the main campaign. Wish Intro and campaign will have been separated.
Fun Factor: 8/10
Components: 10/10
Rules Book:
LikeLike
This game is a blast. Review is accurate to what I also feel. The introduction scenario provide a good feel of the game but many aspect of the game are skip in a 3 turns scenario (invest in gas for Allies have no impact after 3 turns, CP can get the bonus for the last turn. The Eastern Front also have no impact for a 3 turn scenario). The intro scenario is in fact the 3 first turn a the main campaign. Wish Intro and campaign will have been separated.
Fun Factor: 8/10
Components: 10/10
Rules Book: 9/10
I big 8.8/10 for me. Cant wait to play it again.
/Bx
LikeLiked by 1 person
While “Poison Gas” was indeed horrific (and remains so today) for those forced to endure it, its use in the Great War never had a significant strategic impact. It sounds like the game reflects that accurately.
LikeLike
Yeah. After talking with the designer and looking at some statistics poison gas played only a minor role and was probably most effective in the area of fear and morale. The design is spot on and I was wrong about it. Once again an incorrect preconceived notion about WWI has now been blown up.
LikeLike
I just discovered your site as part of my journey of entering the world of war gaming and it is great! As a WWI buff I am quite interested in Fields of Despair and I am really interested to know how this game has aged for you? Is it still favourite, Grant? Would there be any WWI game that you would recommend in its place?
LikeLike
We have only played one additional time since I wrote the review but I loved it even more once I was confident in the system and the strategy. It is a great game and I’m not sure there is another like it.
LikeLike
Wow. Such a great review. It wrapped up the rules in a very deatailed but easy to understand way. Congratulations for the good job, as always. Kind Regards from Brazil.
LikeLike
Great detailed but easy to follow review! I’m late to the party. I hope the latest p500 works out and this game is reprinted. I’m in that one as a result of your channel and blog. Thanks!
Also, would love to see a review of the solo system either on the blog or the Youtube channel. Sounds like a great game!
Wayne
LikeLike
Thanks. It is a great game. Glad you liked the review.
LikeLike
Handsome Grant, has this ever hit your table again? If not, is that simply due to too many other great games to play currently? Or is there anything about the game since your last play that keeps it on the shelf?
I am new to this whole war game thing and see it on GMTs P500 list, from your experience is this still years away from a reprint? It is only half way to 500 and it has been three years since it’s original release.
Keep the quality reviews coming.
LikeLike
We have played twice but not sine our initial foray. I tried it Solo about a year ago and it was a good solo game. Just too many good games. It probably is a year or so away from a reprint.
LikeLike