

Before I get into our After Action Report, I just wanted to say one thing to those who may be new to playing Combat Commander. If there is one thing I’ve learned about this beautifully designed tactical gem of a game, it is that no matter how desperate things might look, no matter how far behind you are on the Victory Point track, no matter the situation or the odds being stacked against you, there is ALWAYS a chance to pull out a victory! We have played 11 scenarios over the past 6 months and there have only been a few of those that were blowouts. The rest have come right down to the end, some even coming down to the very last few cards. This scenario is one such occurrence!
Scenario Setup
From the playbook, we read the following situation report for Scenario #9 Rush to Contact:
Outskirts of Hitdorf, Germany, April 6, 1945 – After crossing the Rhine, leading elements of Company A, 1st Battalion, 504th Parachute Regiment found themselves met by elements of the 62nd Volksgrenadier Division on the road to Hitdorf.
Both sides reported contact and immediately called for reinforcements.
I chose to play as the Americans and Alexander played the German forces, with me as the Attacker (6 cards) and Alexander the Defender (4 cards). The Surrender level was set at 11 for the Germans and 13 for the Americans, which told me that this was a longer scenario that would be bloody. Also, the Axis started with control of all 5 Objectives and also started with 14VP’s, which led me to believe that I most likely couldn’t win by Victory Points alone but would have to have the goal of killing his units to force Surrender or attempt to control all 5 Objectives by the time we hit the 1st and only Sudden Death at round 12. This was going to be a real tricky scenario to win for the Americans but I felt good about my odds as I was given 12 Paratroop units (FP 6 (boxed), Range 4 (boxed), Move 5 (boxed) and Morale 8). The Paratroop units are amazingly hardy and versatile and can take advantage of several key Action cards such as Spray Fire (if all firing pieces have boxed Range, Target 2 adjacent hexes), Assault Fire (make a Fire Attack while moving with any units that have boxed Firepower) and Smoke Grenades (place smoke adjacent to a hex occupied by an American unit with boxed Movement that is currently activated to Move).

I also would be given the fortune of taking the first move and the Germans would have the misfortune of only starting the game with 3 units on the board, with the other remaining Leaders and units being reinforcements on the Time Track in space 3. This would give me a full round to try and get a foothold from which to assault the Objectives and set up fire teams to take out the eventual German reinforcements. I guess this is the price for allowing the Germans to start with such a huge VP advantage! The scenario had Open Objective U which reads “Each of the 5 Objectives are worth 3VP to the player holding them last at the end of the game., but I didn’t feel that it would be possible to win with VP for two reasons. One, he was starting with a considerable lead with 14VP, and two he was the Defender so would get a free VP at each Time Check, of which there were 10 in the game equating to a possible 10 additional free VP.
The special rules for the scenario also were interesting as they gave the Germans all of their reinforcements in Round 3, while the American reinforcements were spread out from Rounds 3 through 5, with a 105mm Radio (FP10) being given in Round 6.

The scenario required the Americans to set up first, one hex deep from the edge of the map. I never like to set up first but when I do, I typically look at the map to guess where it is I believe he will set up. This allows me to be able to deal with whatever he gives me. I had 2 great Leaders in Lt. Wray (Command 2, Morale 9) and Lt. Esparza (Command 2, Morale 9) along with Cpl. Hubbard (Command 1, Morale 7) and decided to deploy into 3 separate teams, each with a specific objective in mind but remembering flexibility in case he setup differently than expected and I would be required to adjust.

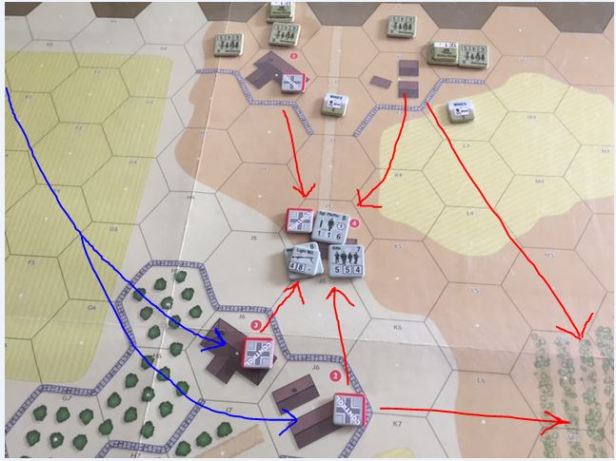
Team #1 – I put 2 Paratroop units on my left flank led by Lt. Wray (Command 2, Morale 9) who was equipped with a Satchel Charge as his range is bad (Range 1). I was planning to take the buildings located in hex K2 (denoted by the red line) from which to establish a Fire base to offer cover to Team #2 and Team #3 to the right as they would be my main forces advancing on the German held buildings in the middle of the map at Objective #4. They could also bring fire to bear (denoted by the blue line) through the wheat field to my left flank in case the Germans spawned on that side of the map and tried to advance through the brush on the hilltop there. Also in looking ahead to Round 3 when I would be able to deploy Sgt. Smith (Command 2, Morale 8) along with a Medium MG and a Paratroop unit, I would be reinforcing Lt. Wray on the left flank with these 2 units in order to bring additional Firepower on the Germans in Objective #4 and assist in the defense of advance up my left flank.
Team #2 – In the same picture above you can see that Team #2 is led by Cpl. Hubbard (Command 1, Morale 7) who is also equipped with a Satchel Charge and consists of 2 Paratroop units as well. They have the goal of taking Objective #1 located in hex I2 (denoted by the red line) at the outset and then advancing on the German position at Objective #4 (denoted by the blue line). They would not be my primary attack force on this Objective but would move and fire when the opportunity presented itself. As you can see from the picture, the Germans placed a few mines in my way to prevent me from quickly advancing and having to go over the wall using up an additional +1 movement point. Good use of those mines!

Team #3 – Consisted of 2 Paratroop units led by Lt. Esparza (Command 2, Morale 9) who would start on the road hex in order to take advantage of a +1 Move bonus. I initially setup this group thinking that they would be focused on advancing down the road to the buildings located on the hilltop at Objective #5 but when the Germans deployed into the buildings at Objective #4, I saw an opportunity to run through the wheat field, taking advantage of its LOS penalty of -1 on Fire Attacks, to try to take over Objectives #2 and #3 (denoted by the blue line on the picture below) and then fire on the Germans on all fronts (denoted by the red lines showing fields of fire). Also in looking ahead to Round 4 when I would be able to deploy Lt. Blankenship (Command 1, Morale 9) along with a Paratroop unit, I planned to reinforce Lt. Esparza on the right flank or if I had taken Objective #4 by that point, looked toward advancing on Objective #5 on the right side of the map near their German spawn point.
As you can see from the picture above, after I setup he placed his forces in the buildings at Objective #4 which was a total shock to me. I feel that he did it to slow my advance and also to stop me from gaining the +1 Firepower from firing downhill at him if he setup in Objectives #2 and #3. This caused me considerable pain as I was simply unable to eliminate his units here with Fire Orders.
Full Out Assault on Objective #4 – Take It and We will Control the Battlefield
Lt. Wray: Lt. Esparza. Dog 1 is open and unprotected. Advance through the field and take those buildings located in the orchard to flank Gerry. If you can take it, we will control the battlefield! We will advance here up to the wall and provide suppressing fire for your assault. Do you copy?
Lt. Esparza: I read you loud and clear and am already on it! Just make sure you force them to keep their heads down….[Lt. Esparza quickly advances through the sheaves of wheat, dodging fire from the Germans as easily as a running back in the open field avoiding tacklers.]
Lt. Wray: Great execution Lieutenant! Keep the pressure on them as you now have them flanked…We will move up and assault the Krauts!
I felt like I had to take Objective #4 at all costs prior to the 3rd Time Check when the German reinforcements would arrive. In my opening hand, I had 2 Move Orders along with 2 Fire Orders so I moved Team #2 into Objective #1 in order to setup a good firing position to keep the pressure on the Germans. I was able to use one of my Assault Fire Actions to fire with the 2 Paratroop units on the Germans which broke his Rifle unit. I also used my other Move Order to move Team #3 led by Lt. Esparza through the wheat field to get into position to take Objectives #2 and #3 on my next turn. He did do an Opportunity Fire Attack on me through the wheat field but I defended without taking any damage. He was already sweating as I don’t feel he anticipated my aggressive opening move! I followed that move up with another Move Order the next round, taking Objective #2 and putting myself in perfect position to fire on Objective #4 from his rear. This created a “killing field” where I could bring to bear 3 separate fire teams with interlocking fire on the Germans. These teams had an average starting Firepower of 10, which was really good as a base and I was able to focus at least 3-4 Fire Orders on him in the first 3 or 4 rounds, but to no avail as he had good cover from the buildings of 3 along with the Command bonus from Sgt. Pfeiffer and the decent morale of the units. I just couldn’t break them!


Time Wasted & the German Reinforcements Arrive
Lt. Wray: Lt. Esparza. German reinforcements have been spotted in the hills to your south and southwest. Brace for contact. You have to hold them back until we can dislodge Gerry from the buildings. This is imperative. Do you copy?!?
Lt. Esparza: I copy but am now taking fire from the Krauts to my south as they provide cover for the column moving up our left flank. Is Sgt. Smith moving up? Over…
Lt. Wray: Smith is moving up & he is carrying the Medium MG into the wheat field slinging lead all over the place! That crazy son of a bitch is going to dislodge them all by himself.
On my turn in the 6th round, I drew a Time Event as I was firing on him and this opened the flood gates as he now was able to deploy all of his reinforcements. He placed half of his reinforcements on my left flank planning to move up through the brush covered hills to attack by main fire base and take Objective #1 from me. The other half of his forces were placed in the center just south of Objectives #2 and #3 where he was planning to move up slowly on my positions and force me to focus there rather than on the units now trapped in the center at Objective #4. I had wasted my time and had not accomplished my objective while I had the chance. Now I would have additional pressure and problems to deal with. This was not going well for me and my frustration was building, and would manifest itself in a few critical errors over the next few rounds.
I also received some reinforcements this round, Sgt. Smith (Command 2, Morale 8) along with a Medium MG (FP6, Range 10) and a Paratroop unit. I placed this team on my left flank with the plan of moving them into the middle of the wheat field to offer some form of cover and focus their fire on the buildings. As would be my luck, on my very next Fire Order I drew the Time Event again (I guess I didn’t shuffle that well) which allowed me to bring in another Leader Lt. Blankenship with another Paratroop unit whom I placed on my right flank to give support to Lt. Esparza’s team at the orchard but this brought me one step closer to the end which I wasn’t really making any progress toward my goals.

My Fire Orders from Sgt. Smith finally started to take a toll as I was able to suppress the Rifle unit and break both Sgt. Pfeiffer and the Weapon team in the buildings. While I broke them, he always seemed to have that one Recover Order waiting in his hand and was able to keep bringing them back on life support with that huge Morale!

Fun with Artillery – A Lesson in Range Finding
Lt. Wray: Take cover…..incoming artillery! They have the range on us. Keep your heads down and take cover! [Loud explosions can be heard along with the screaming of the men that were hit]
Lt. Wray: Report! Green 1? Green 1, do you read me? Hubbard?
Cpl. Hubbard: We’re still here Lieutenant! Barely….that last round hit right next to me but was a dud. Boy, am I lucky.
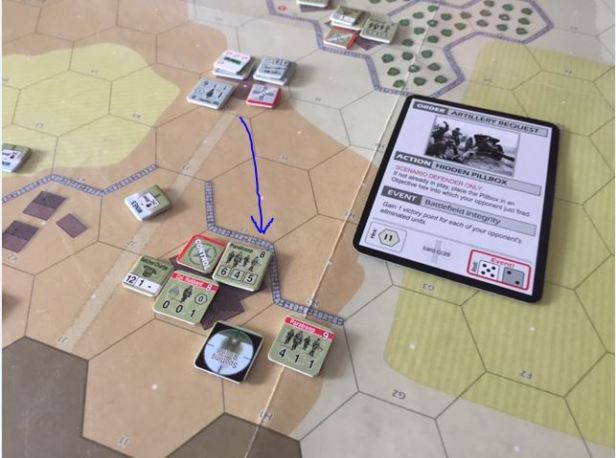
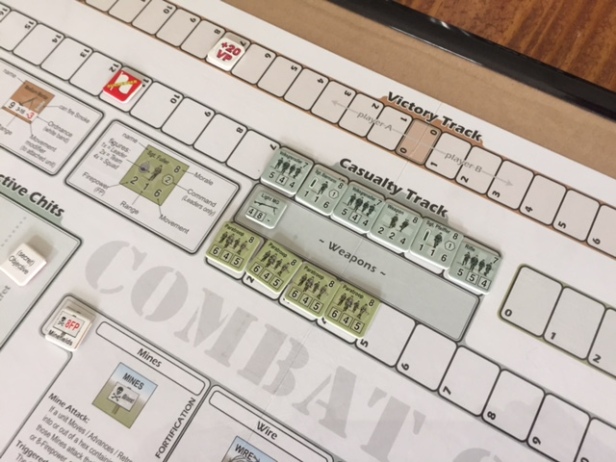
At this point, we seemed to be at a stalemate and the Germans decided to call in artillery with an Artillery Request Order. For those that don’t know, the Artillery Request is a fairly involved and complex procedure. First, the firing player must be able to trace a Line of  Sight with a leader. If they can trace the LOS, you next calculate the number of hexes from the spotter to the target and pull a card as a roll. You are looking for a number higher than the number of hexes and you get to multiply the 2 numbers together. So for example, if the target is 6 hexes away and you pull a card as shown below with a 5 and a 2, you take the product of these two numbers, or 10, and compare it against the number of hexes. If it is greater then you have found your target and the artillery barrage is a hit! You then check for drift by pulling a card as a roll and then move the target one space in the direction hex-compass according to the number on the white die then again for the black die. This means it can drift away from the target, onto another target or even drift away from all targets and miss. Artillery is very fun and very involved but the rewards are sometimes sketchy! In the picture below, you can see that the Germans artillery was effective and found its target in my Team #2, breaking Cpl. Hubbard and one of the two Paratroop units. We exchanged Artillery fire 3 or 4 times over the next few rounds, eliminating a few units but truly without much effect.
My Desperation Shows Itself through Aggression
Lt. Wray: Sgt. Smith, tell your men to fix bayonets, we are going to charge Gerry! We have to take that position now or we are going to be overrun by the German force to your left flank. Do you copy?
Sgt. Smith: We are going to risk friendly fire as we are coming from all sides, sir, but we are with you. Bayonets are fixed and we are steely! On your order sir.
Lt. Wray: God help us…..charge!
As the Germans began to make progress on their advance up my left flank, and with my units taking artillery fire and beginning to break as well (see all of the red in the picture below), I decided it was time to take a risk. I first played a Recover Order, bringing back to full strength nearly all of my units, and I had an Advance Order in my hand and felt it was time to use it. I desperately needed to take Objective #4 and had him outnumbered so I made the call and decided to engage in hand to hand.

I played the Advance Order activating Lt. Wray who in turn activated the Paratroop unit in his hex as well as Sgt. Smith and the Paratroop unit in hex K4. This brought my Firepower to a 27 (Sgt. Smith with 4FP + Veteran Paratroop with 10FP + Paratroop with 9FP + Lt. Wray with 4FP [including Command bonus of 2 from Smith]). [I made a mistake here and shouldn’t been able to activate Sgt. smith so my FP would have only been 21 which was still enough to win the fight so no big deal. Here is how I got to the corrected 21FP – Veteran Paratroop unit is base 6FP, +1 for Veteran, +1 for boxed FP and +2 Command from Lt. Wray; so 10FP + Paratroop unit with base 6FP, +1 for boxed FP and +2 Command from Lt. Wray; so 9FP + Lt. Wray base is 2FP = 10 + 9 + 2 = 21 if my math is right!] This led to my victory as he was only a base FP of 8. I eliminated 1 Leader and 2 of his units, gaining 5VP and gaining some ground on causing him to have to Surrender. But there was a major cost to this victory for me! After the melee was over, I was over stacked and would have to lose 1 of my 2 Paratroop units so in the end I only netted 3VP. Friendly fire! But I took the Objective and now could turn my focus to other areas of need such as staving off the Germans advancing up my left flank and starting to think about how to take Objective #5.

Moving in for the Killing Blow
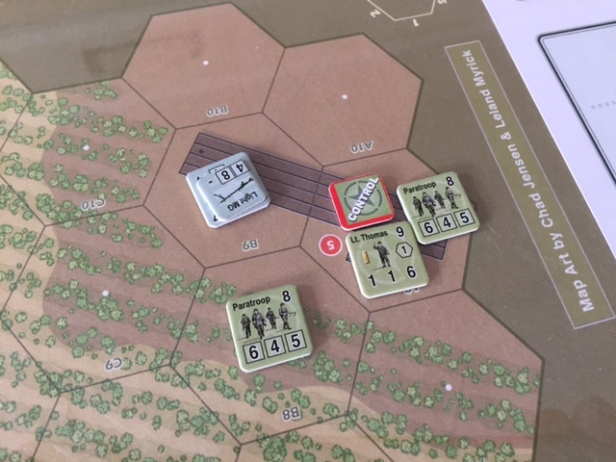
I now was able to turn my focus to Objective #5 located on my right flank in a cluster of buildings located at the top of a brush covered hill. He had left this area lightly defended and only had a few Volksgrenadier units with Light MG’s and a Leader (Sgt. Biermann Command 1, Morale 8). It took me several rounds to move Lt. Thomas (Command 1, Morale 9) along with 2 Paratroop units along the road on the right side of the map to get into position to attack the Objective. I wanted to try and call in an Artillery Request on the buildings before moving in to use the Advance Order and Ambush Action that I had in my hand but I was unable to trace a Line of Sight from any of my Leaders due to obstacles and the fact that the buildings are on a higher elevation. So having been foiled in my plan to soften him up, I decided to go for it and moved into melee. My team had a total FP of 9 to his 7 and after using my Ambush, I reduced him to a 4FP and won the battle easily, eliminating 2 more units bringing his total killed units to 9 (after killing another unit back at Objectives #2 and #3). This meant that I only had to kill 2 more units to cause a Surrender!
The Germans now reacted to me taking over Objective #5 by moving a few teams toward the buildings and I reacted similarly moving Lt. Esparza along with 2 Paratroop units (one of which was Veteran) from the orchard toward the hill top to intercept his movement. I now could trace a LOS to the Germans and called in a very effective Artillery Request (thanks to my newly acquired FP10 105mm Radio) that broke several of the advancing German units and then finished one off with a Fire Attack from Lt. Esparza’s group but this is where I was foiled in my attempt.
When I was breaking one of his already broken units, he was able to play a Light Wounds Event that allowed him to replace that squad with 2 teams, thus robbing me of one kill, keeping his eliminated units to 10, 1 shy of having to Surrender! But I felt that I had him where I wanted him, even though we were in space 11 on the Time Track (game would automatically end at space 12). I looked at his deck and he appeared to have about 3 cards left so I knew it was going to come down to the wire. On his turn, the Germans called in 2 very weak and ineffective Fire Order but his intent was not to kill me or even break my units….he wanted to eat up his cards so that he could end the round now, before I could kill one more of his units. Alas, his tactic worked as he ate through his remaining cards and forced the final Time Check. As I looked down at my hand, I saw 2 Artillery Requests and 1 Fire Order, which would have been enough to kill at least one more unit forcing Surrender, but alas, I was never able to get that opportunity!

Summary & Debriefing
What a great game, terribly disappointing way to lose for me, but it was an amazingly tense and tactical game that stretched our minds and nerves. At the end, I was reminded of the great quote from Herman Melville’s Moby Dick, “…to the last I grapple with thee; from hell’s heart I stab at thee; for hate’s sake I spit my last breath at thee.” In Combat Commander, you are never really out of it! Had I had one more round, I most likely would have been able to kill one more unit and force Surrender. Never give up, battle to the very end….and you will be surprised by the opportunities that present themselves. I now hold a slim edge over Alexander and am 6-5 in our plays. I have lost 2 in a row! I have to get the ship righted and back in the winners column.
-Grant

“I played the Advance Order activating Lt. Wray who in turn activated the Paratroop unit in his hex as well as Sgt. Smith and the Paratroop unit in hex K4.”
This sounds like it may have been a rules slip. You can’t activate another leader with a leader. Perhaps I misunderstand?
LikeLike
Fantastic writeup. It seems like CC:E produces more than its share of close games.
LikeLiked by 1 person
Still not sure how you got 21 FP? Did you add up the moral instead of FP?
LikeLike
Here is how I got to the corrected 21FP – Veteran Paratroop unit is base 6FP, +1 for Veteran, +1 for boxed FP and +2 Command from Lt. Wray; so 10FP + Paratroop unit with base 6FP, +1 for boxed FP and +2 Command from Lt. Wray; so 9FP + Lt. Wray base is 2FP = 10 + 9 + 2 = 21 if my math is right!
LikeLike
My congratulations for your blog and more specifically by the AAR of Combat Commander, which I read with more interest. I like a lot this fantastic game.
Seeing your report I found a play, that of the melee, which, in my opinion, is not correct .. According to the original rules O16.4.1 Melee Strengh that says:
“After both players have played and resolved any Ambush Actions (A25), each adds up the current FP of each of his remaining units – not weapons – in the Melee hex, then adds +1 for each of those units with a boxed to arrive at his “Melee FP”.”
You do the following calculation for the Total FP American player: +6 first paratrooper unit, Veteran +1, +1 boxed FP, and adds +2 Command Lt. Wray which gives a total of 10 FP. Then again do the same for the other paratrooper unit, except veteran, giving 9FP: + 6FP, boved FP +1, +2 Lt.Wray; and finally adds +2 FP Lt.Wray. Total = 21 FP.
First, and if so be that it is not, the command only must adds once to any action of fire, and in this case has added twice. But the fact is that the Command factor is not added in a Melee or so is evident in the O16.4.1 rule, which does not indicate at any time that the Command factor must be add.
Returning to the melee play, the result would have been, two paratroopers units +6 and +6; a veteran +1; two boxed FP +1, and +1; more, finally, FP Lt. Wray, + 2 . Total = 17 FP.
Any chance more had had the German player.
I reiterate my congratulations for your blog and by the AAR. I like a lot. Thank you, again. and I hope to see more AAR of this fantastic game.
José A.
LikeLike
Thanks for your nice words. I am glad you like our blog and enjoy our AAR’s. I will look at the rules later today about the Command Bonus in Melee.
LikeLike
Remember also that the starting setup has vps baked in, therefore for each objective you take the Germans LOSE 3 vp as well as you gaining 3 vp, so each is worth 6 points. Starting at -14 and conceding -10 for defender vp is exactly balanced by the USA taking just 4 of the 5 objectives. Of course there’s casualties, exits and a secret objective each but I think a vp win is definitely a possibility for the USA in this scenario
LikeLiked by 1 person