

The German invasion of Poland began on 1 September 1939, one week after the signing of the Molotov–Ribbentrop Pact. German forces invaded Poland from the north, south, and west in the morning. As the Wehrmacht advanced, Polish forces withdrew from their forward bases of operation close to the Polish–German border to more established lines of defence to the east. After the mid-September Polish defeat in the Battle of the Bzura, the Germans gained an undisputed advantage. Polish forces then withdrew to the southeast where they prepared for a long defence of the Romanian Bridgehead and awaited expected support and relief from France and the United Kingdom.[16] While those two countries had pacts with Poland and had declared war on Germany on 3 September, in the end their aid to Poland was very limited.
The Soviet Red Army‘s invasion of Eastern Poland on 17 September, in accordance with a secret protocol of the Molotov–Ribbentrop Pact, rendered the Polish plan of defence obsolete. Facing a second front, the Polish government concluded the defence of the Romanian Bridgehead was no longer feasible and ordered an emergency evacuation of all troops to neutral Romania.
Scenario Setup
From the Playbook we read the following about the “At the Crossroads” scenario:
“Sochaczew, Poland, 15 September 1939 – On 9 September, the Polish Poznan Army, encircled by the rapid German advance, attempted to force a crossing of the Bzura River to the southeast. This attack inadvertently allowed time for the Polish Pomorze Army – also trapped in the pocket – to regroup further east near the Kampinos Forest. Many attempts were made by elements of the Pomorze Army to affect a withdrawal from the pocket east towards Warsaw; by the middle of the month, however, only two divisions had made the escape.
On September 15, one such skirmish saw a company of Polish regulars attempt a breakout along an infrequently-used farm road.”

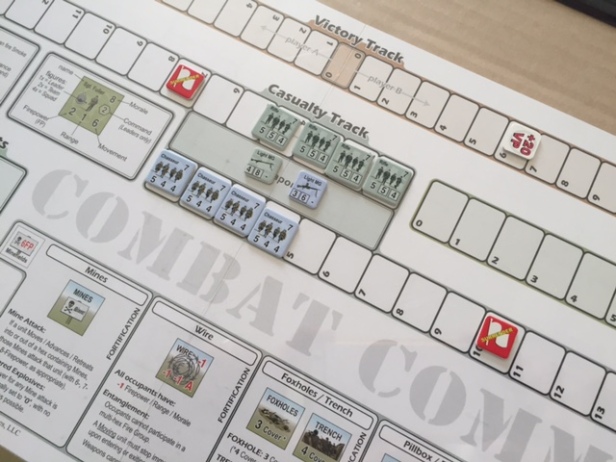
I chose to play as the Polish who are the Attacker (6 card hand limit) in the scenario and Alexander played the German forces which were the Defender (4 card hand limit). The Surrender level was set at 7 for the Germans and 10 for the Pols. The scenario had an Open Objective W which reads “Exit points are doubled”, so we assumed that the goal of the Pols was to attempt to exit the map to breakout out of the pocket as described in the scenario summary and this would affect the way we both assembled our teams. The scenario required the Germans to set up first and they had 3 Rifle units along with a Light MG and Lt. Lauerbach (Morale 9, Command 1) in the 3 space of the Time track. The Axis also are in control of all 5 of the objectives at the start of the game and then had to place their forces in the 8 hexes from their edge of the map (to the top of the picture below) leaving the Allies to setup 2nd but taking the 1st turn. He then set up his remaining units as follows:
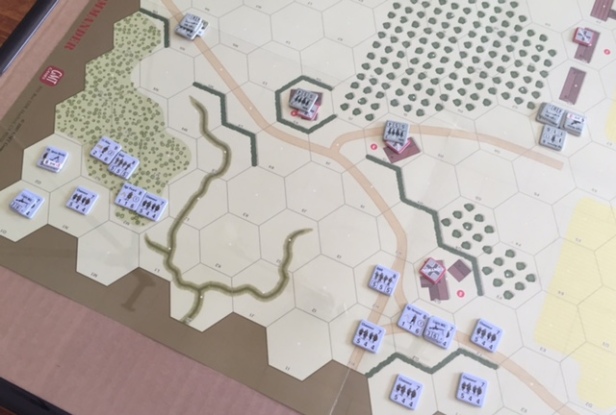
I reacted to his set up by breaking my available units into 3 separate teams that each had a different objective in mind.
- Team #1 – I put Lt. Allier (Morale 9, Command 2) leading a BAR unit (Morale 8, FP 5 (boxed), Range 5, Move 5 (boxed)) along with 4 Chasseur (French term for “hunter” or light infantry) units (Morale 7, FP 5, Range 4, Move 4) and a Light MG and the 50mm Mortar to advance or push up the German right flank and attempt to break the resistance there to open up a highway to allow troops to escape.
- Team #2 – I then placed Sgt. Vernejoul (Morale 8, Command 1) leading a larger group intended to fire on the Germans in the center and keep them occupied so that they couldn’t simply move to defend their right flank and my advance. He led a BAR unit along with 5 Chasseur units with a Light MG. They were planning to move into Objective #5 as I had pulled a random Objective Chit that game me 2VP for controlling Objective #5 at game’s end.
- Team #3 – I put Sgt. Picard (feels like this should be Captain Picard!) along with a lone Chasseur unit on the far edge of the German left flank and planned to simply move them as fast as possible up the edge of the map using the wheat field as cover to exit off the map gaining a total of 8VP. This would take me 2 Move orders to accomplish as they were 9 movements from the edge of the map and I was not going to be upset if they didn’t make it but it was worth a try!


Assault the German Right Flank & Run Like Crazy
The Pols then took the 1st action of the game. One note before I begin the AAR. I was using the French Fate deck and was saddled with a discard capability of only 1 card. This worried me immensely as if you have read the strategy for the French (you can read it here in my Preview of Combat Commander: Mediterranean) this is their biggest concern! They have quality units with good morale but if you are unfortunate enough to draw a hand-o-crap, you may find yourself paralyzed and poised for a crushing defeat! (This malady affected me on 2 separate occasions during this match and I was able to overcome and crush the Germans!).
My opening move was to play a Move Order and activate Lt. Allier along with the units in his Command radius to move up the German right flank and begin the push toward the open road and breakout. As I moved, I was able to play an Assault Fire Action which reads “Make one Fire Attack with any number of your units/Weapons with boxed Firepower that are currently activated to Move.” This allowed me to fire with my BAR unit and the Chasseur unit with the Light MG to bring a Fire Power 20 to bear on the German Rifle unit snuggled up in the road in a nice cozy foxhole. He rolled poorly, leading to him breaking. Also during the 1st round, I was able to play a second Move Order on Sgt. Picard and the Chasseur on the far right of the left flank and move them to within 3 hexes of exiting the board. He had no Fire Actions in his hand as he didn’t fire on me. This was a very lucky break and I knew it was a risk when I decided to do it….but it was working! Fortune favors the bold!


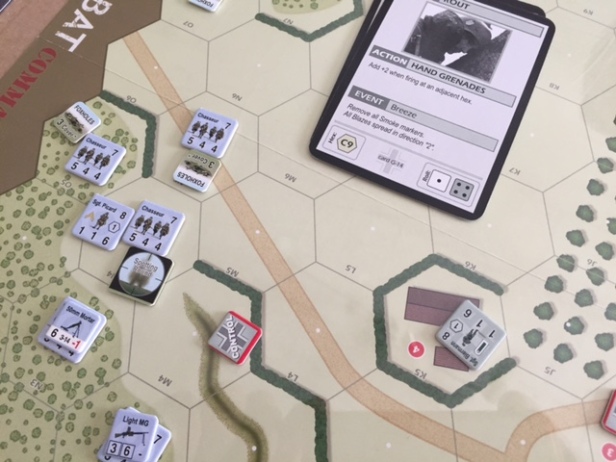
He returned weak fire on Lt. Allier that I defended easily and in the next round, I was able to Fire on him again using a Hand Grenades Action that provided a +2 FP bonus if firing at an adjacent hex. My total FP was an amazing 25 and his unit was eliminated giving me 2VP bringing his VP down to 1 but more importantly eliminating a major threat and impediment to my units planned surge up the German right flank.


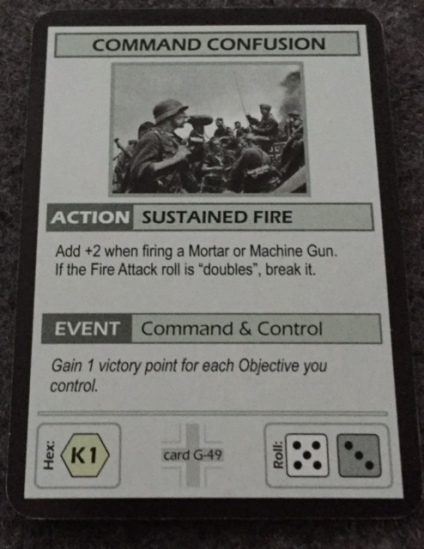
He then pulled an Event during one of my Fire Attacks that continued to plague me throughout the game, coming out a whopping 2 times. The Event was Command & Control which reads “Gain 1 victory point for each Objective you control.” This happened 2 times near the beginning of the game while he controlled all 5 of the Objectives based upon the initial setup. The 1st time it was pulled it took him from 1VP to 6VP.
I then was able to draw another Move Order and activated Sgt. Picard and the Chasseur he had in tow to move off of the map gaining me 8VP. You might ask how the heck did you get 8VP for a Squad and a Command 1 Leader for exiting the map? You must remember that the scenario started with Open Objective W which doubles exit points. So the math is as follows: Leader is always 1 + 1Command = 2 and Chasseur Squad is 2 = 4VP but then doubled for a total of 8VP. This moved the VP track into my territory with a total of 2VP and more importantly, I was able to place Sgt. Picard and the Chasseur unit on the Time Track on the next available space which was the 2 space for later reinsertion into the battle. This would allow me to do this action again gaining an additional 8VP later.

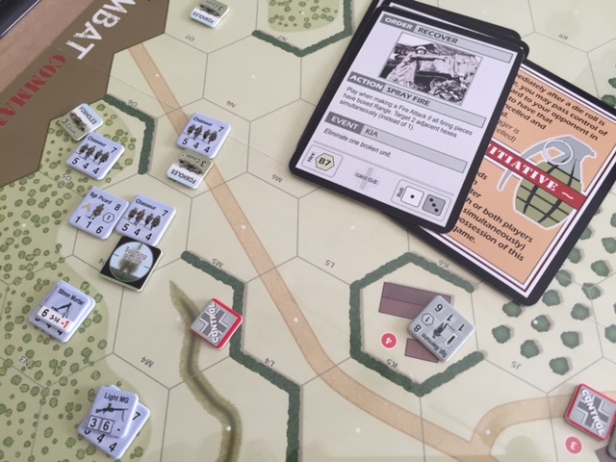
Over the next few rounds, we both had to deal with hand clog as we simply couldn’t draw useful cards. From the picture below, you can clearly see that I have 3 Recover Orders, 1 Route Order, a Command Confusion and an Artillery Request in my hand. None of these cards were helpful at the time as I needed either a Move or Fire Order in order to break out and move additional units toward the ultimate goal of exiting the map.

The Germans then drew several Fire Orders and began to pepper my units with mortar fire from their Light Mortar located in the middle of the map. The scenario allowed them to use Sgt. Bierman as a spotter for the mortar which helped him target my units more effectively. They broke one of my Chasseur units but I was lucky and was able to roll well in defense and shrug off the attacks. I would cringe every time I drew a card because it appeared that more often than not, the cards I drew for the rolls were Move or Fire Orders!

Securing Victory by Sucking Less
I was then able to finally draw a few more useful cards than my opponent (sucking slightly less) including a Move Order which I used to move Sgt. Vernejoul into Objective #5 and a few Fire Orders which allowed me to attack the German Rifle unit hold up in the buildings at Objective #3 breaking them and ultimately allowing me to play Rout Orders to force them to retreat back into the orchard behind the buildings freeing up a lane to assault the other Rifle at Objective #4. This freed up my units to try to Move into the buildings taking up a good defensible position to defend Objective #5 and more importantly try to attack the German mortar team. I was able to Move up to be adjacent to the Rifle and brought a good Fire attack on him with a total FP of 19 leading to him breaking. The next round I was able to draw an Advance Order and coupled with the Ambush Action I had in my hand at the time, was able to eliminate the broken Rifle without having to risk a roll. This allowed me to take control of Objective #4 from which I would protect Objective #5 and continue to funnel troops up the German right flank to exit off the map.


We then finally hit Time space 3 and the German reinforcements came onto the map and he placed them right smack dab in the middle of the highway I had been using to move off the map to throw up a road block. I was patient though and continued to bring steady fire on the Germans on the right flank whittling them down. I then used Sgt. Vernejoul and a BAR to Advance onto a broken German Rifle unit in a fox hole and to engage in hand to hand combat. I also had an Ambush Action in hand and played it to eliminate the unit before we made it to rolls.

Over the final 3 or 4 rounds as we drew nearer to Time space 6 which would mean we were in Sudden Death, I was able to exit off of the map with Sgt. Vernejoul and the Chasseur unit netting 10VP as well as exit a 2nd time with Sgt. Picard and his Chasseur on the left flank for a total of 8VP. This would wrap up the victory for me and give me 26VP at the time (with an additional 2VP coming from holding Objective #5). But I have to share with you one of those moments that is so Combat Commander and one of the reasons that I love this game so much. I will summarize the situation with 4 pictures with captions that will explain the hilarity.


Summary & Debriefing
The game came to an end in the 1st Sudden Death time space and I was declared the victor as I had a total of 28VP. I had amassed 26VP from exiting my units 4 different times as well as killing 4 of his units. A couple of lessons that I learned from this match.
- Identify Your Objective & Stick with It – I knew at the outset that I was set up to win most easily by focusing on exiting the map. A lot of times I get caught up in wanting to defeat my opponent through force of arms but in this case, I identified what my true objective was and made steps toward that goal each time I could without fail.
- Make the Enemy Stop You – A lot of times I am hesitant to run out into the open and expose my units to fire. I always assume that he has the cards needed to Fire upon me while I am exposed. This is a lesson that I learned during Scenario #5 Cold Front to keep up the pressure and MAKE the enemy stop you. More often than not, they will not be able to.
- Trust the Games Designers with the Factions – I’ll admit that coming into this game, and using the French Fate deck, I was almost in a negative mindset that I would not do well. I was expecting poor draws, hand clog and a lack of quality units and weapons to do what needed to be done. While I did have a few problems with hand clog, overall the French (Polish in this scenario) performed admirably and their Morale and other vital statistics are on par with the best factions. Trust that the game has been balanced and play tested such that you can win any scenario playing anyone of the nations.
I now lead the series between Alexander and I at 6-3 and have finally broken my terrible 3 game losing streak. I realized that I was able to win not because I was better, or had the best fighting forces, but because I had a plan, stuck to that plan and executed it as well as I could have to secure victory. As the old saying goes, “The race is not to the swift nor the battle to the strong”.
-Grant

Great description of the workings of the game. Made me interested in playing the game. Thanks for the post.
LikeLiked by 1 person
great AARs as Always, dont know if you made some rules mistakes sometimes but this stood out to me
“This allowed me to fire with my BAR unit and the Chasseur unit with the Light MG to bring a Fire Power 20 to bear on the German Rifle unit snuggled up in the road in a nice cozy foxhole”
Assuming you made a firegroup with those two units their max FP is 6+1 for 7, right, so if you rolled a 12 thats still only 19 (and a time trigger): I wondered if you might have mistakenly added their FP together there, or perhaps you just forgot that you added some kind of FP boost action
LikeLike
Don’t remember it was so long ago but probably just a simple addition mistake. Could have a FP increase Card.
LikeLike