
D-Day at Tarawa (2014) is a solitaire war game published by Decision Games that is a follow up to D-Day at Omaha Beach (2009) designed by John H. Butterfield. The game is a look at the 4 day campaign spanning November 20-23, 1943 over the control of the islet of Batio located in the Tarawa Atoll. The game covers the operations of the US 2nd Marine and 27th Infantry Divisions in their attempt to clear the islet which is defended by nearly 5,000 hardened and dug-in Japanese troops. This battle was the first heavily contested landing of the Pacific War and brought the horrors of this war to the general public. All told, nearly 6,400 Japanese, Koreans and Americans died on the tiny island in 76 hours of fighting. In the aftermath of the battle, American casualties lined the beach and floated in the surf. Marine cameramen were present obtaining footage that would later be used in a documentary titled With the Marines at Tarawa which contained scenes of American dead so disturbing that the decision of whether or not to release it to the public was deferred to President Franklin Delano Roosevelt.


The game covers a 33 hour period from 0900 hours on 20 November 1943 to 1800 hours on 21 November. The first 10 turns each represent 30 minutes of time. Then, after the Marines are established on the beach, the time scale expands to 1 hour per turn, plus a special overnight turn. In this post, I want to give you a preview of the game, including a look at the components which includes the gorgeous (if not somewhat busy) map, 54 cards, counters and game mechanics and provide you a brief look at my very first attempt to play the game (which lasted only 3 rounds but took about 2 hours).
First off, let’s look at the components, starting with a look at the beautiful map.
The map (33″ x 22″) represents the small islet of Batio, which is part of the Tarawa Atoll, where the Japanese forces were dug in and prepared for a very lengthy siege from land and sea. A little history of the siege taken from Wikipedia: A series of fourteen coastal defense guns, including four large Vickers 8-inch guns were secured in concrete bunkers around the island to guard the open water approaches. It was thought these big guns would make it very difficult for a landing force to enter the lagoon and attack the island from the north side. The island had a total of 500 pillboxes or “stockades” built from logs and sand, many of which were reinforced with cement. Forty artillery pieces were scattered around the island in various reinforced firing pits. An airfield was cut into the bush straight down the center of the island. Trenches connected all points of the island, allowing troops to move quickly where needed under cover. As the command believed their coastal guns would protect the approaches into the lagoon, an attack on the island was anticipated to come from the open waters of the western or southern beaches. Rear Admiral Keiji Shibazaki, an experienced combat officer from the campaigns in China, took over the defense of the islet on July 20, 1943, in anticipation of the coming fight. Shibazaki continued the defensive preparations right up to the day of the invasion. He encouraged his troops, saying “it would take one million men one hundred years” to conquer Tarawa.


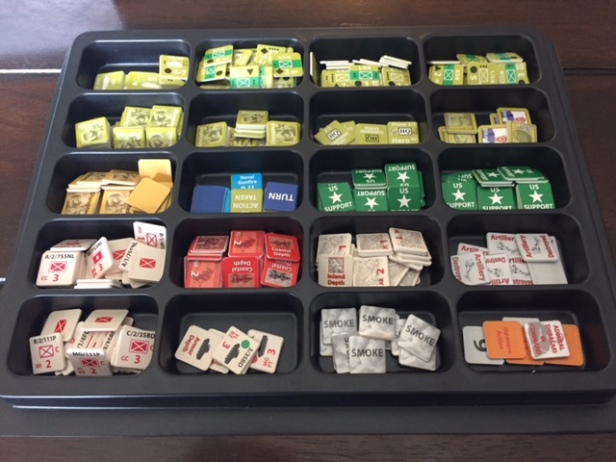
Next up let’s take a look at the components, starting with the heart of the game, the counters. There are 352 die cut counters which represent the Japanese units (including a few tanks, a thing called a depth marker, disrupted markers, etc.) and the American units (including tanks, HQ’s, heroes and these cool little landing craft called LVT’s or Landing Vehicle Tracked!). I was a little disappointed with the way the counters were cut as they were almost as if someone cut them halfway through with a dull knife. This caused several of my counters to tear as I was punching them out. I clip my counters so the tears were taken care of after the fact but that was disappointing. The counters are nicely colored, clearly marked and have good representations of each of the historical units taking part in the campaign. Overall, a very good part of the components and well done (except for the cutting). The counters are assigned a round that they are scheduled to enter play and are designated a beach sector (including R1, R2 or R3) from which they must ride in on an LVT. It would be great if you have several counter trays so that you can store the units for each round in their own compartment for ease of deployment. Also included with the counters are the reduced counters (marked with a green stripe in the middle with the words “rdc” to the side) that correspond with a specific named unit. Once the unit takes the reductions below their printed value, you just find the corresponding counter and replace it on the map.
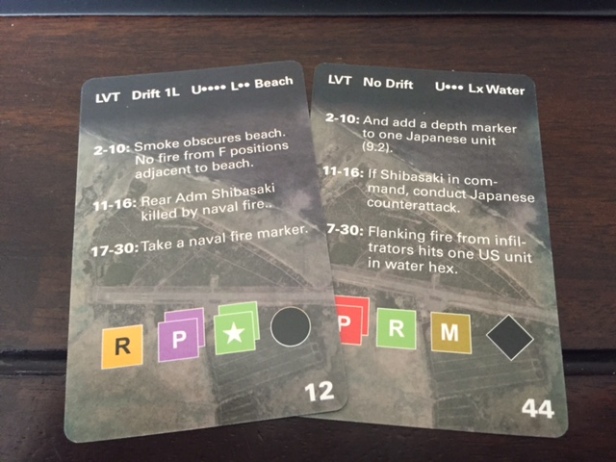
The cards are a pretty neat part of the game as there is a “no dice” version of combat for the battles. As you can see from the picture below, when drawn during Close Combat or Japanese fire actions, the colored boxes with various symbols tell you which Japanese positions will fire that round and what type of units they will hit. The colored areas also tell other information about the actions that can be taken in later rounds and add qualifiers to the ability to fire. But my favorite part is the multi-use aspect of the cards. As you can see on the cards, information is printed in 3 distinct areas, the top of the card, the middle section with number designators like 2-10, 11-16 or 17-30 (which represent the range of rounds that the event happens) and the bottom section with the colored symbols.
I already explained the bottom portion but the top row of information is for the US Amphibious Operations Phase. During this phase, you draw two cards for each LVT that is attempting to land troops on the beaches. The first drawn card tells you what happens to the orientation of the LVT including No Drift, Drift 1L, 1R (you literally move the boat one row to the left or right) or PR (pivot right). You then refer to the 2nd drawn card to see the result of the landing which will tell you how many Units survived the ride in, whether or not the LVT is hit or destroyed and where the units end up either in the water (having to then spend a few turns wading to the beach, all the while taking fire from the positions), on the beach or Inland 1 or 2 spaces. This system is an ingenious way to deal with this phase of the game. It is very tense as you flip the cards over to see what happens! Will my units make it? Will they be so wounded to make them ineffective? or will they have to spend a few turns walking to the beaches?)
The middle information is for the event phase and for Close Combat rolls. As you can see, there is text that starts with a number designator as described above. These events occur in the rounds that are identified and have both positive and negative effects for each side. During Close Combat, the CC designator means that there is an event during the combat that will either reinforce the Japanese adding a depth marker, causing the Japanese units to surrender if not elite, adding a card to the side drawing a card’s CC deck, etc. This system is very tense and I enjoy having to draw the cards rather than rolling a few dice.
Finally, lets talk a little about the actual gameplay. There are several scenarios that can be played with varying victory conditions and time requirements. The scenarios are as follows:
- The First Waves – can your marines survive the initial landings? Turns 1-10 – 3 hours
- 20 November 1943 – can you establish a viable beachhead before nightfall? Turns 1-15 – 4 hours
- Two Days in Hell – can you secure the island in only two days? Turns 1-30 – 7 hours
- 21 November 1943 – on D+1, can you expand your narrow beachhead against undiminished Japanese resistance? Turns 17-30 – 4 hours
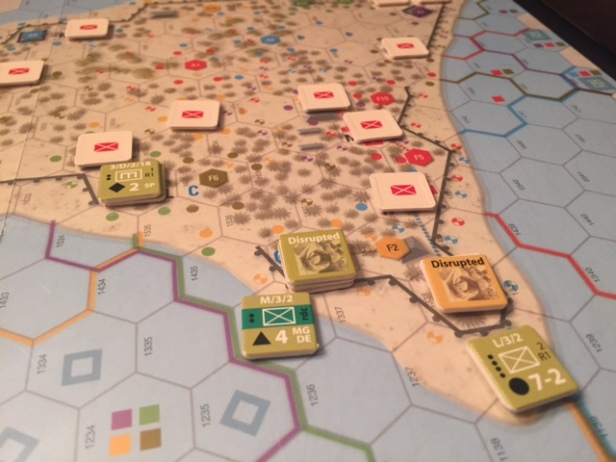
I have only played Turns 1-3 of The First Waves scenario but I am excited about finishing that one. I enjoy the Amphibious Landing Phase immensely. In my play, I lost 2 LVT’s and had another 3 hit (being hit reduces their capacity to carry troops) so I was in pretty good shape at that point. After 3 rounds, I had established 2 pretty good beach heads, one around the Parrot’s Beak on the southwest part of the islet and the other in the middle of the islet around the pier.


I found that it took me quite a while to finish one turn as this was my first play. I had to constantly refer to the rulebook (which is fairly well written with good examples) for each phase and action. The part that I still haven’t figured out yet is the “puzzle” for the weapons. As you probably don’t know, each unit has a certain array of weapons that they carry and each Japanese unit has certain weapon requirements to effectively attack them. You must learn what those weapon requirements are (you find this out only after you attack and uncover the units) and bring troops with those requirements to bear on that unit to do any real damage. I found that I had trouble with fire attacks on the Japanese due to the weapons not matching and their great cover (for example, a fortified building doubles the strength of the unit inside) usually only adding a Disrupted marker to them but this was beneficial as it prevented them from firing the next round as they had to remove the Disrupted marker. This is a part of the game that I will figure out as I play.
One more element of the game that I like is the US Action phase. The US is given three actions that they can take each turn which include movement, attack and barrage (using artillery which I didn’t cover). These actions can activate 3 units or stacks and each can only be activated once. You can also take free actions with certain units that have a hero, inspired or disrupted marker or an HQ unit. This requires you to think about and plan out each of your uses of these scarce actions. I found that I would use at least 2 on groups to create a stronger attack on Japanese units and then always use one of the other remaining actions to move into Close Combat (as that was more effective than my fire attacks). This is another puzzle that must be solved in order to effectively play the game and I have lots of work to do in that area. I do look forward to giving it another go using the lessons that I learned on my first 3 rounds. All in all, this is a GREAT game! Well designed, well thought out and with a very realistic and viable AI system to control the Japanese. John Butterfield has made a great game that will be tough to master but that can be played again and again with different results each time! But isn’t that why we play these strategic war games? I would definitely recommend this game for anyone who loves tactical combat and I personally am going to try to get my hands on D-Day at Omaha Beach and D-Day at Peliliu. P.S. I would recommend watching a few videos on the game play. There are a few great ones including one by Stuka Joe which is a great overview of the rules and game play and a longer series by Heavy Lifting By Myself that covers multiple rounds with good explanation.
-Grant

Great preview sounds interesting though it has been a while since I played a solitaire board game. Thanks for the preview and information.
LikeLiked by 3 people
Great review, spot on with all comments. I am in the middle of my second go at D- Day Tarawa right now. I played a practice game up to turn 5, restarted and am now cooking along. You will find on your second go through the game that the mechanics of landing, combat, events, close combat, etc. Will work more seamlessly. I am not a big fan of solitaire games, but this system and the beauty of the game is making me a fan.
LikeLiked by 1 person