
This week on “War Game Wednesday”, Alexander and I played Combat Commander: Europe Scenario #5 Cold Front. Once again Alexander chose the Germans (Defender) and I played as the Russians (Attacker). I think he wants to beat me with the Huns so badly he is obsessed with it…but he would have to wait for another day. I grew up playing a lot of sports and was pretty good at two of them, baseball and football. As a “thicker” dude, I was an offensive lineman and for years have had coaches scream at me saying things like “You have to run the ball to win!” or “Beat them in the trenches and we will win it in the 4th quarter!”. So with the strategy of running the ball engrained in my brain, I decided early on in this scenario that I should “run the ball up the middle”.
From the playbook, we read the following summary for the scenario:
Staritsa, Russia, December 30, 1941 – When winter hits Eastern Europe with its full fury in late 1941, the German 26th Infantry was just one of many Axis Divisions halted more by the extreme weather than by the stubborn Russian defense.
In the final weeks of 1941, the 31st Soviet Army – part of the Kalinin Front under General Yushkevich – received a large influx of Siberian troops. Clad in quilted jackets and fur hats and inured to the cold, they led many small-unit actions up and down the frozen front. One such attack took place near Staritsa, Northwest of Moscow, as German troops of Infantry Regiment 18 were fighting to stay warm in their trenches.

The scenario set the Surrender condition at 5 for the Germans (as they were provided trenches as a starting defense offering a +4 cover bonus) and the Russians were set at 12 units. The Russian units were all Guard SMG units so they had good Morale at 8, 5 Movement and 6 FP (boxed) but their Range was only a 3 but they had no attached Weapons. The German units were Rifle with Morale 7, 5 Movement and 5 FP and had 4 Weapons to use, including a Heavy MG, 2 Light MG and a Satchel Charge. The balancer for the scenario was that one of the Weapons would start “broken” and it was chosen randomly and this fell in my favor as we rolled a 4 sided dice and 1 was the Heavy MG and it came up broken! Good luck to start! The Russians were to set up first and were to be 3 hexes deep with the Germans setting up after and being 12 hexes deep. The big obstacles for the map were a stream running 3/4 of the way across the middle of the map ending at a marshy area. To move through the stream requires 3 movement (I can’t imagine those poor Russians getting wet in -20 degree weather) and adds a -1 to cover and the marsh added 3. There was an open bridge in the middle of the map crossing the stream but the Germans could line up their trenches so as to offer a perfect “killing zone” there as it only offers 1 cover. The game was set to end at Time space 13 and began in space 5. So I would have 8 rounds to take the Germans and win the scenario.
Knowing that his Heavy MG started broken and also knowing that my range was limited, I created 3 Fire teams, one on the far west edge of the map, one in the center and one on the far eastern edge to move up through the marsh. My western team was led by Sgt. Kovalev (Command 2, Morale 8) and he had 4 Guards SMG units in tow and would be able to activate all 4 with a Move order. *I have a fondness for Sgt. Kovalev as he has served me well previously in Scenario #1. He has led several bayonet charges into Melee and always has come out the victor!

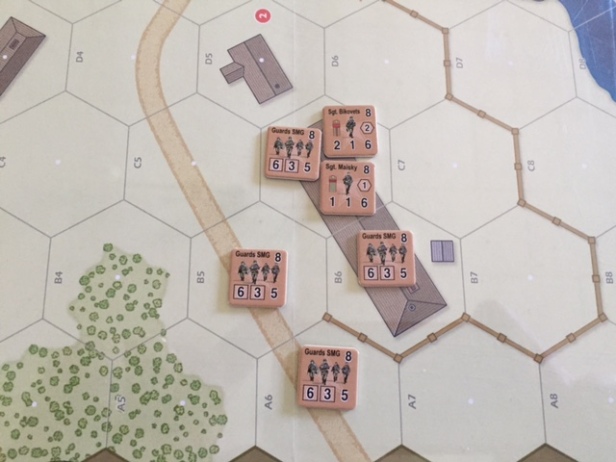
The center team was led by Sgt. Bikovets (Command 2, Morale 8) and Sgt. Maisky (Command 1, Morale 8) and were set up in the buildings south of Objective #2. All units would be able to be activated and move in the first round because they were in range of Bikovets. This is the team that would take the “ball” for me and run it up the middle!
The eastern team was led by Sgt. Kaminsky (Command 1, Morale 8) and he had 4 Guards SMG units at his disposal. His objective was to quickly traverse the marshes and get into cover in the woods to the southeast of the German trenches. He was to engage only if his Fire action had a reasonable chance of success and to offer cover for the advancing center team.

The German setup was to place their line of trenches in the far southern edges of the woods north of the stream so that they could cover the bridge approach and also fire on the Russians as they advanced through the center. As the defender, Alexander was interested in firing every round into a large group to force me to run through my deck to hit Time checks as often as possible. You will also notice he spread his leaders out and each trench was occupied. With their movement bonus being adjacent, I think he would have preferred to place the leaders with the strongest fire groups to increase his attack FP and do more damage to my troops. His backup plan was to retreat to the northeast to the line of buildings at Objective #3 and set up a defense there if my Russians broke through.

The Allies were given the first move action and I was fortunate as I drew 3 Move orders along with a Fire order in my opening hand. I was able to activate all three teams and advance to the north. Sgt. Bikovets team was able to make it into the buildings at Objective #1 and set up with both leaders and a single Guards SMG unit. This gave me a solid Fire defense roll base of 14 for the SMG unit, 12 for Bikovets and 13 for Maisky. The Germans fired on that group with the Light MG team but I was able to defend and took no damage.
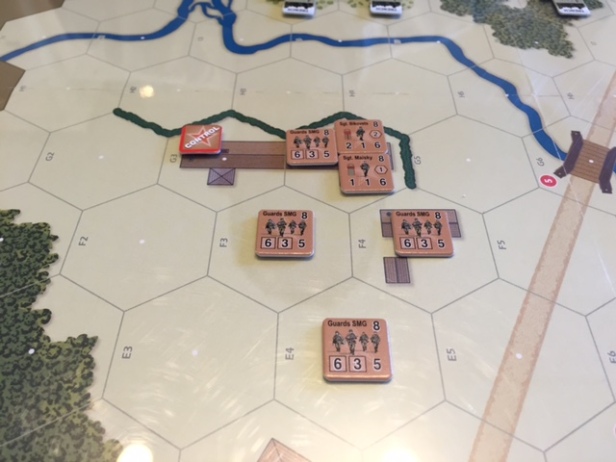

I was fortunate to draw so many Move orders in my opening hand and this fortune stayed with me as a I drew two more in the next hand and was able to advance the marsh team to the tree lines to get into range of the German trenches. More importantly, I did this as I wanted to see if the Germans would Fire on me as I moved there. They didn’t which told me they most likely had no Fire actions in their hand. This gave me the confidence that I needed to take my next set of actions which was to “pick the ball up and run it up the middle”!

The Germans obviously had a hand of junk so I activated Sgt. Bikovets and decided to move a strike team across the bridge led first by Sgt. Kaminskly and get to the relative safety and cover provided by the woods. As you can see from the above picture, the previous round the Germans moved their leader Sgt. Ganz (Command 2) to the east into the adjacent trench to offer a better FP to attack the Russian Guards SMG units that had moved into range in the woods. This worked well into my plan as I moved the group up the road (taking advantage of the +1 Move bonus the road gives) to make it to the woods and take cover. They had no Fire actions so I made it without a scratch. The very next round, after Lt. Von Karsties (Command 2, Morale 9) moved into the adjacent hex to the west I drew the card that I needed to “punch the ball across the goal line and score”…an Advance Order (in fact, 2 of them) along with 2 Ambush actions. I used it to activate Sgt. Bikovets and move into Melee with the Germans.
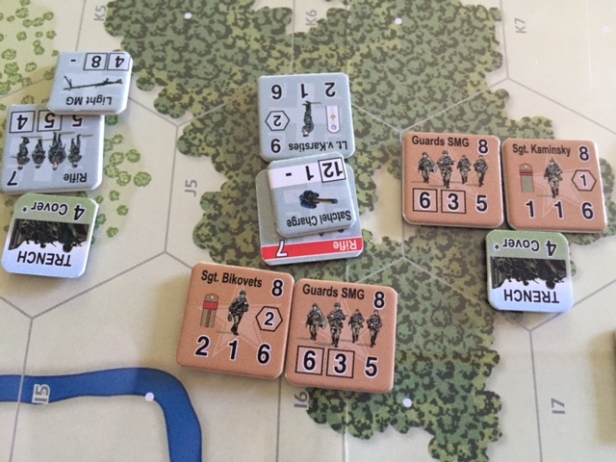
I then used the Ambush action in my hand and he decided to break his Rifle unit. My FP was 11 to his FP of 9. We drew cards and I was victorious eliminating his best leader and scoring myself 5 VP. I then followed that move up with my 2nd Advance order of the turn to activate Sgt. Kaminsky to move into the next trench to Melee with the team led by Sgt. Ganz.

As you can see from the picture, my FP was 9 vs. his FP of 9. We both played Ambush actions lowering my FP by 2 to a 7 and his FP by 3 to a 6. We then rolled and as you can see from the picture both pulled out 11’s for a total FP of 18 for me vs. his 17. I won by one pip of the dice and took out his other good leader scoring 5 more VP and bringing the casualties to a total of 4 for the Germans, only 1 shy of Surrender. “I scored by running the ball”….the NFL is now more of a finesse league but I showed that running can still work!
In the next 2 rounds, I was able to fire on the Rifle unit to the west of Sgt. Bikovets, 1st breaking him and then in the next round finishing him off and brining the game to a quick close as the Germans met their Surrender condition of 5 casualties.
That was by far the quickest game we had played as it only lasted about 7 rounds and we never even had a Time check come up. Obviously his inability to draw Fire orders was a major reason for my victory but I was also very fortunate to draw the number of Move 0rders that I did (7 in my first 3 turns) and then to get 2 Advance orders with 2 Ambush actions as well. I will say that “Fortune Favors the Bold” and I feel that I made some of my own luck in that scenario! Great game that I love more each time we play! As I mentioned earlier in the blog post, I am actually starting to gain some confidence in certain leaders (most notably Sgt. Kovalev with the Russians and Sgt. White with the Americans). I don’t know if this is a normal feeling for a game but it feels like that is the feeling I have!
Until next time, keep building confidence in your leaders and remember to “run the ball up the middle…they can’t stop it!”.
-Grant

Did your opponent neglect to pass the initiative on those melee rolls? That’s one of the few high-leverage instances where the initiative is worth passing in a combat.
LikeLike
I had the initiative card. The Allies started with it and I almost never give it up unless it is a critical move, like what you are describing.
LikeLike