
In this series of articles, we are looking at the overall strategy recommendations for the very interesting and unique strategic level wargame One Hour World War II from Worthington Publishing. This is general tactical consideration advice for the various factions in the game and will be of interest to anyone who might want to better understand the framework of the design around which the game focuses. The images used here are prototypes and not necessarily the final product. For this 3rd article, we are focusing on the Soviet Union.
Soviet Union Strategy Guide

The Red Army is the hammer which must destroy the fascist menace. But you will need to endure terrible losses before having a chance of raising the hammer and sickle over Berlin. The Soviet Union starts off vulnerable to attack by Germany and with its large forces not ready for combat. In most (not all) games the Germans will be invading you by around 1942 and your focus on the first half of the game will be in holding your own territory. However, soon enough the Soviets can build up their numerous Armies into a formidable force and begin taking the fight to the enemy. By 1944-45, they can be battering at the gates of Berlin and forcing the Germans to focus all their efforts on a desperate defense of the capital. When Germany is dealt with or at least contained, the Soviets can also assist the Allies in the Pacific Theatre by attacking the Japanese in China. Of the three Allied Nations, the Soviets are the most desperately embattled but also the best positioned to strike directly at the Axis.
Opening Moves
In 1940, the Soviets only have one Action marker. By 1941 this goes up to two and by 1942 it goes to three, where it will stay for the rest of the game. As with all Nations in One Hour World War II, every single Action is precious. But for the Soviets in the early game this is even more true. They are late in the turn order and Germany has three Actions per turn from the get-go. Even before the Soviets make a single move, it is possible for the Germans to have already attacked them in two spaces, possibly destroying two Armies permanently. The effects of Actions taken in the early game also compound over time – victory spaces yield points every turn they are held, Upgrades are mostly permanent and a unit on the map is much harder to kill than one in Reserve. For all these reasons, the first few Soviet Actions are absolutely critical. There are a lot of options to choose from – some will depend entirely on what the Germans do first though.
Let’s take a look at all the options for your first Action:
–Invade the Balkans: This is an extremely high-risk but high-reward move. Your Army in Ukraine can do an Offensive into the Balkans, claiming a victory space and preventing the Germans from just walking in there and taking it. The downside should be obvious when you actually make the move though. Germany can easily cut your supply line by moving into Ukraine, so that Army in the Balkans will be cut off from Reserves and unable to Strategic Move back home or launch further Offensives. Alternatively, the Germans might just attack your Army in Balkans with their Level 2 Army in Poland, probably destroying it permanently. If you choose this opening move, it is best to wait and see what the Germans do first. If they focus all their efforts on the UK or invest in their Fleet instead of heading towards the east, it may be viable.
–Build Fleet: Another high-risk, high-reward strategy that can mainly work if Germany’s attention is not fixed on you. You only have a single Fleet, but from the very first turn you have the option of building it in the Baltic and thereby opening up an invasion route directly to Germany’s capital. It is unlikely the Germans will let this go. They will either build one of their own Fleets in the Baltic too, stack up in Germany itself or invade Leningrad from Poland to prevent you landing an Army in Germany. However, this still forces them to divert resources from whatever else they were planning. You may also be able to take Germany itself, IF the German player has left it empty and IF the UK or USA can use Code Breaking in 1940 to shift the Soviets to first in turn order. Unlikely, but the possibility is there!
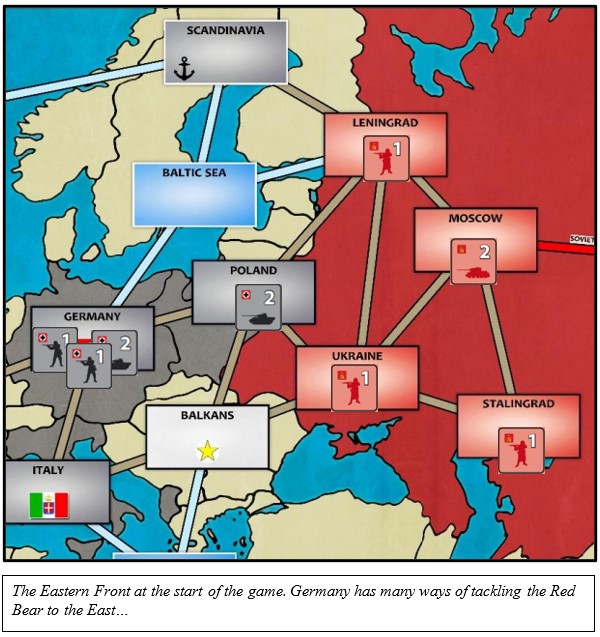
–Strategic Move: This is a very safe, very conservative move that focuses all your efforts on defending the border, but also opens the possibility of attacking Germany later. With a Strategic Move, you can shift your Level 1 Army from Siberia and your Level 2 Army in Moscow to Leningrad and Ukraine. The Level 2 Army should probably go to Ukraine, just to make it look like you might invade the Balkans with it – this will keep the Germans guessing. In doing this move, you have made sure the Germans basically have no chance of taking Moscow in 1940-41.
–Build Army: This is another safe, reliable move. You simply build an Army from Spent directly to the map, most likely in Ukraine or Leningrad. This gets more of your pieces off your Nation Sheet and onto the map where they can be useful and provides another speed bump for the Germans if they try to go for Moscow early. The other option with a Build Action is to shift two Armies from Spent over to Reserve. This doesn’t give you as much presence on the ground but it does allow you to cover both Leningrad and Ukraine with more strength. If the Germans attack either space, you can boost your strength to 3 rather than 1 by committing the Reserves.
–Upgrade Air Force: This is more of a long-term investment but is also useful to have in the early game. +1 strength to your Armies in battle will provide a much-needed boost if the Germans strike in 1940 or 1941. It prevents the Germans from getting a permanent kill on your Armies in Ukraine and Leningrad, which would normally be facing a Level 2 German Army with a +1 Air Force boost of its own (3 to 1 ratio in favor of the Germans). It will continue to pay dividends throughout the whole game – chances are the Soviets will be fighting land battles ever year of the war.
–Chinese Communists: This move requires some co-operation with the other Allied Nations and can only work if the Germans are leaving you alone. If the Japanese launch an Offensive, you can use the Chinese Communists Response and shift one of their Armies from China to Spent. This by itself is not really worth it on the first turn when you have other priorities. But, if the UK and USA jump in and use Chinese Nationalists as well, two Japanese Armies can be removed from China and replaced with a single Chinese Army. This can give the Allies a crucial edge during scoring, offsetting the inevitable gains by Germany in the first turn. If the UK and USA are willing to go along with it and Germany is not breathing down your neck, this is a great first turn move.
–Upgrade Build: This is actually a risky move as it is purely a long-term investment in your productive capacity whole offering no extra firepower on the front-line in the short-term. It is a great move IF the Germans don’t attack you early. You could even follow it up by Upgrading Build again in 1941, bringing your Build track to the maximum of 4. This is huge, as it allows the Soviets to put down two Armies from Spent to the map with a single Action. Or, shift four units from Spent to Reserve. But this investment in your Build track may not be necessary if you are on good terms with the USA…
Lend Lease
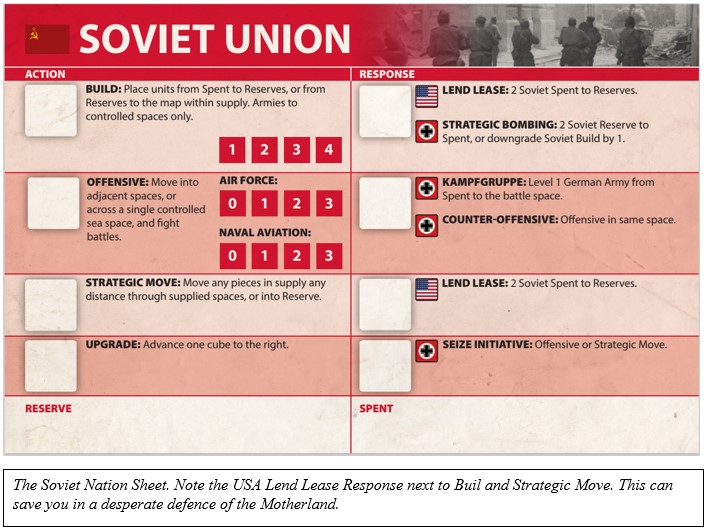
The Soviet Union can take advantage of American economic might in the form of the Lend Lease Response. This is a Response chosen by the USA player which can follow a Soviet Build or Strategic Move Action. It lets the Soviets shift two units from Spent to Reserve, basically a “free” Build for the Soviets. This is incredibly helpful and lets you keep a steady pipeline of units supporting the front line. In many games it will be absolutely essential to save Moscow. Indeed, it should be used AT LEAST once per game, if not several times. The USA has more Actions than any other Nation over the course of a typical game, but is far from the action. Lend Lease allows American Actions to be put to work right where they are needed – putting Armies on the front-line against Germany.
Holding the Line
When the Germans do come after you, which could realistically happen in any turn from 1940 to 1943, there are a few key things to remember. First, keep in mind that they can Blitz and get two Offensives in a row. This can allow them to break through your front line and get behind you, perhaps taking Moscow or cutting supply lines to your other Armies. To stop this happening, it is often worth cramming the map with a lot of Armies, rather than keeping them back in Reserve. Even if you take losses in the first battle, you may still slow the Germans down as they need control of a space to Blitz out of it. Even if the Germans have three Armies, including their Level 2’s, in Poland or Balkans, you can completely prevent them reaching Moscow by stacking Ukraine and Leningrad with three Armies each. Granted, you will not be able to stack up in this way very often. But even two Armies in each space will have a similar effect.
If you don’t have the chance to build up your forces on the map, there are still options to stop the Germans in their tracks. The Not One Step Back Response can be used following a German Offensive and lets you place an Army from Spent directly to the battle space. This costs an Action but lets you quickly throw up a “speed-bump” to stop the Germans getting to Moscow. Do not waste this Response on superfluous battles, keep it for the desperate situations where the Eastern Front hangs in the balance.
In a similar way, hold onto your Reserves. They should not be frittered away but held onto as long as possible in preparation for decisive Offensives that let you actually take ground or hold your capital. Do not be afraid to permanently lose Armies either. You have a total of ten Armies and can afford to permanently lose a few. If losses stack up, switch your battlefield approach by upgrading the Air Force track rather than cycling through Reserves. You can also use Reserves effectively by saving them for Counter-Offensives rather than defending against German Offensives. If you have a big pile of Reserves, the Germans may be lured into committing lots of theirs to match you. Let them – you can afford to lose an Army on the front line. Then, hit them back with your own Reserves in a Counter-Offensive, perhaps following it up with an Offensive of your own during your own turn. This is a great way to destroy the pesky level 2 German Armies.
Remember that time is your friend. By 1942 you will have three Actions per turn, the same as the Germans. But the UK and USA will also have three Actions each by then and will be battering at the gates of Europe in either France, Italy or Scandinavia. The Germans will eventually be forced to pull back unless the Western Allies are totally failing at their job. This means the Red Army must prepare to take the offensive…

The Hammer Falls
Eventually, you will have to start attacking Germany. This could happen as early as 1942, but often will be in 1943 or 1944. There are a few tips to help you get to Berlin before time runs out.
First, always be on the lookout for chances to cut off German Armies from their supply line. Often the Level 2 German Armies will be on the Eastern Front, perhaps in Ukraine or Leningrad. If you get a chance to move in behind them and take Poland, do it. The Germans may be able to reopen the supply line with an Offensive and then extract their units with a Strategic Move, but this wastes a couple of precious Actions which they cannot afford.
Second, Reserves are your battering ram to break the enemy defenses. You can keep up a pretty aggressive cycle of Build > Offensive > Build > Offensive, with each Build placing units back in Reserve to help in the next Offensive. If the USA continues to supply you with Lend Lease aid, this is even more powerful.
Third, keep in mind how large the Soviet contribution to Allied victory can be. You are in position to take Poland, Balkans, Germany and perhaps China (see below). This is four Axis victory spaces – the UK and USA combined will barely match this. You can’t just sit back and let others do the fighting, you need to be grabbing victory spaces and keep up the pressure. It may not seem fair for the Russians to do most of the fighting and most of the dying, but that’s how it was historically.
The Manchurian Front
The Soviet Union also shares a border with the Japanese Empire. Soviet Armies in Siberia can attack Japanese-occupied China from the very first turn. Now, the Japanese will most likely leave you alone all game and there is not much they can do to hurt you. But retaining the ability to intervene in China is very useful. By 1945 or even 1944, once Germany is defeated or at least contained, you can turn your attention to the Far East. A Soviet Offensive into China, perhaps combining forces with any Chinese Armies already there, can take control of this critical victory space right on Japan’s doorstep. It is best to do this very late in the game – the very last Action of 1945 is ideal – so that the Japanese cannot try to take it back. Every single victory space counts in One Hour World War II, so don’t forget to avail yourself of this option in the late game. The Soviet Army that starts the game in Siberia should really be kept there unless it is absolutely needed in the defence of Moscow.

Conclusion
The Soviet Union must bear the brunt of the war with Germany and will be under pressure from the start of the game. Hold the line, keep Moscow safe with help from your American allies, and then push forward to begin the march to Berlin!
In our next Strategy Guide, we will take a look at the Japanese.
If you are interested, you can read our interview with the designer Clint Warren-Davey on the blog to find out more about the design at the following link: https://theplayersaid.com/2024/06/04/interview-with-clint-warren-davey-designer-of-one-hour-wwii-from-worthington-publishing/
And if you are interested in One Hour World War II, you can back the project on the Kickstarter page at the following link: https://www.kickstarter.com/projects/1456271622/one-hour-world-war-ii?ref
The campaign concludes on June 15th at 4:00pm EDT.
-Grant

Backed the Kickstarter and really looking forward to this one. Would be interested to see whether any thought is given to extending to 1946 or 1947 to allow for build-up (on all sides) and a delayed start to hostilities.
LikeLiked by 1 person