
In this series of articles, we are looking at the overall strategy recommendations for the very interesting and unique strategic level wargame One Hour World War II from Worthington Publishing. This is general tactical consideration advice for the various factions in the game and will be of interest to anyone who might want to better understand the framework of the design around which the game focuses. The images used here are prototypes and not necessarily the final product. For this 2nd article, we are focusing on Germany.
German Strategy Guide

Like the real events of the war, Germany is the center of attention in One Hour World War II. The decisions made by the German player early on will shape the entire course of the game and determine which strategic options become viable for the Allies. Therefore, it is essential for the German player to decide on a broad strategy for Germany early on. You must seize the initiative and shape the war to your advantage.
Opening Moves
During the first half of the game (1940 to 1942) you will be on the attack and the Allies will be dancing to your tune. You have overwhelming strength and plenty of victory spaces within easy reach. You also go first in turn order – a huge advantage but one which may not last forever due to Allied Code Breaking. From the very first action of the game you are in a “target rich environment” and have to choose which direction to swing the hammer of the Wehrmacht.
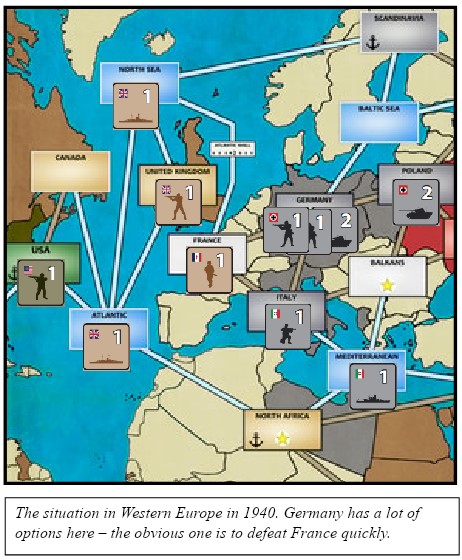
Looking at the set-up, the obvious first move is to attack France. There is a single enemy Army there – the French Army, which is under UK control. The UK does have a supply line to France and a single Army in Reserve which could be committed to help the French Army. The decision of whether or not to commit this Army (basically, the BEF) to help the French is a massive decision the UK player will have to make, before they even take a turn. Because it is possible for the UK to boost their strength to a maximum of 2, the German player can be guaranteed of success by sending in all their Armies from Germany itself. If the UK commits a Reserve, the French Army will go to Spent and will eventually be available to deploy to the map again. If the UK doesn’t commit their Reserve, the French Army will be permanently destroyed. Either way, with a single Offensive action on the first turn, Germany should be able to take over France (a victory space) and neutralise the French Army, perhaps permanently.
Aside from this first move, there are other directions which could be taken. There are 3 main choices in terms of taking victory spaces:
-North Africa
-Balkans
-Soviet Union
Let’s go through each of these. First, North Africa is a prime target. It’s a victory space, but also the linchpin of the British Empire. It is a Strait controlling access to the Mediterranean and is the link from the UK itself to its colonial empire, especially India. Axis control of North Africa is simply unacceptable for the UK player, and they will be forced to fight for it. Now, the most straightforward way to take North Africa is with the Italian Army. The Italian Fleet is already in position in the Mediterranean, ready to ferry over Mussolini’s legions. If you go after North Africa on the first turn, timing is critical. The UK player may well use their first action to place an Army in North Africa, meaning that you will have to commit German Reserves to assist the Italian Army.
To avoid this annoyance, it is possible to use the Blitz response on your very first action of the game to send the Italians in before the British even make a move. A combination of an Offensive into France and then a Blitz into North Africa will immediately put the pressure on Britain and grab you 2 victory spaces right off the bat.
The second option is the Balkans. This space is hugely important. It is a neutral victory space, so either side can benefit from taking it. It is right on the doorstep of the Soviet Union AND has access to the Mediterranean. Both the British and the Soviets can therefore use it to open another front against you. Taking and holding it early will put you ahead in Political Will and lock down another approach to the Fatherland. To take the Balkans on the first turn, you can either send in the Level 2 German Army from Poland, or the Italian Army from Italy (this would mean you are not taking North Africa though).
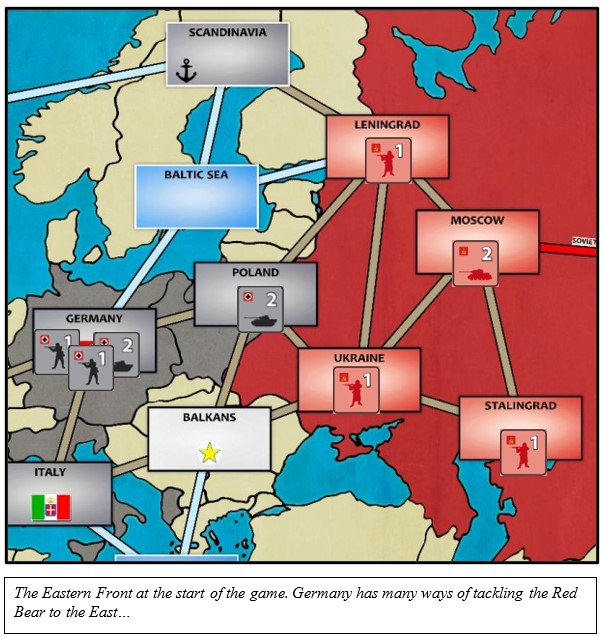
The third option for an early Offensive is attacking the Soviet Union. Both Ukraine and Leningrad are right next to your Level 2 Army in Poland, and both are lightly defended. In the 1940 turn the Soviets only have 1 action and they start with no Reserves, so it is entirely possible to permanently destroy one or even two Soviet Armies in a surprise attack on the first turn while also taking victory spaces. Attacking the Soviets in 1940 is a very bold move and puts enormous pressure on the Allies. BUT it does signal your intentions very early and paints a target on your back. Be prepared for Strategic Bombing from the UK and USA. Plus, the USA will see you pushing hard into Russia and will most likely use Lend Lease to boost Soviet Reserves. By the end of 1941, it is possible for the Soviets to have most of their 10 Armies in Reserve or on the map. So be warned – if you go after the Bolshevik menace in 1940 you will either win big or be crushed by all 3 Allies working together in the European Theatre. Of course, this leaves out the Japanese from the equation. You may deliberately decide to hit the Soviets just to force the USA to pour their actions into Lend Lease rather than building up Fleets, thereby giving Japan a free hand in the Pacific. The Axis can definitely win with an embattled Germany but a triumphant Japan – but this needs to be achieved by 1944 at the latest.
The Eastern Front
This question of when to attack the Soviets leads into the question of mid-game strategy. The 1942 and 1943 turns are the “hinge” of the game. This is when you must commit to a particular direction and you must confront the Soviet Union. There is no way around it. Either you march on Moscow or the Red hordes will be marching on Berlin. The Western Allies will most likely be going on the offensive at this point too – either in Italy, the Balkans, France or Scandinavia.
In handling the Soviets, you can either:
1. Go straight for Moscow: This is a high risk move and requires you to go all in. Both your Level 2 Armies should be committed to this, and you are highly likely to lose at least one of them. If the USA doesn’t provide at least two Lend Lease Responses to the Soviets by 1942, this strategy can work and neutralize the Soviets for one or two whole turns. This might even be enough to secure an auto-win well before 1945 – the ideal outcome for the Axis.
2. Stalingrad: If you take Ukraine with 2-3 Armies and the Soviets build up their forces in Moscow out of fear of losing their capital, Stalingrad becomes a viable option. At the very least, threatening to do this forces the Soviets to defend multiple approaches and weakens their offensive power.
3. Bite and Hold: this is my preferred strategy. Take Ukraine and Leningrad, preferably in 1941 and 1942. Then, stop advancing and just hold the line. Upgrade your Air Force, build up Armies in Reserve, and use the Kampfgruppe Response to reform the line if the Soviets launch a major counter-attack.
4. Turtle: this is where you don’t attack Soviet territory at all. Just hold the Balkans and Poland with large forces for as long as possible. This cedes the initiative to the Allies but at least it forces the Soviets to waste actions coming at you. It can work as part of an overall defensive strategy, especially combined with your navy to shield the Mediterranean from Allied advances (see below).
Now, a few other things to remember about the Eastern Front. The Soviets have a total of 10 Armies, including two that are Level 2. This puts them on par with Germany. BUT Germany is going to be fighting on multiple fronts. The Soviets will eventually gain the upper hand unless you devote every single action to crushing them, and if you do that then Britain and America will be on your doorstep as early as 1942. Also, permanently killing Soviet armies is not as crippling as it seems. If such losses are mounting up, the Soviet player can pivot to maxing out their Air Force track instead of relying on sheer numbers. It’s not as deadly immediately, but it can make up for big early game losses and still allow the Soviets to pull off something like Operation Bagration – a major offensive into Poland by 1944. The key to containing the Soviets is the judicious use of Reserves. Often it is best to sacrifice a front-line army (especially the Italians) and save your Reserves for a counter-attack. A calculated retreat will also often be necessary. Let’s say you have a single Level 2 Army in Moscow, but you can see that the Soviets are building up for an Offensive to retake it. Use a Strategic Move to pull back your Level 2 and then reorganize your front line into something that can survive another year. A Level 2 Army each in Ukraine and Leningrad, backed up by 2-3 Armies in Reserve and an Air Force track of 2 will be enough to survive any Soviet attack throughout 1943 and 1944.

German Defense
It is important to remember that once all the Allies start coming after you, you will need to switch to a defensive strategy. This will happen in most (not all) games, especially if you play aggressively and seem to be overstretched. The decision of when to switch from offense to defense is the most important decision you will make all game, and only experience will tell you when the timing is right. Even as early as 1941 it may be necessary.
When Germany is in a defensive posture, there are three key choke points that need to be held for as long as possible – France, Italy and Poland. Each of these spaces provides a path to Germany. You will probably not be able to hold all of them for the entire game – Allied resources are too great. But you can delay the enemy advance and make them pay for every space taken. If you still control two out of these three spaces at the end of 1944, there is a good chance you will still win the game.
To hold these choke-points, you have three main methods. The first is Reserves. Imagine this. The USA is building up to invade France. The UK is about to invade Italy. The Soviets are about to attack Poland. If you have an Army each in France, Italy and Poland, your Air Force track at 1 and two Armies in Reserve, all three Allied forces are faced with a possible strength of 4. This is not easy for them to break. Each Allied country might slow their advance to build up first, perhaps upgrading their Air Force track or shifting more units over from Spent to Reserve. When they do strike, your Reserves can only be committed to 1 or 2 fronts, but the threat of committing them has possibly forced the Allies to each waste an entire action building up. You can keep building up your own Reserves to maintain such a level of deterrence, but the Allies have an easy answer to this in the form of Strategic Bombing. The USA and UK working together on this can shift 2 of your Reserves to Spent AND downgrade your Build Track by 1, right after you Build. Sure, it costs the Allies actions to do this, but it means you can’t just build up forever as Germany. If your Build Track is at 1 and you have nothing in Reserve, you need to take a different approach.
Your next defensive weapon is the Air Force track – this also helps on attack. One Action spent upgrading the Air Force track gives you a permanent +1 strength on all subsequent land battles. If you have breathing room (i.e. no single front is about to collapse and all supply lines secure) it is nearly always worth investing in the Air Force track.
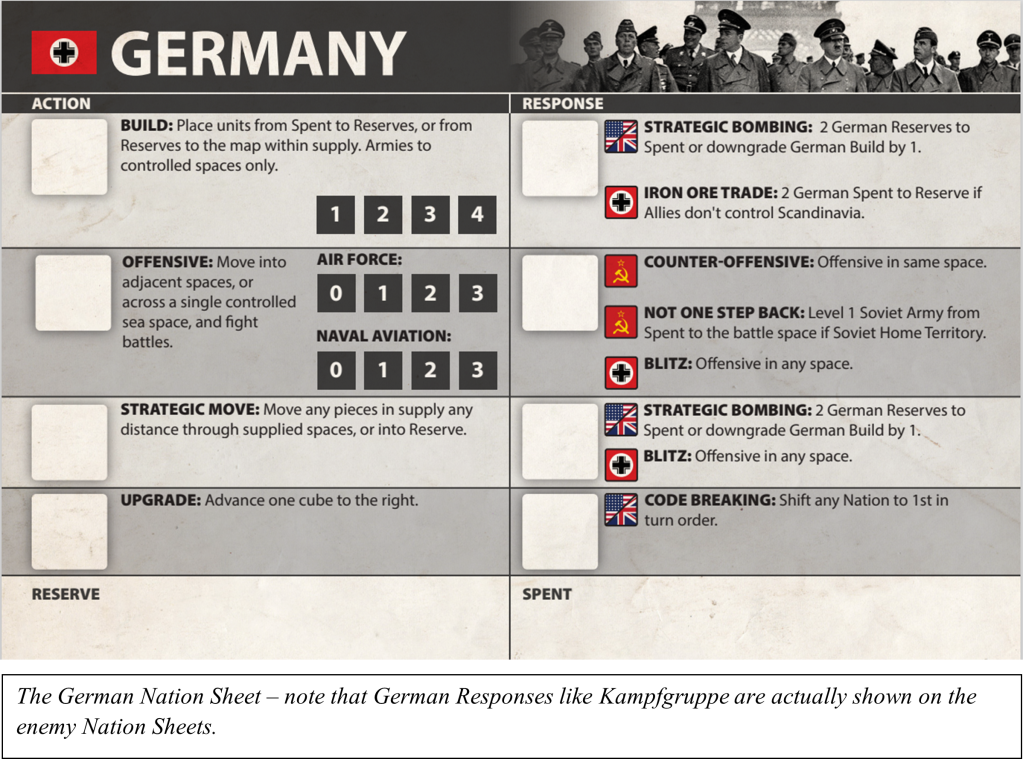
Finally, the sneakiest tool in your defensive arsenal is the Kampfgruppe Response. This lets you place a German Army from Spent directly to the map, in a space where a battle just occurred. This is especially useful if the Allies have been Strategically Bombing the hell out of you – if your Build Track is at 1 then Kampfgruppe is more efficient at getting troops on the map. Because it immediately follows an enemy Offensive, the Kampfgruppe Response is great for plugging gaps which suddenly appear in your front lines. It is often advisable to pass for a few rounds and keep a precious action marker in reserve, just in case you need to use Kampfgruppe.
German Naval Strategy
So far, we have focused on land warfare and securing victory spaces. But there is another dimension to German strategy – the sea. Now, obviously the Allies have vastly more Fleets than you and can eventually wipe out the Kriegsmarine and the Regia Marina if they decide to. But the German and Italian Fleets can be used to decisive effect, both offensively and defensively.
If you are going down the path of a naval focused German Strategy, the first decision is where to build the German Fleets. Basically, there are two choices – the Baltic or the Mediterranean. The Italian Fleet already starts the game in the Med, so it may seem a waste of resources to put one of your two precious German Fleets there as well. However, Axis dominance of the Mediterranean provides a valuable shield to the “soft underbelly” of Europe. Every Action the Allies spend killing Fleets is an action they are NOT spending on landing troops in Italy or the Balkans. Remember that when the Allies take control of Italy for the first time, both the Italian Army and the Italian Fleet are permanently destroyed. Holding the Med means holding onto Italy, which means a spare Army to hold the line somewhere else.
You also don’t necessarily have to build the German Fleets in the Med to support this strategy. You can keep them in Reserve and commit them when the Italian Fleet comes under attack. The Allies will see this and be forced to build up a bit before striking in the Mediterranean – often the UK will upgrade Naval Aviation or build their only Level 2 Fleet in order to secure control of the Med.
The other sea space to build a German Fleet is the Baltic. This serves several purposes:
1. It is a safe place to keep your Fleet alive for as long as possible – this gives you more chances to use Submarine Warfare (see below).
2. It protects Germany from a potential Soviet amphibious assault. If the Soviets build a Fleet in the Baltic early in the game – they are going for your capital. Having your own Fleet in the Baltic prevents this.
3. It allows a counter-attack into Scandinavia if the Allies land there.
4. It opens another supply line and potential invasion route to Leningrad. Soviets may not see this coming if you have gone with a southern focused strategy on the Eastern Front.
5. Finally, it opens up the slim possibility of Operation Sea Lion – an amphibious attack on the UK itself! If you already have a large force in France, this can be pulled off with two moves- an Offensive with the Fleet from the Baltic to the North Sea (assuming you still control Scandinavia, which has a Strait linking the two) and then an amphibious assault from France to the UK. Now, this will only happen if the UK player is caught off-guard and doesn’t figure out what you’re doing. It is also not a great strategy long term because you have devoted so many resources to the West and given the Soviets more breathing room to build up. But still – a very fun strategy!
Whether you go for the Baltic or the Med, it may be worth considering upgrading Naval Aviation. This is a big decision as every Action marker is precious in One Hour World War II, especially for Germany. But a permanent +1 boost in naval battles can be the crucial difference between the Allies landing in German territory in 1942 versus landing in 1943 or later.
While you have a German Fleet on the map, you also have the option of playing Submarine Warfare anytime the USA or UK does a Build action. Indeed, you may decide on a Submarine Warfare focused strategy from the very beginning of the game, and essentially lock out the Western Allies from hurting you until very late in the war. Submarine Warfare shifts a Level 1 Allied Fleet in the North Sea or Atlantic directly to Spent. The obvious use of this is to cut Allied supply lines. Imagine a situation where the USA and UK have built up their Armies in North Africa and are poised to do a Joint Offensive into Italy. Using Submarine Warfare to sink a UK Fleet in the Atlantic totally ruins this strategy – the UK units in North Africa become out of supply, and the USA may not have the strength to carry out the Offensive alone.
Conclusion
Germany sets the tone of the game from the very first move. Whichever course of action they choose, the Allies will be forced to react. For at least the first half of the game, Germany can push hard and conquer France, North Africa, the Balkans and much of the Soviet Union. It is entirely possible for the Axis juggernaut to win the game by 1942, by reducing the Allied Political Will to zero. This advantage in tempo will not last forever though. At some point the Germans will have to switch over to the defensive as the Soviets and Western Allies bring their strength to bear. By using the Air Force track, Reserves, Kampfgruppe and the underestimated German Navy, it is still possible to outlast the Allies and achieve victory.
In our next Strategy Guide, we will take a look at the Soviets.
If you are interested, you can read our interview with the designer Clint Warren-Davey on the blog to find out more about the design at the following link: https://theplayersaid.com/2024/06/04/interview-with-clint-warren-davey-designer-of-one-hour-wwii-from-worthington-publishing/
And if you are interested in One Hour World War II, you can back the project on the Kickstarter page at the following link: https://www.kickstarter.com/projects/1456271622/one-hour-world-war-ii?ref
The campaign concludes on June 15th at 4:00pm EDT.
-Grant
